


Content management systems (CMS) like WordPress and Drupal make the process of sharing digital content on the web less technical. They largely eliminate the need to learn server-side or database programming.
A static CMS specifically allows you to create and manage digital content for a static site.
In this short guide, we will explore Outstatic, a relatively new static CMS package. We’ll go over how it works, how to install and configure Outstatic for Next.js applications, as well as how to get started with creating and fetching content.
Jump ahead:
To follow along with this tutorial, you should be familiar with Next.js static site generation and have some basic knowledge of Git and GitHub.
What is Outstatic?
Outstatic is a static CMS package created for Next.js applications. It was made available to developers in late 2022.
This tool enables you to create, edit, and save content to then be committed automatically to your repository and deployed to your live website. Outstatic is fast, doesn’t require any database configuration, and includes a dashboard to create and manage your content on the fly.
Among the many use cases for this framework are blogs, portfolio websites for managing and showcasing projects, news websites, and documentation sites.
How Outstatic works
Outstatic stores data using a collection-document schema. You could think of a collection as a table in a traditional database, while a document is a single record in that table.
Each Outstatic project is linked to your GitHub account and a GitHub repository. All content you create is then mapped to the remote GitHub repository and converted to a markdown file.
You can then manage your content directly on your Outstatic dashboard or fetch them as needed in your Next.js application.
Getting started with Outstatic and Next.js
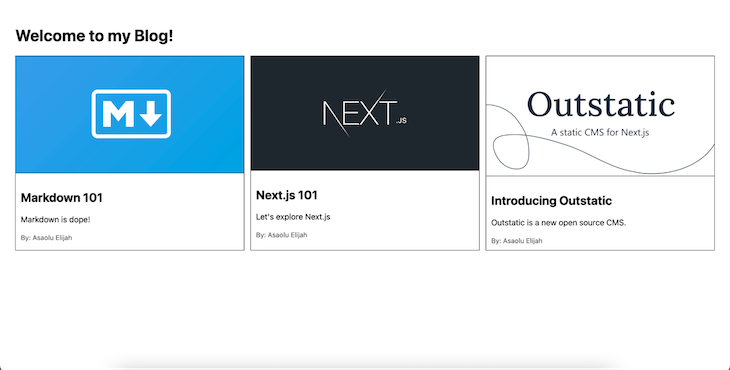
To explore the capabilities of Outstatic, we will create a simple blog site to display our most recent writings. When everything is finished, here’s a sneak peek at how our application will look:
Let’s get started by creating a new Next.js application:
npx create-next-app outstatic-blog
As previously stated, Outstatic requires a connection to GitHub in order to function. Therefore, we must first push our project to GitHub before we can begin creating collections and documents.
Head over to GitHub, create a new repository, and push the new Next.js application we just created to this repo. If you are unfamiliar with this procedure, you can refer to this useful guide from GitHub.
Creating a GitHub OAuth app
Your Outstatic dashboard is where you can manage all of your content. To authorize access to this dashboard and write access to your GitHub repository, you’ll need to create a new GitHub OAuth app. This will allow Outstatic to remotely create collections and documents.
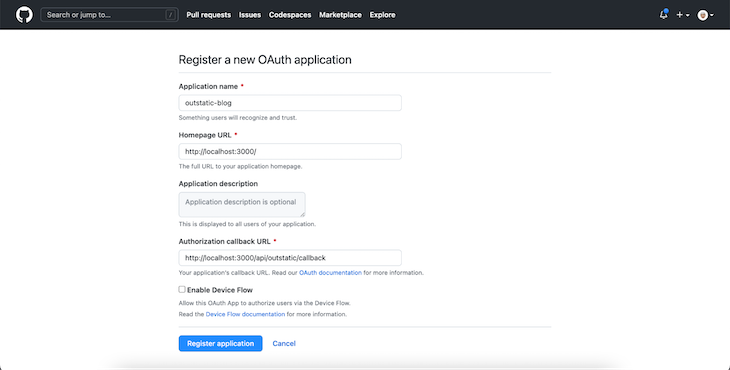
Start by registering your new OAuth app with GitHub. If you’re following along with this tutorial directly, then during the registration process, make sure the information you entered matches what is shown below:
In your new GitHub OAuth application page, you should see the application client ID displayed. You should also see a “Generate a new client secret” button. Click this button to generate a new secret.
Once finished, copy the newly generated value along with the client ID and save it somewhere safe for now.
Adding Outstatic to Next.js
The next step is to install the Outstatic framework in our Next.js application. We can do this with the following command:
npm install outstatic
# OR
yarn add outstatic
Inside the default /pages directory in Next.js, create a new outstatic/[[...ost]].tsx file and paste the following content into it:
import 'outstatic/outstatic.css'
import { Outstatic, OstSSP } from 'outstatic'

export default Outstatic

export const getServerSideProps = OstSSP
This code above exports Outstatic and an OstSSP function. The OstSSP function is responsible for creating the Outstatic content management dashboard as well as every other server-related operation that’ll happen on it.
Additionally, create a new outstatic/[[...ost]].tsx file inside the default /pages/api and paste the code below into this file:
import { OutstaticApi } from 'outstatic'

export default OutstaticApi
The code above is where Outstatic integrates with the Next.js API feature, allowing it to asynchronously fetch created content.
Finally, in your project root folder, create a new .env file and paste the following code into it:
OST_GITHUB_ID=YOUR_GITHUB_OAUTH_APP_ID
OST_GITHUB_SECRET=YOUR_GITHUB_OAUTH_APP_SECRET
OST_TOKEN_SECRET=A_RANDOM_TOKEN
OST_REPO_SLUG=YOUR_GITHUB_REPOSITORY_SLUG
Let’s take a closer look at the env variables set up in the code above:
OST_GITHUB_ID— the Client ID from the GitHub OAuth app we created earlierOST_GITHUB_SECRET— the client secret we generated earlierOST_TOKEN_SECRET— a random string with at least 32 characters- You can easily generate one using a free online service
OST_REPO_SLUG— your GitHub repository name
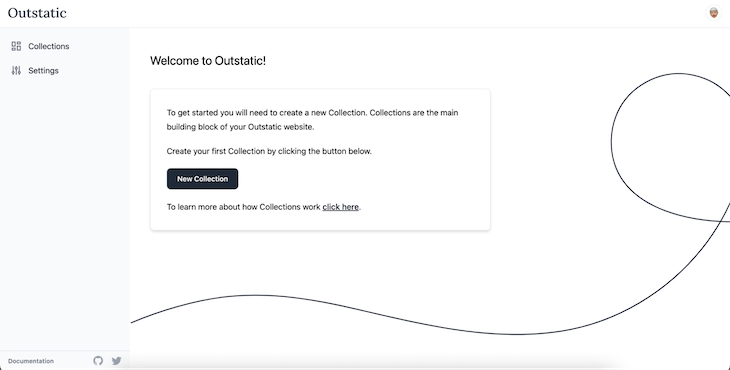
We’re all done now! Run your Next.js app with the npm run dev command and navigate to http://localhost:3000/outstatic. You’ll see an output like this:

Sign in with your GitHub account to confirm the authorization, and you should be redirected to your Outstatic content dashboard as shown below:
Outstatic content management
We can directly create new collections and manage all of the content inside of those collections using the Outstatic content editor. Let’s explore how to create and manage Outstatic collections and documents now.
Creating collections
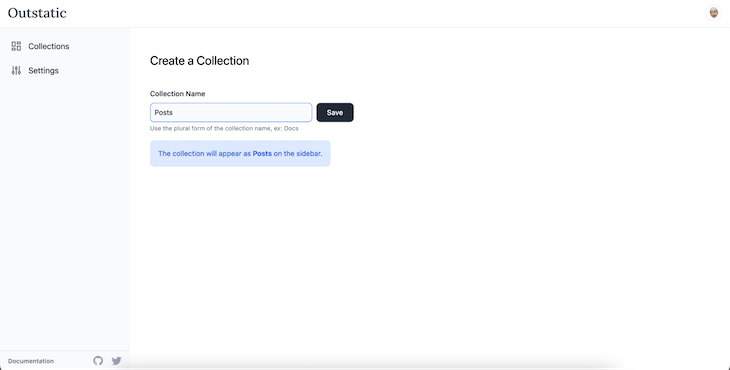
Let’s create a new collection for our blog posts. Click the “New Collection” button shown on your Outstatic dashboard. Then, type “Posts” in the collection name field as shown below and click the “Save” button:
Creating documents: Markdown editor
Outstatic features an interactive editor for creating documents. Inside this editor, you can write Markdown code, and the corresponding output is instantly generated. Additionally, you can easily format selected elements, import images, and much more:

Now that we’ve gotten this far, you can explore the editor yourself. Try to create some new documents for our Posts collection, add cover photos and descriptions, and also make sure to set their status to “Published.”
Fetching data
If you pull remote changes with the git pull command, you’ll see that Outstatic has created a new outstatic/content folder. Inside this folder, all of the collections and documents we’ve created are present, converted to Markdown files.
The Outstatic package supports the following methods:
getDocuments()method for fetching all documentsgetDocumentBySlug()method to fetch a single document by its slug
We can then leverage these methods with the native Next.js getStaticProps or getServerSideProps methods to fetch created content for our application.
To continue, replace the content of the pages/index.js file with the following:
import { getDocuments } from "outstatic/server";
import Link from "next/link";

const Index = ({ posts }) => {
  return (
    <>
      <div className="container">
        <h1>Welcome to my Blog!</h1>
        <div className="row">
          {posts.map((post) => (
            <Link href={"/blog/" + post.slug} key={post.publishedAt}>
              <div className="card">
                <img
                  className="card-img"
                  src={post.coverImage}
                  alt={post.title}
                />
                <div className="card-body">
                  <h2>{post.title}</h2>
                  <p>{post.description}</p>
                  <small className="author">By: {post.author.name}</small>
                </div>
              </div>
            </Link>
          ))}
        </div>
      </div>
    </>
  );
};

export default Index;

export const getStaticProps = async () => {
  const posts = getDocuments("posts", [
    "title",
    "publishedAt",
    "slug",
    "coverImage",
    "description",
    "author",
  ]);

  return {
    props: { posts },
  };
};
Here, we used the getDocuments() method to fetch all our posts’ documents. We then passed the returned data as a prop to our page components.
Afterward, we mapped through the returned data and displayed a blog card for each iteration. Each blog card shows the post’s cover image, title, description, and author’s name. We also linked each blog card to a dynamic page that displays the blog content.
To add a little aesthetic to your Next.js app, replace the content in your styles/global.css file with the following code:
html,
body {
  padding: 0;
  margin: 0;
  font-family: -apple-system, BlinkMacSystemFont, Segoe UI, Roboto, Oxygen,
    Ubuntu, Cantarell, Fira Sans, Droid Sans, Helvetica Neue, sans-serif;
}

.container {
  padding: 30px;
}

.row {
  display: flex;
  justify-content: space-between;

}

.card {
  border: 1px solid;
  max-width: 450px;
}

.card-body {
  padding: 10px;
}

.card-img {
  width: 100%;
  border-bottom: 1px solid #282828;
}

.author {
  color: #4c4c4c;
  font-weight: 400;
}
Run the application with the following command:
npm run dev
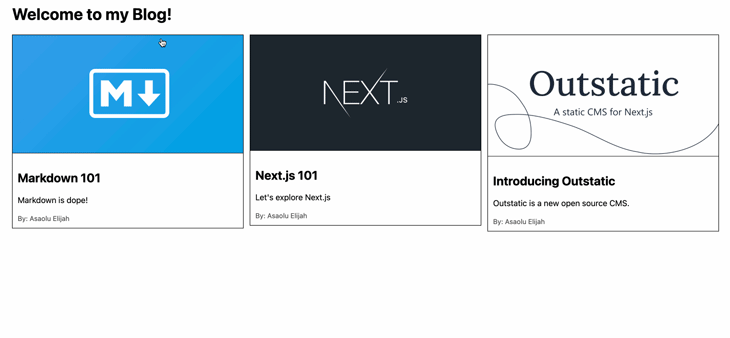
You should then see an output similar to the one below in your browser:
For our blog information page, create a new blog/[slug].js file inside the existing /pages folder and paste the code below into it:
import { getDocuments, getDocumentBySlug } from "outstatic/server";

const BlogSingle = ({ post }) => {
  return (
    <div>
      <div className="container">
        <img
          className="card-img"
          src={post.coverImage}
          alt={post.title}
          style=
        />
        <div className="card-body">
          <h2 style=>{post.title}</h2>
          <small className="author">By: {post.author.name}</small>
          <p style=>{post.content}</p>
        </div>
      </div>
    </div>
  );
};

export default BlogSingle;

export async function getStaticPaths() {
  const posts = getDocuments("posts", ["slug"]);

  const paths = posts.map((post) => ({
    params: { slug: post.slug },
  }));

  return {
    paths,
    fallback: false,
  };
}

export const getStaticProps = async ({ params }) => {
  const slug = params.slug;
  const post = getDocumentBySlug("posts", slug, [
    "title",
    "slug",
    "coverImage",
    "author",
    "content",
  ]);
  return {
    props: { post },
  };
};
Here’s a rundown of what’s happening in this file. To begin, we used the Next.js getStaticPaths() method and the Outstatic getDocuments() method to retrieve all documents and generate dynamic paths for them.
Furthermore, we used the Next.js getStaticProps() method in combination with the Outstatic getDocumentBySlug() method to retrieve the content of the document with the passed slug. After this, we passed the returned data as a prop and displayed it on our page.
If we run our application now, we should see everything working perfectly, as shown in the GIF below:
Conclusion
Outstatic is an up-and-coming static CMS for Next.js. This tutorial has demonstrated how it works by using it to build a simple blog site. Outstatic is a fairly recent library with ongoing improvements that appears to have a promising future.
Check out the official Outstatic website to learn more. You can also read up on implementing SSR in Next.js if your app has dynamic page content that changes frequently or is fetched from external services or databases.
The post Using Outstatic for Next.js static site management appeared first on LogRocket Blog.
from LogRocket Blog https://ift.tt/5FiKQwD
Gain $200 in a week
via Read more


