


If you want to create a cross-platform application that works natively on mobile and desktop platforms, there are many great frameworks to choose from.
One of these is .NET Multi-platform App UI (MAUI), Microsoft’s open source, cross-platform framework for building mobile and desktop apps using C# and XAML. .NET MAUI enables you to develop applications that can run on iOS, macOS, Android, and Windows, all from a single shared codebase. .NET MAUI is an advancement over Xamarin.Forms, which now includes UI controls redesigned and optimized for better performance and scalability.
.NET MAUI comes equipped with XAML hot reload, which updates your application UI as you modify your XAML code without you needing to recompile. Similarly, it also supports .NET hot reload, which applies your C# code changes to your running application without recompiling the whole thing.
In this article, we’ll explore .NET MAUI, reviewing its architecture, comparing its features to React Native and Flutter, and finally, using it in a project. Let’s get started!
Jump ahead:
- .NET MAUI architectural overview
- .NET MAUI vs. Flutter vs. React Native
- .NET MAUI installation and setup
- Creating a new .NET MAUI project
- Example .NET MAUI app
- Design a list with
CollectionView - Integrating HTTP service
- Navigating to the
Detailspage
.NET MAUI architectural overview
.NET MAUI offers a write-once, run-anywhere experience, while still letting you access native, platform-specific APIs. Under the hood, .NET MAUI uses platform-specific frameworks for creating apps on different target devices:
- .NET for Android → Android devices
- Windows UI 3 (WinUI 3) → Windows devices
- .NET for iOS → iOS devices
- .NET for macOS → macOS devices
The diagram below explains this in more detail:
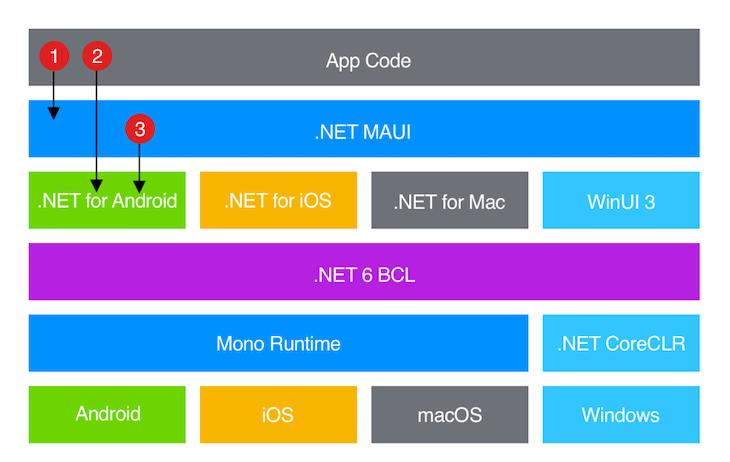
For more insight into .NET MAUI’s architecture, you can also refer to the official documentation.
.NET MAUI vs. Flutter vs. React Native
While there are many cross-platform frameworks, Flutter and React Native are the most popular, used by developers across the globe.
If we compare these on the basis of community size and third-party library compatibility .NET MAUI is a less mature option, released in May 2022. Therefore, it can be challenging to get help from the community if you get stuck somewhere. Additionally, Visual Studio for Mac can be a little buggy and less performant than on Windows OS.
.NET MAUI mainly uses C# and XAML code, so if you’re already familiar with the .NET ecosystem, then MAUI can easily become your go-to framework. On the other hand, Flutter uses Dart, which is a programming language introduced by Google that has a significantly higher learning curve. Finally, we have React Native; developed by Facebook and built on top of JavaScript, React Native is a cross-platform application development framework.
Although all of these frameworks can deploy to Android, iOS, macOS, and Windows, some require extra tweaking to do so, like React Native, which uses react-native-windows and react-native-macos for Windows and macOS support. On the other hand, .NET MAUI comes with support for these out of the box.
However, unlike Flutter and React Native, you can’t deploy .NET MAUI apps directly on the web. As an added bonus for Flutter, Flutter apps can also be distributed and run on Linux based operating systems. Ultimately, it’s up to you to decide which framework is the best fit. But, if you need a .NET ecosystem, .NET MAUI can surely be your framework of choice.
.NET MAUI installation and setup
Before writing our .NET MAUI app, we first need to correctly install and set up .NET MAUI in our systems. Since I’m using macOS, I’ll guide you through the installation steps for macOS. If you’re using Windows, you can refer to the docs.
First, we’ll download Visual Studio 2022 for Mac. You’ll be prompted to add configuration for the installation; select .NET → .NET MAUI → iOS → Android. That’s it! Now, you should be able to run Visual Studio 2022 for Mac on your system.
Creating a new .NET MAUI project
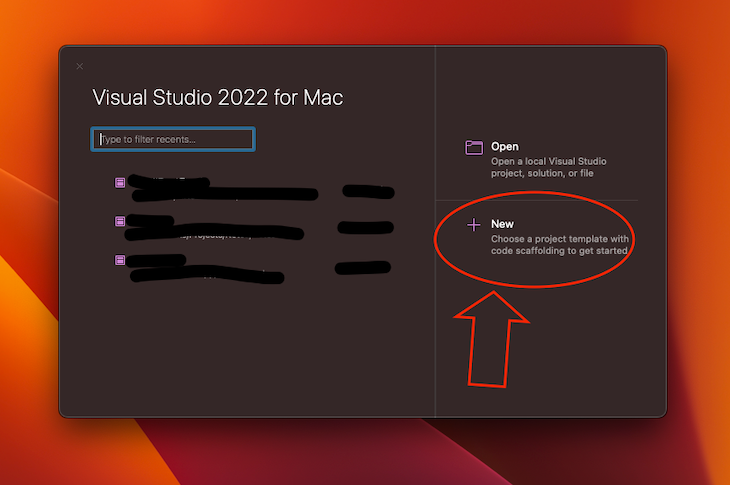
When you open VS 2022, you’ll see a popup like the one below. To create a new project, click New:
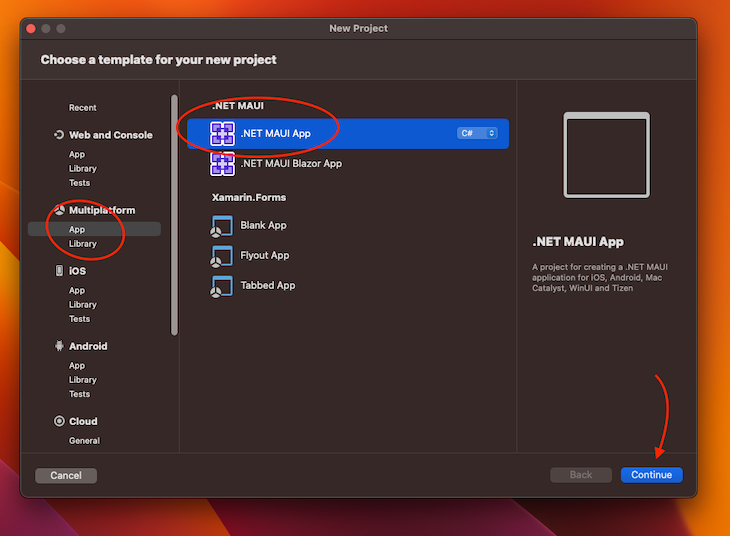
Then, you’ll be prompted to select the project type. Select Multiplatform App and .NET MAUI App, then click Continue:
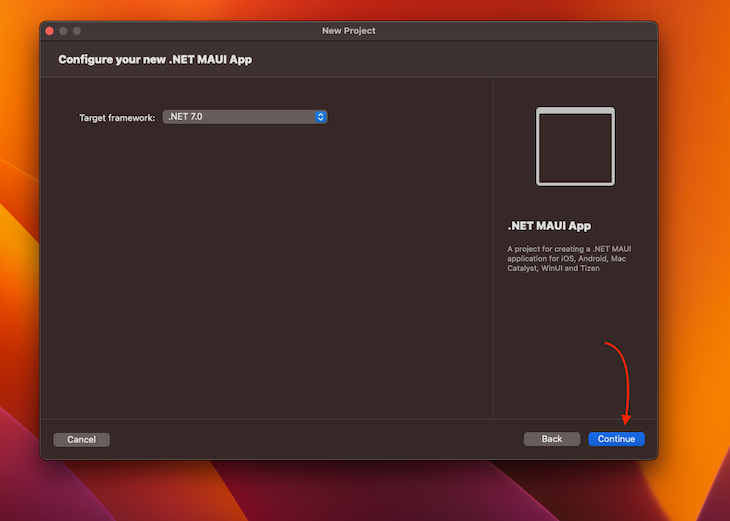
Select .NET 7.0 as the target framework and click Continue:
Enter the project name and uncheck the Put project in a subfolder checkbox. Click Create to create your app:
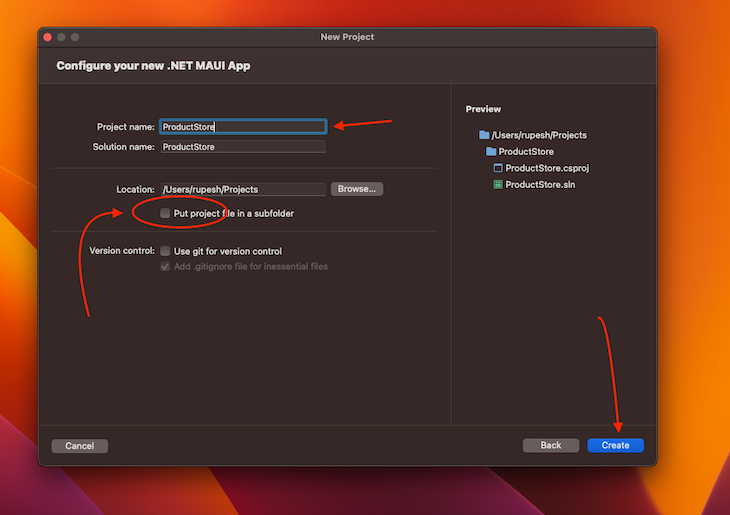
Now, your project should be created, and VS 22 should be open. After selecting your preferred debug device or simulator from the list, move your mouse cursor to the top left corner of the app and click the play icon:
![]()
You’ll notice that the build times for Android and iOS are very fast. Your simulator will open the app with predefined dummy text on the screen:
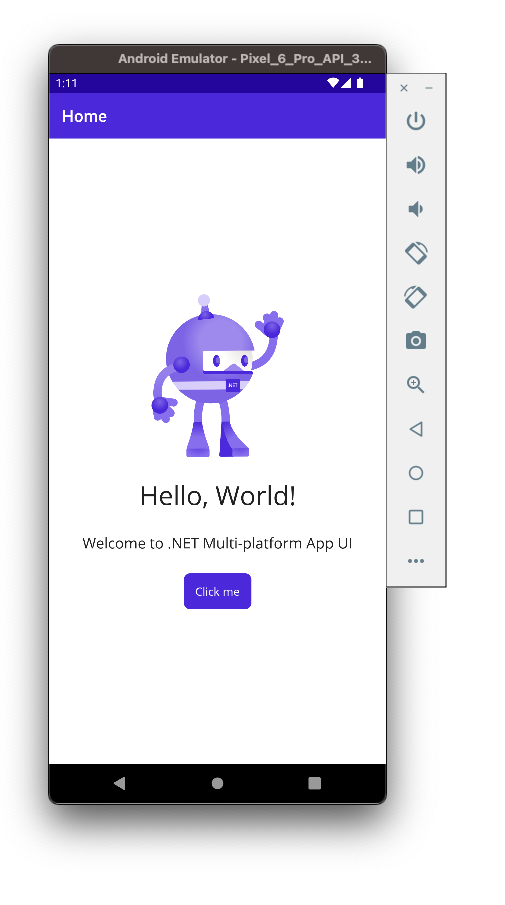
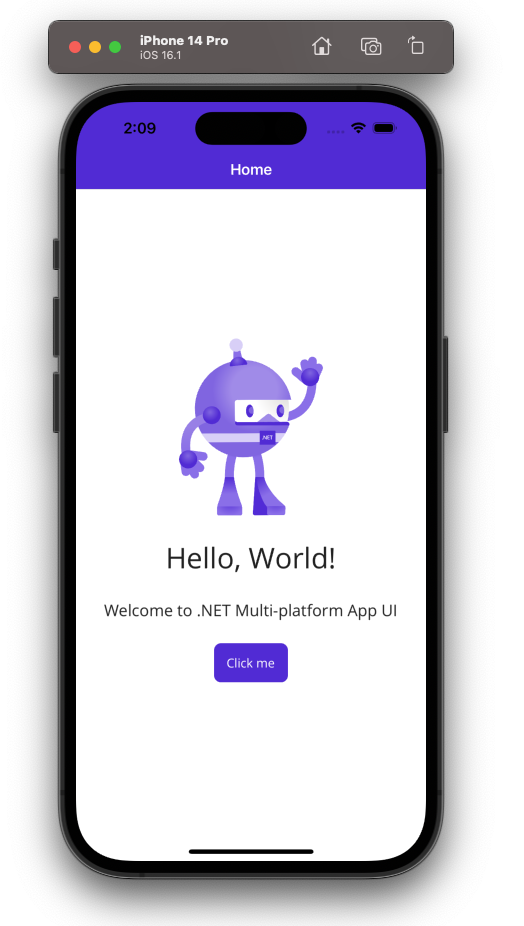
And with that, you’ve just created your first .NET MAUI app for Android and iOS. Before we jump into the code, first, let’s understand what we’ll build.
Example .NET MAUI app
Our example application will be fairly simple, displaying just two screens, including a list screen that will display a vertical list of products with images. When we tap an image, we’ll navigate to the Product Detail screen, which will display all the information about that product. We’ll also use HTTP services to fetch the list of products from a REST API.
Our final app UI will look like the images below:

You can find the code for this tutorial in this GitHub repository.
Design a list with CollectionView
XAML is the basic building block to create a UI in .NET MAUI; let’s create a UI to render a list of products. Before we start, we need to organize our code files so that all of our respective code chunks belong in a particular folder:
Views: UI elements and screenModels: Data structures and typesServices: API handlers and business logic
Delete the MainPage.xaml file and its code-behind file, or the .cs file associated with that file. In this case, it’s MainPage.xaml.cs.
Create a new folder inside Project by right-clicking on the project in the Solution Explorer window and naming it Views. In the next step, we’ll add the ProductList file inside this folder:
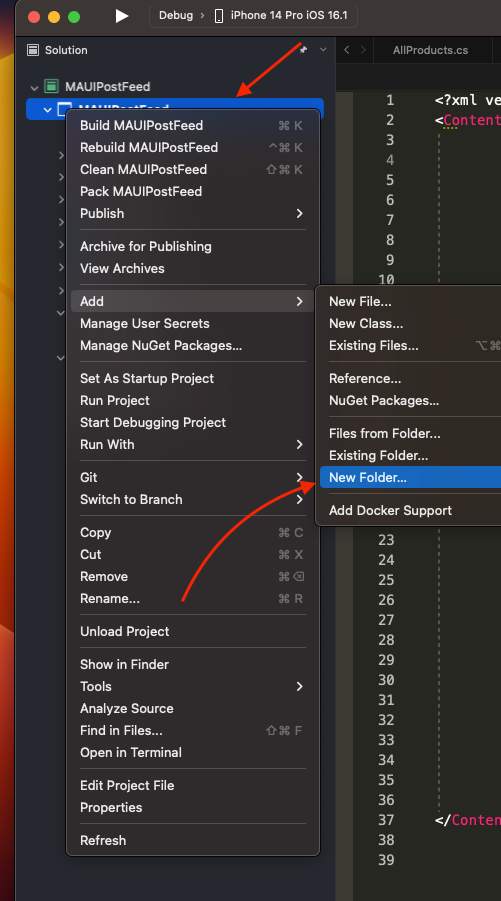
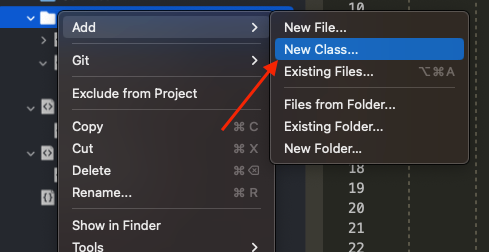
Right click on the created Views folder and select Add → New Class:
You’ll be prompted to select the type of file you want to create. Select .Net MAUI → .NET MAUI ContentPage(XAML). Change file name to ProductList and press Create:
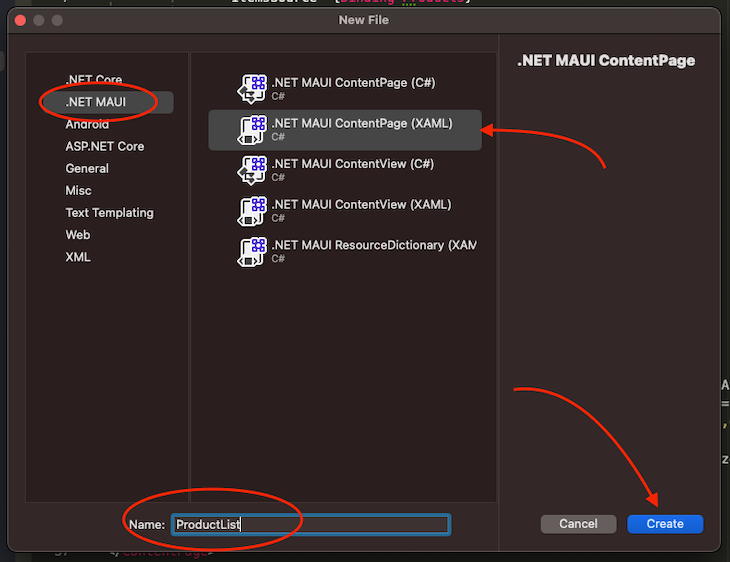
This will create two files, ProductList.xaml and its code-behind file, ProductList.xaml.cs, which will contain all of its code logic.
Before writing any code in ProductList.xaml, we first need to update our AppShell.xaml file, which is the root of our UI, and as the name suggests, is the Shell or structure of our app’s UI:
<?xml version="1.0" encoding="UTF-8" ?>
<Shell
    x:Class="MAUIPostFeed.AppShell"
    xmlns="http://schemas.microsoft.com/dotnet/2021/maui"
    xmlns:x="http://schemas.microsoft.com/winfx/2009/xaml"
   // Added views to refer to Views folder inside project
    xmlns:views="clr-namespace:MAUIPostFeed.Views"
    Shell.FlyoutBehavior="Disabled">
    <ShellContent
        Title="Products"
        // Using views to access Views.ProductList file
        ContentTemplate="{DataTemplate views:ProductList}"
     />
</Shell>
Now that our page is set up correctly in AppShell, let’s write the code in the ProductList.xaml file:
<?xml version="1.0" encoding="utf-8" ?>
<ContentPage xmlns="http://schemas.microsoft.com/dotnet/2021/maui"
xmlns:x="http://schemas.microsoft.com/winfx/2009/xaml"
x:Class="MAUIPostFeed.Views.ProductList"
>
<CollectionView x:Name="productsCollection"
ItemsSource="{Binding Products}"
Margin="10"
SelectionMode="Single"
>
<CollectionView.ItemsLayout>
<LinearItemsLayout Orientation="Vertical" ItemSpacing="20" />
</CollectionView.ItemsLayout>
<CollectionView.ItemTemplate>
<DataTemplate>
<VerticalStackLayout>
<Image HeightRequest="180" Aspect="AspectFill" >
<Image.Source>
<UriImageSource
Uri="{Binding thumbnail}"
CacheValidity="00:12:00:00"
/>
</Image.Source>
</Image>
<HorizontalStackLayout>
<Label Text="{Binding title}" FontSize="Title" FontAttributes="Bold" />
<Label Text="{Binding discountPercentage}" FontSize="Default" Margin="40,4,0,0" FontAttributes="Italic" FontFamily="Open-Sans" />
<Label Text=" % OFF" FontSize="Default"
Margin="0,4,0,0" FontAttributes="Italic"
FontFamily="Open-Sans" />
</HorizontalStackLayout>
<Label Text="{Binding description}" MaxLines="2"
FontSize="Subtitle" TextColor="Gray" />
</VerticalStackLayout>
</DataTemplate>
</CollectionView.ItemTemplate>
</CollectionView>
</ContentPage>
In the code above, we added x:Class="MAUIPostFeed.Views.ProductList" to give a class name to ContentPage so that we can access its Controls properties from the code-behind file.
We then created a CollectionView with ItemSource = Products, which comes from Binding. Binding is a mechanism in XAML through which XAML and code-behind classes can communicate. We haven’t yet created Products; we’ll do that in the next step. Finally, we used CollectionView.ItemTemplate to define how a list item should render.
With that, the UI part for the list page is done. Now, let’s work on actually setting up an HTTP service to fetch products from the REST API and store it in ObservableCollection.
Let’s start with the code-behind file of ProductList. Paste the following code in the ProductList.xaml.cs file:
using MAUIPostFeed.Models;

namespace MAUIPostFeed.Views;

public partial class ProductList : ContentPage
{
        public ProductList()
        {
                InitializeComponent();
                // Initializing the BindingContext with Products
                BindingContext = new Models.AllProducts();
        }
}
In the code above, we set BindingContext to Models.AllProducts. But, we haven’t created any models yet, so let’s do that now.
Integrating HTTP service
Add a new folder to your project named Models. Inside, create a new class called AllProducts.cs. This model will contain the list of Products we want to display. Paste the following code inside the AllProducts.cs file:
using System.Collections.ObjectModel;
using MAUIPostFeed.Services;

namespace MAUIPostFeed.Models
{
    public class AllProducts
    {
        public ObservableCollection<Product> Products { get; set; } =                                new ObservableCollection<Product>();
        readonly IProductsRepository ProductsRepository =                                            new ProductsService();

        public AllProducts() =>
            LoadProducts();

        public async void LoadProducts()
        {
            ObservableCollection<Product> temp =                                                await ProductsRepository.LoadProducts();
            for (int i = 0; i < temp.Count; i++)
            {
                Products.Add(temp[i]);
            }
        }
    }
}
In the code above, we created a class called AllProducts and added a Products property, which is an ObservableCollection of Product. We’ll create the Product class later.
Next, we added a ProductsRepository property on type IProductsRepository, which instantiates with ProductService. We’ll create these classes in the next steps.
In the constructor of the class, we have called the LoadProducts method, which fetches the Product list from ProductsRepository. Then, we push each product into our class property Products.
We need one more Model in our code, which will hold the structure of Products. Add a new class in Models and name it Products.cs. Then, add the following code into the new class:
using System;
using System.Collections.ObjectModel;

namespace MAUIPostFeed.Models;

public class Product
{
    public int id { get; set; }
    public string title { get; set; }
    public string description { get; set; }
    public int price { get; set; }
    public double discountPercentage { get; set; }
    public double rating { get; set; }
    public int stock { get; set; }
    public string brand { get; set; }
    public string category { get; set; }
    public string thumbnail { get; set; }
    public List<string> images { get; set; }
}

public class Products
{
    public ObservableCollection<Product> products { get; set; }
    public int total { get; set; }
    public int skip { get; set; }
    public int limit { get; set; }
}
In the file above, we’ve created two classes. The first, Product, holds the structure of a single Product. The second, Products, contains a Product list and some other data that we get from the API.
With that, we’re done with Models. Now, let’s create Services, which will interact with the network and fetch products.
In the project, add a new folder called Services. Inside it, create a new class called IProductsRepository and add the following code inside the file:
using System;
using System.Collections.ObjectModel;
using MAUIPostFeed.Models;

namespace MAUIPostFeed.Services
{
        public interface IProductsRepository
        {
                Task<ObservableCollection<Product>> LoadProducts();
        }
}
In the code above, we’ve created an IProductsRepository interface, which has a LoadProducts property, or a Task that returns the ObservableCollection of Product.
Next, we need to create the ProductsService class, which will implement the IProductsRepository class and fetch Products using HTTPClient. Create a new class called 'ProductsService.cs and add the following code to it:
using System;
using System.Collections.ObjectModel;
using System.Diagnostics;
using System.Text.Json;
using MAUIPostFeed.Models;

namespace MAUIPostFeed.Services;

public class ProductsService: IProductsRepository
{
    HttpClient client;
    JsonSerializerOptions serializerOptions;

    public ObservableCollection<Product> Products { get; set; }

    private static string BASE_URL { get; set; } =                                                          "https://dummyjson.com/";

    public ProductsService()
    {
        client = new HttpClient();
        serializerOptions = new JsonSerializerOptions
        {
            PropertyNamingPolicy = JsonNamingPolicy.CamelCase,
            WriteIndented = true
        };
    }

    public async Task<ObservableCollection<Product>> LoadProducts()
    {
        Products = new ObservableCollection<Product>();

        Uri uri = new Uri(string.Format($"{BASE_URL}products?limit=10",                                   string.Empty));
        try
        {
            HttpResponseMessage response = await client.GetAsync(uri);
            if (response.IsSuccessStatusCode)
            {
                string content =                                                                     await response.Content.ReadAsStringAsync();
                Products temp =                                                    JsonSerializer.Deserialize<Products>(content, serializerOptions);
                Products = temp.products;
            }
        }
        catch (Exception ex)
        {
            Debug.WriteLine(@"\tERROR {0}", ex.Message);
        }

        return Products;
    }
}
As you may have noticed, we’re using the dummyjson endpoint to get a list of Products. We used the GetAsync method from HttpClient to call a GET request on the specified API endpoint. Then, we Deserialized it using our Products class and assigned only the products received from the API response.
That’s it. Rebuild your app, and you’ll see a list of ten products on the screen:

Navigating to the Details page
At this point, we can see a list of products on the Products page. When the user clicks on any product, they should be navigated to the ProductDetails page; all the relevant product info should be visible there.
To implement this functionality, we’ll pass a Product as a NavigationParam to the ProductDetails page.
Create a new .NET MAUI content page inside the Views folder and name it ProductDetails. Paste the following code inside ProductDetails.xaml:
<?xml version="1.0" encoding="utf-8" ?>
<ContentPage xmlns="http://schemas.microsoft.com/dotnet/2021/maui"
xmlns:x="http://schemas.microsoft.com/winfx/2009/xaml"
x:Class="MAUIPostFeed.Views.ProductDetails"
Title="Product Details"
>
<ScrollView BackgroundColor="#eee" >
<VerticalStackLayout>
<CarouselView Loop="False"
ItemsSource="{Binding product.images}"
VerticalOptions="Start"
HeightRequest="300"
HorizontalScrollBarVisibility="Never" >
<CarouselView.ItemTemplate>
<DataTemplate>
<Image Source="{Binding}"
Aspect="AspectFit"
HeightRequest="300" />
</DataTemplate>
</CarouselView.ItemTemplate>
</CarouselView>
<VerticalStackLayout Margin="24, 10" Spacing="10" >
<Label Text="{Binding product.title}" FontSize="Title" FontFamily="OpenSansSemibold" />
<Label Text="{Binding product.description}" FontSize="Body" FontFamily="OpenSansRegular" />
<Grid ColumnDefinitions="*,*" ColumnSpacing="30" Margin="0, 10" >
<HorizontalStackLayout>
<Label Text=" $" FontSize="30" VerticalTextAlignment="Center" FontFamily="OpenSansRegular" />
<Label Text="{Binding product.price}" FontSize="40" FontFamily="OpenSansRegular" />
</HorizontalStackLayout>
<HorizontalStackLayout Grid.Column="1">
<Label Text="
$" FontSize="30" VerticalTextAlignment="Center" FontFamily="OpenSansRegular" />
<Label Text="{Binding product.price}" FontSize="40" FontFamily="OpenSansRegular" />
</HorizontalStackLayout>
<HorizontalStackLayout Grid.Column="1">
<Label Text=" " FontSize="30" VerticalTextAlignment="Center" FontFamily="OpenSansRegular" />
<Label Text="{Binding product.rating}" FontSize="40" FontFamily="OpenSansRegular" />
</HorizontalStackLayout>
</Grid>
<HorizontalStackLayout>
<Label Text="Stocks left: " FontSize="20" VerticalTextAlignment="Center" FontFamily="OpenSansRegular" />
<Label Text="{Binding product.stock}" FontSize="30" FontFamily="OpenSansRegular" />
</HorizontalStackLayout>
<HorizontalStackLayout>
<Label Text="Brand: " FontSize="20" VerticalTextAlignment="Center" FontFamily="OpenSansRegular" />
<Label Text="{Binding product.brand}" FontSize="30" FontFamily="OpenSansRegular" />
</HorizontalStackLayout>
<HorizontalStackLayout>
<Label Text="Category: " FontSize="20" VerticalTextAlignment="Center" FontFamily="OpenSansRegular" />
<Label Text="{Binding product.category}" TextTransform="Uppercase" FontSize="30" FontFamily="OpenSansRegular" />
</HorizontalStackLayout>
</VerticalStackLayout>
</VerticalStackLayout>
</ScrollView>
</ContentPage>
" FontSize="30" VerticalTextAlignment="Center" FontFamily="OpenSansRegular" />
<Label Text="{Binding product.rating}" FontSize="40" FontFamily="OpenSansRegular" />
</HorizontalStackLayout>
</Grid>
<HorizontalStackLayout>
<Label Text="Stocks left: " FontSize="20" VerticalTextAlignment="Center" FontFamily="OpenSansRegular" />
<Label Text="{Binding product.stock}" FontSize="30" FontFamily="OpenSansRegular" />
</HorizontalStackLayout>
<HorizontalStackLayout>
<Label Text="Brand: " FontSize="20" VerticalTextAlignment="Center" FontFamily="OpenSansRegular" />
<Label Text="{Binding product.brand}" FontSize="30" FontFamily="OpenSansRegular" />
</HorizontalStackLayout>
<HorizontalStackLayout>
<Label Text="Category: " FontSize="20" VerticalTextAlignment="Center" FontFamily="OpenSansRegular" />
<Label Text="{Binding product.category}" TextTransform="Uppercase" FontSize="30" FontFamily="OpenSansRegular" />
</HorizontalStackLayout>
</VerticalStackLayout>
</VerticalStackLayout>
</ScrollView>
</ContentPage>
In the code above, we wrapped the complete UI in a ScrollView and used a CarouselView to display a list of images of the Product. We then used a VerticalStackLayout to display all the relevant information about the product using Label.
However, because we haven’t mapped the navigation params that we got from Navigation with the BindingContext, this won’t work. To do so, add the following code in ProductDetails.xaml.cs:
using System.ComponentModel;
using MAUIPostFeed.Models;

namespace MAUIPostFeed.Views;

[QueryProperty(nameof(Product), "product")]
public partial class ProductDetails : ContentPage, IQueryAttributable,                                           INotifyPropertyChanged
{
    public Product product { get; private set; }

    public void ApplyQueryAttributes(IDictionary<string, object> query)
    {
        product = query["product"] as Product;
        OnPropertyChanged("product");
    }

    public ProductDetails()
    {
        InitializeComponent();
        BindingContext = this;
    }
}
In the code above, we used IQueryAttributable and its ApplyQueryAttributes to set the product property to the value that we get from the QueryProperty.
Finally, add the navigation logic inside the ProductList page. Add the SelectionChanged event handler in the CollectionView of products:
<CollectionView x:Name="productsCollection"
                ItemsSource="{Binding Products}"
                Margin="10"
                // Add below lines
                SelectionMode="Single"
                SelectionChanged="productsCollection_SelectionChanged"
                >
Now that we’ve passed an eventHandler, let’s create the eventHandler in the code-behind file. Add the method below in ProductList.xaml.cs:
    async void productsCollection_SelectionChanged(System.Object sender,                      Microsoft.Maui.Controls.SelectionChangedEventArgs e)
    {
        if (e.CurrentSelection.Count != 0)
        {
            Product product = e.CurrentSelection.FirstOrDefault()                                          as Product;
            var navigationParams = new Dictionary<string, object>
            {
                { "product", product }
            };
            await Shell.Current.GoToAsync("ProductDetails",                                                           navigationParams);

            productsCollection.SelectedItem = null;
        }
      }
In the code above, we’re navigating to the ProductDetails page when any item in CollectionView is selected. Then, we’re setting the selectedItem of the productsCollection list to null, resetting the UI.
If you run this code now, it won’t work because we haven’t yet registered the ProductDetails page in Router1. To do so, paste the following code in AppShell.xaml.cs:
using MAUIPostFeed.Views;

namespace MAUIPostFeed;

public partial class AppShell : Shell
{
    public AppShell()
    {
        InitializeComponent();
        // Registering the Page into Routes
        Routing.RegisterRoute("ProductDetails",                                                       typeof(ProductDetails));
    }
}
With that, our app is complete. Now, if you build and run the project, the output will be similar to the image below:

Conclusion
In this article, we learned how to create cross-platform apps for iOS and Android using .NET MAUI. But, .NET MAUI isn’t limited to just iOS and Android; we could also deploy our application on macOS and Windows using the same codebase.
.NET MAUI is a performant framework that is great for building cross-platform apps, especially if you want to remain in a .NET ecosystem without having to learn a new framework. I hope you enjoyed this article, and thanks for reading!
The post .NET MAUI tutorial for Android and iOS appeared first on LogRocket Blog.
from LogRocket Blog https://ift.tt/6XC8bqH
Gain $200 in a week
via Read more


