


Occasionally, in cross-platform development, we need to execute certain code on a platform-specific basis. For Flutter apps, we can draw from a rich plugin library to use the native functionality of many platforms without having to write our own implementations, so this may not be too daunting.
However, as our needs become more and more niche, we may find that a plugin does not exist to leverage a certain function. That’s when we need to consider writing our own platform-specific code.
The platforms that you are targeting already have a language that you can use to implement the functionality. For example, on Android, you can use Kotlin or Java, whereas on Windows, you can use C++.
So, the first question we need to answer is: Why would we even consider Rust for our platform-specific language?
Jump ahead:
- The case for using Rust with Flutter
- How using Rust and Flutter Rust Bridge resolves these problems
- Creating our Flutter Rust Bridge project
The case for using Rust with Flutter
Let’s imagine that we needed to get the current battery level of the device that the user was currently on. If there was no plugin that provided this functionality, we would need to consider at least two things:
- How to transmit data between our native code and Flutter
- The platform-specific language (like C++/Kotlin/Swift/etc)
Let’s explore each of these challenges now.
Transmitting data between native code and Flutter
If we have a lot of data to transmit between our Flutter app and native code, we’ll need to create the bindings to transmit data back and forth. There’s quite a bit of boilerplate involved in this process, and it can be frustrating and time-consuming to have to update these bindings when our implementation changes.
Fortunately, there is a package called Pigeon that is supposed to automate quite a bit of this for developers. Can that help us in our situation?
A quick look at Pigeon’s documentation for supported platforms tells us that Pigeon supports generating the following:
- Objective-C code for iOS (accessible to Swift)
- Experimental Swift code for iOS
- Java code for Android (accessible to Kotlin)
- Experimental Kotlin code for Android
- Experimental C++ code for Windows
Despite the uptake of Kotlin and Swift on the targeted mobile platforms, Pigeon support for these platforms is still in an experimental phase.
That’s not such a big deal for mobile apps, as you can call Java code from Kotlin and Objective-C code from Swift. This allows you to leverage the generated Pigeon code within your app. However, desktop and web apps are another matter.
Pigeon support for Windows is experimental, and support for Linux doesn’t exist. If you’re hoping to take your app to production, using an experimental generator doesn’t feel like a good idea. And for Linux or the web, you’re back to writing your platform bindings by hand anyway.
This can become a chore if you’re writing an app that targets a lot of platforms, especially if your app targets a platform where Pigeon support is experimental or nonexistent. It’s not an unmanageable amount of work, but it is still an amount of work.
Drawbacks of working with platform-specific languages
Flutter, by its very nature, is a cross-platform language. That means that there’s a chance that some people writing Flutter apps will not have encountered a bona fide platform-specific language, like Kotlin or Swift.
In these cases, it’s not so hard to search StackOverflow for an implementation and try to guess your way through. Kotlin and Swift will manage your memory for you, disposing of objects when they are no longer accessed, so it’s harder — though not impossible — to introduce memory leaks.
On Windows and Linux, this is a completely different proposition.
To implement native functionality, you have to use C++. As Pigeon support is experimental for Windows and doesn’t exist for Linux, you have to not only write your platform-specific code in a language you possibly don’t understand, but also your binding code.
Making this proposition more difficult is the fact that you have to manage your own memory and track your own references. To top it off, any exceptions that occur at the native layer that are uncaught will cause your app to crash on desktop.
In short, even if you can get your binding code created, you’re only going to bind to your — if you’re a beginner — potentially very unsafe code. It’s not very appealing.
How using Rust and Flutter Rust Bridge resolves these problems
To use Rust within our Flutter project, we have to make use of the community-produced flutter_rust_bridge package.
This package has broad platform support encompassing Android, iOS, Windows, Linux, macOS, and Web. As a result, no matter what platform you are targeting, you’ll be able to use Rust and Flutter Rust Bridge.
Quickly reviewing the benefits of Rust and Flutter Rust Bridge, it becomes quite a compelling case.
First, Flutter Rust Bridge generates all of your binding code for you and supports asynchronous operations like emitting to a Stream.
Next, Rust is an easier language to use, and also safer than C++ on Windows.
Additionally, you can use Rust crates within your Rust project to leverage native functionality instead of writing your own implementation.
Finally, uncaught exceptions within Rust code are transferred to Flutter via a panic, which you can view and troubleshoot accordingly. Compared to native uncaught exceptions on Windows causing crashes on desktop, this is a much better experience.
To demonstrate this, let’s create a simple Flutter app that gets the current battery level of the device that it’s running on.
Creating our Flutter Rust Bridge project
First up, let’s install some dependencies for flutter_rust_bridge. These are the Rust programming language, and LLVM.
Start by downloading and installing Rust from the website. In a command window, run the following:
winget install -e --id LLVM.LLVM
This will download and set up LLVM.
If you are creating a new project with Flutter and Rust, you can clone this template repository from Github. This template comes ready-made with all the bits and pieces you need to get Rust working within your Flutter project. Then, you can skip down to the “Writing the Rust Code” part of this tutorial.
However, if you have an existing project with Flutter to which you would like to add Rust, continue reading. This will also be helpful if you’re curious about how Rust integrates with Flutter projects.
In my case, we’ll be integrating Rust with a brand-new Flutter project that I created by running flutter create windows_battery_check.
Because we’re about to make low-level changes to your project, now would be an ideal time to check your code into your source control system. This way, if we accidentally break your project, it’s easy to undo.
Configuring the Rust project
Let’s go through the documentation on flutter_rust_bridge to understand how we can integrate Rust into our project.
It’s not a complicated setup per se. However, if we get any steps wrong, our project won’t build and it will be difficult to troubleshoot why. I’ll also offer some explanation of what we’re doing to help you understand what’s happening if this is your first exposure to Rust as well.
First, navigate to your Flutter project. Within the project, execute cargo new native --lib from the command line.
Note that native is just the project name for the Rust project. You can change it if you want, but keep in mind you’ll have to update it every time we reference it in this article’s code samples.
Next, within the native directory, open cargo.toml. Under the [dependencies] header, add the following:
flutter_rust_bridge = "1"
Add the following entry beneath [package]:
[lib]
crate-type = ["lib", "cdylib", "staticlib"]
Our cargo.toml file should now look like this:
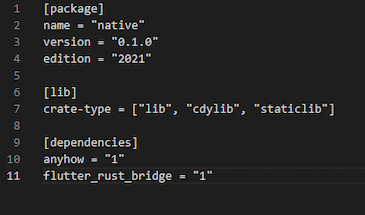
For context, cargo.toml is the file that contains information on our rust project. This file also houses what other packages — or as they’re called when working with Rust, crates — our project depends on.
Let’s continue. Within the native directory, execute the following commands from a command prompt or terminal:
cargo install flutter_rust_bridge_codegen
flutter pub add --dev ffigen && flutter pub add ffi
This adds the code generation tool for Rust to the Rust project, along with the FFI generation bits to the Flutter project.
Configuring our Flutter project
Within our native directory, run the following commands:
flutter pub add flutter_rust_bridge
flutter pub add -d build_runner
flutter pub add -d freezed
flutter pub add freezed_annotation
These components achieve the following points:
flutter_rust_bridge— The “Flutter-side” part of the Flutter Rust Bridge librarybuild_runner— Used to generate the Dart code used in platform bindingfreezed— Used to transfer objects from Rust to Flutter
Checking our configuration
We’ve touched on quite a few things, so let’s take a moment to check that our setup is good so far. If we’ve skipped a package accidentally or made a mistake, nothing will work and it will be hard to troubleshoot why.
Our native/config.toml file should look like this:
[package]
name = "native"
version = "0.1.0"
edition = "2021"

# See more keys and their definitions at https://doc.rust-lang.org/cargo/reference/manifest.html

[dependencies]
anyhow = "1"
flutter_rust_bridge = "1"
Meanwhile, our pubspec.yaml should have these dependencies:
dependencies:
  flutter:
    sdk: flutter
  cupertino_icons: ^1.0.2
  ffi: ^2.0.1
  flutter_rust_bridge: ^1.49.1
  freezed_annotation: ^2.2.0

dev_dependencies:
  flutter_test:
    sdk: flutter
  flutter_lints: ^2.0.0
  ffigen: ^7.2.0
  build_runner: ^2.3.2
  freezed: ^2.2.1
Setting up our Windows project integration
It’s finally time to integrate our native Rust project with Flutter. To do that, download the cmake file that Rust uses and place it within your project’s windows directory. Then, around line 57, after include(flutter/generated_plugins.cmake), add the following line:
include(./rust.cmake)
Returning to our Rust project configuration
Now, within your editor of choice, open the Rust project from the native directory. Create a new file called api.rs within the src directory. Then, open the lib.rs file and add the following to the top of the file:
mod api;
Now let’s write some very basic Rust code that we can call from our Flutter app. Within our api.rs file, let’s add a really simple function to test our integration:
pub fn helloWorld() -> String {
    String::from("Hello from Rust! ")
}
")
}
Generating the platform binding code
Now it’s finally time to generate the code that Flutter will use to invoke Rust functionality. Within the root of your project, run the following command:
flutter_rust_bridge_codegen --rust-input native/src/api.rs --dart-output lib/bridge_generated.dart --dart-decl-output lib/bridge_definitions.dart
For your sanity, you should save this command into a file like generate_bindings.bat. You will need to re-run it after you update your Rust code and expose any new functions.
Open your Flutter project. Within the lib directory, add the following native.dart file:
// This file initializes the dynamic library and connects it with the stub
// generated by flutter_rust_bridge_codegen.

import 'dart:ffi';

import 'dart:io' as io;

import 'package:windows_battery_check/bridge_generated.dart';

const _base = 'native';

// On MacOS, the dynamic library is not bundled with the binary,
// but rather directly **linked** against the binary.
final _dylib = io.Platform.isWindows ? '$_base.dll' : 'lib$_base.so';

final api = NativeImpl(io.Platform.isIOS || io.Platform.isMacOS
    ? DynamicLibrary.executable()
    : DynamicLibrary.open(_dylib));
And with that, we’re done! Our Flutter project can now call Rust code.
Calling Rust from Flutter
Within our main.dart, we’ll call our very simple Rust code. Our widget that does this looks like so:
import 'package:windows_battery_check/native.dart';
...

class HomePage extends StatelessWidget {
  const HomePage({Key? key}) : super(key: key);

  @override
  Widget build(BuildContext context) {
    return Scaffold(
      appBar: AppBar(
        title: Text("Flutter Battery Windows"),
      ),
      body: Center(
        child: FutureBuilder( // All Rust functions are called as Future's
          future: api.helloWorld(), // The Rust function we are calling.
          builder: (context, data) {
            if (data.hasData) {
              return Text(data.data!); // The string to display
            }
            return Center(
              child: CircularProgressIndicator(),
            );
          },
        ),
      ),
    );
  }
}
Running the project results in the following window coming up:
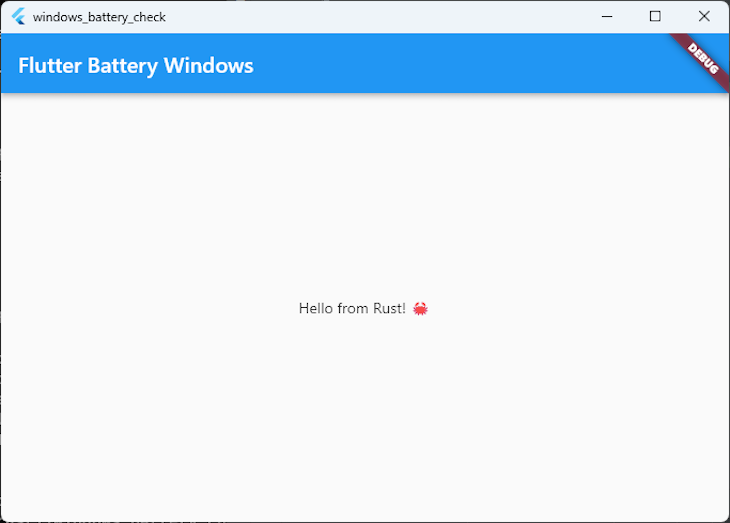
Our app works! Now let’s actually get our battery statistics.
First, let’s update our cargo.toml with the dependencies we need to retrieve the battery status on Windows. We need to add the Windows crate to leverage functionality from the Windows API, and we also need to specifically load certain features from this crate.
Our dependencies within the cargo.toml will look like this:
[dependencies]
anyhow = "1.0.66"
flutter_rust_bridge = "1"

[target.'cfg(target_os = "windows")'.dependencies]
windows = {version = "0.43.0", features =["Devices_Power", "Win32_Foundation", "Win32_System_Power", "Win32_System_Com", "Foundation", "System_Power"]}
Now, it’s time to implement the actual functionality that our app implements. Our app fulfills two functions:
- Checks if a battery is present in the system
- Emits battery status updates over time
Let’s implement these functions now.
Checking if a battery is present
Our function to retrieve the current battery presence status from the system looks like this:
pub fn getBatteryStatus() -> Result<bool> {
    // https://learn.microsoft.com/en-us/windows/win32/api/winbase/ns-winbase-system_power_status
    let mut powerStatus: SYSTEM_POWER_STATUS = SYSTEM_POWER_STATUS::default();
    unsafe {
        GetSystemPowerStatus(&mut powerStatus);
        Ok(powerStatus.BatteryFlag != 128)
    }
}
Essentially, we create a container for the SYSTEM_POWER_STATUS, initialize it with default values, and then pass it to the GetSystemPowerStatus function. Then, we can use the API documentation to understand the result.
In this case, 128 means that there is no battery present. As long as this return value is not equal to 128, there should be a battery present.
Receiving battery updates over time
To be able to receive battery updates over time, our app must send results over a Stream. Fortunately, StreamSink comes with flutter_rust_bridge, so it is simple to send events over a stream.
Within our api.rs, near the top of the file, add a RwLock that defines our Stream:
static BATTERY_REPORT_STREAM: RwLock<Option<StreamSink<BatteryUpdate>>> = RwLock::new(None);
Then, let’s create a new function called battery_event_stream that assigns the value of this RwLock to the Stream that is being passed to Rust:
pub fn battery_event_stream(s: StreamSink<BatteryUpdate>) -> Result<()> {
    let mut stream = BATTERY_REPORT_STREAM.write().unwrap();
    *stream = Some(s);
    Ok(())
}
Because we’re interacting directly with the Windows API, we need to read the documentation on how battery reporting works on Windows. From reading these API documents, we can understand what the BatteryStruct should look like and what the values returned from ChargingState mean.
The data model looks like this:
#[derive(Debug)]
pub struct BatteryUpdate {
    pub charge_rates_in_milliwatts: Option<i32>,
    pub design_capacity_in_milliwatt_hours: Option<i32>,
    pub full_charge_capacity_in_milliwatt_hours: Option<i32>,
    pub remaining_capacity_in_milliwatt_hours: Option<i32>,
    pub status: ChargingState,
}

#[derive(Debug)]
pub enum ChargingState {
    Charging = 3,
    Discharging = 1,
    Idle = 2,
    NotPresent = 0,
    Unknown = 255,
}
With our stream being initialized, and our data model set, it’s finally time to wire up the event generation.
To do this, let’s create an init function that sets up the subscription, and emits events into the stream as the battery status changes. We need to be careful when we do this, as when the device is unplugged, certain properties (like ChargeRateInMilliwatts) will return null.
Fortunately, it’s quite easy to safely handle these null values by using pattern matching within Rust, as we can see here:
pub fn init() {
    Battery::AggregateBattery().unwrap().ReportUpdated(&TypedEventHandler::<Battery, IInspectable>::new(|battery, inspectable| {
        let agg_battery = Battery::AggregateBattery();
        let report = agg_battery.unwrap().GetReport().unwrap();

        let battery_outcome = BatteryUpdate {
            charge_rates_in_milliwatts: match report.ChargeRateInMilliwatts() {
                Ok(charge_rate) => {
                    Some(charge_rate.GetInt32().unwrap())
                }
                Err(_) => {
                    None
                }
            },
            design_capacity_in_milliwatt_hours: match report.DesignCapacityInMilliwattHours() {
                Ok(design_capacity) => {
                    Some(design_capacity.GetInt32().unwrap())
                }
                Err(_) => {
                    None
                }
            },
            full_charge_capacity_in_milliwatt_hours: match report.FullChargeCapacityInMilliwattHours() {
                Ok(full_charge) => {
                    Some(full_charge.GetInt32().unwrap())
                }
                Err(_) => {
                    None
                }
            },
            remaining_capacity_in_milliwatt_hours: match report.RemainingCapacityInMilliwattHours() {
                Ok(remaining_capacity) => {
                    Some(remaining_capacity.GetInt32().unwrap())
                }
                Err(_) => {
                    None
                }
            },
            status: match report.Status().unwrap().0 {
                3 => Charging,
                1 => Discharging,
                2 => Idle,
                0 => NotPresent,
                _ => Unknown
            },
        };

        println!("Handler Update{:?}", battery_outcome);
        match BATTERY_REPORT_STREAM.try_read() {
            Ok(s) => {
                s.as_ref().unwrap().add(battery_outcome);
            }
            Err(_) => {
                println!("Error when writing battery status.");
            }
        }
        Ok(())
    })).expect("Could not subscribe to battery updates");
}
After we have this code in our api.rs, it’s time to re-run the command we saved earlier from the command line:
flutter_rust_bridge_codegen --rust-input native/src/api.rs --dart-output lib/bridge_generated.dart --dart-decl-output lib/bridge_definitions.dart
Showing battery results in the Flutter app
Because we have already integrated the Rust project with our Flutter project, all we have to do is update our code to achieve the following:
- Call the
initfunction to begin listening to events from the Rust library - Use a
FutureBuilderto show whether the system has a battery or not - Use a
StreamBuilderto show updates to the battery status as they arrive
Our HomePage widget now looks like the below, as it can call directly into the Rust library  :
:
class HomePage extends StatefulWidget {
  const HomePage({Key? key}) : super(key: key);

  @override
  State<HomePage> createState() => _HomePageState();
}

class _HomePageState extends State<HomePage> {

  @override
  void initState() {
    api.init();
    super.initState();
  }

  @override
  Widget build(BuildContext context) {
    return Scaffold(
      appBar: AppBar(
        title: Text("Flutter Battery Windows"),
      ),
      body: Center(
        child: Column(
          crossAxisAlignment: CrossAxisAlignment.center,
          mainAxisAlignment: MainAxisAlignment.center,
          children: [
            FutureBuilder( // For when results emit once
              future: api.getBatteryStatus(),
              builder: (context, data) {
                return Text(
                  'System has battery present: ${data.data}',
                  style: TextStyle(
                      color: (data.data ?? false) ? Colors.green : Colors.red),
                );
              },
            ),
            StreamBuilder( // For when there are results over time
              stream: api.batteryEventStream(),
              builder: (context, data) {
                if (data.hasData) {
                  return Column(
                    children: [
                      Text(
                          "Charge rate in milliwatts: ${data.data!.chargeRatesInMilliwatts.toString()}"),
                      Text(
                          "Design capacity in milliwatts: ${data.data!.designCapacityInMilliwattHours.toString()}"),
                      Text(
                          "Full charge in milliwatt hours: ${data.data!.fullChargeCapacityInMilliwattHours.toString()}"),
                      Text(
                          "Remaining capacity in milliwatts: ${data.data!.remainingCapacityInMilliwattHours}"),
                      Text("Battery status is ${data.data!.status}")
                    ],
                  );
                }
                return Column(
                  children: [
                    Text("Waiting for a battery event."),
                    Text(
                        "If you have a desktop computer with no battery, this event will never come..."),
                    CircularProgressIndicator(),
                  ],
                );
              },
            ),
          ],
        ),
      ),
    );
  }
}
With our code updated, we can go ahead and run our Flutter app on Windows. After a few seconds (or, if you unplug your laptop), the following should display:
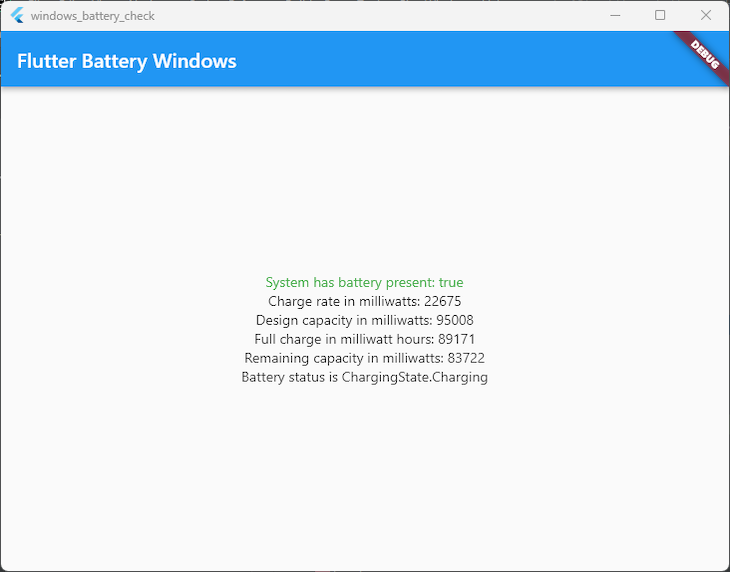
Over time, when there is an update to the battery charge, these values will emit over the stream, and the UI will automatically update.
Conclusion
Using Rust for native platform functionality, especially on Windows, can make writing native code easier and safer. Being able to receive events over a stream is a great fit for asynchronous events as well.
As always, the code samples used within this guide are available on Github. There are two folders within this repository.
The batterytest folder is a standalone Rust console app that acted as a sandbox for me to test out the Windows API calls by themselves. Being able to check that my calls were functional before adding on the Flutter solution was valuable in itself.
The windows_battery_check folder contains the full Flutter project, including the Rust library and code.
Happy developing!
The post Using Flutter Rust Bridge for cross-platform development appeared first on LogRocket Blog.
from LogRocket Blog https://ift.tt/4GnZcgQ
Gain $200 in a week
via Read more


