


Text highlight is a feature that can be detected on multiple sites and has several uses. For example, browsers highlight elements found with the search function, and text editors and tools like Notion or Grammarly highlight spelling and grammar errors.
Text highlight can enhance user experience, but adding this functionality to a website or application can be difficult. Fortunately, this is about to get a lot easier thanks to the CSS Custom Highlight API, which allows us to easily add style to a text range. As of this writing, this feature is still in Working Draft, so it is subject to change.
In this article, I’ll provide an overview of the API’s features and things to consider regarding behavior and accessibility. I’ll also share several examples to illustrate the use of the CSS Custom Highlight API in various use cases.
Jump ahead:
- Understanding the basics
- Creating and highlighting more complex ranges
- Handling accessibility limitations
- CSS Custom Highlight API examples
Understanding the basics
Using the CSS Custom Highlight API requires three steps: creating the styles in the stylesheet, setting a highlight range, and then applying those styles to the range.
Before diving into these steps, I want to reiterate that the CSS Custom Highlight API is still a Working Draft, meaning it is still subject to changes. In addition, this feature does not currently work on Firefox, so you shouldn’t use it for production right now if Firefox is necessary for your project.
With that said, let’s start with the first step.
Creating the highlight styles
This CSS Custom Highlight API requires us to use the ::highlight() pseudo-element to set the styles we need. The W3C Working Draft defines this pseudo-element as “the portion of a document that is being contained or partially contained in all the ranges of the registered custom highlight”.
We’ll need to add a name for the custom highlight we’re creating inside the curly brackets, so a CSS declaration for a custom highlight should look something like this:
::highlight(sample-highlight) {
  background-color: rebeccapurple;
  color: whitesmoke;
}
You might be wondering if there’s a restriction in the style rules that you can apply for this highlight, The answer is yes! The CSS rules we can use are quite limited. To be more precise, we can only use the following rules, as they are applicable to the ::selection pseudo-element:
background-colorcaret-colorcolorcursorfillstrokestroke-widthtext-decoration
These rules were selected because they can be efficiently applied by the browser without recreating the site’s layout or inserting new DOM elements (i.e., we could recreate this functionality by wrapping the elements with an inline HTML tag like a span).
To compare the performance difference between the CSS Custom Highlight API and the traditional text formatting method of inserting spans, see this performance comparison demo by Fernando Fiori.
Setting the range
After creating a style, the next step is setting the range with CSS. First, we’ll define our text range with the constructor Range(); this will allow us to select a fragment of a document. This fragment can contain nodes or parts of text nodes.
The kind of elements the Range() constructor can select is important because that means to get the text fragment we want to use, we’ll need to use functions that return one of those types of elements.
Let’s consider the following text example:
<p>This example has <em>cursive</em> and <strong>bold</strong> text</p>
Now, let’s create the style:
:root::highlight(example) {
  background-color: rebeccapurple;
  color: whitesmoke;
}
If we try to create a range with the p element, each node or text fragment will be a new range.
We can use the range.setStart and range.setEnd methods to select the part of the text that we want to highlight.
For this sample text, each new element will be a new range, so we’ll have the following:

Suppose we want to highlight the text “cursive and strong” in the above sentence. In this case, the setStart method should be 1. You might think the setEnd method should be 3 , but this is not exactly correct!
If we set the start of the range at 1, the API starts to select it from the very beginning of the element, and if we set the ending range to 3, the selection will end at the beginning of the third element. So, to select all the text inside the strong element, the attribute range.setEnd for this example should be 4.
The setStart and setEnd methods receive two arguments: the DOM element we want to use and the position. Here’s how it will look in our code:
const paragraph = document.querySelector("p")

const exampleRange = new Range();
exampleRange.setStart(paragraph, 1);
exampleRange.setEnd(paragraph, 4);
Applying the highlight
Now that we have our desired range, it’s time to highlight it! For this, we need to create a new Highlight() constructor that will receive our range as an attribute:
const highlight = new Highlight(exampleRange)
Next, we need to call the CSS.highlight.set method. It receives two attributes: the highlight class we created in our stylesheet and the new highlight that we previously created. This is how it would look in our code:
CSS.highlights.set("example", highlight);
But, what if you need to clear the highlights you created?
Just call the CSS.highlights.clear() method and the highlights will be cleared with no problem.
Creating and highlighting more complex ranges
The technique we demonstrated earlier for creating a highlight range works well when we want to select a full word, but what happens when we need to select just part of a word? Let’s go back to our example, and this time let’s try to highlight only the letters “old tex”.
First, let’s create our style for this highlight:
:root::highlight(partial) {
  background-color: goldenrod;
  color: black;
}
OK, now how do we avoid selecting the entire fragment?
My approach to this issue was to look closely at how this element (in this case, the whole p element) is made. First, I examined it in more detail with the console using console.dir() to check the list of properties. Then I looked at the childNodes property and this was the result:
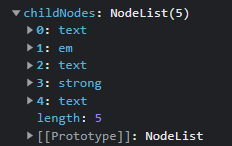
The text we want to highlight, “old tex”, is inside the strong element. To start our range with this text, we could use paragraph.childNodes[3], but that would select the whole element. So, how do we select just a part of the element?
As I mentioned previously, Range will select either an element node or a text node. In our case, we’ll need to check inside this element for something that returns a text node.
Let’s go back to our console.dir() because it has a property that we’ll be able to use: firstChild:

So now we have paragraph.childNodes[3]. firstChild will return our string as a Text prototype.
To set our starting position, we need to check where the “o” in “old” is located. In this example, it is the second character, so if we divide it as an array, the “o” would be position 1. So when we set the setStart method for our range it will be like this:
partialRange.setStart(paragraph.childNodes[3].firstChild, 1)
Great! Now, let’s set the end of this range.
The last characters that we want to highlight, “tex”, are located in the last element of our childNodes. As you’ll notice in the childNodes property’s list above, the last element has the type text, so accessing the firstChild’s property is not necessary.
Next, we need to check where to end our range; we’ll use the setEnd method, like so:
partialRange.setEnd(paragraph.childNodes[4], 4)
Now, all we have to do is create the highlight:
const partialHighlight = new Highlight(partialRange);

CSS.highlights.set("partial", partialHighlight)
Here’s how the highlight would look:
See the Pen
CSS custom highlight demo by Cristian Diaz (@ItsCrisDiaz)
on CodePen.
I’m showing both examples in the same CodePen for a reason — it’s important to consider how the browser will prioritize what to render when multiple styles are applied to the same string.
For example, the string “old” in “bold” has both styles. Which style will be displayed will depend on where we decide to call the CSS.highlights.set method.
In this case, I called the method that adds the example style first, and the method that adds the partial style second. Because this is JavaScript, the last method that was declared will prevail. So, in this case, the “old” string will have the partial style applied.
Finally, as you might suppose, the Range() method can be quite hard to fully understand. This method will likely start to fall short when you start considering scale. We’ll look at some examples later in this article that use other methods for more complex use cases. But first, we need to consider an important consideration: accessibility.
Handling accessibility limitations
The CSS Custom Highlight API is very flexible, but what happens when you need to expose the highlighting to assistive technologies like screen readers? This API covers this, but right now, it’s limited to only a few use cases.
Let’s start with the basics. When you create a highlight with the Highlight() constructor, there is an attribute called type. This attribute gives semantic meaning to a highlight and defines how it will be exposed to screen readers and other assistive technologies!
The types we can use are fairly limited to these three:
highlight: assigned by defaultspelling-error: used to highlight misspelled contentgrammar-error: used to highlight grammatically incorrect content
If the highlighting you use has one of these types, you definitely should add the type. To do so, just change the attribute like so:
// Creating a highlight with a new range
const highlight = new Highlight(range)

// Changing the attribute type of this range
highlight.type = "spelling-error"
Why only these three types? According to the W3C specification, it’s because these are presumed to be the most common use cases for this API:
This initial set of types was chosen because they are expected to be popular use cases for Highlight API and there is some existing support for expressing their semantics in platform accessibility APIs today.
The specification also mentions that “UAs (User Agents) should make custom highlights available to assistive technologies” and right now it mostly does.
Here again, I want to emphasize that the CSS Custom Highlight API is still a work in progress. I made some tests with NVDA and Chrome and found that it will identify spelling or grammar errors before the text is highlighted, but will not expose those errors when the text type is highlight.
Why is this important? Well, if this highlight is not there for merely visual purposes but instead needs to be exposed to assistive technologies, you might need to consider another option for this job. One solution I think works well is the one ProgrammingTT demonstrates in this video where the highlighted content is wrapped in the <mark> element.
As of this writing, only two types of highlight are exposed to assistive technologies, but the possibility to add more highlight types is open, as W3C mentions:
Accessibility APIs currently don’t have any way to express the specific semantics of other expected Highlight API use cases. More types could later be added to
HighlightTypeas accessibility APIs gain support for expressing additional popular use cases of Highlight API.
Now, with that said, let’s check out some use cases for this API!
CSS custom highlight API examples
To get a better understanding of what this API can do, let’s take a look at some implementations of this API made by Microsoft Edge’s team, as well as an example that I built. These use cases will also let us see different ways of handling text ranges.
Select and highlight web text
Let’s start with an example from the Microsoft Edge video “Highlight text on the web with the CSS Custom Highlighting API.” In this project, you can select text, highlight it to store it in a list, and then check it later. The stored text will be highlighted using the CSS Custom Highlight API.
For this example, Patrick Brosset uses the document.getSelection() method to get create a range with the following selection:
const selection = document.getSelection();
const range = selection.getRangeAt(0);
Since any method that returns a text fragment or a node fragment will be valid, document.getSelection() does the trick. Next, Brosset starts adding ranges with the Highlight method and then highlights them as we demonstrated previously.
Since there’s no live demo of this video, I decided to recreate the functionality of highlighting selection ranges. This is very similar to our previous example but with one key difference: this time there is the possibility that we’ll need to highlight multiple ranges. For this, let’s first create some global variables:
let SELECTION_TEXTS = []
let selectionHighlighter = new Highlight()
The first variable is an array that will store each of the ranges we want to highlight, and the second creates an instance of the Highlight() class.
Why are we handling this globally? Because instead of using the syntax we used before, we’ll use a method of this class to add our ranges.
Now, it’s time to create our function to highlight those text ranges:
const textHighlight = () => {
  const selection = document.getSelection();
  const range = selection.getRangeAt(0)
  SELECTION_TEXTS.push(range)

  SELECTION_TEXTS.forEach((selection) => {
    selectionHighlighter.add(selection)
  })
  CSS.highlights.set("example", selectionHighlighter)
};
This is a bit different from what we have seen previously. Before adding anything to our selectionHighlighter, we have to first add the new range to our array. Then, we need to iterate it with the forEach method to start adding the selection range to the selectionHighlighter with the Highlight. add() method. Next, we just need to call the CSS.highlights.set() method as we have done before.
But, what happens if we need to clear the highlights? For this, we can use the following function:
const clearHighlight = () => {
  selectionHighlighter.clear()
  SELECTION_TEXTS = []
  CSS.highlights.clear()
}
Similar to the Highlight.add(), we can use Highlight.clear() to remove all highlighted elements in our global variable. Then, we just need to clear the global variable we used for our array and then use the CSS.highlights.clear() method as we previously demonstrated.
To see how this works, check out this demo:
See the Pen
Selection text highlight by Cristian Diaz (@ItsCrisDiaz)
on CodePen.
I chose this example because I wanted to show how we can use other strategies to select the desired text range. In this case, document.getSelection() works, but what happens when you need to create something on a bigger scale? This is where our second use case comes in!
Search in page component
This next demo, for a search in-page component, was also made by the Microsoft Edge team. It demonstrates how to create text nodes on a bigger scale with the use of a TreeWalker to get all nodes in a DOM element (in this case, the main element). As for the CSS Custom Highlight API, we’ll need all text nodes, so we’ll use the NodeFilter.SHOW_TEXT instance.
Next, TreeWalker checks every node by using the TreeWalker.nextNode() method and stores them in the allTextNodes variable which gives the following result:

This process gives us an array of text elements; we can check each of them by adding its name as the input. Then, it’s just a matter of adding the ranges of the text nodes, finding those results, and then highlighting them as we‘ve done before with the CSS.highlights.set() method. This method illustrates how we can use a TreeWalker to help us check text nodes reliably on a bigger scale.
This demo would greatly benefit from additional semantic meaning to the highlights for assistive technologies. Remember, this API only has three types, and highlighting a search result is not one of them! So W3C, if you’re seeing this, including this type of semantic meaning for search results would certainly come in handy!
Now, let’s take a look at an example that I built; it effectively uses the available semantic meaning!
Order this phrase app
My project idea was to create an app where the user receives a scrambled phrase and then needs to provide the correctly ordered phrase as the answer. The user will receive visual feedback via highlight depending on whether the words within the submission are in the right order. I chose this example because it can take advantage of a highlight semantic type (in this case grammar-error) to improve the app’s accessibility!
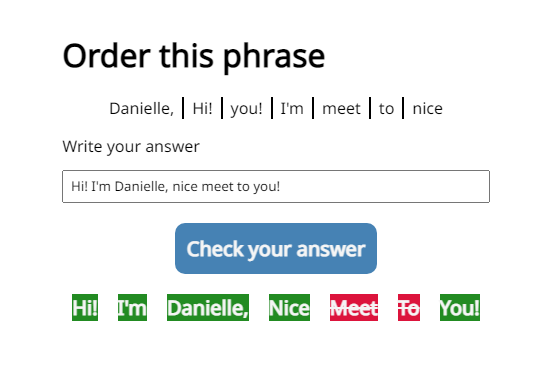
First, we need to create our highlight classes! If we rely only on background color to highlight the right and wrong answers, the results would be difficult to distinguish for users with color blindness. Instead, I decided to use strikeout (or line-through) for incorrect answers:
:root::highlight(wrong-highlight) {
  background-color: crimson;
  color: whitesmoke;
  text-decoration-line: line-through;
  text-decoration-thickness: 2px;
}

:root::highlight(right-highlight) {
  background-color: forestgreen;
  color: whitesmoke;
}
As I mentioned before, the key to creating the semantic meaning is adding the property type to the desired highlight class. In this case, I only want to emphasize those words that appear in the wrong order because those create a grammar error, so this is what I did when I created the Highlight() instances globally. Since there will be multiple ranges to highlight, I’ll have to declare empty arrays, so I decided to add those globally as well:
let RIGHT_RANGES = [];
let WRONG_RANGES = [];

const rightHighlight = new Highlight();

const wrongHighlight = new Highlight();
wrongHighlight.type = "grammar-error";
After multiple validations to check if the added words coincide with the ones in the answer, it’s time to start adding our ranges! I decided to select the answer’s container (in this case, the ol) and then check each of its children. As each inner li consists of only this element, the range starts at 0 and ends at 1.
With that in mind, here is the code I used:
const answerListNodes = ANSWER_LIST.children;

// Selects the range of each <li> to start the highlighting process
answer.forEach((word, index) => {
  const wordRange = new Range();
  wordRange.setStart(answerListNodes[index], 0);
  wordRange.setEnd(answerListNodes[index], 1);

  if (word === RIGHT_ORDER[index]) {
    // If the answer is right
    RIGHT_RANGES.push(wordRange);
  } else {
    // If the answer is wrong
    WRONG_RANGES.push(wordRange);
  }
});
Next, we can use the RIGHT_RANGES and WRONG_RANGES arrays to add the selected ranges to our Highlight() instances and then use the CSS.highlights.set() method to highlight them on the screen:
// Highlights the answers in the right position
RIGHT_RANGES.forEach((element) => {
  rightHighlight.add(element);
});

CSS.highlights.set("right-highlight", rightHighlight);

// Highlights the answers in the right position
WRONG_RANGES.forEach((element) => {
  wrongHighlight.add(element);
});

CSS.highlights.set("wrong-highlight", wrongHighlight);
If you want to see how it works, check out this CodePen:
See the Pen
Order phrase with custom highlight by Cristian Diaz (@ItsCrisDiaz)
on CodePen.
Again, I used this approach because the CSS custom highlight API provides a semantic type that works quite well for this example.
Final thoughts
The CSS Custom Highlight API is a new feature that offers some interesting solutions for some issues we face relating to usability and accessibility. It also offers superior performance compared to other options. This API can be a bit tricky when you consider how to select a range, but once you figure that out, the tool opens up a whole new set of possibilities!
This API is still in process and currently lacks global support, but I think it has great potential. I am hopeful that in the future this API will expand its browser support and will also support more semantic types that can be used for assistive technologies.
The post Getting started with the CSS Custom Highlight API appeared first on LogRocket Blog.
from LogRocket Blog https://ift.tt/8ZCEYuy
Gain $200 in a week
via Read more


