


Unit testing verifies if a single method or class works as expected. It also improves maintainability by confirming if existing logic still works when new changes are made.
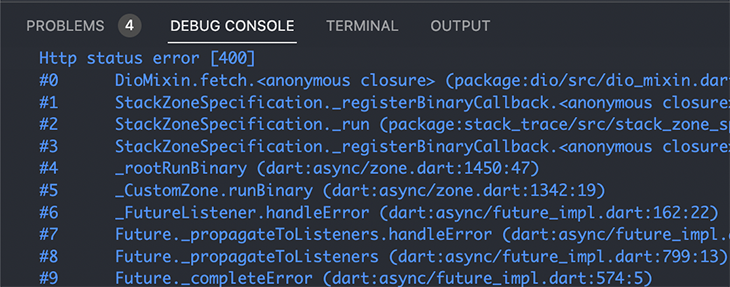
Generally, unit tests are easy to write but run in a test environment. This, by default, produces an empty response with status code 400 when a network call or HTTP request is made. To fix this, we can easily use Mockito to return a fake response anytime we make an HTTP request. Mockito has various use cases that we’ll introduce gradually as we proceed.
In this tutorial, we’ll demonstrate how to use Mockito to test Flutter code. We’ll learn how to generate mocks, stub data, and perform tests on methods that emit a stream. Let’s get started!
- What is Mockito?
- Generating mocks and stubbing data
- Using argument matchers
- Creating fakes in Mockito
- Mocking and testing streams in Flutter
What is Mockito?
Mockito is a well-known package that makes it easier to generate a fake implementation of an existing class. It eliminates the stress of repeatedly writing these functionalities. Additionally, Mockito helps control the input so we can test for an expected result.
Using Mockito hypothetically makes writing unit tests easier, however, with bad architecture, mocking and writing unit tests can easily get complicated.
Later in this tutorial, we’ll learn how Mockito is used with the model-view-viewmodel (MVVM) pattern that involves separating the codebase into different testable parts, like the view model and repositories.
Generating mocks and stubbing data
Mocks are fake implementations of real classes. They’re typically used to control the expected result of a test or when real classes are prone to errors in a test environment.
To understand this better, we’ll write unit tests for an application that deals with sending and receiving posts.
Project structure overview
Before we start, let’s add all the necessary packages to our project.
dependencies:
  dio: ^4.0.6 # For making HTTP requests

dev_dependencies:
  build_runner: ^2.2.0 # For generating code (Mocks, etc)
  mockito: ^5.2.0 # For mocking and stubbing
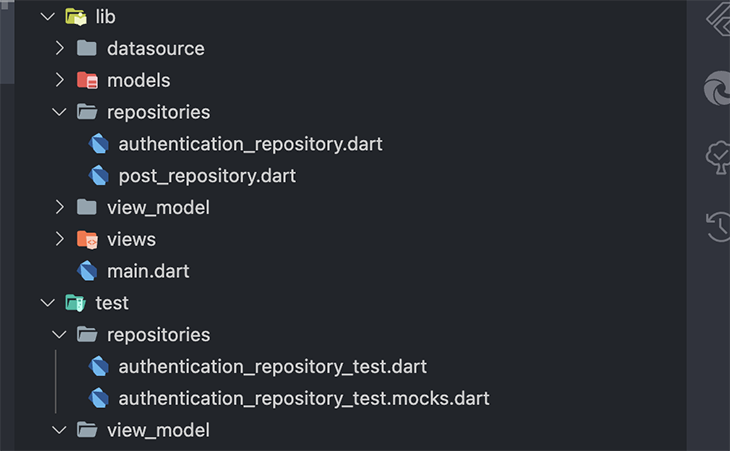
We’ll use the MVVM and repository pattern that’ll include tests for both the repositories and view models. In Flutter, it’s a good practice to place all the tests in the test folder and it closely match the structure of the lib folder.
Next, we’ll create the authentication_repository.dart and authentication_repository_test.dart files by appending _test to the file names. This helps the test runner find all the tests present in the project.
We’ll start this section by creating a class called AuthRepository. As the name implies, this class will handle all the authentication functionality in our app. After that, we’ll include a login method that checks if the status code equals 200 and catches any errors that occur while authenticating.
class AuthRepository {
  Dio dio = Dio();

  AuthRepository();

  Future<bool> login({
    required String email,
    required String password,
  }) async {
    try {
      final result = await dio.post(
        '<https://reqres.in/api/login>',
        data: {'email': email, 'password': password},
      );

      if (result.statusCode != 200) {
        return false;
      }
    } on DioError catch (e) {
      print(e.message);
      return false;
    }

    return true;
  }

  // ...
}
void main() {
  late AuthRepository authRepository;

  setUp(() {
    authRepository = AuthRepository();
  });

  test('Successfully logged in user', () async {
    expect(
      await authRepository.login(email: 'james@mail.com', password: '123456'),
      true,
    );
  });
}
In the test above, we initialize the AuthRepository in the setup function. Since it will run before every test and test group directly inside main, it will initialize a new auth repository for every test or group.
Next, we’ll write a test that expects the login method to return true without throwing errors. However, the test still fails because unit testing doesn’t support making a network request by default, hence why the login request made with Dio returns a status code 400.

To fix this, we can use Mockito to generate a mock class that functions like Dio. In Mockito, we generate mocks by adding the annotation @GenerateMocks([classes]) to the beginning of the main method. This informs the build runner to generate mocks for all the classes in the list.
@GenerateMocks([Dio, OtherClass])
void main(){
    // test for login
}
Next, open the terminal and run the command flutter pub run build_runner build to start generating mocks for the classes. After code generation is complete, we’ll be able to access the generated mocks by prepending Mock to the class name.
@GenerateMocks([Dio])
void main(){
      MockDio mockDio = MockDio()
      late AuthRepository authRepository;
      ...
}
We have to stub the data to make sure MockDio returns the right response data when we call the login endpoint. In Flutter, stubbing means returning a fake object when the mock method is called. For example, when the test calls the login endpoint using MockDio, we should return a response object with status code 200.
Stubbing a mock can be done with the function when(), which can be used with thenReturn, thenAnswer, or thenThrow to provide the values needed when we call the mock method. The thenAnswer function is used for methods that return a future or stream, while thenReturn is used for normal, synchronous methods of the mock class.
// To stub any method; gives error when used for futures or stream
when(mock.method()).thenReturn(value);

// To stub method that return a future or stream
when(mock.method()).thenAnswer(() => futureOrStream);

// To stub error
when(mock.method()).thenThrow(errorObject);

// dart
@GenerateMocks([Dio])
void main() {
  MockDio mockDio = MockDio();
  late AuthRepository authRepository;

  setUp(() {
    authRepository = AuthRepository();
  });

  test('Successfully logged in user', () async {
    // Stubbing
    when(mockDio.post(
      '<https://reqres.in/api/login>',
      data: {'email': 'james@mail.com', 'password': '123456'},
    )).thenAnswer(
      (inv) => Future.value(Response(
        statusCode: 200,
        data: {'token': 'ASjwweiBE'},
        requestOptions: RequestOptions(path: '<https://reqres.in/api/login>'),
      )),
    );

    expect(
      await authRepository.login(email: 'james@mail.com', password: '123456'),
      true,
    );
  });
}
After creating our stub, we still need to pass in MockDio into the test file so it gets used instead of the real dio class. To implement this, we’ll remove the definition or instantiation of the real dio class from the authRepository and allow it to be passed through its constructor. This concept is called dependency injection.
Dependency injection
Dependency injection in Flutter is a technique in which one object or class supplies the dependencies of another object. This pattern ensures that the test and view models can both define the type of dio they want to use.
class AuthenticationRepository{
        Dio dio;

        // Instead of specifying the type of dio to be used
        // we let the test or viewmodel define it
        AuthenticationRepository(this.dio)
}
@GenerateMocks([Dio])
void main() {
  MockDio mockDio = MockDio();
  late AuthRepository authRepository;

  setUp(() {
    // we can now pass in Dio as an argument
    authRepository = AuthRepository(mockDio);
  });
}
Using argument matchers
In the previous login example, if the email james@mail.com was changed to sam@mail.com when making the request, the test would produce a no stub found error. This is because we only created the stub for james@mail.com.
However, in most cases, we want to avoid duplicating unnecessary logic by using argument matchers provided by Mockito. With argument matchers, we can use the same stub for a wide range of values instead of the exact type.
To understand matching arguments better, we’ll test for the PostViewModel and create mocks for the PostRepository. Using this approach is recommended because when we stub, we’ll be returning custom objects or models instead of responses and maps. It’s also very easy!
First, we’ll create the PostModel to more cleanly represent the data.
class PostModel {
  PostModel({
    required this.id,
    required this.userId,
    required this.body,
    required this.title,
  });

  final int id;
  final String userId;
  final String body;
  final String title;

  // implement fromJson and toJson methods for this
}
Next, we create the PostViewModel. This is used to retrieve or send data to the PostRepository. PostViewModel isn’t doing anything more than just sending and retrieving data from the repository and notifying the UI to rebuild with the new data.
import 'package:flutter/material.dart';
import 'package:mockito_article/models/post_model.dart';
import 'package:mockito_article/repositories/post_repository.dart';

class PostViewModel extends ChangeNotifier {
  PostRepository postRepository;
  bool isLoading = false;

  final Map<int, PostModel> postMap = {};

  PostViewModel(this.postRepository);

  Future<void> sharePost({
    required int userId,
    required String title,
    required String body,
  }) async {
    isLoading = true;
    await postRepository.sharePost(
      userId: userId,
      title: title,
      body: body,
    );

    isLoading = false;
    notifyListeners();
  }

  Future<void> updatePost({
    required int userId,
    required int postId,
    required String body,
  }) async {
    isLoading = true;
    await postRepository.updatePost(postId, body);

    isLoading = false;
    notifyListeners();
  }

  Future<void> deletePost(int id) async {
    isLoading = true;
    await postRepository.deletePost(id);

    isLoading = false;
    notifyListeners();
  }

  Future<void> getAllPosts() async {
    isLoading = true;
    final postList = await postRepository.getAllPosts();

    for (var post in postList) {
      postMap[post.id] = post;
    }

    isLoading = false;
    notifyListeners();
  }
}
As stated earlier, we mock the dependencies and not the actual classes we test for. In this example, we write unit tests for the PostViewModel and mock the PostRepository. This means we’d call the methods in the generated MockPostRepository class instead of the PostRepositorythat might possibly throw an error.
Mockito makes matching arguments very easy. For instance, take a look at the updatePost method in the PostViewModel. It calls the repository updatePost method, which accepts only two positional arguments. For stubbing this class method, we can choose to provide the exact postId and body, or we can use the variable any provided by Mockito to keep things simple.
@GenerateMocks([PostRepository])
void main() {
  MockPostRepository mockPostRepository = MockPostRepository();
  late PostViewModel postViewModel;

  setUp(() {
    postViewModel = PostViewModel(mockPostRepository);
  });

  test('Updated post successfully', () {
    // stubbing with argument matchers and 'any'
    when(
      mockPostRepository.updatePost(any, argThat(contains('stub'))),
    ).thenAnswer(
      (inv) => Future.value(),
    );

    // This method calls the mockPostRepository update method
    postViewModel.updatePost(
      userId: 1,
      postId: 3,
      body: 'include `stub` to receive the stub',
    );

    // verify the mock repository was called
    verify(mockPostRepository.updatePost(3, 'include `stub` to receive the stub'));
  });
}
The stub above includes both the any variable and the argThat(matcher) function. In Dart, matchers are used to specify test expectations. We have different types of matchers suitable for different test cases. For example, the matcher contains(value) returns true if the object contains the respective value.
Matching positional and named arguments
In Dart, we also have both positional arguments and named arguments. In the example above, the mock and stub for the updatePost method deals with a positional argument and uses the any variable.
However, named arguments do not support the any variable because Dart doesn’t provide a mechanism to know if an element is used as a named argument or not. Instead, we use the anyNamed(’name’) function when dealing with named arguments.
when(
  mockPostRepository.sharePost(
    body: argThat(startsWith('stub'), named: 'body'),
    postId: anyNamed('postId'),
    title: anyNamed('title'),
    userId: 3,
  ),
).thenAnswer(
  (inv) => Future.value(),
);
When using matchers with a named argument, we must provide the name of the argument to avoid an error. You can read more on matchers in the Dart documentation to see all possible available options.
Creating fakes in Mockito
Mocks and fakes are often confused, so let’s quickly clarify the difference between the two.
Mocks are generated classes that allow stubbing by using argument matchers. Fakes, however, are classes that override the existing methods of the real class to provide more flexibility, all without using argument matchers.
For example, using fakes instead of mocks in the post repository would allow us to make the fake repository function similar to the real one. This is possible because we’d be able to return results based on the values provided. In simpler terms, when we call sharePost in the test, we can choose to save the post and later confirm if the post was saved using getAllPosts.
class FakePostRepository extends Fake implements PostRepository {
  Map<int, PostModel> fakePostStore = {};

  @override
  Future<PostModel> sharePost({
    int? postId,
    required int userId,
    required String title,
    required String body,
  }) async {
    final post = PostModel(
      id: postId ?? 0,
      userId: userId,
      body: body,
      title: title,
    );
    fakePostStore[postId ?? 0] = post;
    return post;
  }

  @override
  Future<void> updatePost(int postId, String body) async {
    fakePostStore[postId] = fakePostStore[postId]!.copyWith(body: body);
  }

  @override
  Future<List<PostModel>> getAllPosts() async {
    return fakePostStore.values.toList();
  }

  @override
  Future<bool> deletePost(int id) async {
    fakePostStore.remove(id);

    return true;
  }
}
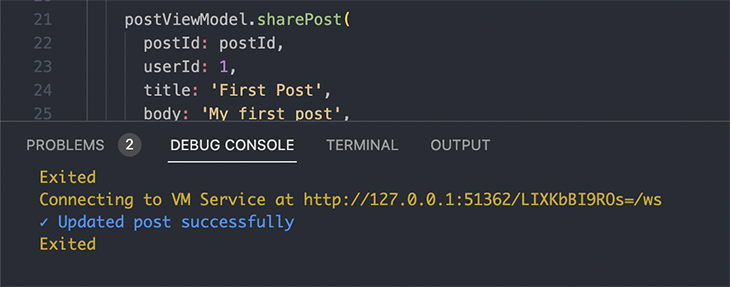
The updated test using fake is shown below. With fake, we can test for all the methods at once. A post gets is to the map in the repository when it’s added or shared.
@GenerateMocks([PostRepository])
void main() {
  FakePostRepository fakePostRepository = FakePostRepository();
  late PostViewModel postViewModel;

  setUp(() {
    postViewModel = PostViewModel(fakePostRepository);
  });

  test('Updated post successfully', () async {
    expect(postViewModel.postMap.isEmpty, true);
    const postId = 123;

    postViewModel.sharePost(
      postId: postId,
      userId: 1,
      title: 'First Post',
      body: 'My first post',
    );
    await postViewModel.getAllPosts();
    expect(postViewModel.postMap[postId]?.body, 'My first post');

    postViewModel.updatePost(
      postId: postId,
      userId: 1,
      body: 'My updated post',
    );
    await postViewModel.getAllPosts();
    expect(postViewModel.postMap[postId]?.body, 'My updated post');
  });
}
Mocking and testing streams in Flutter
Mocking and stubbing streams with Mockito are very similar to futures because we use the same syntax for stubbing. However, streams are quite different from futures because they provide a mechanism to continuously listen for values as they are emitted.
To test for a method that returns a stream, we can either test if the method was called or check if the values are emitted in the right order.
class PostViewModel extends ChangeNotifier {
  ...
  PostRepository postRepository;
  final likesStreamController = StreamController<int>();

  PostViewModel(this.postRepository);

  ...
  void listenForLikes(int postId) {
    postRepository.listenForLikes(postId).listen((likes) {
      likesStreamController.add(likes);
    });
  }
}


@GenerateMocks([PostRepository])
void main() {
  MockPostRepository mockPostRepository = MockPostRepository();
  late PostViewModel postViewModel;

  setUp(() {
    postViewModel = PostViewModel(mockPostRepository);
  });

  test('Listen for likes works correctly', () {
    final mocklikesStreamController = StreamController<int>();

    when(mockPostRepository.listenForLikes(any))
        .thenAnswer((inv) => mocklikesStreamController.stream);

    postViewModel.listenForLikes(1);

    mocklikesStreamController.add(3);
    mocklikesStreamController.add(5);
    mocklikesStreamController.add(9);

    // checks if listen for likes is called
    verify(mockPostRepository.listenForLikes(1));
    expect(postViewModel.likesStreamController.stream, emitsInOrder([3, 5, 9]));
  });
}
In the example above, we added a listenforLikes method that calls the PostRepository method and returns a stream that we can listen to. Next, we created a test that listens to the stream and checks if the method is called and emitted in the right order.
For some complex cases, we can use expectLater or expectAsync1 instead of using only the expect function.
Conclusion
As simple as most of this logic looks, it’s very important to write tests so we don’t repeatedly QA those functionalities. One of the aims of writing tests is to reduce repetitive QA as your apps get larger.
In this article, we learned how we can effectively use Mockito for generating mocks while writing unit tests. We also learned how to use fakes and argument matchers to write functional tests.
Hopefully, you have a better understanding of how to structure your application to make mocking easier. Thanks for reading!
The post Unit testing Flutter code with Mockito appeared first on LogRocket Blog.
from LogRocket Blog https://ift.tt/Grfvca5
Gain $200 in a week
via Read more
