In this guide, we will talk about RegEx and how it’s used in Kotlin. RegEx stands for “regular expression”. In layman’s terms, it checks if a string matches a pattern. Regular expressions come in handy in cases of validation of input.
Why is this a big deal? Instead of having numerous IF and ELSE operators, RegEx handles these validations all at once.
That brings us to the aim of this guide. In this article, we will guide you on how to use regular expression as a means of validation in Kotlin by building a simple app to validate a mobile number.
Prerequisites
I recommend readers of this guide have the following:
- Basic knowledge of Kotlin syntax
- A Kotlin compiler on their device to run Kotlin code in the terminal
(Note: You’ll also need to have your android studio up and running on your operating system)
Checking input patterns using RegEx
Regular expression patterns can often be confusing to work with, so we will learn how to check for patterns in a string using RegEx. Below are some of the RegEx patterns in Kotlin:
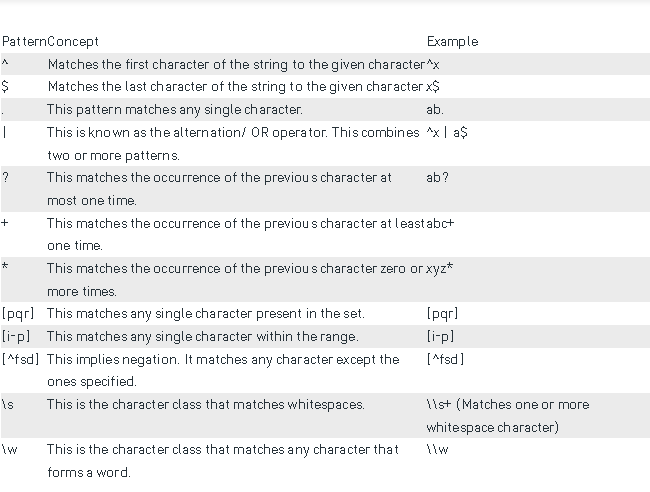
To check an input pattern with RegEx, create a RegEx class with the variable name “pattern.” This variable will contain the pattern we want to match.
Similarly, we will create another variable with the name “result” to specify the RegEx string. Below is an implementation of this explanation:
fun main ()
{
  var pattern = Regex("wa");
  var result = pattern.containsMatchIn("Muyiwa");

  println(result);
}
The output is true since “wa” is within the regex string “Muyiwa.”
(Note: This is case sensitive, so, “WA” is different from “wa,” but we can overlook this situation using IGNORE_CASE)

RegexOption (IGNORE_CASE)
This section will show you how to check patterns in a string regardless of its case sensitivity. To do this, we will pass RegexOption.IGNORE_CASE as the parameter to the RegEx constructor. Thus, the code will be as below:
fun main ()
{
  var pattern = "WA".toRegex(RegexOption.IGNORE_CASE)
  var result = pattern.containsMatchIn("Muyiwa");

  println(result);
}
There are similar processes between the two (pattern above), with the only difference being if there is a pattern, the code above will recognize it regardless of its case.
Mobile number validation
This project will show you how to validate a mobile number using RegEx. For an easy flow, we’ll put the processes step-by-step. Thus, to get started, follow the below steps accordingly:
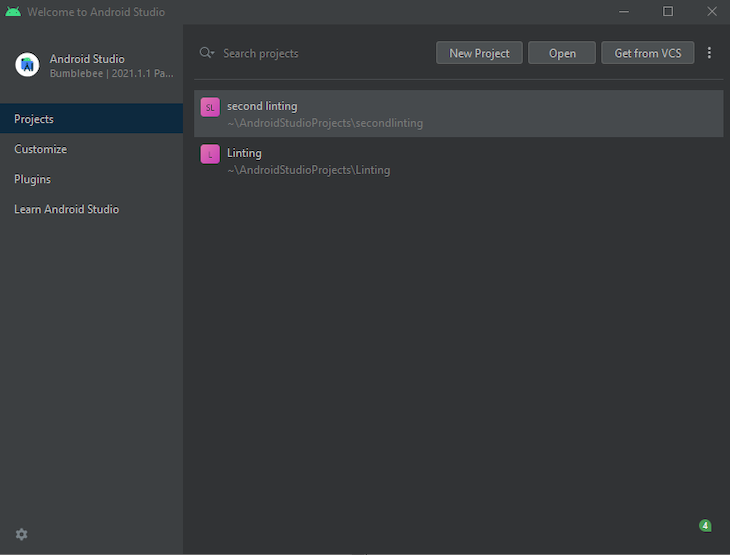
First, start up your android studio and select “New Project”.
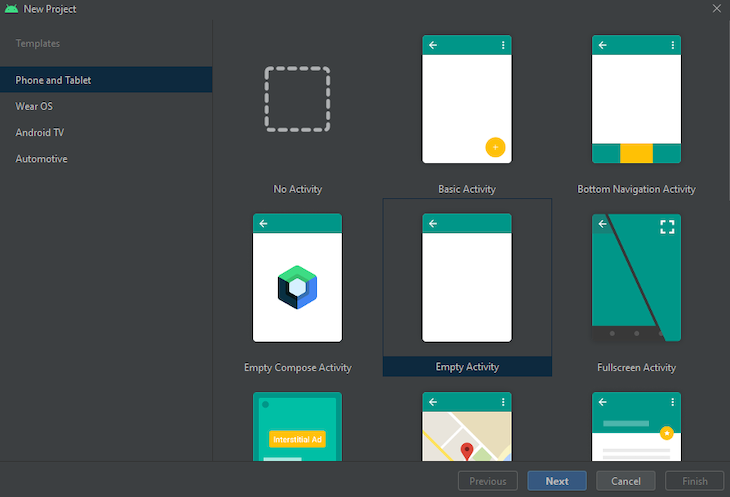
After this, select “Empty Activity” as your project template and click on “Next”.
On this page, use any name of your choice — for this project’s, I have called it “PhoneNumberValidation”. Select the language of your choice (Kotlin) and click on “Finish”.
Let’s give a quick rundown of what we want to do — we want to create a simple button and “Edit text” area. In this process, we want the button enabled once a user enters a valid phone number, and if it is an invalid phone number, the message displayed should be “Invalid phone number.”
Now, we can begin with the design.
First, in your new project, click on activity_main.xml and select “Show System UI” in the design section. Click on the eye icon to find this.
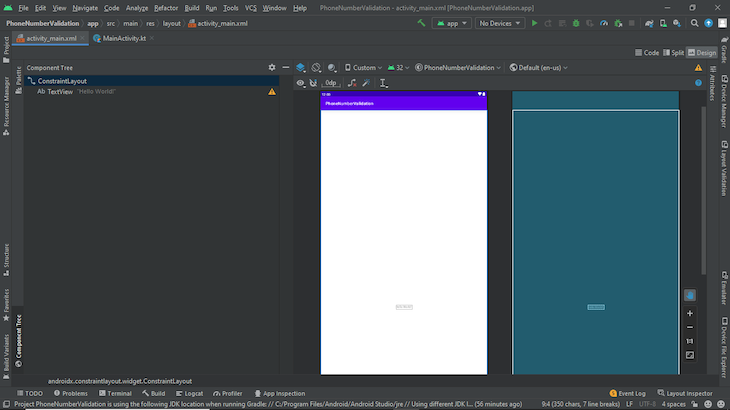
Next, click on “Split” and remove the default textview as we do not want it in that position. Click on the palette, then select “Text” and drag and drop the phone text into the system UI (click on the wand icon to add the constraint to the EditText).
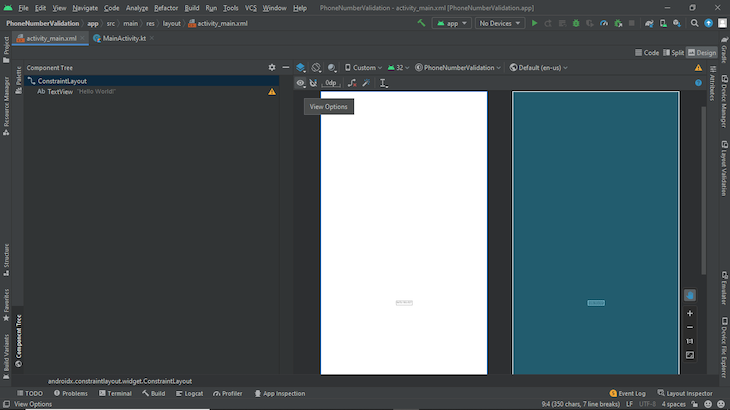
Add a hint to EditText with the text “Enter Phone Number”. For more straightforward reasons, we will change the ID to edit. Thus our EditText listener will look like this:
(Note: It is up to you if you want to change the default ID in EditText)
Next, we will need a button. To do this, we will follow a similar process to how we added the text area, with the difference being we are adding a button instead. In this case, we need the button to be disabled; thus, we set the enabled property as “false”.
android:enabled="false"
So, the code for the button will be as below:
<Button
  android:id="@+id/button2"
  android:layout_width="wrap_content"
  android:layout_height="wrap_content"
  android:layout_marginTop="6dp"
  android:text="Button"
  android:enabled="false"
  app:layout_constraintEnd_toEndOf="parent"
  app:layout_constraintStart_toStartOf="parent"
  app:layout_constraintTop_toBottomOf="@+id/edit" />
Binding Kotlin to XML
Before proceeding, we will need to bind our Android view with Kotlin. In the past, performing this operation was fairly easy using Kotlin synthetics.
All you have to do is add the following plugin to build.gradle(:app) and call the view by their ID in the Kotlin file:
id 'kotlin-android'
id 'kotlin-android-extensions'
But, this has become deprecated and is not contained in new Android Studio projects by default.
The problem with Kotlin synthetics was even though we could call these views by their ID, all of this could potentially be null; meaning we could access views that do not belong to the layout.
On the other hand, view binding breaks that gap because it ensures that the views accessed in an activity or fragment are not null. Thus, there is no way a null pointer exception can occur.
(Note: Data binding is an alternative to view binding, but view binding happens to be simpler, and view binding will only bind your views)
Here is a step-by-step method on how to use view binding on your views:
First, head on to your build.gradle(:app), because you have to explicitly enable that you want to use view binding in your project.
In the Android block, add the new block below to it and sync your Gradle file:
buildFeatures {
  viewBinding true
}
Head to the MainActivity.kt file. In there, we want to reference the EditText.
View binding generates a binding class used in accessing our views. So, we will create a private lateinit var called binding with type ActivityMainBinding (this is the class view binding generated for us).
Basically, for every XML file in our project, view binding will do that, and we do not need to rebuild our project since annotation processing isn’t required.
Now that we have binding, to initialize it, we will use the code below:
binding = ActivityMainBinding.inflate(layoutInflater)
layoutInflater basically adds views from one group to another. Finally, we will set the content view to binding.root using the code below:
setContentView(binding.root)
Now to have access to the view, use the code binding.id (ID of the views). Now we are good to go.
We want the button to be enabled once the user enters a valid mobile number. To do this, head to the MainActivity.kt file. We will need to write the code for the key pressed. Below is the Kotlin code required for the entire process:
package com.example.phonenumbervalidation

import androidx.appcompat.app.AppCompatActivity
import android.os.Bundle
import android.text.Editable
import android.text.TextWatcher
import com.example.phonenumbervalidation.databinding.ActivityMainBinding
import java.util.regex.Pattern

class MainActivity : AppCompatActivity() {

  private lateinit var binding: ActivityMainBinding

  override fun onCreate(savedInstanceState: Bundle?) {
    super.onCreate(savedInstanceState)
    binding = ActivityMainBinding.inflate(layoutInflater)
    setContentView(binding.root)
// beginning
    binding.edit.addTextChangedListener(object:TextWatcher{
      override fun beforeTextChanged(p0: CharSequence?, p1: Int, p2: Int, p3: Int) {
      }

      override fun onTextChanged(p0: CharSequence?, p1: Int, p2: Int, p3: Int) {
        if (mobileValidate(binding.edit.text.toString()))
          binding.button2.isEnabled=true
        else{
          binding.button2.isEnabled=false
          binding.edit.setError("Invalid Phone number")
        }
      }

      override fun afterTextChanged(p0: Editable?) {
      }
    })
  }

  private fun mobileValidate(text: String?): Boolean {
    val p = Pattern.compile("\[0\][7-9]\[0-1\][0-9]{8}")
    val m = p.matcher(text)
    return m.matches()
  }
}
Explaining the code snippet
TextWatcher monitors the changes made to the EditText using any of its three callback methods:
beforeTextChangedonTextChangedafterTextChanged
Here is a link to a resource if you want to learn about these methods. In onTextChanged, we create an if statement to check for the mobileValidate function with the argument binding.edit.text.toString().
Initially, doing this will throw an error as we do not have a function called mobileValidate, so press Alt+Enter to automatically create a function in MainActivity. Change the argument from Editable to String since you want the input as a string.
In the mobileValidate function, we want our text to match a certain pattern: a standard Nigerian phone number (usually 070, 080, 081, 090, 091, and a total of 11 digits).
Thus, we compile a pattern for four different intervals, with the first three having only one combination, and split the last interval into eight combinations of 0-9 intervals. So, basically, any digit outside of each interval will flag the number as invalid, and the button will remain disabled.
Next, we will declare our matcher instance using the p.matcher() function. Then, we will parse the input in our matcher function and return m.matches(). The result returns true if our input matches the pattern and the button is enabled — and false if there is no match.
Back in the if statement, the button should be enabled if the condition of the button remains true. We also have an else statement in case the condition changes to false. We set an error message to throw in a notification that “The number is invalid.”
After this, you can run the app in your desired emulator to test it out.
Conclusion
RegEx’s versatility makes it an essential tool in numerous programming languages, and its ability to check for patterns has made it an efficient tool for validation.
Its advantages in terms of versatility also come with multiple disadvantages: its complex syntax, for one, which makes RegEx somewhat difficult for even veteran programmers.
Nonetheless, it is absolutely advantageous having the knowledge of ReGex in your repertoire, because one day, it will come in handy as long as you are in the development space!
The post A guide to regular expressions in Kotlin appeared first on LogRocket Blog.
from LogRocket Blog https://ift.tt/gBni4zA
via Read more


