


In modern web development, we often need an authentication solution to store user information and limit access to certain features and resources. Developing such a solution from scratch involves a lot of time and resources. There are also many concerns related to such a task, including security and data storage.
Luckily, there are ready-made solutions that help us with the authentication process, such as Auth0, AWS Cognito, Firebase, or Azure AD B2C. Choosing the right solution depends on your project’s requirements and limitations, such as developer experience or available budget.
In this article, we are going to go over the steps that a frontend developer must perform to integrate a React app with msal-react, the Azure AD B2C authentication service. We will cover:
All the code snippets will be written using TypeScript.
What is Azure AD B2C?
Azure AD is built on the same technology as Azure Active Directory (Azure AD), but is a separate business-to-client (B2C) service. It was developed by Microsoft, which provides an easy-to-scale and secure solution for all the authentication needs of an app.
This solution offers support for email-based authentication, accounts for a workplace, school, or any other organization, and social login providers such as Google, Facebook, Linkedin, and others.
There are some obvious advantages to choosing Azure AD B2C. For instance, you ensure that the user data is safely stored, the system is secure and not exposed to threats, and that monitoring of the system is provided within the same ecosystem.
In addition, according to the official docs, AzureAD supports millions of users and billions of authentications on a daily basis. These are arguably impressive numbers that cannot be easily achieved otherwise.
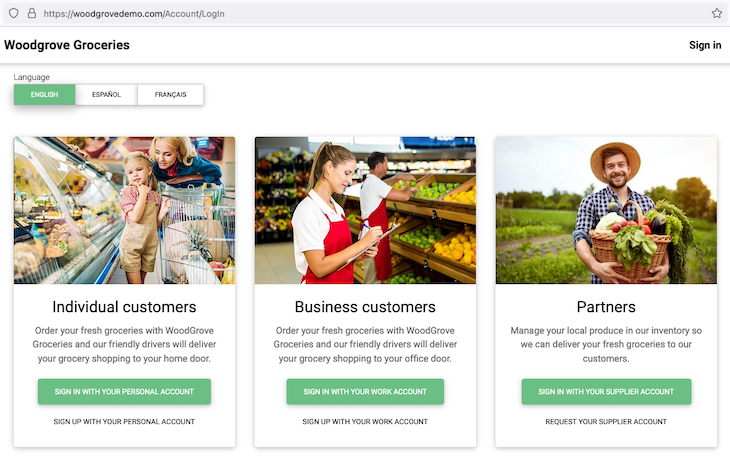
Microsoft offers a live demo website where you can try out the AzureAD authentication, including seeing the types of authentication that it has to offer:
In the following sections, we are going to take a look at the official msal-react library created by Azure specifically for enabling JWT token retrieval in React web apps. All the code snippets that we will look at use TypeScript, but you can use them easily in JavaScript with no problems.
Integrating msal-react in your project
The msal-react library available through Azure AD B2C is meant to be used in single-page applications developed with React.
Integrating this library assumes that you have pre-existing experience with developing web apps using React. You must also have set up a project and successfully integrated the authentication service on your backend.
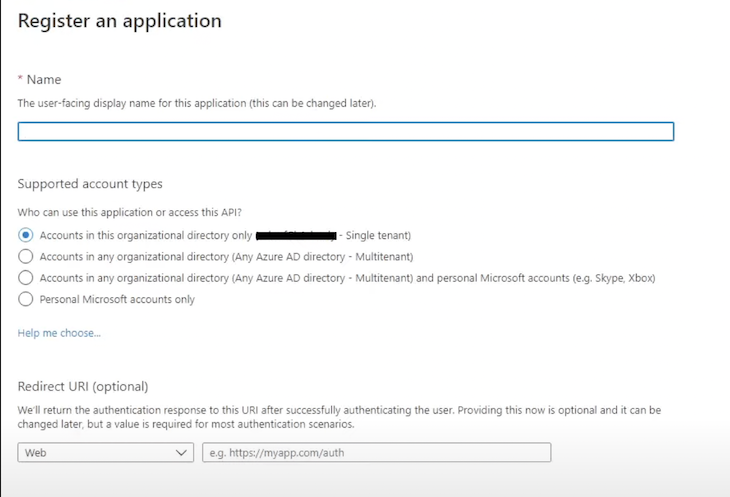
In addition to this, the frontend app must be registered in the AzureAD portal. Microsoft provides a tutorial that covers the steps for this process. This is in the scope of the backend part of the work.
The screenshot below is what you will see when you will head over to portal.azure.com, into Azure Active Directory, then over to App Registrations, and select the “New Registration” option. For the purpose of this tutorial, you can go with http://localhost:3000 as the redirect URL:
After completing these steps, you can start integrating msal-react in your frontend app.
Adding the msal-react and msal-browser packages
To use this package, we first need to add two packages to our project.
The first package — @azure/msal-react — is the library itself. The second package — @azure/msal-browser — is a peer dependency that allows your app to authenticate without using a backend server.
Run the following command:
npm install @azure/msal-react @azure/msal-browser
The command above will install the corresponding packages to our project.
Wrapping the app in the MsalProvider component
Now we are going to add the necessary code to our project. This library makes use of the Context API. Thus, we need to wrap our app in the MsalProvider component like this:
<MsalProvider instance={pca}>
       <App />
</MsalProvider>
By using this wrapper, we enable everything in our app to use the authentication result. For example, we are going to need this information when building our router to limit access to some places of the app only to authenticated users.
Initializing the public client application
In the snippet above, you may have noticed the instance prop that is needed for MsalProvider. This prop expects an object of type PublicClientApplication.
This object from the library enables us to obtain the JWT token that tells us a user is indeed authenticated. It offers certain APIs for obtaining and retrieving authentication tokens for our SPA.
To initialize the public client application object (pca), we need to pass in a configuration file. This configuration provides some information that is unique to our Azure app, thus letting the pca know where it will connect to in AzureAD to authenticate our users. Let’s see how to obtain this configuration file.
The configuration file can contain several fields. Note that in order to access those fields, you must have completed the steps that we mentioned in the prerequisites section. Those steps register our web app in the Azure portal.
Out of the fields in the configuration file, we will look over the following:
- Client ID — mandatory
- Authority — optional
- Redirect URI — optional
The clientId field
The clientId field uniquely identifies our specific app on the platform. For this first field, you will need to go into the Azure portal and navigate to the Overview page of your Azure app.
The authority field
The authority field is obtained by concatenating the identity provider instance URL and the target audience for the app. Let’s unwrap this a bit before moving forward.
The identity instance refers to the cloud instance that will be used for signing users in. There are two types of instances — public cloud and national cloud.
The msal-react package will default to Azure public cloud instances if no explicit instance is specified, since this covers most use cases. The URL you should use is as follows:
https://login.onmicrosoftonline.com
National cloud instances are isolated Azure instances limited to a specific country or region to comply with certain data regulation or local rules — for example, if the user data should not be stored outside of the said country or region. You can obtain the appropriate URL for your use case in the Microsoft docs.
To specify the audience in the authority field, use the domain name associated with your Azure AD instance for single-tenant applications. For the global instance common case, you would simply use /common.
After appending the audience to the identity instance, the resulting string gives you the contents of the authority field. For example, an authority for a common instance would be:
https://login.microsoftonline.com/common
For a single-tenant app with a custom domain, the authority would be:
https://login.microsoftonline.com/example.com
The redirectUri field
Finally, the redirectUri field is pretty self-explanatory. Since the authentication process takes place outside of our web app, we need to tell the identity provider where the user will be taken in our web app after a successful authentication.
For example, let’s say the user starts from the /signIn page before going into the identity provider and logging in successfully. We may want to redirect them to the /home page afterwards rather than sending them back to the sign up page.
Other considerations when dealing with the configuration object
As mentioned above, msal-react assumes the common tenant by default. In this case, you will only need to specify the clientId in your configuration object.
If you are dealing with a single-tenant app, on the other hand, you need to also provide the authority field, which will include the audience specification — also called the tenant ID. The authority field will then look like this:
'https://login.microsoftonline.com/{your_tenant_id}'
If you also opted for a separate authority or identity server, you will additionally need to provide the knownAuthorities array. For example, let’s say you have the following authority field:
'https://login.microsoftonline.com/{tenant_id}'
In that case, the knownAuthorities field would be ["login.microsoftonline.com"]. You can also check out the library docs for more information on the authority field.
Example configuration
Below is an example configuration. This example assumes that you are using the common cloud instance and that you want to redirect the user to a route we have defined called root after successfully authenticating:
import { Configuration } from '@azure/msal-browser';

export const msalConfig: Configuration = {
  auth: {
    clientId:  "11111111-1111-1111-111111111111",
    authority: "https://login.microsoftonline.com/common"
    redirectUri: "/root",
  }
}
In the example above, root corresponds to a page that checks whether or not the user is logged in and then redirects the user accordingly. We will look at an example for this behavior later in the article.
If you were to use login.live.com as an authority, then your config would look like this:
export const msalConfig: Configuration = {
    auth: {
        clientId: "11111111-1111-1111-111111111111",
        authority: 'https://login.live.com',
        knownAuthorities: ["login.live.com"]
    }
};
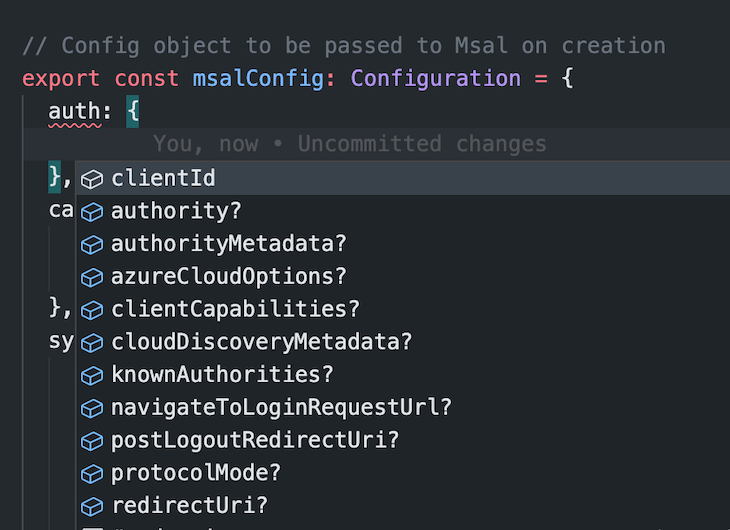
These examples assume that you are also using TypeScript in your project. Using vanilla JavaScript is not a problem, but using TypeScript and specifying the Configuration type for this object will help you see the fields available to add to your configuration. You can see this in the screenshot below:
The backend team will help you decide what fields are necessary for the configuration, so don’t worry if some pieces seem unclear.
As frontend developers, we might not even have access to the Azure portal. What we must do, however, is to do our best to understand what each field does and ensure that the authentication flow is handled properly in our app.
This takes us to the next step: ensuring that some parts of our app are only available to authenticated users.
Using AuthenticatedTemplate and UnauthenticatedTemplate
The msal-react library offers two components that make controlling the access to resources very easy in a React app. The names are fairly self-explanatory, but let’s go over them now.
You will use AuthenticatedTemplate to wrap the parts of our app that limit access to authenticated users only. Likewise, you will use UnauthenticatedTemplate for whatever is available to everyone.
In the following example, we want only authenticated users to access the Home component, whereas everyone can go to the Login component:
<AuthenticatedTemplate>
    <Home />
</AuthenticatedTemplate>
<UnauthenticatedTemplate>
    <Login />
</UnauthenticatedTemplate>
Initializing the authentication flow
After configuring msal-react, we need to initialize the authentication flow. In order to do this we will need the MSAL instance. We can acquire it using the useMsal hook.
We can initialize the authentication in two ways — either in a popup or by using a redirect. You can opt for the popup method when you would rather keep the user inside of the app, thus preserving the current state.
However, your users might have popup blockers that prevent them from entering the authentication flow smoothly. Also, the popup method is known to have issues in Internet Explorer, thus making the redirect option preferable.
In the following example, we are going to take a look at the redirect approach, since it fits the configurations and the previous examples. See the code:
import { useMsal } from '@azure/msal-react';

const LoginPage = () => {
  const { instance } = useMsal();

  const initializeSignIn = () => {
    instance.loginRedirect();
  };

  return (
    <>
      <div onClick={initializeSignIn}>Sign in</div>
    </>
  );
};
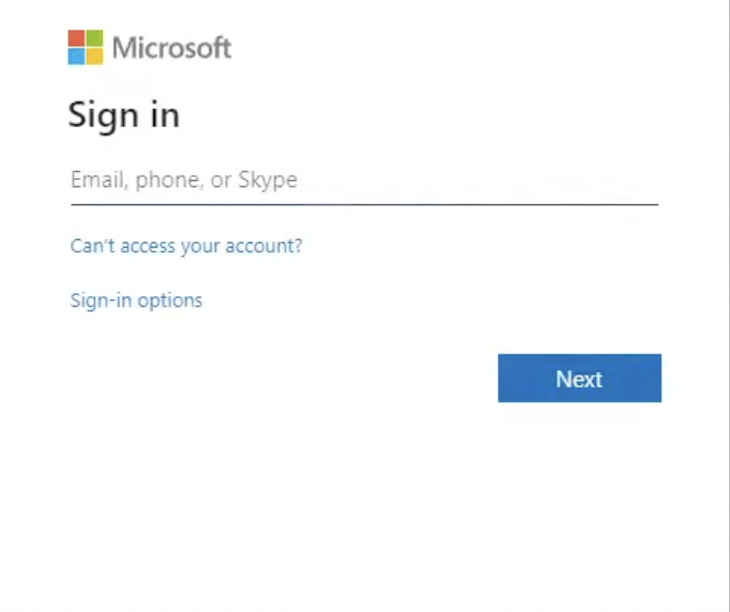
In the above snippet, we allow the user to press on the Sign in text and initialize the login redirect. This will take the user to the Microsoft identity provider, where they will sign in or sign up.
The default identity provider login page will look like the following:
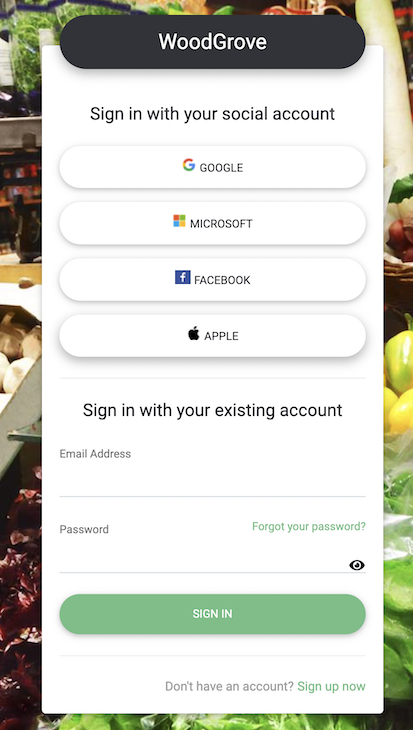
With some tweaks to the default template, you can also customize the look and feel of the identity provider page such that it can capture your brand. Take, for example, the Woodgrove template:
Microsoft has a tutorial on how to pass in scopes to the loginRedirect method for the APIs that the user must consent to when authenticating.
Handling user signout
We have a different method in the MSAL instance to handle when a user logs out. Simply call instance.logoutRedirect() to clear the browser cache. The user will be navigated into the identity provider, and then back into the app.
The default post-logout redirect location is the page where the user initialized the redirect, so you should also configure a postLogoutRedirectUri in your config object.
Building on the code snippet above, simply add the code below to redirect the user after logging out:
instance.logoutRedirect();
Putting everything together
This is what a complete example would look like based on what we have configured:
import React from "react";
import { MsalProvider } from "@azure/msal-react";
import { Configuration,  PublicClientApplication } from "@azure/msal-browser";

import App from "./App";

const msalConfiguration: Configuration = {
    auth: {
        clientId: "client_id" // the only mandatory field in this object, uniquely identifies your app
        // here you'll add the other fields that you might need based on the Azure portal settings
    }
};

const pca = new PublicClientApplication(configuration);

const AppWithAuthentication = () => (
    <MsalProvider instance={pca}>
        <App />
    </MsalProvider>
);

ReactDOM.render(<AppWithAuthentication />, document.getElementById("root"));
Your App file will look like this:
import React from "react";
import { AuthenticatedTemplate, UnauthenticatedTemplate } from '@azure/msal-react';
// ...imports for Home and Login components

const App = () => {
      return (
<AuthenticatedTemplate>
    <Home />
</AuthenticatedTemplate>
<UnauthenticatedTemplate>
    <Login />
</UnauthenticatedTemplate>
      );
}
The app has two main sections: Login and Home. The Login component is public, while the Home component is visible only to users who are logged in.
In the Home component, you will probably use the logoutRedirect method, while in the Login component, you will use the loginRedirect method. You will also probably communicate with the backend in the Home component.
The authentication templates add an additional layer of security for the backend APIs, which are only accessible if the request has a JWT token attached. The unauthenticated user cannot even reach the protected pages, let alone attempt to communicate with the backend.
The steps above are enough for integrating the msal-react library and making the authentication process work in your app. However, let us look at one more interesting concept that this has to offer.
Using msal-react hooks
The msal-react library also offers some hooks that can help you solve specific tasks. We used the useMsal hook earlier, but let’s look at some more detailed use cases for this and the useIsAuthenticated hook.
The useIsAuthenticated hook
Let’s consider a case in which you have a component that is shown both in the authenticated and unauthenticated parts of your app — for example, a Drawer. The drawer’s content will depend on user authentication state.
The drawer may contain fewer options for the unauthenticated user, such as a link to About Us and Contact pages. In comparison, the authenticated user will find some additional options here, such as a Logout button and a link to their profile page.
How should we tackle this?
For this particular case, we can make use of the useIsAuthenticated hook. It returns a boolean whose value is true if the user is logged in and false if they are not.
In our hypothetical Drawer, the code could look like this:
import React from 'react';
import { useIsAuthenticated } from '@azure/msal-react';

const Drawer = () => {
       const isAuthenticated = useIsAuthenticated();

       const renderAuthenticatedContent = () => {
          // ...return component
       }

       const renderUnauthenticatedContent = () => {
          // ...return component
       }

       return isAuthenticated ? renderAuthenticatedContent() : renderUnauthenticatedContent();
}
Now you can safely use this Drawer both in the Login component and in the Home component. No need to duplicate any code, and no need to store any authentication tokens in your local app state manually — msal-react takes care of this for us.
The useMsal hook
Let’s consider a new situation in which you would like to show a progress indicator in your app while the library checks if the user is authenticated — and, perhaps, is trying to retrieve an authentication token silently.
For this case, we can use the useMsal hook. It returns three objects:
- The
msal-reactPublic Client Application (pca) instance - The list of accounts that are currently signed in
- Whether or not authentication or another action is in progress
Take a look at the following snippet:
import { useMsal } from "@azure/msal-react";
// ...import for the custom LoadingIndicator and PageContent components

const LandingPage = () => {
      const { inProgress } = useMsal();

      return inProgress ? <LoadingIndicator /> : <PageContent />;
}
As you can see, we retrieved the inProgress status using the useMsal hook. We also displayed a loading indicator while authentication is in progress.
Alternative to AuthenticatedTemplate and UnauthenticatedTemplate
If you choose not to use the AuthenticatedTemplate and UnauthenticatedTemplate components, you could use the useIsAuthenticated hook with the useEffect React Hook to redirect the user to a specific place in the app based on their authentication status.
See the code below:
const isAuthenticated = useIsAuthenticated();

useEffect(() => {
   if (isAuthenticated) {
      // go to an authenticated-only place
   } else {
     // go back to the public landing page where the user can try to login again
   }
}, [isAuthenticated]);
The above snippet could be useful in, for instance, the component that handles the main router switch of your app — the first place that a user visits when accessing your web app.
In the brief moments that msal-react will need to check what to do with the user, you’ll be able to show a loading indicator using the logic from the previous section on the useMsal hook. You can then handle a redirect for the user based on the authentication result of the msal-react library.
Conclusion
In this article, we reviewed using msal-react for Azure AD authentication, public client applications, how to get the configuration file for our frontend app, and how to integrate the msal-react library in our React app such that users can successfully sign up and authenticate.
We also went over some code and specified what each line of configuration does, pinpointing how the templates and the hooks can be useful — and necessary — for good authentication practices in a frontend web application.
Thank you for reading! I hope this article was useful for you and that it cleared up the most important concepts related to msal-react and Azure AD B2C.
The post Using <code>msal-react</code> for React app authentication appeared first on LogRocket Blog.
from LogRocket Blog https://ift.tt/lmIDHa4
Gain $200 in a week
via Read more


