


NestJS is a relatively new JavaScript web framework that enables you to build enterprise-grade, server-side applications. It’s powerful, enforces best practices, and uses the latest JavaScript features. It also has default support for TypeScript and uses TypeORM, a strong object-relations-management library built with TypeScript.
With over 29.3k stars on GitHub, TypeORM is one of the most popular Node.js ORMs. Besides being database agnostic, TypeORM has a unique API that allows you to access data in SQL databases, such as MYSQL and PostgreSQL, and NoSQL databases, like MongoDB, in different ways using Active Record and Data Mapper patterns.
In this piece, we’ll learn how to integrate TypeORM with NestJS, add a database driver, and run basic queries with TypeORM QueryBuilder in NestJS.
To effectively follow along with this article, you should have:
- Node.js v12 LTS or Node >v14 installed on your computer — NVM makes it much easier to switch between different versions of Node.js
- Basic working knowledge of NestJS and JavaScript
Need to brush up on some basics? Check out this practical article on building an ecommerce application with NestJS.
Let’s get started!
Table of contents
- Set up NestJS
- Run basic queries with TypeORM QueryBuilder in NestJS
- Use
JOINin TypeORM Query with NestJS
Setting up NestJS is straightforward, and there are several ways to do so, depending on your needs. However, in this article, we’ll install it with the CLI.
npx @nestjs/cli@9.0.0 new nest-app
This command will scaffold the NestJS “Hello, World!” boilerplate app, so you can dive right in and start coding.
Now that we have NestJS installed, let’s integrate TypeORM into our application. Pay close attention to this section; you’ll need to correctly integrate TypeORM before you can start writing your queries.
Run this command on your terminal to install TypeORM and SQLite3 driver — we’ll be using SQLite in this tutorial to reduce the complexity of installing and setting up MySQL or PostgreSQL databases.
npm install @nestjs/typeorm sqlite3
Generate basic app setup
Next, let’s generate controllers and services for the skeleton of our query application using the NestJS CLI. Run the following command to generate it and choose the REST API transport layer.
npx @nestjs/cli@9.0.0 g resource posts
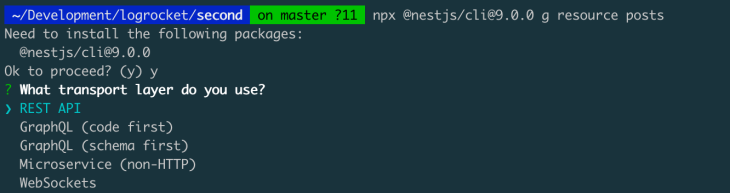
It will ask if you want to generate CRUD entry points. Select Yes. It will take a little while to generate everything for you, but that’s one of the helpful aspects of NestJS.
Your directory structure should now look like this:
.
├── README.md
├── dist
├── nest-cli.json
├── package-lock.json
├── package.json
├── src
│   ├── app.controller.spec.ts
│   ├── app.controller.ts
│   ├── app.module.ts
│   ├── app.service.ts
│   ├── main.ts
│   └── posts
│       ├── dto
│       │   ├── create-post.dto.ts
│       │   └── update-post.dto.ts
│       ├── entities
│       │   └── post.entity.ts
│       ├── posts.controller.spec.ts
│       ├── posts.controller.ts
│       ├── posts.module.ts
│       ├── posts.service.spec.ts
│       └── posts.service.ts
├── test
├── tsconfig.build.json
├── tsconfig.json
└── yarn.lock
Configure TypeORM with SQLite
Now, let’s configure TypeORM in the src/app.module.ts file.
Initially, it’ll look like this:
// src/app.module.ts
import { Module } from '@nestjs/common';
import { AppController } from './app.controller';
import { AppService } from './app.service';
import { PostsModule } from './posts/posts.module';
@Module({
  imports: [PostsModule],
  controllers: [AppController],
  providers: [AppService],
})
export class AppModule {}
Import SQLite connection options, the TypeORM module, and the post entity, as shown in the code below:
// src/app.module.ts
import { Module } from '@nestjs/common';
import { TypeOrmModule } from '@nestjs/typeorm';
import { SqliteConnectionOptions } from 'typeorm/driver/sqlite/SqliteConnectionOptions';
import { AppController } from './app.controller';
import { AppService } from './app.service';
import { Post } from './posts/entities/post.entity';
import { PostsModule } from './posts/posts.module';

const config: SqliteConnectionOptions = {
  type: "sqlite",
  database: "../db",
  entities: [Post],
  synchronize: true
}

@Module({
  imports: [PostsModule, TypeOrmModule.forRoot(config)],
  controllers: [AppController],
  providers: [AppService],
})
export class AppModule {}
Now, let’s work through the update we just added. First, looking at the shape of the config object, we added the database and the entities and synchronized the database. However, it’s important to remember that synchronizing the database is not something you should do in a production environment, as it might result in loss of data.
// the config
const config: SqliteConnectionOptions = {
  type: "sqlite",
  database: "../db",
  entities: [Post],
  synchronize: true // set to false on production
}
Because we are using the SQLite database, we can quickly add the path to the database with "../db",. If it does not exist, it will automatically be created for you. For MySQL or PostgreSQL, the shapes are different, so check out the docs to learn more.
Create database entities
The entities are the database models and, in our case, our Post entity has an ID and a title, as shown in the code below:
// src/post/entities/post.entity.ts
import { Column, Entity, PrimaryGeneratedColumn } from "typeorm";
@Entity()
export class Post {
    @PrimaryGeneratedColumn()
    id: number;
    @Column()
    title: string;
}
Finally, on the general app TypeORM setup, let’s hook the TypeORM config with NestJS. Note the .forRoot method because you might see something similar when setting up the feature-level configuration.
imports: [PostsModule, TypeOrmModule.forRoot(config)],
Here, we have TypeORM hooked with NestJS. Next, let’s integrate our Post feature with the ORM.
Navigate to the src/posts/posts.module.ts file and update it with the following configuration:
// src/posts/posts.module.ts
import { Module } from '@nestjs/common';
import { PostsService } from './posts.service';
import { PostsController } from './posts.controller';
@Module({
  controllers: [PostsController],
  providers: [PostsService]
})
export class PostsModule {}
Next, import TypeORM, the Post entity, and update the code by setting the value of the module imports with [TypeOrmModule.forFeature([Post])]. Please note that we’re using forFeature and passing in an array of entities as opposed to the app-level module configuration.
import { Module } from '@nestjs/common';
import { PostsService } from './posts.service';
import { PostsController } from './posts.controller';
import { TypeOrmModule } from '@nestjs/typeorm';
import { Post } from './entities/post.entity';
@Module({
  imports: [TypeOrmModule.forFeature([Post])],
  controllers: [PostsController],
  providers: [PostsService]
})
export class PostsModule {}
Run basic queries with TypeORM QueryBuilder in NestJS
There are several ways to access the database using TypeORM and NestJS, including using the Repository API, the Entity Manager API, and by using the DataSource API.
Below is a quick example of how to get an item by ID using the APIs mentioned above. I’ve removed most of the code that isn’t relevant for this example, but you can find the complete code on GitHub.
//src/posts/posts.service.ts

@Injectable()
export class PostsService {

  constructor(
    @InjectRepository(Post) private postRepository: Repository<Post>,
    @InjectEntityManager() private postManager: EntityManager,
    @InjectDataSource() private dataSource: DataSource
  ) { }

  async findOne(id: number) {

    const postWithRepository = await this.postRepository.findOneBy({ id });

    const postWithRepositoryQueryBuilder = await this.postRepository
      .createQueryBuilder("post")
      .where("post.id= :postId", { postId: id })
      .getOne()

    const postWithEntityManager = await this.postManager
      .createQueryBuilder(Post, "post")
      .where("post.id= :postId", { postId: id })
      .getOne()

    const postWithDataSource = await this.dataSource
      .createQueryBuilder()
      .select("post")
      .from(Post, "post")
      .where("post.id= :postId", { postId: id })
      .getOne()

    return {
      postWithRepository,
      postWithRepositoryQueryBuilder,
      postWithEntityManager,
      postWithDataSource
    };
  }

}
As you can see, we initialized the data access layers in the constructor and then used them inside the methods.
//src/posts/posts.service.ts
...
constructor(
    @InjectRepository(Post) private postRepository: Repository<Post>,
  ) { }
...
Aside from this, the rest of the code is just vanilla TypeORM queries; you can explore deeper into TypeORM by looking at their documentation.
All the queries in the above code will return the same result. So, there are several ways to achieve one goal, but which method is the most efficient?
When working with small datasets, the two methods perform similarly. However, I found that the QueryBuilder API was more efficient than the repository queries when working with larger datasets with several relations. I believe this is because the QueryBuilder API is relatively closer to the raw SQL queries than the Repository API.
Using JOIN queries in TypeORM with NestJS
If you’ve written an SQL Query that involves accessing data from multiple tables with SQL, chances are that you’ve written a JOIN query before. JOIN queries allow you to query data from multiple tables at once. Let’s look at a LEFT JOIN operation in TypeORM. This type of query will return all rows from a left table and matching rows from a right table.
There are several ways to perform a LEFT JOIN operation in TypeORM. Let’s examine some of them:
- Using
findoptions - Using the QueryBuilder
Even though our focus is on using the QueryBuilder, I’ll show you an example that uses both options so that you can see the differences between the two.
Let’s look at this SQL LEFT JOIN operation below. We’ll convert it to use the find option and the QueryBuilder method of TypeORM.
SELECT * FROM "user"
LEFT JOIN "courses" "course" ON "course"."id" = "user"."courseId"
WHERE "course"."name" = 'JavaScript Fundamentals' AND "course"."length" = '8 hours'
Using find in TypeORM
userRepository.find({
    relations: { course: true },
    where: {
        course: { name: "JavaScript Fundamentals", length: "8 hours" },
    },
})
The code above is a LEFT JOIN query using the TypeORM find option. Fortunately, it’s simple because TypeORM figures out the best JOIN for you and gives you the appropriate result. Now, let’s implement the above query with the TypeORM QueryBuilder.
Using the QueryBuilder for JOIN
const user = this.userManager
      .createQueryBuilder(User, "user")
      .leftJoin("course"."id", "course")
      .where("course.name = :name", { name: "JavaScript Fundamentals" })
      .andWhere("course.length = :length", { length: "8 hours" })
When using the QueryBuilder, you also have options for different types of JOINS, unlike the find option, which does everything under the hood.
Here are some additional JOINS that are available in TypeORM.
Conclusion
If you’re looking to build a solid backend quickly without compromising quality, consider using with TypeORM. In this article, we learned how to integrate and use TypeORM QueryBuilder with NestJS, but we’ve only scratched the surface of what you can do with TypeORM. Check out the TypeORM documentation to learn more.
Happy hacking!
The post Using TypeORM’s QueryBuilder in NestJS appeared first on LogRocket Blog.
from LogRocket Blog https://ift.tt/vaJ1RIi
Gain $200 in a week
via Read more


