


NestJS is a web framework built exclusively in TypeScript. Most experienced developers will recognize something familiar in NestJS; it’s a strong, object-oriented programming model, and its syntax is very similar to another framework, Angular.
NestJS code often forces you to create an optimal design pattern. Developers transitioning to Node.js and TypeScript from a Java or ASP.NET background will quickly appreciate how NestJS is structured. Concepts like dependency injection, encapsulation, classes, and class annotations or decorators are all available in NestJS.
In NestJS, creating a custom module to reuse is quite simple and is, above all, encouraged. Encapsulating a module into small, reusable chunks will help to increase the development speed of a NestJS application. And, if you decide to release those modules into the wild as open source packages, you’ll get some brownie points.
In this article, we’ll explore modules in NestJS, creating our own basic, configurable module. To follow along, you can access the full code on GitHub. Let’s get started!
- What is a NestJS module?
- NestJS module state management
- Preventing data racing conditions when using singletons
- Injection scopes of modules in NestJS
- Dynamic modules in NestJS
- Architecting a basic configurable NestJS module
- How to create a basic configurable NestJS module
What is a NestJS module?
A module is a set of code encapsulated to be injected into a NestJS application. You can use modules to create custom services that are meant to perform specific tasks. For example, TypeORM is a TypeScript-based ORM. The NestJS team created a module that will inject an open database connection, allowing for database commands and queries from the injected module.
NestJS modules are the backbone of the framework’s robust dependency injection mechanism. Dependency injection is an application development pattern that aims to decouple the dependencies between two classes or modules.
Instead of having strictly defined dependencies for each class, you can use an interface to specify a sort of contract of how your dependency should behave while having no literal definition of how it should run. Finally, a decoupled architecture allows for versatile applications and creates a plug-and-play behavior for each module in the application.
NestJS module state management
By default, NestJS modules are singletons, meaning you only need to initiate a module once. While creating singletons for every module can seem excessive from an engineering point of view, NestJS initializes singletons on a component level.
Module scopes in NestJS
In NestJS, there are three injection scopes of modules:
- Request-level modules
- Component-level modules or transient modules
- Shared application-level modules
By default, most NestJS modules are application-level modules, also known as globally shared modules. But, not every module can be a global module. Some of them need to remain transient or request-level modules.
For example, if you need an application-level, read-only module, your best bet is to use globally shared modules. Data stored within the module won’t change often, so it can be deferred as an application-level singleton to conserve memory and create a globally accessible class. Modules with the @Global decorator remove redundancy in both code and component levels since you don’t need to reinitialize the module.
To better understand state preservation on a modular level, if you have a constant within a module with either a transient or request scope, it will be an immutable variable until the module destroys it on garbage collection. However, when using a global module spanning the entire application, it will be destroyed only at the end of an application’s lifetime.
Preventing data racing conditions when using singletons
Another thing to be cautious about when using singletons is the data race problem. Node.js is not immune to data racing conditions, and neither is NestJS.
Data race conditions occur when two separate processes try to update the same block of data simultaneously. Because the objects are accessible globally, simultaneous data execution may result in lost data points on execution.
Best practice for avoiding data race conditions involves creating a global read-only module and being more deliberate on each module’s injection scopes. Global modules are the most susceptible to data race conditions, and using global modules to communicate or manage states between components will result in an anti-pattern.
But, why can’t the same be said of transient component-level modules? At the component level, the encapsulation barriers only extend to the component’s needs. Each transient module provider will have a dedicated instance. The separation of concerns at the component level is usually more granular, making it more predictable than in large-scale applications. The same can be said for the request-level singletons, albeit on a smaller scale.
NestJS modules injection scopes
In summary, there are three injection scopes of modules in NestJS:
- Request-level modules
- Component-level modules: Transient
- Shared application-level modules: Global
Each has its benefits and disadvantages, with data racing being the most common problem for global modules. Most global modules should be read-only, and NestJS will only set the original state once during initialization.
Component-level modules have more nuances. More specifically, you can use them for state management on a smaller scale because of their predictability. The granular encapsulation that singletons provide on a component level makes it a perfect choice for component-level state management.
Keep in mind that the data race condition is only limited to the state of each independent module. Modifying data in external applications like databases should not be a problem since databases have their own data race solution.
Dynamic modules in NestJS
Default NestJS modules are static and are unconfigurable. Configurable model builders are essentially dynamic module factories that can churn out different modules based on the variables passed on initialization.
Before you get started with a configurable module, you need to understand the basics of dynamic modules. Their use cases typically revolve around creating non-static modules that can receive parameters from external APIs to change how the module behaves, specifically, how each module processes data.
For example, let’s imagine that you create a module for querying data from databases, but you don’t want to hardcode it for specific database providers. How do you solve the problem?
First, you need to create a module that has a configuration function. The configuration function will have a database provider interface as a parameter, which has all the essential functions an application needs to connect and query a database. Because you use an interface as a parameter, you can inject different database providers as long as the provider extends the interface.
The underlying business logic will still be the same, but the database providers will change according to the one you supplied on initialization. Therefore, your module will no longer be static and will instead be dynamic. This is essentially why all configurable modules are dynamic modules under the hood.
Architecting a basic configurable NestJS module
As an example, we’ll create a custom NestJS module that reads data from the .env file using the process.env API in the dotenv package. The module will function as a configurable proxy that you can use within your projects:
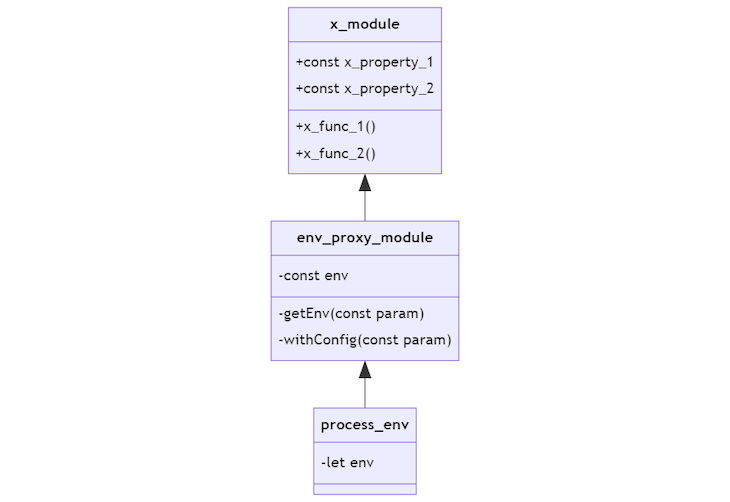
The architecture of the proxy module will seem redundant because you can access the process.env variable directly without dependency injection. But, for the sake of simplicity, you’ll use this architecture to fully grasp how NestJS modules work.
Your proxy module will retrieve the process.env on initialization and store it in its env property. A NestJS module is a singleton by default, so you only need to initialize it once. You can execute the getEnv function to retrieve your env variables. It will function as a getter to the dynamic env property.
You can add a function on initialization to accept parameters and create a dynamic module, making it configurable. In this case, the withConfig function will be the configurable init function.
How to create a basic configurable NestJS module
Install the @nest/cli globally with the command below:
npm i -g @nest/cli
Then, generate a new NestJS app:
nest new configurable-module-builder-examples
You can choose your preferred package manager, but in this tutorial, we’ll mainly use Yarn. You can see the code you generated so far by going to the step-1 branch.
The new NestJS project has all the modules on one level; you need to refactor it before you can continue. Copy the module, controller, and service into a folder called api-modules and rename all the file and variable names from App to Api.
Create a new AppModule file and inject the ApiModule in the imports as follows:
import { Module } from '@nestjs/common';
import { ApiModule } from './api-module/api.module';
@Module({
  imports: [ApiModule],
})
export class AppModule {}
If you’ve failed to follow along, check the step-2 branch in the repository. Now, you can start creating the process.env proxy module. You need the dotenv package to access .env files, so install the dependency by running the command below:
yarn add dotenv
Create a new folder called src/env-proxy-module and create two files, starting with env-proxy.module.ts:
import { Global, Module } from '@nestjs/common';
import { EnvProxyService } from './env-proxy.service';
@Global()
@Module({
  providers: [EnvProxyService],
  exports: [EnvProxyService],
})
export class EnvProxyModule {}
Notice that the @Global decorator is used to automatically inject the module’s exports to any child of the injected component. You don’t have to repeatedly import the EnvProxyModule on every module. Instead, you only need to add it as an import in the main AppModule:
import { EnvProxyModule } from './env-proxy-module/env-proxy.module';
@Module({
  imports: [ApiModule, EnvProxyModule],
})
export class AppModule {}
Then, create the service file, env-proxy.service.ts:
import { Injectable } from '@nestjs/common';
require('dotenv').config(); // eslint-disable-line
@Injectable()
export class EnvProxyService {
  public readonly env: NodeJS.ProcessEnv;
  constructor() {
    this.env = process.env;
  }
}
To test the EnvProxyModule, you can create an .env file with a DATA parameter inside:
DATA=Hello World
Try the module out by returning the environment variable on a GET request:
import { EnvProxyService } from '../env-proxy-module/env-proxy.service';
@Injectable()
export class ApiService {
  constructor(private readonly envProxy: EnvProxyService) {}
  getHello(): string {
    return this.envProxy.env.DATA;
  }
}
Now, run the development server:
yarn start:dev
Open your browser and go to localhost:3000. You should get a “Hello, World!” text in return. You can see the full code for this step in the step-3 branch.
We’ve created a simple module, but it’s not configurable yet. You can use the ConfigurationModuleBuilder to do so. The ConfigurableModuleBuilder is a new feature provided in NestJS v9, and its purpose is to reduce the amount of boilerplate code you need to write to create a configurable dynamic module.
Inside src/env-proxy-module, create a new file called env-proxy.definition.ts:
import { ConfigurableModuleBuilder } from '@nestjs/common';
export interface EnvProxyModuleOptions {
  exclude: string[];
}
export const { ConfigurableModuleClass, MODULE_OPTIONS_TOKEN } =
  new ConfigurableModuleBuilder<EnvProxyModuleOptions>({
    moduleName: 'EnvProxy',
  })
    .build();
The EnvProxyModuleOptions interface represents the object you pass through the config file on initialization. In this case, you’ll pass an array of the environment variables you want to exclude from the module.
Make the EnvProxyModule extend the ConfigurableModuleBuilder as follows:
@Global()
@Module({
  providers: [EnvProxyService],
  exports: [EnvProxyService],
})
export class EnvProxyModule extends ConfigurableModuleClass {}
Continue to the EnvProxyService class and implement the following code:
@Injectable()
export class EnvProxyService {
  public readonly env: NodeJS.ProcessEnv;
  constructor(@Inject(MODULE_OPTIONS_TOKEN) private options: EnvProxyModuleOptions) {
    this.env = process.env;
    options.exclude.forEach(val => {
      delete this.env[val];
    });
  }
}
We retrieve the EnvProxyModuleOptions object from the constructor and the @Inject decorator. Then, we add the main business logic for excluding environment variables to the EnvProxyService constructor. To test it out, you can create a second environment variable called DATA2:
DATA=Hello World
DATA2=Hello World2
On the AppModule imports, add a register function and insert a EnvProxyModuleOptions:
imports: [ApiModule, EnvProxyModule.register({
  exclude: [
    "DATA"
  ]
})],
The module will exclude the DATA variable to check whether or not the exclusion is working. Edit the ApiService as follows:
getHello(): string {
  return this.envProxy.env.DATA ?? this.envProxy.env.DATA2;
}
When you visit localhost:3000, you’ll get Hello World2.
And with that, you’ve created your first configurable module using the configurable module builder! You can check the final codebase here.
If your configuration is more sophisticated than the previous example, you can rely on the factory pattern instead:
import { EnvProxyModule } from './env-proxy-module/env-proxy.module';
@Module({
  imports: [ApiModule, EnvProxyModule.registerAsync({
    useFactory: async () => {
      return {
        exclude: [
          "DATA"
        ]
      }
    }
  })],
})
export class AppModule {}
useFactory allows you to call asynchronous code to help you configure your builder. You can find the final asynchronous example on GitHub.
Summary
NestJS is an object-oriented web framework built in TypeScript. NestJS uses strong object-oriented principles under the hood and offers many functions, including dependency injection, classes, class annotations via decorators, and strong encapsulation.
State management in NestJS varies on the modular level. Most modules’ encapsulation is limited to the component level, while few have global shared states on the application level. All NestJS modules use singletons under the hood. If not made properly, having shared modules that you can use globally can cause data race conditions.
Most shared modules should be read-only, but there are some cases where shared modules are practical, logging and connecting to a message queue. Otherwise, you’ll only need modules on the component level.
Dynamic modules are non-static configurable modules. Essentially, all configurable modules are dynamic. A configurable module uses the factory pattern to create different modules according to the parameters given during initialization.
Writing custom NestJS modules is quite straightforward. You can access the code samples on GitHub, and you can use the different branches to navigate each stage of the project. I hope you enjoyed this article, and leave a comment if you have any questions. Happy coding!
The post How to use configurable module builders in NestJS v9 appeared first on LogRocket Blog.
from LogRocket Blog https://ift.tt/W3zFd9P
Gain $200 in a week
via Read more


