


When building a full-stack application, you’d typically separate your frontend from your backend. In most cases, each of these implementations are written using different frameworks for the frontend and backend services, and are hosted on separate remote servers.
For these services to perform holistic business functionalities, there must be some communication between them, such as in the form of commonly used mechanisms like REST, SOAP, GraphQL, etc.
Flutter is an open-source, cross-platform tool created by Google. It is used to develop interactive, reactive, and adaptive frontend applications (desktop, web, and mobile) that can run on several operating systems using one codebase. Flask is an open-source, beginner-friendly Python framework suitable for building monolithic and microservice backend applications with a lightweight codebase.
Using a basic to-do app, this tutorial will demonstrate how to integrate your frontend Flutter application with a Flask backend service. The application will send HTTP requests from the frontend to the RESTful backend to perform custom operations on a local or remote server.
Jump ahead:
- Prerequisites
- Project overview
- Building the Flask backend service
- Integrating the Flutter app with the Flask service
Prerequisites
- Python ≥ v 3 installed on your machine
- Working knowledge of Flask and Python
- Intermediate-level knowledge of CLIs
- Fundamental knowledge of Flutter and the Flutter SDK installed on your machine
- Working knowledge of building and consuming REST APIs
- Any suitable IDE or text editor. I’ll be using VS Code to build the Flask service and Android Studio for the Flutter app
- Postman API platform for testing the Flask APIs
Project overview
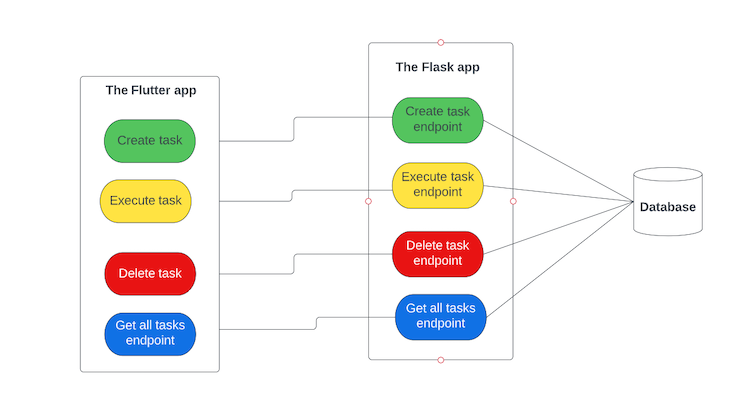
The Flutter app will serve as the frontend component that the user will interact with to create, execute, and delete to-do tasks. At the start of the application, the Flutter app will automatically send an HTTP GET request to the Flask server to fetch all the created tasks stored in the database. For the create, execute, and delete operations, the user will explicitly trigger the requests to the Flask server by clicking their respective buttons.
While features like these can be achieved using only a Flutter app without the need for a backend service, the aim here is to demonstrate how you’d typically perform frontend-backend integrations, using Flutter and Flask as case studies.
The operations performed by the Flask app will interact with the database where the to-do tasks reside. Flask-SQLAlchemy, a library for easily integrating SQLAlchemy with Flask, will manage the database operations. The Flask-Marshmallow and Marshmallow-SQLAlchemy packages will be responsible for serializing and deserializing the Python objects.
The processes involved in this application can be applied to any other full-stack integration, so long as it abides by the REST architecture of building and consuming APIs. That is, you can build your backend service using any other web framework, and expose the endpoints to the Flutter app and vice versa.
Building the Flask backend service
Let’s begin by building the backend service. Run the following commands in your terminal to set up the Flask app:
mkdir flask_todo
cd flask_todo
The first step is to create and activate the virtual environment for the application with the below commands:
pip install pipenv
pipenv shell
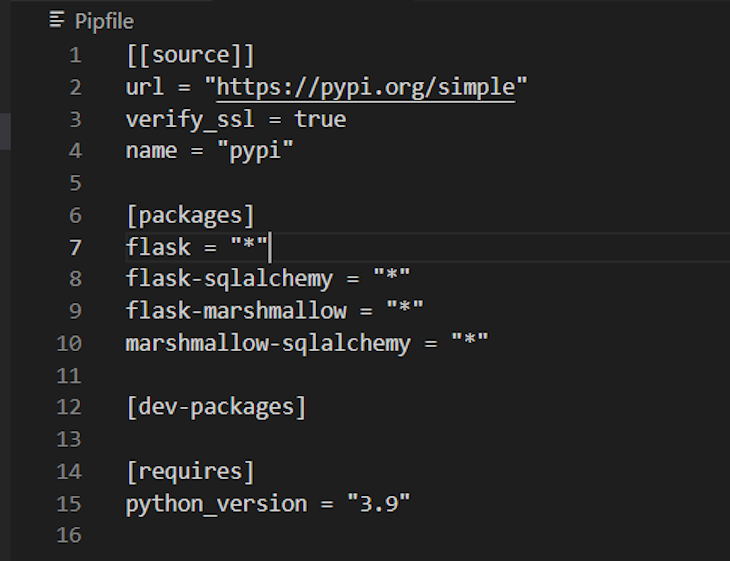
The above commands activate your virtual environment by creating a Pipfile that contains all the packages and dependencies you will install in the application.
Next, install the Flask framework and the dependencies necessary to build and run the application.
pipenv install flask flask-sqlalchemy flask-marshmallow marshmallow-sqlalchemy
After successfully installing the framework and dependencies, your Pipfile should be similar to the below image:
Initialize the Flask app and configure the database
Create a Python file named main.py and add the following code to the code as ordered below:
from flask import Flask, request, jsonify
from flask_sqlalchemy import SQLAlchemy
from flask_marshmallow import Marshmallow
import os

app = Flask(__name__)
basedir = os.path.abspath(os.path.dirname(__file__))

app.config['SQLALCHEMY_DATABASE_URI'] = 'sqlite:///' + os.path.join(basedir, 'db.sqlite')


# suppress SQLALCHEMY_TRACK_MODIFICATIONS warning
app.config['SQLALCHEMY_TRACK_MODIFICATIONS'] = False

db = SQLAlchemy(app)
ma = Marshmallow(app)
The code snippet above sets up and initializes the Flask app and its database configurations. The basedir variable represents the root directory, within which you will create a file with the name db.sqlite. The db and ma variables represent the initialized SQLAlchemy and Marshmallow objects, respectively.
The Todo model and schema
Here is the code snippet for the Todo model, schema creation, and initialization:
class TodoItem(db.Model):
    id = db.Column(db.Integer, primary_key=True)
    name = db.Column(db.String(100))
    is_executed = db.Column(db.Boolean)

    def __init__(self, name, is_executed):
        self.name = name
        self.is_executed = is_executed


# Todo schema
class TodoSchema(ma.Schema):
    class Meta:
        fields = ('id', 'name', 'is_executed')


# Initialize schema
todo_schema = TodoSchema()
todos_schema = TodoSchema(many=True)
Each TodoItem entity has an ID, a name, and an execution status represented by the is_executed property. A task or to-do that has been executed or done will have an is_executed value of True and, if otherwise, False.
At any point in time, you’re either performing an operation on a single TodoItem entity or on multiple entities. The todo_schema handles a single entity, while the todos_schema handles multiple entities as declared using the many=True argument.
Database creation
Open the Python shell by running the python command in your terminal. This will switch the CLI to the Python shell, where you will write the below Python scripts to create the database as shown below:
from main import db
db.create_all()
exit()
from main import db: This imports the SQLAlchemy object initialized with thedbvariable in themain.pyfiledb.create_all(): This creates the SQLite database. You’ll notice adb.sqlitefile with encoded content automatically created in your project root folder after running this methodexit(): Exit the Python shell
Here’s a visual representation of the above process:

Add a To-do API
Create an endpoint for the Flutter application to trigger to add a new to-do task to the database.
@app.route('/todo', methods=['POST'])
def add_todo():
    name = request.json['name']
    is_executed = request.json['is_executed']

    new_todo_item = TodoItem(name, is_executed)
    db.session.add(new_todo_item)
    db.session.commit()

    return todo_schema.jsonify(new_todo_item)
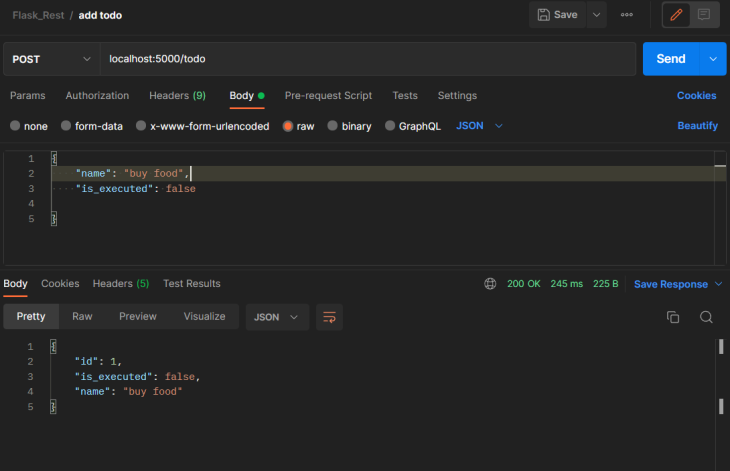
The above endpoint receives a POST request and expects a JSON payload with the name and is_executed keys, as well as their respective values. Using the request package imported from Flask at the top of the main.py file, the values of the name and is_executed keys are extracted into the name and is_executed variables, respectively. Then a new TodoItem object is created and saved to the database. The endpoint returns a JSON object of the newly created entity.
To verify that the endpoint works as expected, add the below to the end of the file:
if __name__ == '__main__':
    app.run(debug=True)
Then run the application from your terminal with the below command:
python main.py
By default, the application will run on port 5000, as shown below:

Proceed to test the endpoint from Postman by sending a POST request to localhost:5000/todo.
Get all To-Dos API
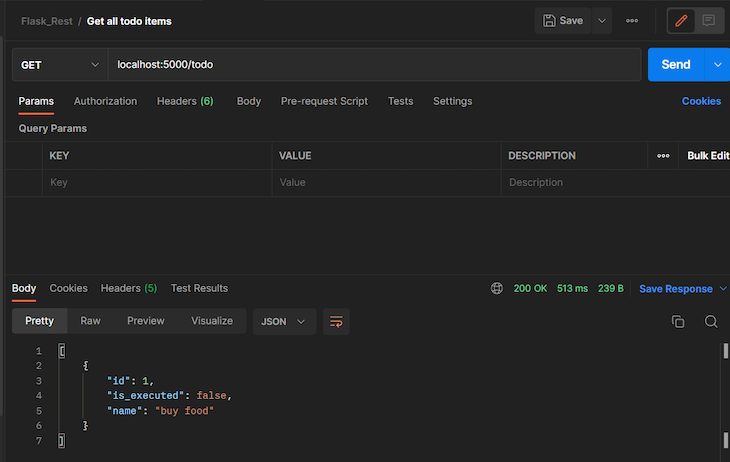
The endpoint below receives a GET request through the /todo path and is responsible for fetching all the TodoItem entities that have been created in the database.
@app.route('/todo', methods=['GET'])
def get_todos():
    all_todos = TodoItem.query.all()
    result = todos_schema.dump(all_todos)

    return jsonify(result)
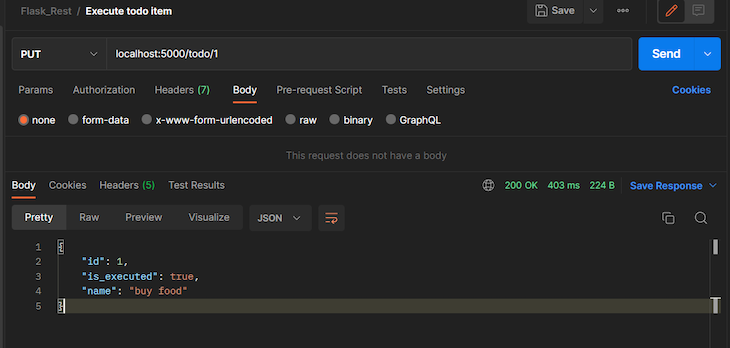
Execute the To-do API
@app.route('/todo/<id>', methods=['PUT', 'PATCH'])
def execute_todo(id):
    todo = TodoItem.query.get(id)

    todo.is_executed = not todo.is_executed
    db.session.commit()

    return todo_schema.jsonify(todo)
The endpoint receives the ID of the TodoItem through a PUT or PATCH request to fetch the entity from the database. Then, the endpoint converts the current value of the is_executed property to its opposite value before saving it again to the database — that is, if its current value is True, it converts it to False, and vice versa.
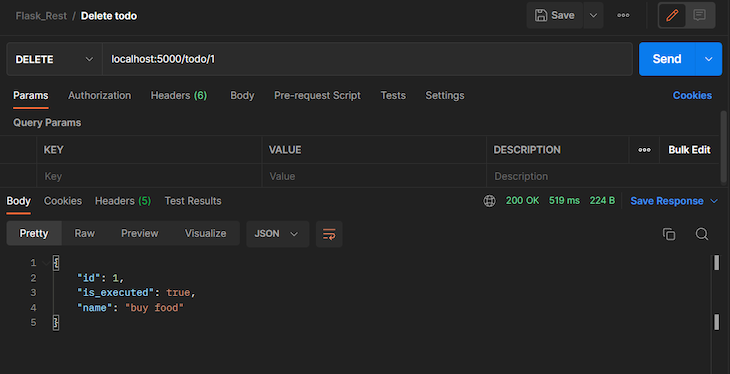
Delete a To-do API
Here’s the endpoint to delete a TodoItem from the database:
@app.route('/todo/<id>', methods=['DELETE'])
def delete_todo(id):
    todo_to_delete = TodoItem.query.get(id)
    db.session.delete(todo_to_delete)
    db.session.commit()

    return todo_schema.jsonify(todo_to_delete)
The endpoint receives the ID of the TodoItem through a DELETE request to fetch the entity from the database and deletes the item from the database.
Integrating the Flutter app with the Flask backend service
Proceed to create the Flutter application by running the following command in your terminal:
flutter create flutter_todo
Install the following dependencies:
- HTTP: This package makes the network communication between the Flutter app and the Flask service
- Provider: This package manages the state of the application. In addition to the documentation, you can also learn about the Provider state management package here
flutter pub add http

flutter pub add provider
Building the model
Create a Dart file with the name todo_item and add the below snippet to the file:
class TodoItem{
  dynamic id;
  String itemName;
  bool isExecuted;

  TodoItem({this.id, required this.itemName, required this.isExecuted});
}
The properties of the class declared above are similar to those of the TodoItem we created earlier, in the Flask app. The values of each of the Flutter TodoItem object’s properties will be displayed on the screen.
State management and communicating with the Flask app
Create another Dart file with the name todo_provider and add the following code to it:
import 'dart:convert';

import 'package:flutter/material.dart';
import 'package:todo/models/todo_item.dart';
import 'package:http/http.dart' as http;

class TodoProvider with ChangeNotifier{
  List<TodoItem> _items = [];
  final url = 'http://localhost:5000/todo';

  List<TodoItem> get items {
    return [..._items];
  }

  Future<void> addTodo(String task) async {
      if(task.isEmpty){
      return;
    }

    Map<String, dynamic> request = {"name": task, "is_executed": false};
    final headers = {'Content-Type': 'application/json'};
    final response = await http.post(Uri.parse(url), headers: headers, body: json.encode(request));
    Map<String, dynamic> responsePayload = json.decode(response.body);
    final todo = TodoItem(
        id: responsePayload["id"],
        itemName: responsePayload["name"],
The asynchronous addTodo method receives the name of the task to be created and uses this value to construct the request payload for adding a new TodoItem to the Flask service. Recall that the Flask endpoint to create a new to-do expects a POST request and a request body with the keys name and is_executed. The value of the is_executed key in the request is set to false because, by default, the newly created to-do should not be executed unless explicitly triggered by the user through the execute endpoint. The json.encode operation formats the request map to a JSON body so that it is compatible with the format and structure that the Flask server expects.
Note: If you’re running the application from an emulator, replace the base URL from localhost to 10.0.2.2. That is, the value of the url variable should be http://10.0.2.2:5000/todo. This is because localhost on the emulator does not point to 127.0.0.1; this could cause your application to fail when sending HTTP requests to a local server from an emulator. The response body from the Flask server contains a JSON body in the following format:
{
    "id": 1,
    "is_executed": false,
    "name": "buy food"
}
The server automatically creates an ID for the newly created TodoItem and returns it as part of the response body. The values of the JSON body are unmarshalled into the Flutter TodoItem object and added to the _items list. The notifyListeners() method from the ChangeNotifierclass notifies all the listeners of the state of the application about the new TodoItem addition.
Here’s the implementation for fetching all the TodoItem entities from the backend:
 Future<void> get getTodos async {
    var response;
    try{
      response = await http.get(Uri.parse(url));
      List<dynamic> body = json.decode(response.body);
      _items = body.map((e) => TodoItem(
          id: e['id'],
          itemName: e['name'],
          isExecuted: e['is_executed']
      )
      ).toList();
    }catch(e){
      print(e);
    }

    notifyListeners();
  }
The getTodos method above asynchronously sends a GET request to the backend server to fetch all the created TodoItem entities as a JSON list. Then it iterates through the response body to unmarshal the values into TodoItem objects.
Future<void> deleteTodo(int todoId) async {
    var response;
    try{
      response = await http.delete(Uri.parse("$url/$todoId"));
      final body = json.decode(response.body);
      _items.removeWhere((element) => element.id == body["id"]);
    }catch(e){
      print(e);
    }
    notifyListeners();
  }
The deleteTodo method is responsible for deleting the TodoItem entity in the database and in the Flutter app. It performs this operation by making an HTTP DELETE request to the backend API in the expected format. The response body contains a JSON payload of the deleted item. Using the ID of this item, the object is also identified in the _items list and removed.
Lastly, the executeTask method below expects the ID of the TodoItem and sends a PATCH request to the Flask endpoint expecting this request. The server executes the task, as earlier illustrated in the Flask API section of this tutorial, then it returns a response body that contains the executed TodoItem with the value of its is_executed property flipped. That is, if the TodoItem had an is_executed value of false before sending the request to the server, it will return with a true value and vice versa.
 Future<void> executeTask(int todoId) async {
    try{
        final response = await http.patch(Uri.parse("$url/$todoId"));
        Map<String, dynamic> responsePayload = json.decode(response.body);
        _items.forEach((element) => {
        if(element.id == responsePayload["id"]){
            element.isExecuted = responsePayload["is_executed"]
        }
        });
    }catch(e){
      print(e);
    }
    notifyListeners();
  }
Creating the task widget
Create a tasks.dart file and following code to the file:
import 'package:flutter/material.dart';
import 'package:provider/provider.dart';

import '../providers/todo_provider.dart';

class TasksWidget extends StatefulWidget {
  const TasksWidget({Key? key}) : super(key: key);

  @override
  State<TasksWidget> createState() => _TasksWidgetState();
}

class _TasksWidgetState extends State<TasksWidget> {
  TextEditingController newTaskController = TextEditingController();

  @override
  Widget build(BuildContext context) {
    return Padding(
      padding: const EdgeInsets.all(20.0),
      child: Column(
        children: [
          Row(
            children: [
              Expanded(
                child: TextFormField(
                  controller: newTaskController,
                  decoration: InputDecoration(
                    labelText: 'New Task',
                    border: OutlineInputBorder(),
                  ),
                ),
              ),
              SizedBox(width: 10,),
              ElevatedButton(
                  style: ButtonStyle(
                      backgroundColor: MaterialStateProperty.all(Colors.amberAccent),
                      foregroundColor: MaterialStateProperty.all(Colors.purple)
                  ),
                  child: Text("Add"),
                  onPressed: () {
                    Provider.of<TodoProvider>(context, listen: false).addTodo(newTaskController.text);
newTaskController.clear();
                  }
              )
            ],
          ),
          FutureBuilder(
            future: Provider.of<TodoProvider>(context, listen: false).getTodos,
            builder: (ctx, snapshot) =>
            snapshot.connection state == ConnectionState.waiting
                ? Center(child: CircularProgressIndicator())
                :
            Consumer<TodoProvider>(
              child: Center(
                heightFactor: MediaQuery.of(context).size.height * 0.03,
                child: const Text('You have no tasks.', style: TextStyle(fontSize: 18),),
              ),
              builder: (ctx, todoProvider, child) => todoProvider.items.isEmpty
                  ?  child as Widget
                  : Padding(
                padding: const EdgeInsets.only(top: 20),
                child: Container(
                  height: MediaQuery.of(context).size.height * 0.6,
                  child: ListView.builder(
                      itemCount: todoProvider.items.length,
                      itemBuilder: (ctx, i) => Padding(
                        padding: const EdgeInsets.only(bottom: 10.0),
                        child: ListTile(
                          tileColor: Colors.black12,
                          leading: Checkbox(
                              value: todoProvider.items[i].isExecuted,
                              activeColor: Colors.purple,
                              onChanged:(newValue) {
                                Provider.of<TodoProvider>(context, listen: false).executeTask(todoProvider.items[i].id);
                              }
                          ),
                          title: Text(todoProvider.items[i].itemName),
                          trailing: IconButton(
                              icon: Icon(Icons.delete, color: Colors.red),
                              onPressed: ()  {
                                Provider.of<TodoProvider>(context, listen: false).deleteTodo(todoProvider.items[i].id);
                              }
                          ) ,
                          onTap: () {},
                        ),
                      )
                  ),
                ),
              ),
            ),
          )
        ],
      ),
    );
  }
}
The TaskWidget class is a stateful widget that is responsible for building the interface and widgets of the application that the user will interact with. The widget renders the TextInputField to receive the value of the new task, ElevatedButton to submit the input value by invoking the addTodo method of the TodoProvider class and a ListView of the created tasks.

When the widget builds, it fetches all the created items in the database by calling the getTodos method in the TodoProvider class. Each task on the screen is a ListTile that contains a checkbox, the name of the task and a delete icon. Each click on the checkbox invokes the TodoProvider execute method to change the isExecuted value of that TodoItem object in the backend server and within the Flutter app. Clicking the delete icon invokes the deleteTodo method to delete the selected task.
![]()
![]()
Here’s the content of the main.dart file that is the entry point for the application:
import 'package:flutter/material.dart';
import 'package:provider/provider.dart';
import 'package:todo/providers/todo_provider.dart';
import 'package:todo/widgets/tasks.dart';

void main() {
  runApp(const MyApp());
}

class MyApp extends StatelessWidget {
  const MyApp({super.key});

  @override
  Widget build(BuildContext context) {
    return ChangeNotifierProvider.value(
        value: TodoProvider(),
      child: MaterialApp(
      debugShowCheckedModeBanner: false,
      title: 'Flutter Demo',
      theme: ThemeData(
        primarySwatch: Colors.purple,
      ),
      home: const MyHomePage(title: 'Todo app'),
    )
    );
  }
}

class MyHomePage extends StatefulWidget {
  const MyHomePage({super.key, required this.title});
  final String title;

  @override
  State<MyHomePage> createState() => _MyHomePageState();
}

class _MyHomePageState extends State<MyHomePage> {

  @override
  Widget build(BuildContext context) {
    return Scaffold(
      resizeToAvoidBottomInset: false,
      appBar: AppBar(
        title: Text(widget.title),
        centerTitle: true,
      ),
      body: TasksWidget(),
    );
  }
}
Conclusion
The process of integrating a frontend app with a backend service is quite similar across different frontend and backend frameworks, depending on the chosen network communication mechanism. This tutorial demonstrated how you would integrate your Flutter application on the frontend with a Flask service on the backend through Restful API architecture. The concept of HTTP communication adopted here can be applied to other frontend and backend frameworks you may choose.
You can check out the codebase for the Flutter app in this repo, and here’s the code for the Flask service.
The post Integrating Flask and Flutter apps appeared first on LogRocket Blog.
from LogRocket Blog https://ift.tt/Noey2SE
Gain $200 in a week
via Read more


