


Modern-day frontend frameworks like React have made state management easier for developers. In React, the state of a component dictates how the UI will look. While managing an application’s state has become easier, the global state concept is still a pain for developers.
Consider, for example, applications keeping track of financial transactions work with a global state that all clients can change and observe in real-time. Such applications are hard to develop because the developers need to sync the state between applications and take care of the ACID properties.
Convex — a global state management platform — aims to solve this problem by providing a full-stack solution including data storage, retrieval, and mutations, all built into an SDK for global state management. Its serverless approach is efficient and makes for a highly scalable platform. Convex is a developer-first platform with a reactive architecture that aligns well with React, and the SDK has support for features like optimistic updates and subscriptions.
In this tutorial, we will build a full-stack Next.js application with Convex for global state management. We’ll also implement Convex functions to query and update the data. By the end of this tutorial, you’ll deploy the application to Vercel. You can follow along with this walkthrough using this GitHub repository.
- Set up a Next.js project
- Set up Convex
- Add state management using Convex
- Secure the application
- Deploy to Vercel
Prerequisites
You’ll need Node.js, npm, or yarn, and a code editor like VS Code installed on your computer. You’ll also need a GitHub account to use with Convex.
Set up a Next.js project
The application will allow users to see a list of existing posts and submit new blog posts. A blog post will contain a title, body, and the author’s name.
To get started, tun the following command to set up a new Next.js project:
npx create-next-app@latest convex-example --typescript
Open the project inside the code editor and update the pages/index.tsx file to display a form in order to create a blog post:
// pages/index.tsx
import type { NextPage } from 'next'
import Head from 'next/head'
import styles from '../styles/Home.module.css'
import { useCallback, useState } from 'react'

const Home: NextPage = () => {
  const [author, setAuthor] = useState('')
  const [title, setTitle] = useState('')
  const [body, setBody] = useState('')

  const createPost = async () => {
    // TODO: create a new post inside database
    console.log({ author, title, body  })
    // reset the inputs after submission
    setAuthor('')
    setBody('')
    setTitle('')
  }

  return (
      <div className={styles.container}>
        <Head>
          <title>Next.js with Convex</title>
          <meta name="description" content="Generated by create next app" />
          <link rel="icon" href="/favicon.ico" />
        </Head>

        <main className={styles.main}>
          <h1 className={styles.title}>
            Welcome to <a href="https://nextjs.org">Next.js</a> with{' '}
            <a href="https://convex.dev">Convex</a>
          </h1>
          <input
              type={'text'}
              value={title}
              placeholder={'Title'}
              className={styles.inputStyles}
              onChange={(event) => setTitle(event.target.value)}
          />
          <input
              type={'text'}
              value={author}
              placeholder={'Author'}
              className={styles.inputStyles}
              onChange={(event) => setAuthor(event.target.value)}
          />
          <textarea
              value={body}
              rows={5}
              placeholder={'Post body '}
              className={styles.inputStyles}
              onChange={(event) => setBody(event.target.value)}
          />
          <button className={styles.button} onClick={createPost}>
            Create post
          </button>
        </main>
      </div>
  )
}

export default Home
Update the styles/Home.module.css to the following:
/* styles/Home.module.css */
.container {
  padding: 0 2rem;
  display: flex;
  flex-direction: column;
}

.main {
  padding: 4rem 0;
  flex: 10;
  display: flex;
  flex-direction: column;
  justify-content: center;
  align-items: center;
}

.button {
  font-size: 1rem;
  font-weight: 800;
  cursor: pointer;
  margin: 0.5rem;
  padding: 0.5rem;
  text-decoration: none;
  border: 1px solid #eaeaea;
  border-radius: 10px;
  transition: color 0.15s ease, border-color 0.15s ease;
  width: 200px;
}

.button:hover,
.button:focus,
.button:active {
  color: #0070f3;
  border-color: #0070f3;
}

.inputStyles {
  width: 300px;
  margin: 10px auto;
}
Run npm run dev to start the application, then open http://localhost:3000/ in a web browser.
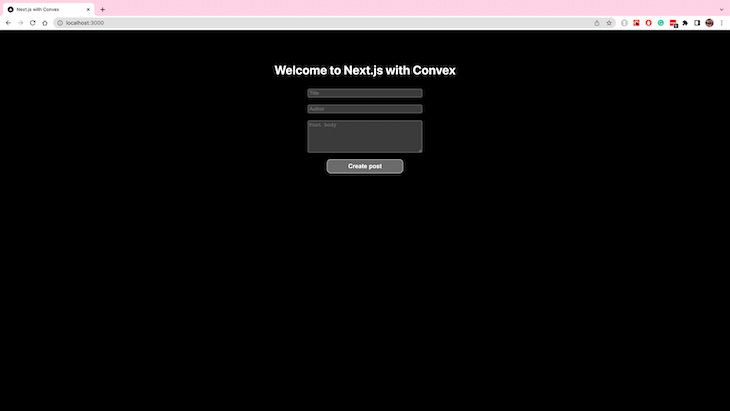
The form for creating new posts is ready. Now, you have to implement the logic to save and read the data using Convex.
Set up Convex
Convex provides a JavaScript SDK that you can use in your project.
- Run
npm i convexto install the Convex package - Inside the project run
npx convex login, this will open a page in the browser to log in to Convex using your GitHub account - After login, run
npx convex initto initialize the Convex project with aconvex.jsonand.env.localfor configuration. This command will also create aconvex/directory to write functions into
N.B., this command will prompt you for a project name.
Finally, update the pages/_app.tsx to add ConvexProvider to the complete application. The ConvexProvider will allow you to use React hooks provided by Convex across the application.
// pages/_app.tsx
import '../styles/globals.css'
import type { AppProps } from 'next/app'

import { ConvexProvider, ConvexReactClient } from 'convex/react'
import convexConfig from '../convex.json'
const convex = new ConvexReactClient(convexConfig.origin)

function MyApp({ Component, pageProps }: AppProps) {
  return (
      <ConvexProvider client={convex}>
        <Component {...pageProps} />
      </ConvexProvider>
  )
}

export default MyApp
Add state management using Convex
With Convex set up in the project, it’s time to create a data model and connect the frontend with the database.
Define the schema
Inside the convex/ folder, create a new file schema.ts to define the schema for blog posts. The defineTable function will create a posts table inside Convex.
// convex/schema.ts
import { defineSchema, defineTable, s } from 'convex/schema'

export default defineSchema({
  posts: defineTable({
    title: s.string(),
    author: s.string(),
    body: s.string(),
  }),
})
Now run npx convex codegen to generate type definitions for the posts schema to improve code completions. This will allow you to reference posts as Document<'posts'>.
Implement Convex functions
Convex functions allow the frontend to communicate with the database in two ways: queries and mutation. These functions are exported from files within the convex directory and they are deployed as serverless functions to execute database interactions.
The frontend needs to read the available posts. For that, create a new file convex/getPosts.ts. This file exports a query function that returns all available posts from the database.
// convex/getPosts.ts
import { query } from './_generated/server'
import { Document } from './_generated/dataModel'

export default query(async ({ db }): Promise<Document<'posts'>[]> => {
  return await db.table('posts').collect()
})
Inside the convex/ folder, create a new file called addPost.ts. This file exports a mutation function to allow users to add a new post to the database. The function accepts a post object as an argument.
// convex/addPost.ts
import { mutation } from './_generated/server'

export default mutation(
  async (
    { db },
    post: { author: string; body: string; title: string }
  ) => {
    await db.insert('posts', post)
  }
)
Run npx convex push to generate the type definitions and deploy the functions to Convex.
Connect the component with Convex functions
Convex provides useQuery and useMutation hooks to interact with the database using the functions implemented above.
Add the useMutation hook to the Home component and update the createPost function to call the addPost mutation function with the post data.
// pages/index.tsx
import type { NextPage } from 'next'
import Head from 'next/head'
import styles from '../styles/Home.module.css'
import { useCallback, useState } from 'react'
import {useMutation} from "../convex/_generated/react";

const Home: NextPage = () => {
  const addPost = useMutation('addPost')

  const [author, setAuthor] = useState('')
  const [title, setTitle] = useState('')
  const [body, setBody] = useState('')

  const createPost = async () => {
    await addPost({ body, author, title});
    // reset the inputs after submission
    setAuthor('')
    setBody('')
    setTitle('')
  }

  return (
      // return the component
  )
}

export default Home
Add the useQuery hook to fetch and display the list of posts from the database. The useQuery hook will return undefined while loading data, and a list of posts afterwards.
// pages/index.tsx
import type { NextPage } from 'next'
import Head from 'next/head'
import styles from '../styles/Home.module.css'
import { useCallback, useState } from 'react'
import {useMutation, useQuery} from "../convex/_generated/react";

const Home: NextPage = () => {
  const posts = useQuery('getPosts')
  const addPost = useMutation('addPost')

  const [author, setAuthor] = useState('')
  const [title, setTitle] = useState('')
  const [body, setBody] = useState('')

  const createPost = async () => {
    await addPost({ body, author, title});
    // reset the inputs after submission
    setAuthor('')
    setBody('')
    setTitle('')
  }

  return (
      <div className={styles.container}>
        <Head>
          <title>Next.js with Convex</title>
          <meta name="description" content="Generated by create next app" />
          <link rel="icon" href="/favicon.ico" />
        </Head>

        <main className={styles.main}>
          <h1 className={styles.title}>
            Welcome to <a href="https://nextjs.org">Next.js</a> with{' '}
            <a href="https://convex.dev">Convex</a>
          </h1>
          {posts ? (
              <>
                <p className={styles.description}>
                  {'Total posts:'} {posts.length}
                </p>

                <ul>
                  {posts.map((post) => (
                      <li key={post._id.toString()}>{post.title}</li>
                  ))}
                </ul>
              </>
          ) : (
              'Loading posts...'
          )}
          <input
              type={'text'}
              value={title}
              placeholder={'Title'}
              className={styles.inputStyles}
              onChange={(event) => setTitle(event.target.value)}
          />
          <input
              type={'text'}
              value={author}
              placeholder={'Author'}
              className={styles.inputStyles}
              onChange={(event) => setAuthor(event.target.value)}
          />
          <textarea
              value={body}
              rows={5}
              placeholder={'Post body '}
              className={styles.inputStyles}
              onChange={(event) => setBody(event.target.value)}
          />
          <button className={styles.button} onClick={createPost}>
            Create post
          </button>
        </main>
      </div>
  )
}

export default Home
Your application is ready now! Open http://localhost:3000 to see it in action:
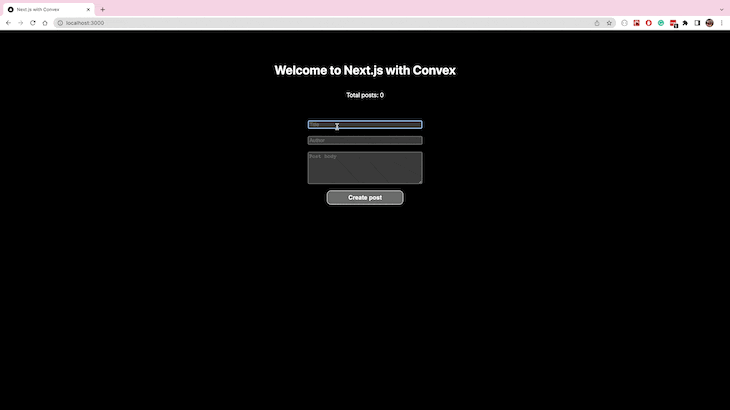
You’ll notice that the list of posts gets updated automatically whenever you create a new post.
This behavior is possible due to the end-to-end reactivity of the Convex global state; every component using the query gets updated whenever the data changes.
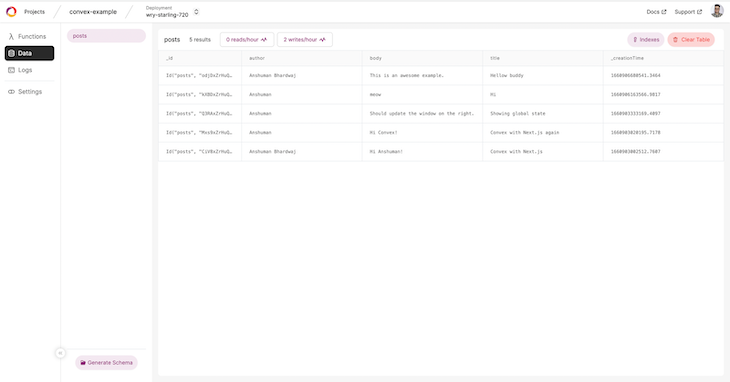
Managing Convex
Run npx convex dashboard to log in to the Convex dashboard to manage your application data, view logs, and see the metrics for function execution and read/writes.
Secure the application
Keeping the application data secure is crucial, and Convex simplifies protecting your data using identity providers. Convex comes with first-class support for Auth0 out of the box, and you can set it up in no time.
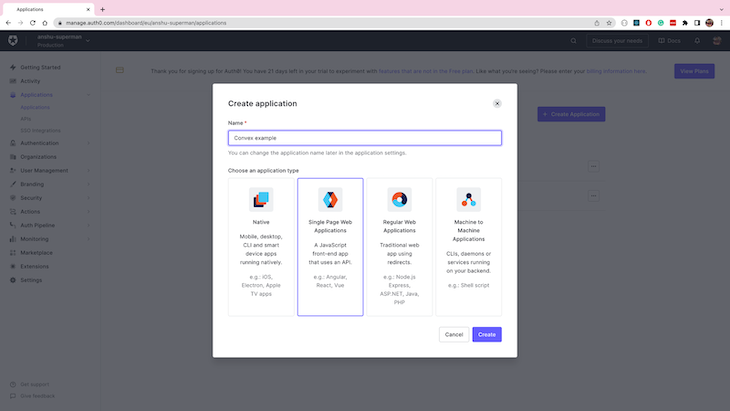
Create an Auth0 application
Log into your Auth0 dashboard and create a new Single Page Web Application. You can sign up for a free account on Auth0 if you don’t have an account already.
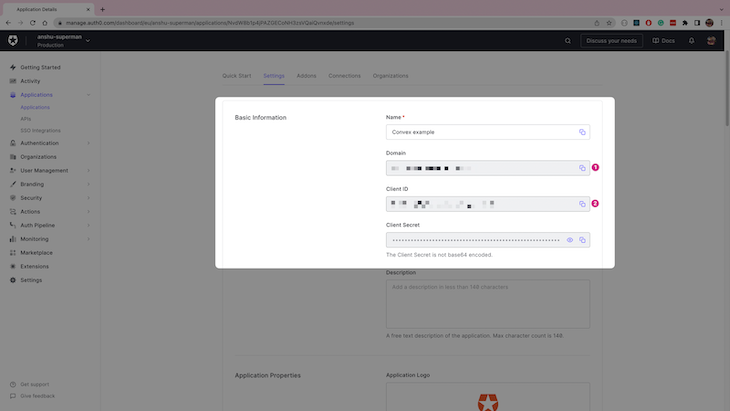
Copy the Domain and Client ID from the settings page of this new application and save them for later.
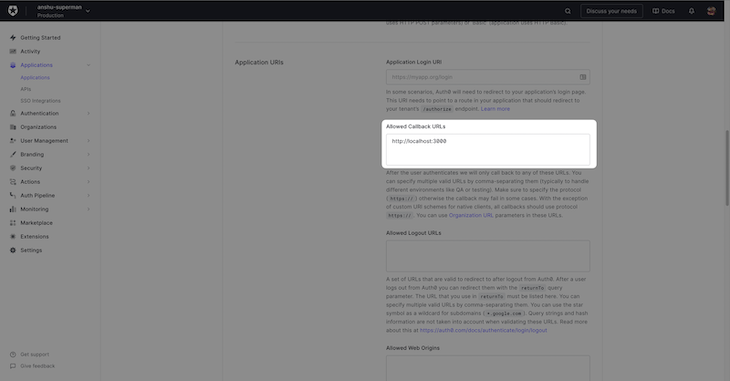
In the application settings page, add http://localhost:3000 in the Allowed Callback URLs field as shown below. This will enable http://localhost:3000 to use Auth0 for login during development.
Set up Auth0
Start by running npm i @auth0/auth0-react to install Auth0 in your project.
Then, run npx convex auth add to add Auth0 as identity provider to Convex. This command will prompt you for the Domain and Client ID copied earlier.
Create a new folder called components/ at the root of the project and add a new file called Login.tsx for the Login component that has a button to prompt users for login.
// components/Login.tsx
import { useAuth0 } from '@auth0/auth0-react'

export function Login() {
  const { isLoading, loginWithRedirect } = useAuth0()
  if (isLoading) {
    return <button className="btn btn-primary">Loading...</button>
  }
  return (
    <main className="py-4">
      <h1 className="text-center">Convex Chat</h1>
      <div className="text-center">
        <span>
          <button className="btn btn-primary" onClick={loginWithRedirect}>
            Log in
          </button>
        </span>
      </div>
    </main>
  )
}
Update the pages/_app.tsx to replace the ConvexProvider with ConvexProviderWithAuth0.
import '../styles/globals.css'
import { ConvexProviderWithAuth0 } from 'convex/react-auth0'
import { ConvexReactClient } from 'convex/react'
import convexConfig from '../convex.json'
import { AppProps } from 'next/app'
import { Login } from '../components/Login'

const convex = new ConvexReactClient(convexConfig.origin)
const authInfo = convexConfig.authInfo[0]

function MyApp({ Component, pageProps }: AppProps) {
    return (
        <ConvexProviderWithAuth0
            client={convex}
            authInfo={authInfo}
            loggedOut={<Login />}
        >
            <Component {...pageProps} />
        </ConvexProviderWithAuth0>
    )
}

export default MyApp
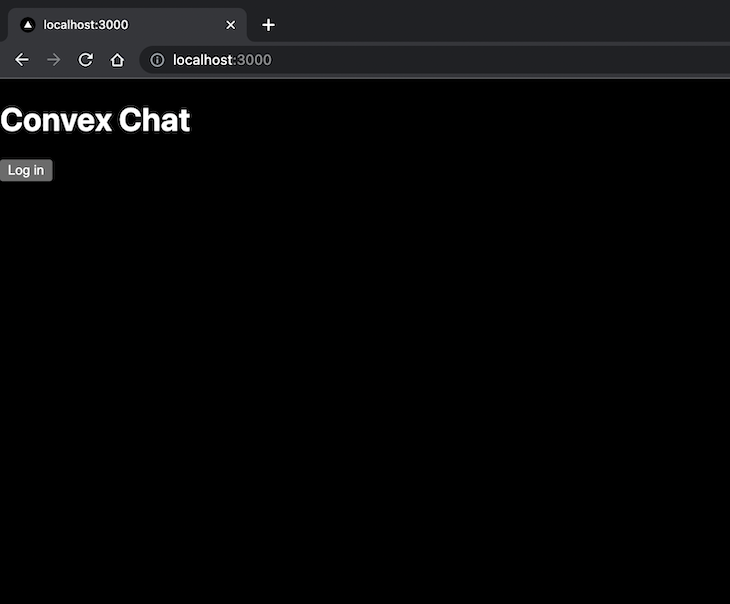
Now, when you open the application http://localhost:3000, you’ll see a login button instead of the post form.
Integrate Auth0 with Convex
Now, that you have Auth0 configured, you can secure the mutation function. The mutation function provides the authentication information as the auth object. The addPost mutation will now reject any unauthenticated requests.
// convex/addPost.ts
import { mutation } from './_generated/server'

export default mutation(
    async (
        { db, auth },
        post: { author: string; body: string; title: string }
    ) => {
      const identity = await auth.getUserIdentity()
      if (!identity) {
        throw new Error('Called addPosts without authentication present!')
      }
      await db.insert('posts', post)
    }
)
You can also update the code on the frontend to use the logged-in user’s name as the author field.
// pages/index.tsx
import type { NextPage } from 'next'
import Head from 'next/head'
import styles from '../styles/Home.module.css'
import { useCallback, useState } from 'react'
import {useMutation, useQuery} from "../convex/_generated/react";
import {useAuth0} from "@auth0/auth0-react";

const Home: NextPage = () => {
  const {user} = useAuth0()
  const posts = useQuery('getPosts')
  const addPost = useMutation('addPost')

  const [title, setTitle] = useState('')
  const [body, setBody] = useState('')

  const createPost = async () => {
    if(user?.name) {
      await addPost({ body, author: user.name, title});
    }
    // reset the inputs after submission
    setBody('')
    setTitle('')
  }

  return (
      <div className={styles.container}>
        <Head>
          <title>Next.js with Convex</title>
          <meta name="description" content="Generated by create next app" />
          <link rel="icon" href="/favicon.ico" />
        </Head>

        <main className={styles.main}>
          <h1 className={styles.title}>
            Welcome to <a href="https://nextjs.org">Next.js</a> with{' '}
            <a href="https://convex.dev">Convex</a>
          </h1>
          {posts ? (
              <>
                <p className={styles.description}>
                  {'Total posts:'} {posts.length}
                </p>

                <ul>
                  {posts.map((post) => (
                      <li key={post._id.toString()}>{post.title}</li>
                  ))}
                </ul>
              </>
          ) : (
              'Loading posts...'
          )}
          <input
              type={'text'}
              value={title}
              placeholder={'Title'}
              className={styles.inputStyles}
              onChange={(event) => setTitle(event.target.value)}
          />
          <textarea
              value={body}
              rows={5}
              placeholder={'Post body '}
              className={styles.inputStyles}
              onChange={(event) => setBody(event.target.value)}
          />
          <button className={styles.button} onClick={createPost}>
            Create post
          </button>
        </main>
      </div>
  )
}

export default Home
Deploy to Vercel
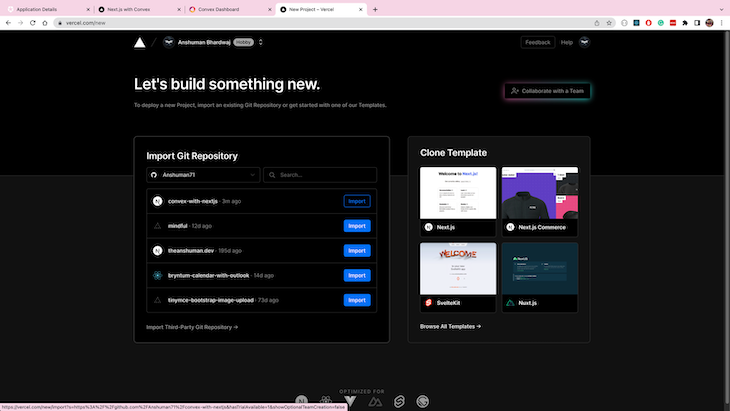
To deploy the application, push your code (including convex.json) to a repository on GitHub and link it to your Vercel account:
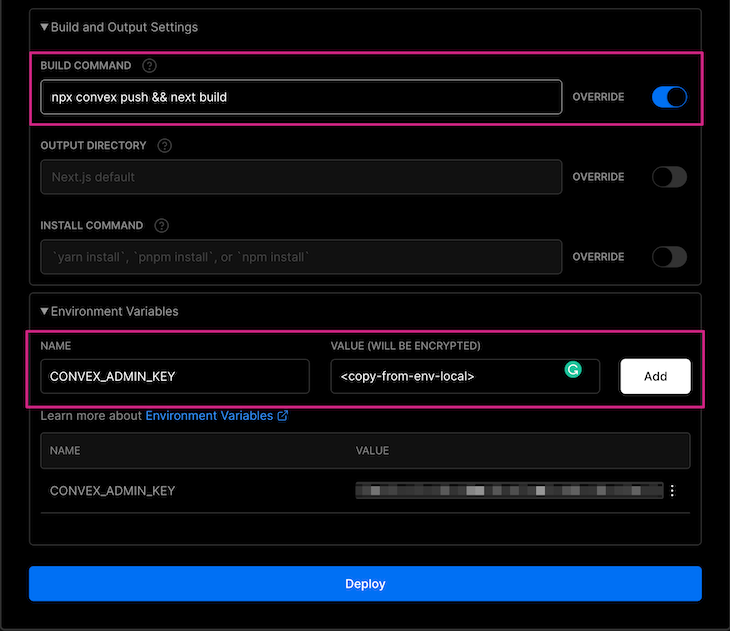
Replace the build command with npx convex push && next build to push the latest functions to Convex while deploying, and add the CONVEX_ADMIN_KEY environment variable from the .env.local:
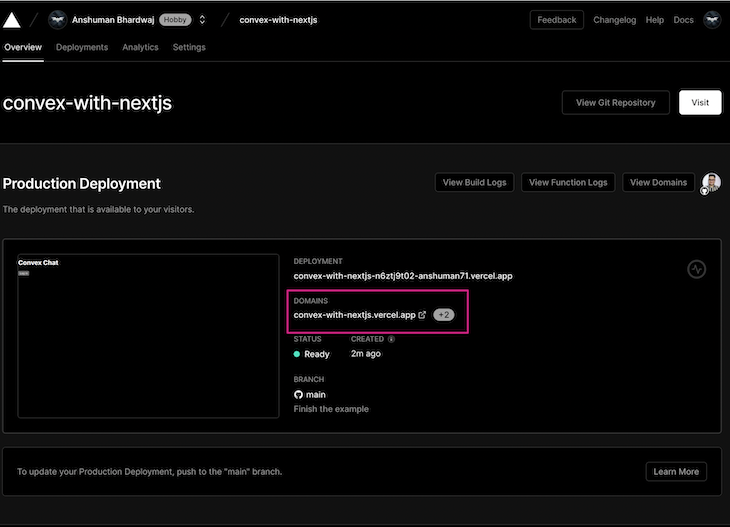
Once the application is deployed, copy the deployment URL (.vercel.app):
Add the URL to the Allowed Callback URLs list alongside the http://localhost:3000 in the Auth0 application settings.

Conclusion
Your application is now deployed on Vercel. In this tutorial, we learned about global state management and how to deploy a Next.js application with state management using Convex. We also learned about securing the application with Auth0 and deploying it to Vercel. You can extend the above application to use advanced features like optimistic updates and indexes to make it even faster.
You can try Convex for free today and read more in their documentation.
The post A guide to using Convex for state management appeared first on LogRocket Blog.
from LogRocket Blog https://ift.tt/Ap0xZaS
Gain $200 in a week
via Read more


