


While developing frontend applications, certain tasks are recurring, and often inevitable. From managing form state to accessing web storage, as a frontend developer, you’re likely to keep running into these scenarios.
Writing the same piece of code for each case can easily become repetitive, and you’ll be better off encapsulating the logic for these tasks into small, reusable functions. Fortunately, React Hooks help solve this problem through custom Hooks!
A custom Hook is a function that lets you write reusable stateful logic using inbuilt React Hooks like useState, useEffect, and others. This architecture enforces good software design principles like code readability, separation of concerns, and preventing code duplication. It is one of my favorite React features to date!
Mantine — a React component library — has created a collection of custom Hooks to handle common state management and DOM manipulation tasks. In this article, we’ll explore five helpful hooks which I’ve winnowed out from the 50+ available Mantine Hooks.
First, let’s have a look at what Mantine is all about.
- What is Mantine?
- Prerequisites
- Installing Mantine Hooks in a React Project
- use-disclosure Hook
- use-clipboard Hook
- use-local-storage Hook
- use-input-state Hook
- use-debounced-value Hook
What is Mantine?
Mantine is a React components library with an aim to provide great user and developer experience. Similar to popular UI frameworks like Material UI, Mantine contains fundamental features like theming, styling, and reusable components included in the core package: @mantine/core.
What I find interesting about this project is how its parts are split up into independent packages: @mantine/hooks, @mantine/form, and @mantine/dates, allowing you to cherry-pick the packages you want for your project without bloating it. Our focus will be on the Hooks package.
Some of these hooks are dependent on the Mantine library itself, i.e., requiring you to download the core package, but the ones I’ll cover do not require it.
Prerequisites
To follow along, you’ll need:
- Familiarity with React concepts, such as state and hooks
- Some knowledge on how custom Hooks work
You can see all five Mantine Hooks in action here. Now let’s install Mantine.
Installing Mantine Hooks in a React project
We will use CodeSandbox to bootstrap a new React project. Type in react.new into a new browser tab to create a starter React application:
// App.js
import "./styles.css";
export default function App() {
  return (
    <div className="App">
      <h1>Hello CodeSandbox</h1>
      <h2>Start editing to see some magic happen!</h2>
    </div>
  );
}
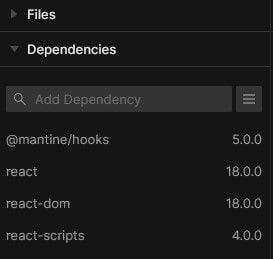
Next, install the Mantine Hooks library by searching @mantine/hooks in the Dependencies tab and adding it to the dependency list.
If you choose to bootstrap your React app in a terminal, use the following command to download the Hooks package:
npm install @mantine/hooks
Let’s see the first Hook on the list.
use-disclosure Hook
The use-disclosure Hook is used to control a Boolean value as state. It returns a handlers property with open, close, and toggle methods for managing its value. This Hook can come into use when controlling the view of a side navigation; creating a toggle button; and many other instances:
import { useDisclosure } from "@mantine/hooks";

export default function UseDisclosure() {
  const [sideNav, handlers] = useDisclosure(false);

  return (
    <div>
      <button onClick={() => handlers.open()}>Open</button>
      <button onClick={() => handlers.close()}>Close</button>
      <button onClick={() => handlers.open()}>Toggle</button>
      <span>
        Side navigation is <strong>{sideNav ? "opened" : "closed"}</strong>
      </span>
    </div>
  );
}

Similar to use-disclosure is another Hook that deserves a shoutout: use-toggle. use-toggle functions like the toggle method in use-disclosure, but accepts two array values instead of a Boolean:
import { useToggle } from '@mantine/hooks';

function UseToggle() {
  const [value, toggle] = useToggle(['blue', 'orange']);

  return (
    <Button color={value} onClick={() => toggle()}>
      {value}
    </Button>
  );
use-clipboard Hook
If I had to use just one Hook from this entire library, it would be this one — I’m not impressed with how often I’ve googled “copy to clipboard JavaScript. :(”
The use-clipboard Hook interfaces with the navigator.clipboard property of the window object.
use-clipboard accepts an options argument and returns an object with the following properties:
copy: function to copy value to clipboardcopied: Boolean value that indicatescopywas called less than time specified inoptions.timeoutreset: function to clear timeout and resetcopiedto falseerror: containsErrorobject if something goes wrong
import { useClipboard } from "@mantine/hooks";
import { checkIcon, clipboardIcon } from "../icons";

export default function UseClipboard() {
  const user = {
    usdtAddress: "0x2a38ed609c51bbe050bf07939d3eafe0f9e029c8"
  };

  const clipboard = useClipboard({ timeout: 1500 });

  return (
    <div>
      <button onClick={() => clipboard.copy(user.bitcoinAddress)}>
        {clipboard.copied ? (
          <>Address copied {checkIcon}</>
        ) : (
          <>Copy BTC Address {clipboardIcon}</>
        )}
      </button>
    </div>
  );
}
As you will come to notice, most Mantine Hooks are wrappers around existing browser APIs.
use-local-storage Hook
The use-local-storage Hook uses the window.localstorage interface to allow you to use local storage items as React state. This hook works similar to the useState hook — it returns a variable for the state and an updater function:
import { useLocalStorage } from '@mantine/hooks'

export default function UseLocalStorage() {
  const [language, setLanguage] = useLocalStorage({
    key: 'lang',
    defaultValue: '',
  })

  return (
    <div>Current language: {language}</div>
  )
}
Here, language‘s value is initiated from the local storage item with key lang.
setLanguage updates both the local storage item language and its state value.
Below is an example where use-local-storage is used to store a user’s preferred language type:
import { useLocalStorage } from '@mantine/hooks'

export default function UseLocalStorage() {
  const [language, setLanguage] = useLocalStorage({
    key: 'lang',
    defaultValue: '',
  })

  const updateLanguage = (e) => {
    setLanguage(e.target.value)
  }

  return (
    <div>
      <h3>Select your preferred language below:</h3>
      <select onChange={updateLanguage}>
        <option hidden disabled selected value>
          Select a language
        </option>
        <option value='english'>English</option>
        <option value='spanish'>Spanish</option>
        <option value='french'>French</option>
        <option value='latin'>Latin</option>
      </select>
      <br />
      <span>Current language: {language}</span>
    </div>
  )
}
You should note that this Hook doesn’t work on iframes — like the browser displayed in CodeSandbox — for security reasons. To see it work, try this Hook out in your local dev environment.
use-input-state Hook
This Hook is used for managing state of native and custom inputs:
import { useInputState } from "@mantine/hooks";

export default function UseInputState() {
  const [firstName, setFirstName] = useInputState("");

  return (
    <>
      <input type="email" value={firstName} onChange={setFirstName} />
      <br />
      <span>Text input value: {firstName}</span>
    </>
  );
}
While not as powerful as the useForm Hook from Mantine’s form management library (@mantine/form), this Hook makes it easier to grab input values without having to directly deal with the event object.
use-debounced-value Hook
This Hook is used to debounce — delay firing of — changes to a value. An autocomplete search box is a common example where this practice is applied. When making a search, for instance, the browser makes multiple requests to the backend with each character entered into the input field.
Accepting such a large number of requests to your server like this will probably max out your bandwidth as your users grow. Therefore, you can use debouncing to trim the number of server requests, only making a request after a specified time:
import { useState } from "react";
import { useDebouncedValue } from "@mantine/hooks";
import { Center, Text, TextInput } from "@mantine/core";

export default function UseDebouncedValue() {
  const [value, setValue] = useState("");
  const [debounced] = useDebouncedValue(value, 200);

  return (
    <Center>
      <div style=>
        <TextInput
          placeholder="Enter value to see debounce"
          value={value}
          style=
          onChange={(e) => setValue(e.currentTarget.value)}
        />
        <br />
        <Text>Value: {value}</Text>
        <Text>Debounced value: {debounced}</Text>
      </div>
    </Center>
  );
}
The use-debounced-value Hook is designed to work with controlled components. This means that your component renders on each state change — when a new character is entered into input.
If you’d prefer to not have this happen, Mantine offers an alternative Hook, use-debounced-state, for debouncing in uncontrolled components. View the differences between these Hooks here.
And that wraps up the list!
Conclusion
So far, we’ve been able to see the benefits of using custom Hooks in React and how component logic can be consolidated into small reusable functions. The Mantine Hooks package is another example of how influential this feature has been. Be sure to check the Mantine docs to see other interesting Hooks that missed this list.
The post 5 Mantine Hooks for simplifying UI management in React appeared first on LogRocket Blog.
from LogRocket Blog https://ift.tt/nDJz4S8
Gain $200 in a week
via Read more


