


Ts.ED is a Node.js framework for building scalable server-side applications with a simple setup. Developed with TypeScript, Ts.ED allows you to build your applications with object-oriented programming, functional programming, or decorators. You can either choose between the complete out-of-the-box project or customize your project yourself.
In this article, we’ll learn how to build a server-side application with Ts.ED and MySQL by building a simple blog post database. To follow along with this tutorial, you’ll need the following installed on your machine:
- Node.js v14.x
- MySQL database
- Postman
The developers of Ts.ED have provided rich documentation to help you get set up quickly. I definitely recommend checking it out before getting started with the tutorial. In addition, the full code for this tutorial is available on GitHub. Feel free to clone it to follow along. Let’s get started!
Table of contents
- Ts.ED benefits
- Scaffold a new project
- Update the data source
- Create the entity model
- Configure Multer
- Create the app service
- Create app controllers
- Serve static files
- Test the application
Ts.ED benefits
Before we begin coding, let’s consider some of the reasons why Ts.ED is a great Node.js framework for web developers. For one, it allows you to create REST APIs faster with OpenSpec and JSON Schema complaints. The rich CLI tool allows you to create a pre-configured server, saving you some time, and it has lots of plugins that you can choose from to create your stack.
Ts.ED is a class-based framework, therefore, controllers, pipes, and middlewares are created as a class. Finally, it has some embedded features that make testing your applications much easier. As we move through the tutorial, we’ll see these features in action. Let’s get started!
Scaffold a new project
To set up our new project, we’ll first need to install the Ts.ED CLI with the command below:
npm install -g @tsed/cli
Once the installation is complete, create a folder and initialize a new project with the following command:
mkdir tsed-demo && cd tsed-demo
tsed init .
The command above will create a new folder called tsed-demo. The tsed init . command will prompt you to select your desired configurations. Select the following:
- Target platform: Express
- Architecture for the project: Ts.ED
- Convention file styling: choose Ts.ED
- The features needed for your project: Database
- The ORM for the database: TypeORM
- The TypeORM to install: MySQL
- The package manager: Yarn
Ts.ED will create a new project in the root directory of the folder, denoted by the . in the init command. Wait while Yarn installs the packages required to run the application; once the installation is completed, Ts.ED will create the following folder structure:
tsed-demo
┣ node_modules
┣ src
┃ ┣ config
┃ ┃ ┣ envs
┃ ┃ ┃ ┗ index.ts
┃ ┃ ┣ logger
┃ ┃ ┃ ┗ index.ts
┃ ┃ ┗ index.ts
┃ ┣ controllers
┃ ┃ ┗ rest
┃ ┃ ┃ ┣ HelloWorldController.ts
┃ ┃ ┃ ┗ index.ts
┃ ┣ datasources
┃ ┃ ┗ MysqlDatasource.ts
┃ ┣ Server.ts
┃ ┗ index.ts
┣ .DS_Store
┣ .barrelsby.json
┣ .dockerignore
┣ .gitignore
┣ Dockerfile
┣ README.md
┣ docker-compose.yml
┣ package.json
┣ processes.config.js
┣ tsconfig.compile.json
┣ tsconfig.json
┗ yarn.lock
Let’s review the most important files:
Server.ts: The main server configuration file where all the configurations required to run the application are configuredindex.ts: The root file where the application is bootstrappedsrc/config: The configuration folder for each Ts.ED projectsrc/datasource: The configuration for the selected database management systemsrc/controllers/rest: The controllers folder. By default, Ts.ED listens on the/restendpoint to access the routes in the controllers
Update the datasource
With the project created, let’s create and connect to our database. Open the MySQL shell with the command below:
mysql -u root -p
Then, create a blog database with the command below:
CREATE DATABASE blog;
Now, open the src/datasources/MysqlDatasource.ts file and update the data source with the code snippet below:
...
export const MysqlDataSource = new DataSource({
  type: "mysql",
  entities: [],
  host: "localhost",
  port: 3306,
  username: "YOUR DATABASE USERNAME",
  password: "YOUR DATABASE USERNAME",
  database: "blog",
  synchronize: true,
});
...
In the configuration above, we modified the value of the data source to that of our database. We included synchronize: true to allow Ts.ED to generate tables for our database.
Create the entity model
Let’s create an entity model for our blog database. We can do so easily with the command below:
tsed generate
Select model from the list of providers. The command should generate a models/BlogService.ts file in the src folder. Next, create a model with the code snippet below:
import {Property} from "@tsed/schema";
import {Column, Entity, PrimaryGeneratedColumn, CreateDateColumn, UpdateDateColumn} from "typeorm";

@Entity()
export class BlogModel {
  @Property()
  @PrimaryGeneratedColumn()
  id: string;

  @Column()
  title: string;

  @Column()
  content: string;

  @Column()
  coverImage: string;

  @Column()
  @CreateDateColumn()
  createdAt: Date;

  @Column()
  @UpdateDateColumn()
  updatedAt: Date;
}
To create an entity, we imported the Entity and Column decorators. PrimaryGeneratedColumn will generate a primary key for the entity, and CreateDateColumn and UpdateDateColumn will create, auto-generate, date, and update the date.
Next, you’ll need to make the BlogModel available in the entities array in the data source:
export const MysqlDataSource = new DataSource({
  ...
  entities: [BlogModel],
  ...
});
Configure Multer
Now, let’s configure Multer to allow users to upload the cover images for each blog saved in the database. Ts.ED has the configuration for this setup already. Simply head over to the Server.ts file and append Multer to the configurations with the code snippet below:
...
import { diskStorage } from "multer";

...
@Configuration({
  ...
  multer: {
    storage: diskStorage({
      destination: join(process.cwd(), "./public/uploads"),
      filename: (req, file, cb) => {
        const ext = file.mimetype.split('/')[1];
        cb(null, `${generateName(15)}-${Date.now()}.${ext}`);
      }
    })
  },
  ...
There are several ways to upload files using Multer. For this demonstration, we’ll store the files in the disk storage. We imported diskStorage from Multer, which has been automatically installed for us by Ts.ED during the project setup.
Then, we specified the location in the file system where the file will be stored in the server and modified the filename of the file by creating a generateName function. The generateName function will generate 15 random string characters for each file uploaded and append the date to when the file was uploaded to the filename.
Now, create the generateName function with the code snippet below:
function generateName(length: number) {
  let str = '';
  const characters = 'ABCDEFGHIJKLMNOPQRSTUVWXYZabcdefghijklmnopqrstuvwxyz0123456789';
  const charactersLength = characters.length;
  for (let i = 0; i < length; i++) {
    str += characters.charAt(Math.floor(Math.random() * charactersLength));
  }
  return str;
}
You can see other Multer options in the Ts.ED docs.
Create the app service
With the model entity created, let’s generate a service using the generate command below:
tsed generate service
Then, name the service blog and hit the enter key. Ts.ED will create another folder called services with a BlogService.ts file. Now, update the file with the code snippet below:
import { Injectable } from "@tsed/di";
import { Inject } from "@tsed/di";
import { MYSQL_DATA_SOURCE } from "../datasources/MySqlDataSource";
import { DataSource } from "typeorm";
import { BlogModel } from "../models/BlogModel";

@Injectable()
export class BlogService {
    constructor(@Inject(MYSQL_DATA_SOURCE) private dataSource: DataSource) { }

    async getAll(): Promise<BlogModel[]> {
        return await this.dataSource.getRepository(BlogModel).find();
    }

    async create(blog: BlogModel): Promise<BlogModel> {
        return await this.dataSource.getRepository(BlogModel).save(blog);
    }


    async getById(id: string): Promise<any> {
        return await this.dataSource.getTreeRepository(BlogModel).findOne({ where: { id } });
    }

    async update(id: string, blog: BlogModel): Promise<any> {
        return await this.dataSource.getRepository(BlogModel).update(id, blog);
    }

    async delete(id: string): Promise<any> {
        return await this.dataSource.getRepository(BlogModel).delete(id);
    }

}
In the code snippet above, we injected our data source to the constructor using the Inject decorator. There, we created an instance variable from the DataSource class, providing access to the getRepository method, which then provides the methods we need to perform CRUD operations on our database.
Create app controllers
Now, we need our API routes to use the CRUD service we created for this application. To do that, we need to generate a controller with the command below:
tsed generate controller
Name the controller blog, select rest as the preferred director, select /blog as the root endpoint, and hit the enter button. Ts.ED will create a BlogService file inside the controller’s folder.
Next, create the controller for the BlogService with the code snippet below:
import { Controller, Inject } from "@tsed/di";
import { Get, Post, Put, Delete } from "@tsed/schema";
import { BlogService } from "src/services/BlogService";
import { BlogModel } from "src/models/BlogModel";
import { BodyParams, PathParams } from "@tsed/platform-params";
import { MultipartFile, PlatformMulterFile } from "@tsed/common";

@Controller("/blog")
export class BlogController {
  constructor(@Inject(BlogService) private blogService: BlogService) { }

  @Get("/")
  get(): Promise<BlogModel[]> {
    return this.blogService.getAll();
  }

  @Post("/")
  create(@MultipartFile("file") file: PlatformMulterFile, @BodyParams() blog: BlogModel): Promise<BlogModel> {
    blog.blogImage = file.filename;
    return this.blogService.create(blog);
  }

  @Get("/:id")
  getOne(@PathParams("id") id: string): Promise<BlogModel> {
    return this.blogService.getById(id);
  }

  @Put("/:id")
  update(@PathParams("id") id: string, @BodyParams() blog: BlogModel): Promise<BlogModel> {
    return this.blogService.update(id, blog);
  }

  @Delete("/:id")
  delete(@PathParams("id") id: string): Promise<BlogModel> {
    return this.blogService.delete(id);
  }
}
In the code snippet above, we injected the BlogService class in our BlogController constructor and created a private instance to the class, enabling access to the method defined in the BlogService.
Then, we defined the CRUD routes for the application using the GET, POST, PUT, and DELETE decorators. Ts.ED provides us with two other decorators, PathParams and BodyParams. These two decorators enable us to parse the data from the request body and the request parameters.
Then, to upload files with Multer, we imported the MultipartFile and PlatformMulterFile decorators provided by Ts.ED.
Serve static files
To serve the cover images and files in our application, we need to configure the application to serve static files. We’ll also do this in the Server.ts file with the code snippet below:
...
@Configuration({
  ...
  statics: {
    "/static": [
      {
        root: `./public`,
        // Optional
        hook: "$beforeRoutesInit" // Load statics on the expected hook. Default: $afterRoutesInit
        // ... statics options
      }
    ]
  }
  ...
Ts.ED uses the statics object to configure static files. This object takes a URL path as a required argument. So, we access the static files from the /static route. The URL path also takes an array as key-value pairs. In this array, we specified the location of the static files. For this demonstration, we want them in the public folder, which we’ll create shortly.
Now, create a public folder in the root directory of the project. You can find more static options in the docs.
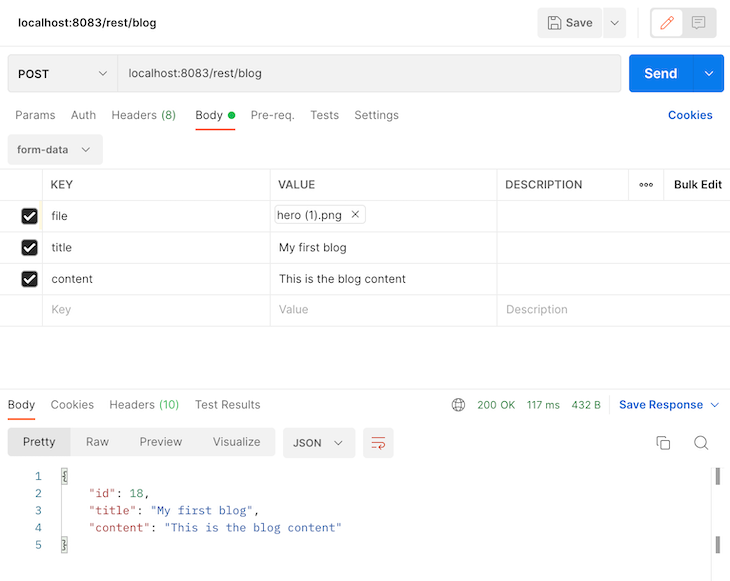
Test the application
Now, let’s test our application using Postman. Before that, start the server with the command below:
yarn start
The command above will start the server on port 8083, which is the default port configured for Ts.ED projects. Next, open Postman and test the create route, as shown in the screenshot below:
If you open the public and uploads folders, you should see the uploaded cover image:

Then, test the get-all route to get all the blogs, as shown below:
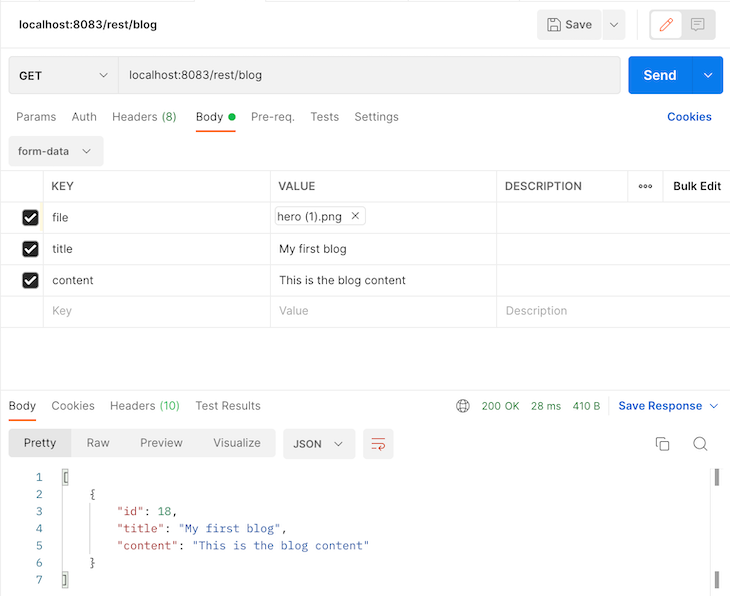
Feel free to test out the other routes.
Conclusion
In this tutorial, we explored Ts.ED by building a simple blog database application. Ts.ED is a modern Node.js framework for creating scalable server-side applications.
With Ts.ED, you can develop server-side applications with ease and speed. You can build and manage small-scale applications like websites and blogs without having to do any initial server configurations. Feel free to read more about Ts.ED from the official documentation. Happy coding!
The post How to build a server-side application using Ts.ED and MySQL appeared first on LogRocket Blog.
from LogRocket Blog https://ift.tt/RYPOgaV
Gain $200 in a week
via Read more


