


React Native is one of the most popular JavaScript-based frameworks for creating mobile applications. It cuts down on the overall complexity and time required for total app development by enabling the creation of cross-platform apps that run on both iOS and Android.
But, in order to build a React Native app and distribute it, the developer must first sign the certificates, compile and update the version, and then submit the build to the appropriate platform App Store for iOS and Google Play for Android.
In this article, we’ll demonstrate how to leverage GitHub Actions and fastlane to automate these tedious tasks.
This post will help you automate the build, test, and distribution of iOS and Android apps built with React Native.
Contents
- What is fastlane?
- Setting up fastlane
- Configuring fastlane for Android
- Configuring fastlane for iOS
- Automating workflows with GitHub Actions
What is fastlane?
fastlane is a solution that helps iOS and Android developers automate time-consuming operations. This platform helps deliver high-quality apps through continuous deployment without compromising the speed or agility of a developer’s daily work.
fastlane offers native Gradle (Android) and Xcode (iOS) plugins in addition to a Ruby command line utility. It manages tasks like signing up for the App Store and Google Play, publishing apps to stores, deploying beta software, Firebase Crashlytics, and more. Any CI system you already have will function with fastlane as well.
Setting up fastlane
There are a few system requirements that must be installed locally before we start.
fastlane is officially supported to run on macOS; Linux and Windows are only partially supported by fastlane because tools like Xcode only work on macOS.
Fastlane can be installed with Homebrew for macOS:
brew install fastlane
Or, with RubyGems for macOS, Linux, and Windows:
sudo gem install fastlane # Make sure ruby is already installed
There are two ways to add fastlane to a React Native project:
- Use the
fastlane initcommand for Android and iOS individually in their respective folders; fastlane will automatically detect the platform, request any necessary information, and configure the platform - Create a
fastlanefolder at the root of the React Native project and add aFastfilefile to it. Then, manually configure it for iOS and Android
We’ll use the second approach in this article.
Configuring fastlane for Android
Let’s start by configuring fastlane for Android.
As previously mentioned, we’ll create a fastlane folder at the project’s root and add a Fastfile file to the folder. We’ll use this same Fastfile file for iOS and Android.
Before doing anything else, let’s check and clean up the Git branch. We’ll set up two lanes for Android distribution, one for beta testing and one for the final release.
First, we’ll define an Android platform, like so:
platform :android do
    desc "Release for the Android beta"
    lane :beta do
        increment_version_code('app_project_dir': './andriod/app')
        gradle(task: 'clean', project_dir: './andriod')
        gradle(task: 'bundle', bundle_type: 'Release', project_dir: './andriod')
        supply(track: 'beta', abb: './andriod/app/build/outputs/apk/app-beta-release.apk')
    end
    desc "Release for the Android production"
    lane : release do
        increment_version_code(app_project_dir: './android/app')
        increment_version_name(app_project_dir: './android/app', bump_type: 'patch')
        gradle(task: 'clean', project_dir: './android/')
        gradle(task: 'bundle', bundle_type: 'Release', project_dir: './andriod', properties: {
            "android.injected.signing.store.file" => ENV['ANDROID_KEYSTORE_FILE'],
            "android.injected.signing.store.password" => ENV['ANDROID_KEYSTORE_PASSWORD'],
            "android.injected.signing.key.alias" => ENV['ANDROID_KEYSTORE_ALIAS'],
            "android.injected.signing.key.password" => ENV['ANDROID_KEYSTORE_PASSWORD']
        })
        supply(track: 'production', aab: './android/app/build/outputs/bundle/release/app_release.aab', release_status: 'draft')
    end
end
Next, we’ll create a distribution lane for the beta version and add a set of actions to be performed.
We’ll utilize Gradle to clean the build in the next step. Next, we’ll execute the Gradle bundle to build an APK or AAB.
As a final step, we’ll submit the metadata, screenshot, binaries, and app bundle to Google Play using the CI utility supply.
The Android app release distribution lane will be created next in the same manner as the beta lane; at this point, we’ll add the Keystore and Google credentials for release.
N.B., fastlane’s supply tool only works if you have successfully published your Android app at least once to Google Play.
Configuring fastlane for iOS
Now, let’s configure fastlane for iOS. Before we get started, Xcode and macOS are prerequisites for the iOS app distribution with fastlane.
We’ll set up two lanes for iOS distribution, one for TestFlight and one for App Store release.
platform :ios do
    private_lane :update_version do
        app_store_version = get_app_store_version_number(bundle_id: 'rnFastlane')
        plist_version = get_version_number_from_plist(xcodeproj: './ios/rnFastlane.xcodeproj')
        if Gem::Version.new(plist_version.to_f) == Gem::Version.new(app_store_version.to_f)
            increment_version_number_in_plist(xcodeproj: './ios/rnFastlane.xcodeproj', bump_type: 'minor')
        else
            increment_version_number_in_plist(xcodeproj: './ios/rnFastlane.xcodeproj', bump_type: 'patch')
        end
    end
    private_lane :testflight_build do
        increment_build_number_in_plist(xcodeproj: './ios/rnFastlane.xcodeproj', target: 'rnFastlane')
        gym(scheme: 'rnFastlane', workspace: './ios/rnFastlane.xcworkspace')
    end
    private_lane :distribution_build do
        increment_build_number_in_plist(xcodeproj: './ios/rnFastlane.xcodeproj', target: 'rnFastlane')
        create_keychain(
            name: ENV['KEYCHAIN_NAME'],
            password: ENV['KEYCHAIN_PASSWORD'],
            default_keychain: true,
            unlock: true,
            timeout: 3600,
            add_to_search_list: true)

        match(
            type: 'app-store',
            keychain_name: ENV["KEYCHAIN_NAME"],
            keychain_password: ENV["KEYCHAIN_PASSWORD"],
            readonly: true,
            shallow_clone: true,
            verbose: false)
        gym(
            scheme: 'rnFastlane',
            workspace: './ios/rnFastlane.xcworkspace',
            export_method: 'ad-hoc',
            output_directory: "./build",
            configuration: 'Release',
            output_name: "rnFastlane.ipa"
            clean: true
            export_options: {
                method: 'app-store',
                provisioningProfiles: {
                    'rnFastlane' => ENV["sigh_#{options[:app_identifier]}_app-store_profile-name"],
                }
            })
    end
    desc "Release for the iOS beta"
    lane :beta do
        testflight_build
        upload_to_testflight(username: ENV['APP_STORE_EMAIL'] app_identifier: 'rnFastlane')
        commit_version_bump(message: 'bump build')
        push_to_git_remote
    end
    desc "Release for the iOS production"
    lane :release do
        distribution_build
        deliver
        commit_version_bump(message: 'bump build')
        push_to_git_remote
    end
end
Increment the version number
The next step is to add a private lane for the updating version.
We’ll use the
get_app_store_version_number and get_version_number_from_plist plugin method to get the version from the App Store and plist file. This enables increasing the version number for minor and patch bump types using the increment_version_number_in_plist method.
Set up certificate and provisioning profiles
Now, we’ll use match to set up certificate and provision files. match is included in fastlane for iOS apps, it is used for code signing. With match, an entire development team can use a single code signing identity.
Before adding match, we’ll need to create a private GitHub repository to store the certificates. Then, we can install match with the following command:
fastlane match init

Next, we’ll need to add a private repo, as shown above, to store the certificates. A Matchfile is generated under the fastlane folder. Once the match setup is complete, we can create certificates and profiles for development and for the App Store.
fastlane match appstore
# for the appstore
fastlane match development
# for the development
When the above command is executed, it will add the certificates to the private repo.
Build the iOS app
Another fastlane feature, gym, will be used to build the iOS IPA app. gym will also help automate the deployment and distribution of beta software.
Upload the build
Now it’s time to upload our build. We’ll use the upload_to_testflight function for the TestFlight upload and deliver for the App Store submission. The deliver service is a part of fastlane; it is used to upload metadata and IPA to the App Store.
Automating workflows with GitHub Actions
GitHub Actions is a new GitHub feature that makes it easy to create and run workflows in the cloud. We’ll set up the GitHub Actions to automate the build and release workflow for Android and iOS distributions.
First, we’ll add two separate workflows for iOS and Android. At the project’s root level, we’ll create a .github folder; under this folder, we’ll create another folder called workflows. Then, we’ll add ios_release.yml for the iOS release and android_release.yml for the Android release to the .github > workflows folder.
mkdir .github && cd .github && mkdir workflows && cd workflows && touch andriod_release.yml && touch ios_release.yml
Defining GitHub Actions workflows
We’ll define the GitHub Actions workflows, like so:
on:
  push:
    tags:
      - 'android*'
The build for the Android release will start when we add a tag that includes an android keyword, as defined above. Here’s an example:
git tag -a 'versions' -m "andriod release"
Two jobs are defined for the Android release workflows, one for the beta release and one for the Google Play release.
Next, we’ll define the latest version of an Ubuntu virtual machine to run the GitHub Actions workflows.
name: Build and deploy Android release
on:
  push:
    tags:
      - 'android*'
jobs:
  testFlight-build:
    name: android-beta-build
    runs-on: ubuntu-latest
    strategy:
      matrix:
        node-version: [12.x]
    steps:
      - uses: actions/setup-node@v1
        with:
          node-version: $
      - name: Checkout to git repository
        uses: actions/checkout@v2
      - name: Install dependencies
        run: |
          yarn install
      - name: Install Fastlane
        uses: actions/setup-ruby@v1
        with:
          ruby-version: 2.6
      - name: Install npm dependencies
        run: |
          yarn install
      - name: Install Fastlane
        run: |
          bundle install
          bundle update fastlane
      - name: Build and upload to TestFlight
        run: |
          bundle exec fastlane android beta
          env:
             ANDROID_KEYSTORE_FILE: $
             ANDROID_KEYSTORE_PASSWORD: $
             ANDROID_KEYSTORE_ALIAS: $
             ANDROID_KEYSTORE_PASSWORD: $
  release-build:
    name: Android-release-build
    runs-on: ubuntu-latest
    strategy:
      matrix:
        node-version: [12.x]
    steps:
      - uses: actions/setup-node@v1
        with:
          node-version: $
      - name: Checkout to git repository
        uses: actions/checkout@v2
      - name: Install dependencies
        run: |
          yarn install
      - name: Install Fastlane
        uses: actions/setup-ruby@v1
        with:
          ruby-version: 2.6
      - name: Install npm dependencies
        run: |
          yarn install
      - name: Install Fastlane
        run: |
          bundle install
          bundle update fastlane
      - name: release-build
        run: |
          bundle exec fastlane android release
          env:
             ANDROID_KEYSTORE_FILE: $
             ANDROID_KEYSTORE_PASSWORD: $
             ANDROID_KEYSTORE_ALIAS: $
             ANDROID_KEYSTORE_PASSWORD: $
In the above code, we define a series of the steps, which are the predefined actions provided by either the GitHub marketplace or supported by the community.
We add the steps for installing the npm dependencies, adding the required Node.js version, and installing fastlane in the next series of events as shown in the above code.
Lastly, we run the fastlane build for the beta and release jobs. We also use GitHub Actions Secrets to define the environment variable required during the build workflow.
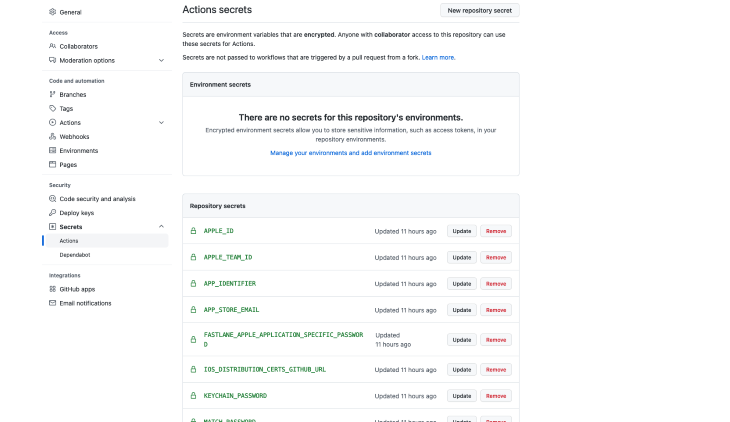
Creating and storing secrets for Github Actions
Encrypted secrets allow us to store sensitive information. We can add our environment variables, key, and passwords to the GitHub repo as encrypted secrets. The repository’s secrets will be accessible to any workflows that are put up on the repo.
To add the secrets, go to the repo’s Settings menu. Under the Secrets > Actions section (left nav), click the New repository secret button (top right) to add the new secret.
Adding secrets for Android and iOS apps is required throughout the procedure to correctly sign your app before upload.
Defining iOS workflows
As previously mentioned, we are separating the iOS and Android release by creating a distinct ios release.yml file under the .github > workflows folder. The build for the iOS release will start when we add a tag that includes ios keywords.
Here’s an example:
git tag -a 'versions' -m "ios release"
For the iOS release, we’ll specify two jobs: one for the TestFlight release and one for the App Store release.
Next, we’ll define the latest version of macos-latest virtual machine to run the GitHub Actions workflows for the iOS distributions.
name: Build and deploy iOS release
on:
  push:
    tags:
      - 'ios*'
jobs:
  testFlight-build:
    name: iOS-testFlight-build
    runs-on: macos-latest
    strategy:
      matrix:
        node-version: [12.x]
    steps:
      - uses: actions/setup-node@v1
        with:
          node-version: $
      - name: Checkout to git repository
        uses: actions/checkout@v2
      - name: Install dependencies
        run: |
          yarn install
      - name: Install Fastlane
        uses: actions/setup-ruby@v1
        with:
          ruby-version: 2.6
      - name: Install npm dependencies
        run: |
          yarn install
      - name: Install Fastlane
        run: |
          bundle install
          bundle update fastlane
      - name: Build and upload to TestFlight
        run: |
          bundle exec fastlane ios beta
          env:
             APPLE_ID: $
             APP_STORE_EMAIL: $
             APPLE_TEAM_ID: $
             IOS_DISTRIBUTION_CERTS_GITHUB_URL: $
             MATCH_PASSWORD: $
  release-build:
    name: iOS-testFlight-build
    runs-on: macos-latest
    strategy:
      matrix:
        node-version: [12.x]
    steps:
      - uses: actions/setup-node@v1
        with:
          node-version: $
      - name: Checkout to git repository
        uses: actions/checkout@v2
      - name: Install dependencies
        run: |
          yarn install
      - name: Install Fastlane
        uses: actions/setup-ruby@v1
        with:
          ruby-version: 2.6
      - name: Install npm dependencies
        run: |
          yarn install
      - name: Install Fastlane
        run: |
          bundle install
          bundle update fastlane
      - name: Build and upload to TestFlight
        run: |
          bundle exec fastlane ios beta
          env:
             APPLE_ID: $
             APP_STORE_EMAIL: $
             APPLE_TEAM_ID: $
             IOS_DISTRIBUTION_CERTS_GITHUB_URL: $
             MATCH_PASSWORD: $
Now, we define a series of steps for installing the npm dependencies, adding the required Node.js version, and installing fastlane in the next series of events as shown in the above code.
Finally, we run the fastlane build for the TestFlight release. We use GitHub Actions Secrets to define the environment variable required during the build workflow.
Conclusion
In this article, we demonstrated how to set up fastlane in React Native projects. Using fastlane and GitHub Actions together simplifies the build and release for iOS and Android apps and improves the deploy pipeline for build, test, and release distributions.
Refer to the official docs to learn more about fastlane and GitHub Actions.
The post fastlane: Build, test, and ship React Native apps appeared first on LogRocket Blog.
from LogRocket Blog https://ift.tt/dOsPWyH
Gain $200 in a week
via Read more


