


One of the primary features of decentralized applications (DApps) is the ability to connect a wallet, which in turn allows the user to interact with transactions on the DApp. It abstracts functionalities like switching networks, providing signers, and other features that provide users with a form of authentication. Connecting a wallet also acts as a gateway that allows users to make and read actions on the blockchain through the DApp, using their wallet address as an authorized identity.
WalletConnect is a free and open source protocol that makes it possible to connect our DApps to multiple wallets, including MetaMask, Trust Wallet, Rainbow, and others. This protocol abstracts this process by establishing a connection between the DApp and the wallet, keeping them in sync throughout the session.
In this article, we’ll use WalletConnect to link our wallet app to our DApp, using Vue.js on the front end. One thing to note is that WalletConnect can be used on any DApp, chain, and wallet (custodial and non-custodial) that are wallet-connect compatible.
You can find the source code for this tutorial here, and a demo of the app we’ll be building here.
Contents
- Getting started with a Vue.js app
- Building the UI
- Instantiating WalletConnect
- Adding functionality using composables
- Creating actions
- Implementing logic in our components
- Adding auto connect
Getting started with a Vue.js app
Firstly, let’s use the Vue CLI to kickstart the project. If you already have Vue CLI installed on your system, you can go on to create the Vue project directly.
You can install it globally with this command:
npm install -g @vue/cli
We can now use the Vue CLI to create our project. Create a new project using this command:
vue create vue-wallet-connect
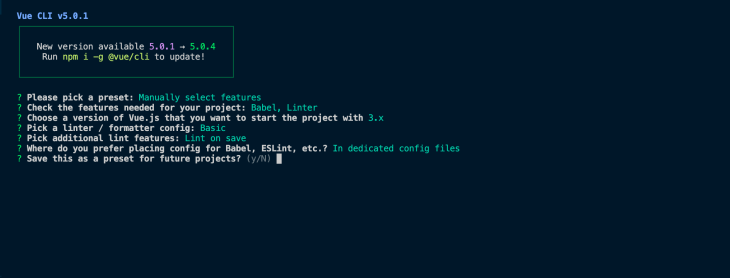
You will need to pick a preset. Choose Manually select features, then select the options as shown below:
After the project has been created, navigate to the new project folder:
cd vue-wallet-connect
We’ll be using Ethers.js in our Vue app to directly interact with the blockchain while connecting our wallet:
npm i ethers
Here, we install the WalletConnect library into your project:
npm install --save web3 @walletconnect/web3-provider
Next, to use the WalletConnect library directly in Vue 3, we need to install node-polyfill-webpack-plugin:
npm i node-polyfill-webpack-plugin
We are installing it because our project uses webpack v5, where polyfill Node core modules were removed. So, we are installing it to access these modules in the project.
Now, open the vue.config.js file and replace it with this block of code:
const { defineConfig } = require("@vue/cli-service");
const NodePolyfillPlugin = require("node-polyfill-webpack-plugin");
module.exports = defineConfig({
  transpileDependencies: true,
  configureWebpack: {
    plugins: [new NodePolyfillPlugin()],
    optimization: {
      splitChunks: {
        chunks: "all",
      },
    },
  },
});
Once that is done you can now start the server:
npm run serve
Building the UI
Let’s go into the components folder and create a new file called StatusContainer.vue. This component contains our main page.
It it, we have our welcome message, the Connect Wallet button that helps us connect, and our Disconnect button to disconnect us from the wallet. Finally, the Connected button displays when we successfully connect to a wallet:
<template>
  <div class="hello">
    <h1>Welcome to Your Vue.js Dapp</h1>
    <div >
       <button class="button">Connected</button>
       <button class="disconnect__button">Disconnect</button>
    </div>

    <button class="button"> Connect Wallet</button>
  </div>
</template>
<script>
export default {
  name: 'StatusContainer'
}
</script>
Once that’s done, open the App.vue file and import the StatusContainer component like so:
<template>
  <status-container/>
</template>
<script>

import StatusContainer from './components/StatusContainer.vue'
export default {
  name: 'App',
  components: {
    StatusContainer
  }
}
</script>
<style>
@import url('https://fonts.googleapis.com/css2?family=Sora:wght@100&display=swap');
#app {
  font-family: 'Sora', sans-serif;
  -webkit-font-smoothing: antialiased;
  -moz-osx-font-smoothing: grayscale;
  text-align: center;
  color: #2c3e50;
  margin-top: 60px;
}
.button {
      background-color: #1c82ff;
    border: none;
    color: #ffffff;
    font-family: "Sora";
    border-radius: 3rem;
    padding: 2rem 3rem;
    font-weight: 600;
    font-size: 2rem;
    margin: 1rem 1rem 1rem auto;
    width: 40%;
}
.disconnect__button {
     background-color: red;
    border: none;
    color: #ffffff;
    font-family: "Sora";
    border-radius: 3rem;
    padding: 1rem 1.3rem;
    font-weight: 600;
    font-size: 1rem;
    margin: 8rem 1rem 1rem auto;
    width: 20%;
}
</style>
Within our style tag, we now add styles for the buttons we created earlier: .button and .disconnect__button. Also, we import the Sora custom font from Google Fonts and use it as our font-family.
Instantiating WalletConnect
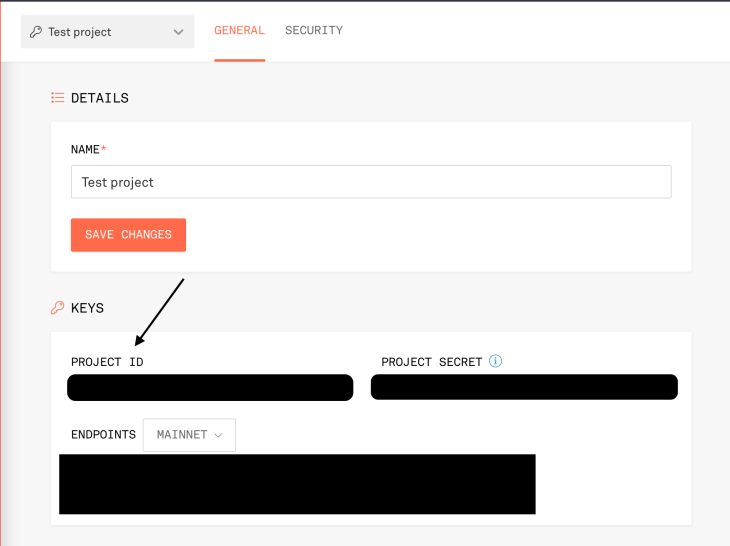
We’ll be needing an RPC provider to instantiate our WalletConnect library. For this example, we’ll use Infura. Open Infura, create a new project, and grab the Project ID.
Now, create a new walletConnect folder under the src folder: src/walletConnect. Within this folder, let’s create a provider.js file. Here, we import our WalletConnect library, instantiate it using our Infura ID, and export it for use in other files.
src/walletConnect/provider.js will look like this:
import WalletConnectProvider from "@walletconnect/web3-provider";
export const provider = new WalletConnectProvider({
  infuraId: process.env.VUE_APP_INFURA_ID,
});
The Infura ID should be used as an environmental variable. So add the following to your .env file:
VUE_APP_INFURA_ID=
Adding functionality using composables
After creating our interface and successfully instantiating our library, the next step is to implement our functionalities. To do this, we’ll use Vue composables, because it allows us to use our state and actions in any component within the app, similar to what we have with Pinia and Vuex.
Creating a composable
Inside the src folder, add src/composables/connect. Within the connect folder, let’s create an index.js file.
Here, we import reactive and watch, which we’ll use in this file. Let’s create our state object called defaultState:
import { reactive, watch } from "vue";

const defaultState = {
  address: "",
  chainId: "",
  status: false,
};

const state = defaultState
In a bid to keep our state consistent, we sync the state with an item in the local storage. Let us name this item "userState" and assign it to a variable called STATE_NAME. This is done to avoid making mistakes when repeating "userState" in multiple places:
const STATE_NAME = "userState";
We now use watch to update our local storage once there are any changes in our state:
watch(
  () => state,
  () => {
    localStorage.setItem(STATE_NAME, JSON.stringify(state));
  },
  { deep: true }
);
Next, we create a getDefaultState function that checks if our STATE_NAME item in the local storage exists and assigns the local storage item to the state. If our local storage item does not exist, it assigns the defaultState to state.
Now, we can delete const state = defaultState and use reactive to assign const state = reactive(getDefaultState());:
const getDefaultState = () => {
  if (localStorage.getItem(STATE_NAME) !== null) {
    return JSON.parse(localStorage.getItem(STATE_NAME));
  }
  return defaultState;
};
const state = reactive(getDefaultState());
Finally, we export our state. We also add an if statement that checks if our local storage item does not exist. If it doesn’t, it creates the item and assigns state to local storage:
 export default () => {
  if (localStorage.getItem(STATE_NAME) === null) {
    localStorage.setItem(STATE_NAME, JSON.stringify(state));
  }
  return {
    state,
  };
};
Now, our state always syncs with the local storage, ensuring consistency.
Let’s look at src/composables/connect/index.js:
import { reactive, watch } from "vue";

const defaultState = {
  address: "",
  chainId: "",
  status: false,
};

const STATE_NAME = "userState";
const getDefaultState = () => {
  if (localStorage.getItem(STATE_NAME) !== null) {
    return JSON.parse(localStorage.getItem(STATE_NAME));
  }
  return defaultState;
};
const state = reactive(getDefaultState());

watch(
  () => state,
  () => {
    localStorage.setItem(STATE_NAME, JSON.stringify(state));
  },
  { deep: true }
);
export default () => {
  if (localStorage.getItem(STATE_NAME) === null) {
    localStorage.setItem(STATE_NAME, JSON.stringify(state));
  }
  return {
    state,
  };
};
Creating actions
Our actions consist of functions that’ll be using in our app. We’ll be creating three functions:
connectWalletConnect, which triggers the WalletConnect modal to connect with walletsautoConnect, which handles consistency within our WalletConnect session after the DApp is connected, so when the DApp is connected and you refresh the page, the user’s session is still activedisconnectWallet, which disconnects the DApp from the wallet and ends the user’s session
Let’s jump right into the code!
connectWalletConnect
Still within our connect folder (src/composables/connect), create the connectWalletConnect file. First, we import our index file, providers from ethers, and our provider that we created earlier in our src/walletConnect/provider.js file:
import { providers } from "ethers";
import connect from "./index";
import { provider } from "../../walletConnect/provider";

const connectWalletConnect = async () => {
  try {
    const { state } = connect();
    //  Enable session (triggers QR Code modal)
    await provider.enable();
    const web3Provider = new providers.Web3Provider(provider);
    const signer = await web3Provider.getSigner();
    const address = await signer.getAddress();
    state.status = true;
    state.address = address;
    state.chainId = await provider.request({ method: "eth_chainId" });

    provider.on("disconnect", (code, reason) => {
      console.log(code, reason);
      console.log("disconnected");
      state.status = false;
      state.address = "";
      localStorage.removeItem("userState");
    });

    provider.on("accountsChanged", (accounts) => {
       if (accounts.length > 0) {
        state.address = accounts[0];
      }
    });

    provider.on("chainChanged", (chainId) => {
      state.chainId = chainId
    });
  } catch (error) {
    console.log(error);
  }
};
export default connectWalletConnect;
Next, we have a try-catch statement. Within our try statement, we get our state from connect() and pop up our QR modal for connection. Once connected, we assign our address and chainId to the state properties and make our state.status read true.
We then watch three events with the provider: disconnect, accountsChanged, and chainChainged.
disconnectis triggered once the user disconnects directly from their walletaccountsChangedis triggered if the user switches accounts in their wallet. If the length of theaccountarray is greater than zero, we assign ourstate.addressto the first address in the array (accounts[0]), which is the current addresschainChaingedis triggered if the user switches their chain/network. For example, if they switch their chain from Ethereum mainnet to rinkeby testnet, our application changes thestate.chainIdfrom1to4
Then, our catch statement simply logs any error to the console.
Go back into the index.js file in the connect folder and import the connectWalletConnect action. Here, we create an actions object and export it with our state:
import { reactive, watch } from "vue";
import connectWalletConnect from "./connectWalletConnect";

const STATE_NAME = "userState";
const defaultState = {
  address: "",
  chainId: "",
  status: false,
};
const getDefaultState = () => {
  if (localStorage.getItem(STATE_NAME) !== null) {
    return JSON.parse(localStorage.getItem(STATE_NAME));
  }
  return defaultState;
};
const state = reactive(getDefaultState());
const actions = {
  connectWalletConnect,
};
watch(
  () => state,
  () => {
    localStorage.setItem(STATE_NAME, JSON.stringify(state));
  },
  { deep: true }
);
export default () => {
  if (localStorage.getItem(STATE_NAME) === null) {
    localStorage.setItem(STATE_NAME, JSON.stringify(state));
  }
  return {
    state,
    ...actions,
  };
};
autoConnect
Let’s move on to autoConnect.js, and our actions. Similar to connectWalletConnect, create an autoConnect.js file. We import the index file and destructure it to get our state and connectWalletConnect using connect():
import connect from "./index";

const autoConnect = () => {
  const { state, connectWalletConnect } = connect();
  if (state.status) {
    if (localStorage.getItem("walletconnect") == null) {
      console.log("disconnected");
      console.log("disconnected");
      state.status = false;
      state.address = "";
      localStorage.removeItem("userState");
    }
    if (localStorage.getItem("walletconnect")) {
      (async () => {
        console.log("start");
        connectWalletConnect();
      })();
    }
  }
};
export default autoConnect;
One thing you should know is that once WalletConnect has successfully connected to a DApp, all the information concerning that wallet (including the address and chain ID) is in the local storage under an item called walletconnect. Once the session is disconnected, it’s automatically deleted.
autoConnect checks if our state.status is true. If so, we check if there’s a walletConnect item in local storage. If it’s not in the local storage, we delete all existing data in our state and the userState item in the local storage.
However, if walletconnect is present in your local storage, we have an async function that ”reactivates” that existing session for our DApp by firing connectWalletConnect();. So, if we refresh the page, the connection remains active, and can listen to our provider events.
disconnectWallet
Let’s look at our last action: disconnectWallet. This action allows us to end the session from the DApp itself.
First, we import our provider and state. Then, we use provider.disconnect(); to disconnect the session, after which we reset the state back to default, and delete the "userState" item in our local storage:
import { provider } from "../../walletConnect/provider";
import connect from "./index";
const disconnectWallet = async () => {
    const { state } = connect();
    await provider.disconnect();
    state.status = false;
    state.address = "";
    localStorage.removeItem("userState");
  }
export default disconnectWallet;
We can now go back to our src/composables/connect/index.js and update the actions object like so:
const actions = {
  connectWalletConnect,
  autoConnect,
  disconnectWallet
};
Implementing logic in our components
Let’s open our StatusContainer component and connect the logic in our composables to the interface. As usual, import your composable file and destructure it to get the actions (connect and disconnect) and our state:
<script>
import connect from '../composables/connect/index';
export default {
  name: 'StatusContainer',
  setup: () => {
    const { connectWalletConnect, disconnectWallet, state } = connect();
    const connectUserWallet = async () => {
      await connectWalletConnect();
    };

    const disconnectUser = async() => {
      await disconnectWallet()
    }
    return {
      connectUserWallet,
      disconnectUser,
      state
    }
  }
}
</script>
We then return the functions (disconnectUser, connectUserWallet) and state to be used in the template:
 <template>
  <div class="hello">
    <h1>Welcome to Your Vue.js Dapp</h1>
    <div v-if="state.status">
       <button  @click="connectUserWallet" class="button">Connected</button>
       <h3>Address: </h3>
       <h3>ChainId: </h3>
       <button  @click="disconnectUser" class="disconnect__button">Disconnect</button>
    </div>

    <button v-else @click="connectUserWallet" class="button"> Connect Wallet</button>
  </div>
</template>
First, we use v-if to display things conditionally, using state.status. If we’re connected and state.status is true, we display the Connected button, the user address, and chainId. Also, we’ll display a Disconnect button that triggers our disconnectUser function.
If the user is not connected and state.status is false, we display only the Connect Wallet button that triggers our connectUserWallet function when we click.
Adding auto connect
Let’s go into our App.vue component and add our autoConnect logic to the component. Similarly to what we have done before, we import our composable and destructure it to get out autoConnect action. Using Vue’s onMounted, we will fire the autoConnect() function. As mentioned earlier, this allows us to listen to live events from the wallet even we refresh the page:
<script>
import StatusContainer from './components/StatusContainer.vue'
import connect from './composables/connect/index';
import {onMounted} from "vue";
export default {
  name: 'App',
  components: {
    StatusContainer
  },
  setup: () => {
    const { autoConnect} = connect();
     onMounted(async () => {
      await autoConnect()
    })
  }
}
</script>
Conclusion
Congratulations if you made it all the way here! 
In this article, we covered step-by-step details on implementing WalletConnect in your Vue DApps. From setting up our project with the correct config and building our interface, to writing the necessary logic to ensure our app is always in sync with the wallet.
The post Integrating WalletConnect into Vue.js DApps appeared first on LogRocket Blog.
from LogRocket Blog https://ift.tt/2S56z8P
via Read more


