


Since the introduction of Node.js, basic web technologies (HTML, CSS, and JavaScript) have grown so much that we can now build multi-device/multi-platform applications with them. This massive development also resulted in the introduction of frameworks and libraries, which simplified our job even further. Next.js and Electron are significant examples on this list.
In this article, we’ll be exploring Nextron, a package that combines the powerful features of Next.js and Electron to enable us to create multi-platform desktop applications in the easiest and most enjoyable way ever.
We’ll cover the following sections:
- Setting up your Nextron project
- The file structure for a Nextron project
- How Nextron works
- Pages
- Using layouts
- Creating new windows
- Electron APIs
- Building a demo app
Prerequisites
The following prerequisites are required to follow along with this tutorial:
- Familiarity with JavaScript
- Basic familiarity with the command line/terminal
- Previous experience working with Next.js and Electron might help, but is not required
Setting up your Nextron project
You can easily create a new Nextron application by running:
npx create-nextron-app appName
Nextron also provides various example templates that support TypeScript as well as popular CSS frameworks, such as Tailwind CSS, Ant Design, Material UI, and Emotion. All of the templates can be found here, and after deciding on which to choose for your project, you can install them by prefixing the installation command with the preferred example template along with the --example flag. So if you want to use the TypeScript and Tailwind templates, you’ll have to run:
npx create-nextron-app appName --example with-typescript-tailwindcss
Running the installation command will create all the necessary files and directories for our project. However, we’ll still need to install all the required dependencies with the command below:
npm install
# OR
yarn
Once this is completed, we can start our application with:
npm run dev
# OR
yarn dev
This will immediately open a new window for our application, as shown in the screenshot below:
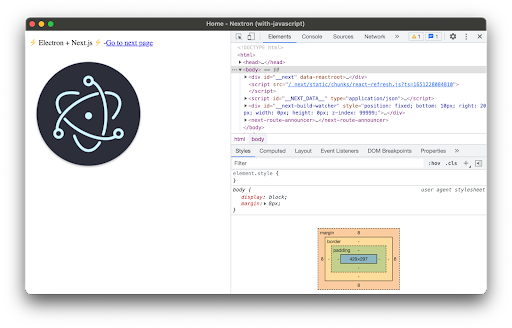
You can also close the dev tool so that you are able to access the application fullscreen.
The file structure for a Nextron project
While there may be minor changes, mostly depending on the example template you choose during installation, the file structure for a typical Nextron project is as follows:
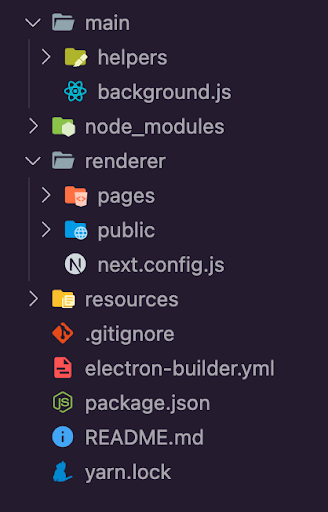
And as you might have noticed, all the Next.js-related code is located inside the /render folder. Some other files and directories that you might not be familiar with include:
main/helpers— This directory exports a module calledcreateWindow, which uses Electron’sBrowserWindowfunction to create our desktop application window. We can configure the default app window options here, such as its initial size and positionmain/background.js— This file is where thecreateWindowfunction is initialized and is responsible for serving our Next.js application as an Electron applicationresources/— We may put our desktop application resources, such as app icons, here
How Nextron works
It’s pretty easy to grasp how Nextron works behind the scenes. It automatically checks if your application is running in development mode or in production. If in development mode, Nextron takes the localhost URL generated by running a Next.js application and serves it as an Electron app. However, if in production, Nextron takes the static files generated from a Next.js build and renders them instead.
Pages
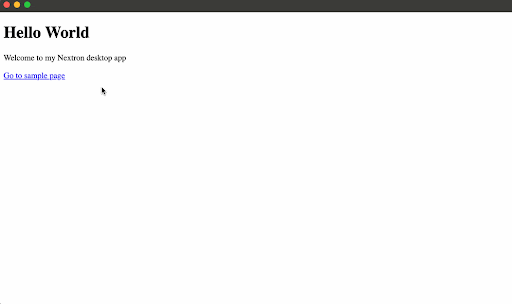
Pages function exactly the same way as they would in a standard Next.js application, with no exception. To try things out, let’s create a new sample.js file inside the renderer/pages directory with the following content:
import Link from "next/link";

const sample = () => {
  return (
    <>
      <div>
        <h1>Hello world</h1>
        <p>Welcome to sample page</p>
        <Link href="/home">
          <a>Go Home</a>
        </Link>
      </div>
    </>
  );
};

export default sample;
And also update the default home.jsx file in this same directory with the content below, so that it links to our new page instead:
import Link from "next/link";

const Home = () => {
  return (
    <>
      <h1>Hello World</h1>
      <p>Welcome to my Nextron desktop app</p>
      <Link href="/sample">
        <a>Go to sample page</a>
      </Link>
    </>
  );
};

export default Home;
We have the following results:
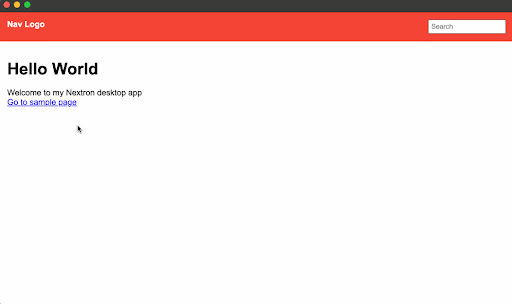
Using layouts
Layouts operate just as they would in a regular Next.js application, with no exceptions either. For example, suppose we have a navbar that we want to share across multiple pages in our desktop application. First, we’ll need to create our layout file; for example, a new layout.js file within the /renderer directory with the following content:
const Layout = ({ children }) => {
  return (
    <>
      <nav>
        <h2>Nav Logo</h2>
        {/* more navbar code here */}
      </nav>
      <main>{children}</main>
    </>
  );
};

export default Layout;
And since Nextron doesn’t automatically include the _app.js file, which would normally come with an application created with the create-next-app package, we’ll have to create one manually as well and include our layout:
//_app.js
import Layout from "../layout";

export default function MyApp({ Component, pageProps }) {
  return (
    <Layout>
      <Component {...pageProps} />
    </Layout>
  );
}
With a little CSS applied to the navbar and the pages we’ve previously generated, we’ll get the following results:
Creating new windows
While the use of this is very uncommon, it is also possible to programmatically create new windows. We would typically have used Electron’s BrowserWindow to accomplish this, but Nextron already exports a helper method called createWindow for us, which we can use instead.
Assume we want to open the /sample page we created earlier in a new window. We’ll need to first update main/background.js to incorporate support for this new window:
import { app, ipcMain } from "electron";
. . .

  const mainWindow = createWindow("main", {
    width: 1000,
    height: 600,
  });
  const sampleWindow = createWindow("sample", {
    width: 700,
    height: 400,
    show: false,
  });

  if (isProd) {
    await mainWindow.loadURL("app://./home.html");
    await sampleWindow.loadURL("app://./sample.html");
  } else {
    const port = process.argv[2];
    await mainWindow.loadURL(`http://localhost:${port}/home`);
    await sampleWindow.loadURL(`http://localhost:${port}/sample`);
  }

  ipcMain.on("show-sample", () => {
    sampleWindow.show();
  });
. . .
In the code provided above, immediately after creating the mainWindow, we create another window (sampleWindow), setting its initial width and height to 700×400 and also setting its show value to false so that this window is not visible by default. And using Electron’s ipcMain event emitter, we are listening for an event show-sample, so that when this event is emitted, we display the new sampleWindow.
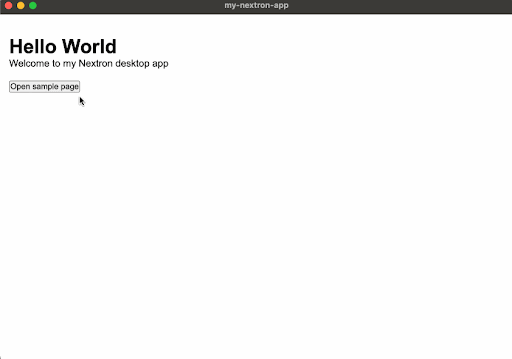
The next step would be to emit this event programmatically, and we can also do that easily with ipc in a page. For example, in render/home.jsx:
import electron from "electron";
const ipcRenderer = electron.ipcRenderer || false;

const Home = () => {
  const openWindow = () => {
    ipcRenderer.send("show-sample");
  };

  return (
    <>
      <h1>Hello World</h1>
      <p>Welcome to my Nextron desktop app</p>
      <button onClick={openWindow}>Open sample page</button>
    </>
  );
};

export default Home;
If we run our application, we’ll have the following output:
Furthermore, we can also open an external URL in a new window by adding the target=_blank attribute or using a JavaScript window.open() method to open the target URL.
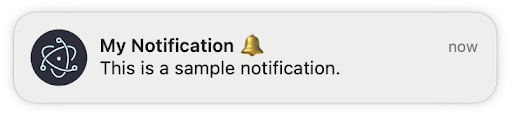
Electron APIs
Browser-based APIs and the Electron APIs work graciously too, and you can directly import them into any page. An example is the browser notification API, which we can utilize on a page like below:
const showNotification = () => {
  const notificationTitle = "My Notification ";

  new Notification(notificationTitle, {
    body: "This is a sample notification.",
  }).onclick = () => console.log("Notification Clicked");
};
";
new Notification(notificationTitle, {
body: "This is a sample notification.",
}).onclick = () => console.log("Notification Clicked");
};
And any time we perform an action that triggers the showNotification function, we’ll immediately get a notification on our desktop. Here’s an example of a macOS notification:
Building a demo app
Once you’re done coding your application, you’ll definitely want to generate an executable file so that you can share the application with others. Nextron handles this with electron-builder. We can generate the executable for our Nextron project with the command below:
npm run build
# OR
yarn build
You can also update the script section in your package.json file to include other build options:
. . .
{
  "scripts": {
    "build": "nextron build",
    "build:all": "nextron build --all",
    "build:win32": "nextron build --win --ia32",
    "build:win64": "nextron build --win --x64",
    "build:mac": "nextron build --mac --x64",
    "build:linux": "nextron build --linux"
  }
}
So, if we want to generate an executable for Windows 64 bit, we’ll use the following command:
npm run build:win64
# OR
yarn build:64
Conclusion
In this article, we’ve looked at Nextron, a JavaScript package that allows us to effortlessly create desktop applications with Electron and Next.js. We looked at creating new pages, application layout, new windows, using Electron APIs, and lastly generating executable files for your application.
The post Building an app with Next.js and Electron appeared first on LogRocket Blog.
from LogRocket Blog https://ift.tt/ye1j64t
via Read more


