


What are Offsets?
Chances are you’ve seen or used Offsets while building your applications with Flutter, but have you ever considered what exactly they are?
Essentially, an Offset is just a representation of an xy coordinate from a point of origin, but can also be interpreted as a vector. Because of this, throughout the course of this article I’ll be using the term “vector” and “offset” interchangeably. A vector is simply a quantity or force moving in a specific direction at a given magnitude.
Congrats, now you know what Offsets are, thanks for reading!
I’m just kidding; the aim of this article is not just to define what an Offset is, but to expose the helpful properties and methods contained in the Offset class. We’ll also learn about operations that can be performed on an Offset, while getting our hands dirty with some code examples.
Contents
- Sample app setup
- Constructing an Offset in Flutter
- Exploring Offset properties
- Exploring Offset methods
- Operations that can be performed on an Offset
- Conclusion
While there are other cases in which Offsets can be applied, for the purpose of understanding what these properties are and how these methods affect an Offset, we’ll be using CustomPainter so we can see the action visually.
Setup
To set up our sample Flutter project, first run flutter create offset_demo. Then, replace the main.dart file with the code snippet below:
void main() {
  runApp(const MyApp());
}

class MyApp extends StatelessWidget {
  const MyApp({Key? key}) : super(key: key);

  // This widget is the root of your application.
  @override
  Widget build(BuildContext context) {
    return const MaterialApp(
    title: 'Offsets Demo',
    home: Home(),
    );
  }
}

class Home extends StatelessWidget {
  const Home({Key? key}) : super(key: key);

  @override
  Widget build(BuildContext context) {
    final size = MediaQuery.of(context).size;

    return CustomPaint(
    size: size,
    painter: PlaygroundPainter(),
    );
  }
}
The CustomPaint widget is used to display a CustomPainter subclass, where the painting magic is done.
Next, we create the PlaygroundPainter by subclassing CustomPainter and implementing the required methods:
import 'package:flutter/material.dart';

class PlaygroundPainter extends CustomPainter {
  @override
  void paint(Canvas canvas, Size size) {
    /// We shift the coordinates of the canvas
   /// so that the point of origin moves to the center of the screen
    canvas.translate(size.width / 2, size.height / 2);
  }

  /// Since this is a static drawing, we set this to false
  @override
  bool shouldRepaint(PlaygroundPainter oldDelegate) => false;
}
Constructing an Offset in Flutter
In Flutter, there are two ways of constructing an Offset.
The first way is using the Offset constructor and passing in the x and y value like this:
Offset(double dx, double dy)
To demonstrate how to position an entity with an Offset, we’ll draw a red circle and position it 20px to the right from the point of origin. Note that the center of origin by default is the top left corner of the screen, but to make things easier, we shifted the canvas coordinates so that the point of origin is at the center of the screen by calling canvas.translate(width/2, height/2).
Let’s add the code below under paint() in the play_ground_painter.dart file to achieve the red circle:
const circlePosition = Offset(20, 0);

canvas.drawCircle(circlePosition, 20, Paint()..color = Colors.red);
The second way to construct an Offset in Flutter is using the fromDirection() constructor to pass in the direction and distance. We’ll talk about these concepts soon, but for now, let’s look at how to create an Offset from direction and distance below:
Offset.fromDirection(double direction, [ double distance = 1.0 ])
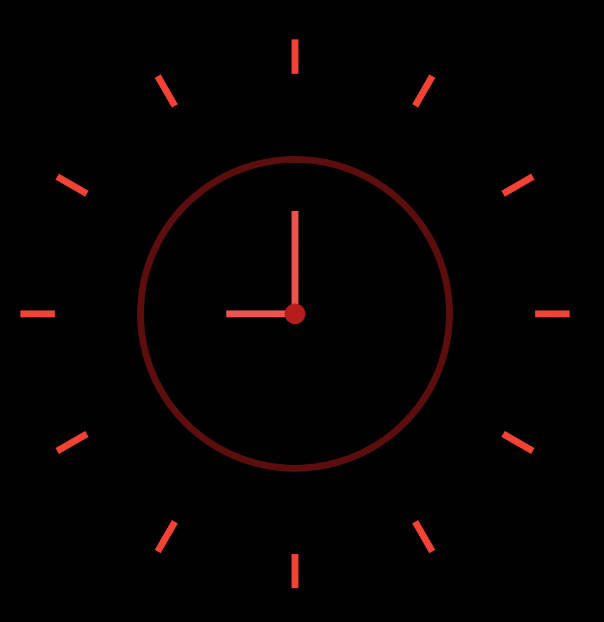
To demonstrate this, let’s draw a very simple clock in order to get the offset for each five minute marker. We’ll make use of the Offset.fromDirection and pass in the angle and the magnitude of each marker, as demonstrated in the images below:
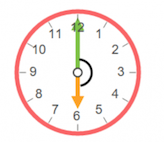
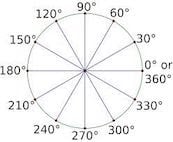
To use the fromDirection Offset constructor, we’ll need to convert the angles from degrees to radians. We’ll do that by using the formula

The code is below:
class ClockPainter extends CustomPainter {
  @override
  void paint(Canvas canvas, Size size) {
    /// We shift the coordinates to the center of the screen
    canvas.translate(size.width / 2, size.height / 2);

     // Total angle of a circle is 360
    const totalDegree = 360;

     // Total ticks to display
    const totalTicks = 12;


     /// The angle between each tick
    const unitAngle = totalDegree / totalTicks;

    final clockPaint = Paint()
    ..color = Colors.red[900]!.withOpacity(.5)
    ..style = PaintingStyle.stroke
    ..strokeWidth = 4;

    /// Draws the clock circle frame
    canvas.drawCircle(
    Offset.zero,
    90,
    clockPaint,
    );

    /// Draws the clock hour hand
    canvas.drawLine(
    Offset.zero,
    Offset.fromDirection(math.pi, 40),
    Paint()
        ..color = Colors.red[400]!
        ..strokeWidth = 4,
    );

    /// Draws the clock minute hand
    canvas.drawLine(
    Offset.zero,
    Offset.fromDirection(-math.pi / 2, 60),
    Paint()
        ..color = Colors.red[400]!
        ..strokeWidth = 4,
    );

    /// Draws the center smaller circle
    canvas.drawCircle(
    Offset.zero,
    6,
    clockPaint
        ..style = PaintingStyle.fill
        ..color = Colors.red[900]!,
    );


 for (int i = 0; i <= 11; i++) {
    /// calculates the angle of each tick index
    /// reason for adding 90 degree to the angle is
    /// so that the ticks starts from
    final angle = -90.radians + (i * unitAngle).radians;

    /// Draws the tick for each angle
    canvas.drawLine(
        Offset.fromDirection(angle, 70),
        Offset.fromDirection(angle, 80),
        Paint()
        ..color = Colors.red
        ..strokeWidth = 4,
    );
    }
  }

  @override
  bool shouldRepaint(ClockPainter oldDelegate) => false;
}
This extension is a way to add new functionality to existing libraries and classes:
extension on num {
 /// This is an extension we created so we can easily convert a value  /// to a radian value
 double get radians => (this * math.pi) / 180.0;

}
When the above code is run, this image below is the result.
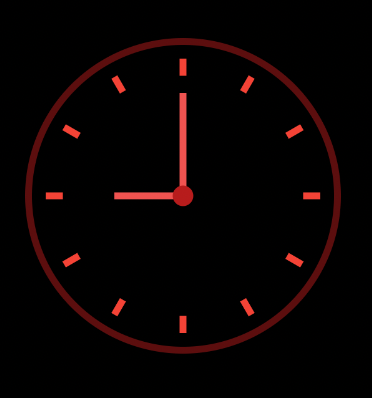
Here’s what is happening in the code above:
First, we draw the circle frame (a circle with a radius of 90) and position it at the center of the screen by giving it a zero Offset.
We draw the hour hand by calling canvas.drawLine() and passing in a start point of zero Offset, Offset direction of -3.142rad (π), and a distance (magnitude) of 40px as the endpoint.
We draw the clock minute hand by calling canvas.drawLine(), passing in a start point of zero Offset, an Offset direction of -1.571rad (π/2) and a distance of 60px as the endpoint.
We then draw a smaller circle of radius six and position it in the middle. To draw the five minute markers, we use a for-loop to loop from zero to 11. We get the angle of each marker and draw the line by passing in a start and end Offset to canvas.drawLine(). Finally, we use the Offset.direction()constructor to pass in the angle and the distance.
Exploring Offset properties
This section will focus on Offset properties. Hopefully, you’ll get to appreciate what the Flutter team provides with Offsets, as they hide a lot of hectic implementation in these easy-to-use properties.
Offset dx
On the horizontal axis, this property holds the value of how far the Offset is from the point of origin.
Offset dy
On the vertical axis, this property holds the value of how far the Offset is from the point of origin.
Offset distance
Remember that Offset can also be interpreted as a vector, so we can rightfully say that the distance between two Offsets is the magnitude of the vector. But what does that mean?
The magnitude of a vector is the distance between two coordinates (the initial and the end Offset). Take a look at the image below.
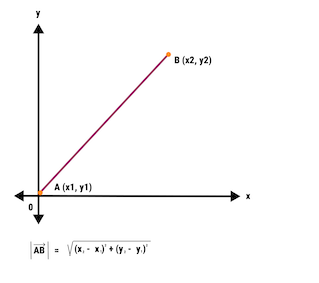
In other to get the magnitude, or distance, between point A and point B, this formula is used:

Here, x1 and x2 are the start and end points on the x axis, and y1 and y2 are the start and end points on the y axis.
Calling offset.distance does this math for you internally and returns the result. Note that distance is a scalar quantity, meaning it has no direction, and as such, the value of the distance is always positive, regardless of the offset’s direction.
This property can come in handy in cases where you need to utilize the distance of a drawn vector.
Offset distanceSquared
As the name implies, this is just the square of the distance of the vector.
Offset direction
When dealing with polar coordinate systems, the direction is the angle of the Offset in radians from -π to π (-3.142 rad to 3.142 rad).
Please note that when dealing with Offsets in Flutter:
- On the x axis, positive values move from point of origin to the right, while negative values move from point of origin to the left
- On the y axis, positive values move from point of origin downward, while negative values move from point of origin upward
It’s worth noting that a vector’s direction is the angle it makes with the horizontal plane, therefore, the angle cannot exceed π radians or 180°.
To understand what an Offset direction is visually, let’s consider the image below.
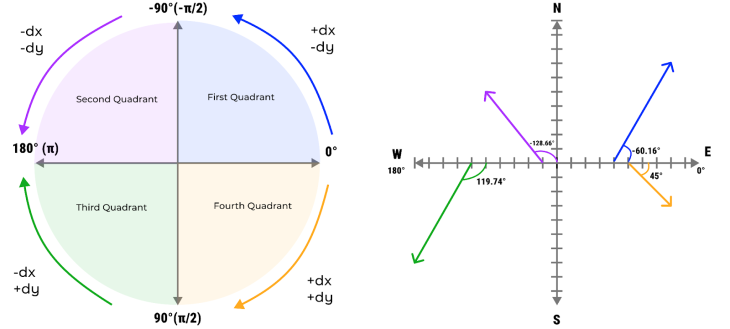
The first image shows the direction when a vector moves along the quadrants. The second image shows four different vectors resting on the horizontal plane. Each of the marks on the x and y axes are assumed to be 10px apart.
They are as follows: the purple vector has a direction of -128.66° (-2.25 rad), blue has a vector of -60.16° (-1.052 rad), green has a vector of 119.74° (2.09 rad), and orange is 45° (0.79 rad).
To calculate the direction (or angle) of an Offset, we have to keep a few things in mind:
- A vector direction falls within the range of -π and π radians or -180° and 180°
- When dy is zero and dx is negative, the direction of the Offset is π (180°)
- When dx is zero and dy is positive (downwards), the direction of the Offset is π/2 (90°)
- When dx is zero and dy is negative (upwards), the direction of the Offset is – π/2 (-90°)
To get the direction of the Offset we use the tangent rule: 

For the blue vector pointing towards the upper right direction, the equation looks like this:

Therefore the direction of this vector is

For the purple vector pointing towards the upper left, the equation is 

Therefore the direction of this vector is

For the orange vector pointing down and to the right, the equation is

And finally, for the green vector pointing down and to the left, we have

However, from right to left takes 180°, and because the green vector is in the bottom left quadrant, we then subtract the result from the total angle. Therefore the direction of this vector is

The math involved in getting the angle of an Offset is a drag, but the good news is that you don’t have to worry about the calculations involved. The reason this section highlights the math is so you can understand what is going on when you call Offset.direction. The internal implementation of this method is double get direction => math.atan2(dy, dx);.
Exploring Offset methods
In this section, we will explore helpful methods that the Offset class contains.
Offset scale
The scale() method accepts two parameters, scaleX and scaleY. It scales both the x component and the y component of the Offset by multiplying the x component by scaleX and y component by scaleY and returns the value as a new Offset.
To see this in action, replace the code that draws the five minute markers on the clock with the code below:
/// Draws the tick for each angle
canvas.drawLine(
        Offset.fromDirection(angle, 70).scale(2, 2),
        Offset.fromDirection(angle, 80).scale(2, 2),
        Paint()
        ..color = Colors.red
        ..strokeWidth = 4,
    );
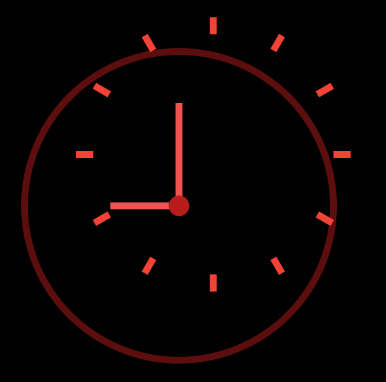
This will result in the image below. Notice that the lines are positioned at twice their previous position, because we are scaling both the x component and y component by a factor of two.
Offset translate
The translate() method accepts two parameters: translateX and translateY. It adds translateX to the x component of the Offset and adds translateY to the y component and returns the new value. Applying translate() to an Offset is just shifting the x or y component based on the translate values.
To see this method in action, replace the code that draws the five minute clock markers with the code below. We are adding 20px to the x component and -30px to the y component:
/// Draws the tick for each angle
canvas.drawLine(
        Offset.fromDirection(angle, 70).translate(20, -30),
        Offset.fromDirection(angle, 80).translate(20, -30),
        Paint()
        ..color = Colors.red
        ..strokeWidth = 4,
    );
The result is pictured here.
The resulting effect doesn’t look so great, but it does explain what goes on when you apply a translate() method to an Offset.
Offset lerp
lerp() is a static method of an Offset that accepts three parameters: Offset a, Offset b, and double t. This method interpolates between Offset a and b, returning a new Offset based on the current value of t. The value t is often retrieved from an AnimationController.
To see this in action, we’ll start by modifying our PlaygroundPainter class by adding a constructor field called animationValue.
Then, we’ll assign the circlePosition variable to an Offset using the Offset.lerp(Offset(0, -120), Offset(0, 120), and animationValue. We want the circle to move from 120px up to 120px down:
 class PlaygroundPainter extends CustomPainter {
  PlaygroundPainter({required this.animationValue});

  final double animationValue;

  @override
  void paint(Canvas canvas, Size size) {
    /// We shift the coordinates to the center of the screen
    canvas.translate(size.width / 2, size.height / 2);

    final circlePosition = Offset.lerp(
        const Offset(0, -120), const Offset(0, 120), animationValue)!;

    /// draws a circle of radius 40 and give it the position above
    canvas.drawCircle(circlePosition, 40, Paint()..color = Colors.red);
  }

  /// We expect this to re-paint when there's a change in animation value
  @override
  bool shouldRepaint(PlaygroundPainter oldDelegate) => true;

}
Next, we set up our animation controller by changing the Home widget from stateless to stateful. We apply the SingleTickerProviderStateMixer to the HomeState so we can use the AnimationController.
Then, we use CurvedAnimation to apply a non-linear curve to the animation.
A curve affects the rate at which the value t moves from zero to one. In this case, we will apply a Curve.bounceOut curve. Below is the code snippet for the Home widget:
class Home extends StatefulWidget {
  const Home({Key? key}) : super(key: key);

  @override
  _HomeState createState() => _HomeState();
}

class _HomeState extends State<Home> with SingleTickerProviderStateMixin {

  late final AnimationController animationController;
  late final Animation animation;

  @override
  void initState() {
    super.initState();
    animationController = AnimationController(
        vsync: this, duration: const Duration(milliseconds: 2500));

    animation =
        CurvedAnimation(parent: animationController, curve: Curves.bounceOut);
    animation.addListener(() {
    setState(() {});
    });

    animationController.repeat();
  }

  @override
  void dispose() {
    animationController.dispose();
    super.dispose();
  }

  @override
  Widget build(BuildContext context) {
    final size = MediaQuery.of(context).size;

    return CustomPaint(
    size: size,
    painter: PlaygroundPainter(animationValue: animation.value),
    );
  }
}
If you followed the steps properly, you should see the effect below. You see clearly how the value t affects the interpolation from Offset a to Offset b.
Operations that can be performed on an Offset
This section focuses on operations you can perform on an Offset. You’ll get to see that these operations provide a convenient way to achieve certain Offset tasks.
Multiplication operator
To multiply both the x component and y component of an Offset by a specific factor, use the multiplication operator (*). This is a better alternative to the scale() method when both scaleX and scaleY are the same value:
/// This will result in Offset(40, 60)
final offset = const Offset(20, 30) * 2;
Division operator
To divide both the x component and y component of an Offset, use the division operator (/):
/// This will result in Offset(10, 30)
final offset = const Offset(20, 30) / 2;
Modulo operator
The modulo operator is denoted by a percent sign (%). This operator provides the remainder of two numbers divided. For instance: 5 / 2 = 2.5 with 1 as the remainder, therefore 5 % 2 = 1.
When this modulo operator is applied to an Offset, it assigns a new Offset value with the x component and y component being the division remainder of the original Offset value:
/// This will result in Offset(0, 3)
final offset = const Offset(25, 53) % 5;
Addition operator
The addition operator adds the x component and y component of an Offset to another Offset:
// This will result in Offset(45, 55)
final offset = const Offset(20, 30) + Offset(25, 25);
Subtraction operator
To subtract the x component and y component of an Offset from another Offset, use the subtraction operator:
/// This will result in Offset(-5, 5)
final offset = const Offset(20, 30) -Offset(25, 25);
Equality operator
Two Offsets are said to be equal when both Offsets’ x component and y component are the same value, like so:
/// true
final isEqual = const Offset(20, 30) == const Offset(20, 30);

/// false
final isEqual = const Offset(20, 30) == const Offset(20, 36);
Greater than or less than operator
An Offset on the left operand is said to be greater than an Offset on the right operand if both the x component and y component of the left Offset is greater than the the x component and y component of the right Offset:
/// true
final isGreater = const Offset(20, 30) > const Offset(10, 20);
/// false
final isLesser = const Offset(40, 60) < const Offset(20, 36);
Unary operator
The unary operator allows you to negate an Offset. You apply this operator by inserting a minus sign (-) before the Offset, like so:
/// This will result in Offset(-20, -30)
final offset = -Offset(20, 30);

/// This will result in Offset(60, -45)
final offset = -Offset(-60, 45);
Rectangle constructor operator
The Rect class constructs a rectangle. In terms of Offset, this operator helps you create a rectangle from an Offset and Size, below is a code snippet demonstrating using this operator.
final offset = const Offset(-30, 50);
final size  = const Size(80, 60);
canvas.drawRect(offset & size, Paint()..color = Colors.red);
Conclusion
Offset is a simple yet powerful class. During the course of this article, you didn’t just consider what an Offset is, but you’ve been exposed to the properties, methods, and operations you can do with an Offset in Flutter.
We also engaged in some practical tasks to see visually how these methods or operations affect Offsets. Next time you use an Offset I’m sure you won’t just see it as a class that stores x and y components, but as a powerful tool loaded with helpful entities.
The post Understanding Offsets in Flutter appeared first on LogRocket Blog.
from LogRocket Blog https://ift.tt/jkCVZKW
via Read more


