


With the introduction of the Metaverse, a broad network of real-time 3D worlds where users can interact as avatars, establish currencies, and sell goods and services, online products and services are taking it to the next level.
As a result, developers are increasingly relying on tools like Git, an amazing version control system that lets us organize our work, codebase, collaboration, work history, and more. With the introduction of GitHub, GitLab, and Bitbucket, we can even host our codebases in the cloud for the rest of our team to access, automating deployment and making it much easier.
Now that we know using Git is important for our day-to-day tasks, we also need to follow some sort of plan or strategy to set up and use Git, ensuring consistency as a team and bug-free feature deployment.
In this article, we’ll cover the following four strategies for setting up and using Git:
Let’s get started!
GitHub flow
The GitHub flow workflow doesn’t rely on releases, so we can release our features and bug fixes anytime.
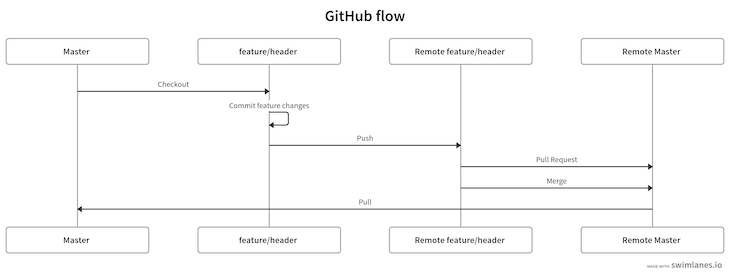
In this strategy, we have one main branch that I’ll call master. When we want to work on a new feature, I’ll create a new feature branch from the master branch, work on that feature branch, and finally push those changes to that feature branch.
Then, I create a pull request on GitHub to master and merge that pull request into the master branch. Finally, I’ll push those changes to the remote master branch.
Diagrammatically, this strategy is as follows:
Let’s go through these steps both practically and visually. First, let’s create a project folder and initialize that folder as a git project with the command below:
mkdir github-flow
git init
The command above will automatically create a master branch for you. Now, create a file in that master branch called index.js:
touch index.js
In index.js, paste the code below:
console.log("github flow");
Now add, commit, and push these changes to the remote master branch on GitHub:
git add -A
git commit -m "initial commit"
git push origin master
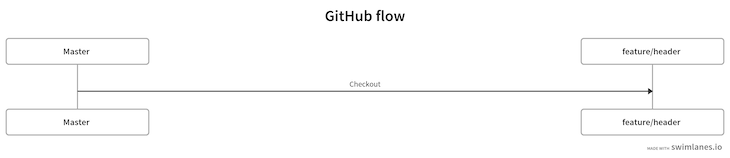
Now, let’s create a feature branch from master with the following command:
git checkout -b feature/header
For now, the diagram of our strategy looks like the following:
Let’s make few changes in our index.js file. In the index.js file, paste the below code:
console.log('feature branch');
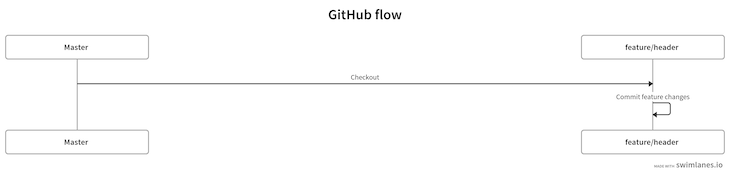
Now, commit these changes:
git commit -am "feature changes"
Currently we’re at the following step in our diagram:
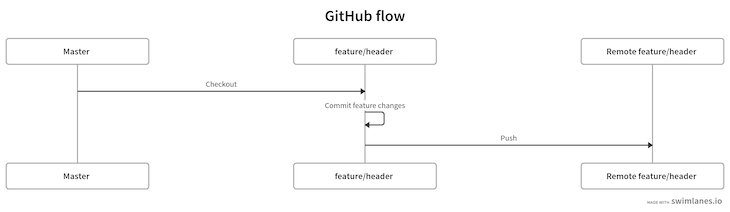
Now, push these changes to the remote feature branch:
git push origin feature/header
After running the command above, our graph looks like the following:
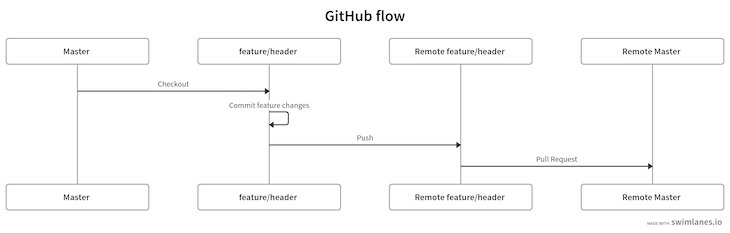
Now, let’s create a pull request. We can do it in one of two ways, either on GitHub or on the command line. Let’s use the second approach. Create a pull request with the command below:
gh pr create
Now, our diagram looks like the following:
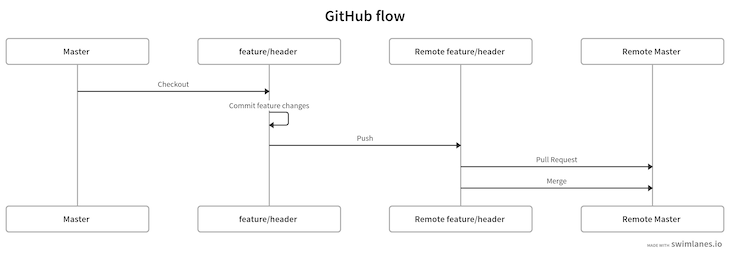
Merge that pull request to master as follows:
gh pr merge
So far, we’ve completed the following steps in our diagram:
Now, we can pull the latest changes from the remote master branch to the local master branch with the command below:
git checkout master
git pull origin master
Our final workflow is as follows:

Gitflow
The Gitflow workflow is all about releases. It also introduces two main branches, which we’ll keep up to date, but it focuses mainly on feature branches.
Although it is an older workflow and may be considered outdated by some, at the industry level, the Gitflow strategy is still pretty common.
As mentioned, the Gitflow strategy has two main branches, master and develop. We’ll keep both of these up to date and create feature branches from the develop branch. Once we’re done with our feature branch, we’ll merge that branch into the develop branch.
When we want to release the feature, we create a release branch, merge that into the master branch, then push those changes to the remote master branch for deployment.
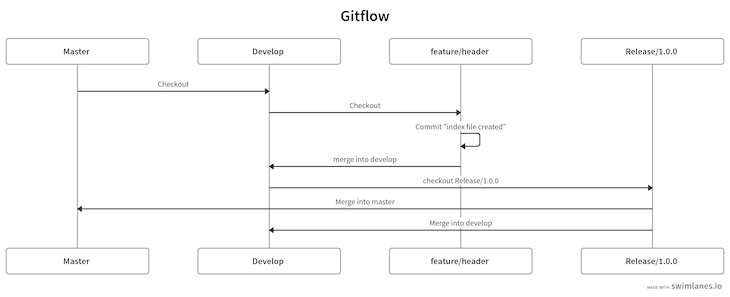
The diagram below showcases the Gitflow strategy:
Let’s try implementing this strategy step-by-step. First, let’s create a new project folder named gitflow and cd into it:
mkdir gitflow
cd gitflow
To use Gitflow, we’ll use the git flow tool to make our lives easier, reducing the number of git commands we would generally have to use to implement this flow.
If you haven’t already installed Gitflow on your machine, you can do so now using Homebrew:
brew install git-flow
Once Gitflow is installed, execute the following command to initialize your project folder as a git and git flow project:
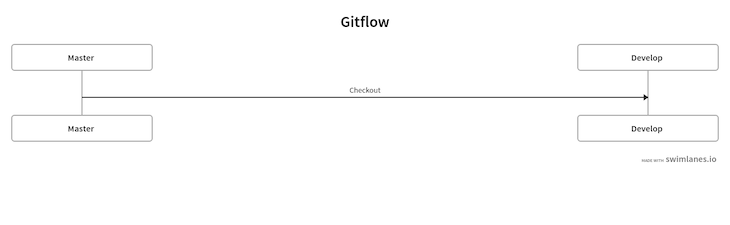
git flow init
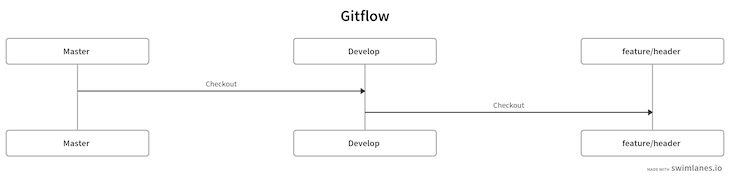
The command above will create two branches, master and develop. By default, we’re in the develop branch. So far, we’re at the following step in our diagram:
Now, let’s create a feature branch with the following command:
git flow feature start header
The command above will create a new feature branch called header. Right now, our diagram is as follows:
Now, we can implement whatever changes we want to. Let’s create a new file:
touch index.js
Open that file and paste the code below in it:
console.log('header branch');
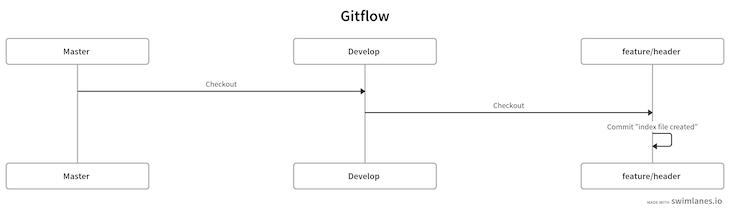
Now, add and commit these changes:
git add -A
git commit -am "index file created"
In our diagram, we’ve completed the following steps:
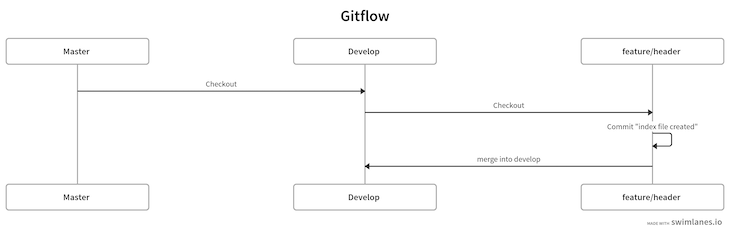
Now, the feature branch is complete. We’ll use the git flow command below to merge the feature/header branch into the develop branch:
git flow feature finish feature/header
The command above will merge the feature/header branch into the develop branch. We can represent this as follows:
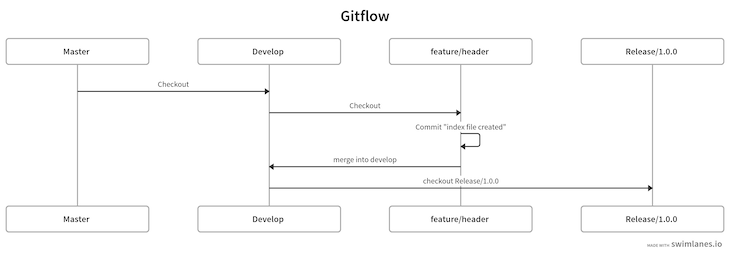
Now, we can release this new feature into production. We’ll have to create a new branch called release that contains the version number, as follows:
git flow release start 1.0.0
The command above will create a new release/1.0.0 branch where we can make minor changes if needed. In our diagram, we’ve completed the following steps:
Let’s complete this release/1.0.0 branch with the command below:
git flow release finish '1.0.0'
The command above will merge our release branch with both the develop and master branches, and we’ll be automatically checked out into the master branch. At this point, we’ve reached the conclusion of our diagram:

Now that we’ve wrapped up the Gitflow strategy, let’s move onto GitLab Flow.
GitLab Flow
There are times when you won’t have control over releases in your application. For example, iOS apps go through a validation process through the App Store. For these types of apps, the GitLab Flow workflow is perfect to follow.
Compared to GitHub flow, we tend to have more branches in GitLab Flow, i.e., master, pre-production, and production branches, alongside feature branches.
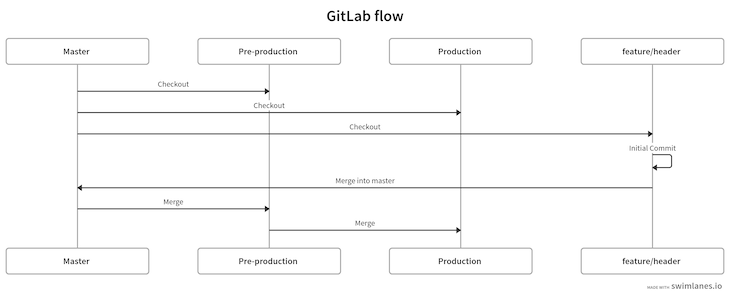
We create feature branches from a master branch. Once the feature branch is done, we’ll create a merge request to the master branch. Then, we merge master into pre-production to test all use cases. Once the tests are passed, we merge pre-production into production, making it widely available:
The diagram below depicts this workflow:
Let’s try it out! First, create a new folder with the command below and cd into that folder:
mkdir gitlabflow
cd gitlabflow
Let’s initialize this folder as a Git project with the command below:
git init
The command above will automatically create a branch called master. Now, create two branches called pre-production and production from the master branch:
git checkout -b pre-production
git checkout master
git checkout -b production
git checkout master
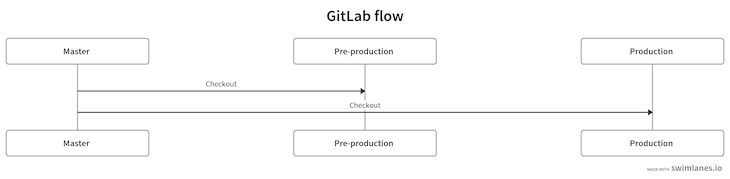
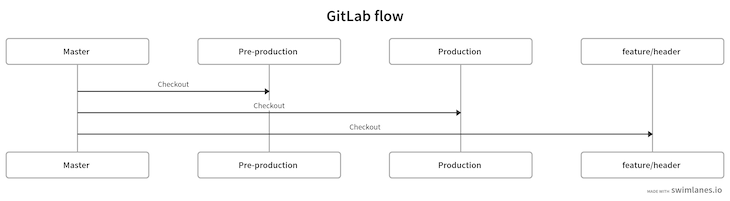
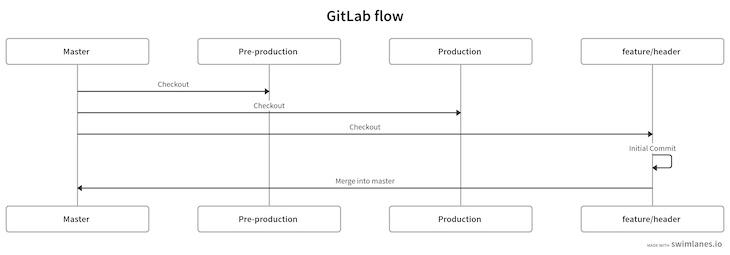
In our diagram, we’ve completed the following steps:
With our main branches set up, let’s create a feature branch from the master branch with the command below:
git checkout -b feature/header
Now, create a file called index.js:
touch index.js
Open index.js and paste the code below inside it:
console.log("gitlab flow");
Now add, commit, and push these changes into the remote feature branch as follows:
git add -Add
git commit -m "initial commit"
git push origin feature/branch
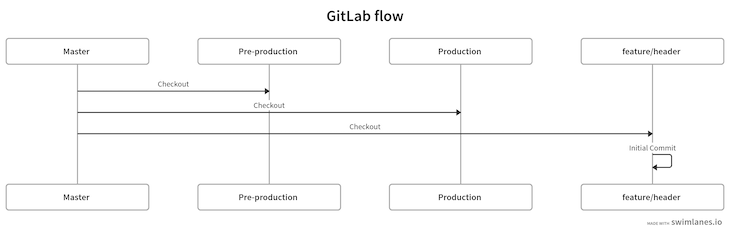
So far, we’re at the following point in our diagram:
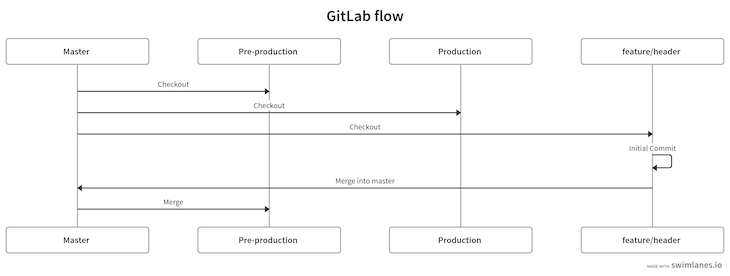
Now, go to GitLab and create a merge request into master. Merge the request into master by pressing the green merge button:
With that done, it’s time to release the merge request into the pre-production branch. Go to the master branch and pull the latest changes. Then, check out the pre-production branch and merge master into pre-production for testing purposes:
git checkout master
git pull
git checkout pre-production
git merge master
git push origin pre-production
The steps above are diagrammed below:
To release it into production, we’ll merge the pre-production branch into production:
git checkout production
git merge pre-production
git push origin production
Diagrammatically, the steps above can be demonstrate as follows:

OneFlow
The OneFlow strategy usually has one main branch. It can have more, but it usually uses one branch for releases for simplicity. The feature branches are created from this master branch.
OneFlow was introduced as an alternative to the Gitflow workflow. In the OneFlow strategy, there is one main branch that we’ll name the master branch. Feature branches are also at the core of this strategy. Therefore, we’ll create a new feature branch from the master branch named feature/header. Once we’re done with the feature branch, we’ll merge the feature branch into master.
The entire strategy is shown below:
Let’s implement this strategy practically. First of all, let’s create a project folder and cd into that folder:
mkdir oneflow
cd oneflow
Let’s initialize this folder as a Git repository:
git init
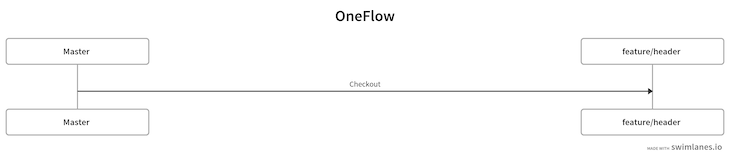
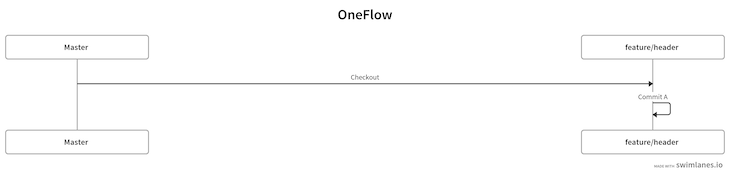
The command above will create a master branch by default, and we’ll stay in that branch. Now, we’ll create a feature branch:
git checkout -b feature/header
So far, the process can be depicted as follows:
Now, let’s create an index.js file with the command below:
touch index.js
Open the index.js file and paste the code below:
console.log("OneFlow");
Finally, add and commit these changes:
git add -A
git commit -m "Initial commit"
We’ve completed the following steps in our diagram:
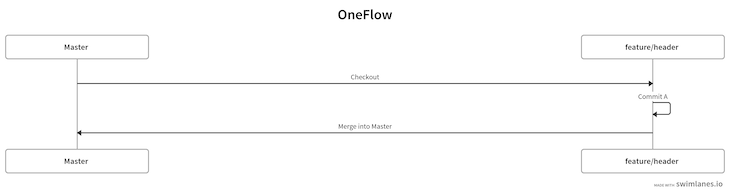
Now, we’re done with the feature branch. Therefore, I’m going to merge it into the master branch:
git checkout master
git merge feature/header
The full workflow for this strategy is as follows:

Conclusion
In this article, we reviewed four different Git workflows that you can use to make deployment easier for your team through automation. While each of these strategies is widely used, the best choice will depend on your unique use case. If you want the flexibility of releasing changes anytime, then I might recommend the GitHub flow strategy. If you’re releasing an iOS app, I’d suggest the GitLab Flow. Be sure to review the information in this article as well as the documentation for each before making any decisions.
I hope you enjoyed this article, and be sure to leave a comment if you have any questions.
The post Git strategies: Collaborate, share, and maintain working history appeared first on LogRocket Blog.
from LogRocket Blog https://ift.tt/wV3oCtF
via


