Say you’re working in a bank where you need to input data from a customer’s form into a computer. To make this possible, you would have to do the following:
- Input the name and personal details of the customer
- Furthermore, double-check if you have entered their data correctly. This will prevent human errors
- In the end, verify whether the entered data is in the right field
While this solution might work, consider this situation: what if your bank receives hundreds of forms every day? Consequently, this would make your job more tedious and stressful. So how do we solve this issue?
This is where OCR (text detection) comes in. It is a technology that uses algorithms to procure text from images with high accuracy. Using text recognition, you can simply take a picture of the user’s form and let the computer fill in the data for you. As a result, this would make your work easier and less boring. In this article, we will build a text detector in React Native using Google’s Vision API.
This will be the outcome of this article:
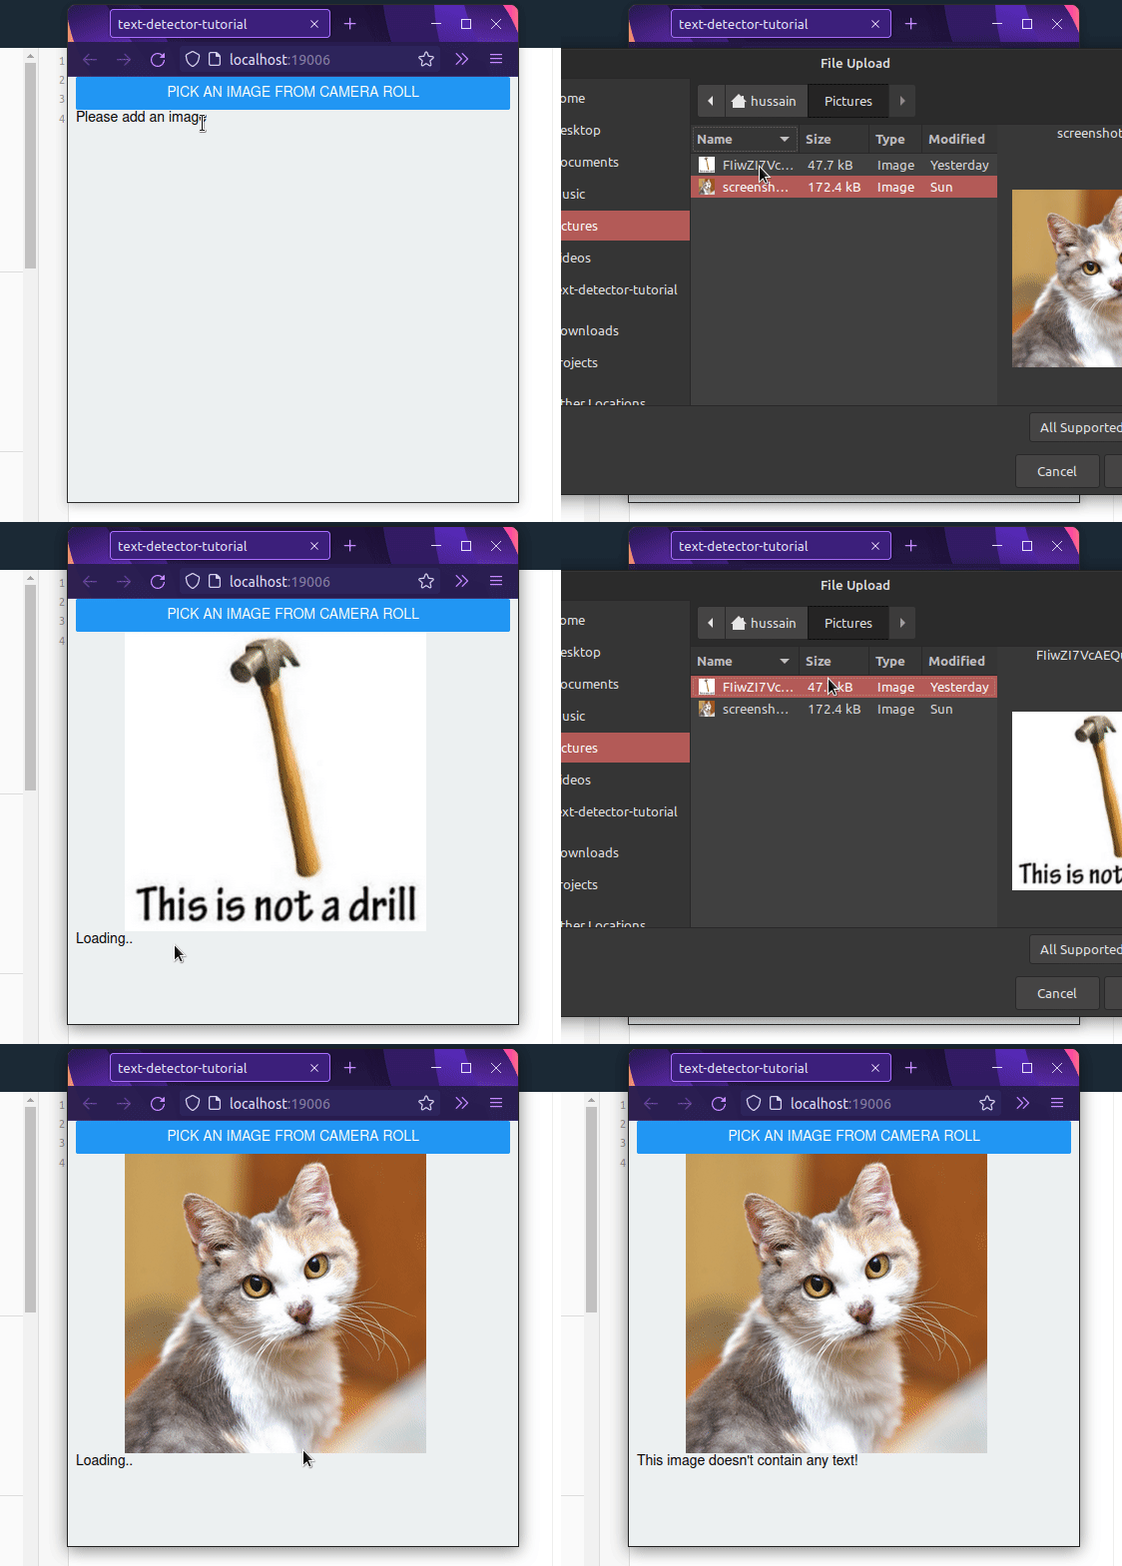
Here are the steps we’ll take:
Let’s get started!
Using Google Cloud Vision
In this section, you will learn how to activate Google’s text detection API for your project.
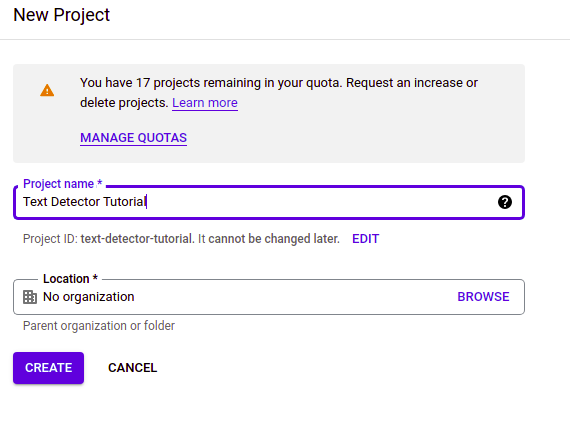
As a first step, navigate to Google Cloud Console and click on New Project:
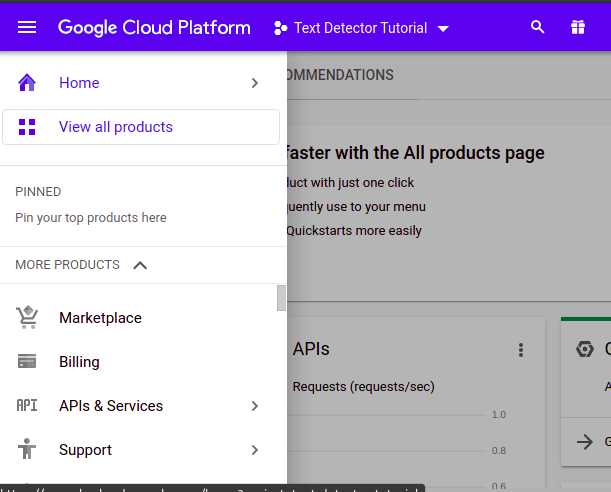
Next, we now need to tell Google that we need to use the Cloud Vision API. To do so, click on Marketplace:
When that’s done, search for Cloud Vision API and enable it like so:
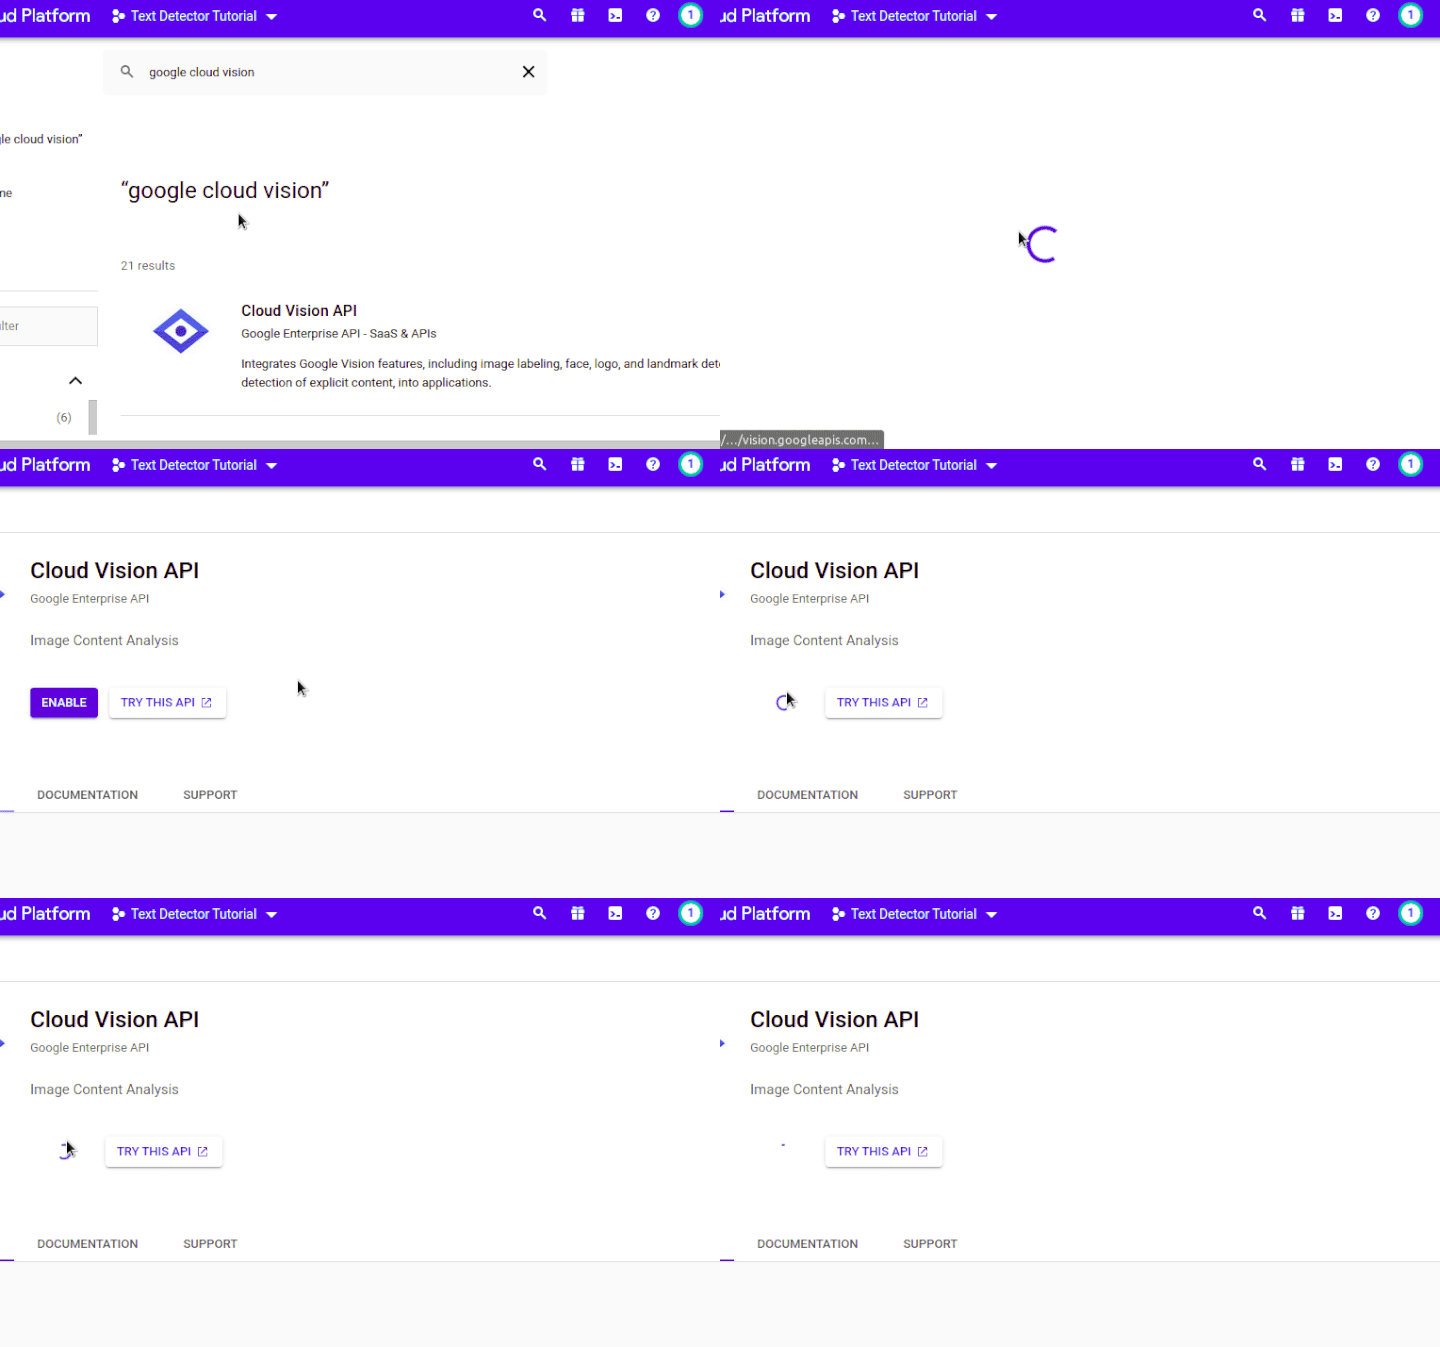
Great! We have now enabled this API. However, for authorization purposes, Google requires us to create an API key. To make this possible, click on Create Credentials:

In the Credentials menu, make sure the following options are checked:
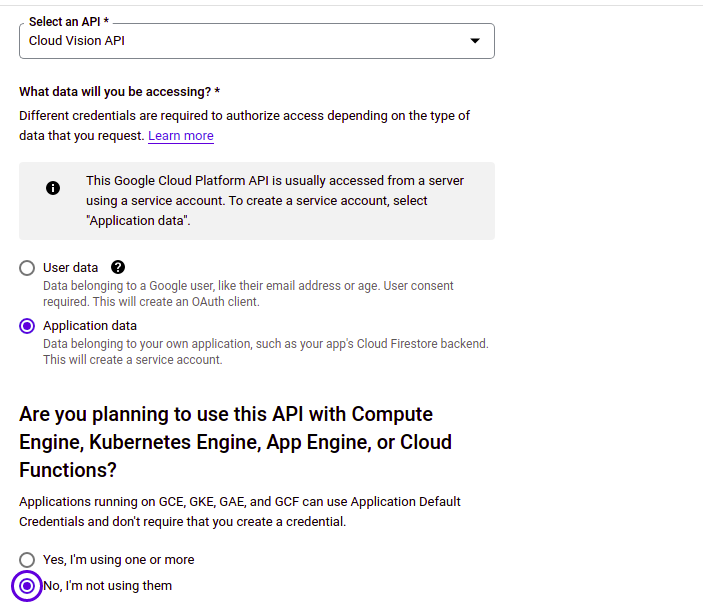
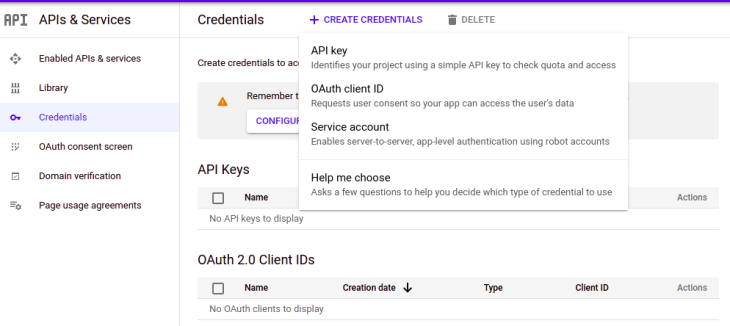
Next, click on Done. This will bring you to the dashboard page. Here, click on Create credentials, and then API key.
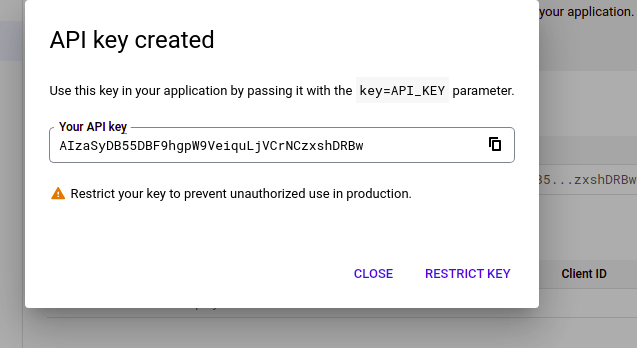
As a result, the program will now give you an API key. Copy this code to a file or somewhere safe.
Congratulations! We’re now done with the first step. Let’s now write some code!
Building our project
Project creation
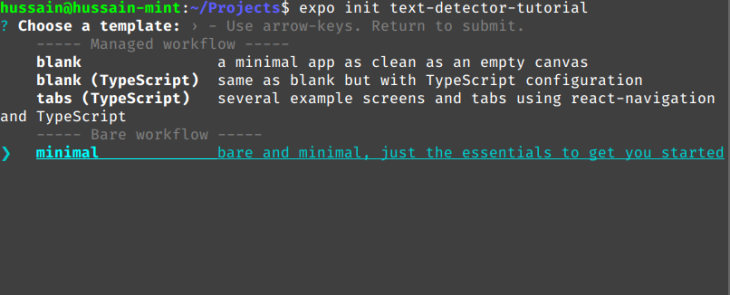
To initialize the repository using Expo CLI, run the following terminal command:
expo init text-detector-tutorial
Expo will now prompt you to choose a template. Here, select the option that says minimal:
Installation of modules
For this application, we will let the client pick photos from their camera roll. To make this possible, we will use the expo-image-picker module:
npm i expo-image-picker
Coding our utility functions
Create a file called helperFunctions.js. As the name suggests, this file will contain our utility functions that we will use throughout our project.
In helperFunctions.js, start by writing the following code:
//file name: helperFunctions.js
const API_KEY = 'API_KEY_HERE'; //put your key here.
//this endpoint will tell Google to use the Vision API. We are passing in our key as well.
const API_URL = `https://vision.googleapis.com/v1/images:annotate?key=${API_KEY}`;
function generateBody(image) {
  const body = {
    requests: [
      {
        image: {
          content: image,
        },
        features: [
          {
            type: 'TEXT_DETECTION', //we will use this API for text detection purposes.
            maxResults: 1,
          },
        ],
      },
    ],
  };
  return body;
}
A few key concepts from this snippet:
- The
API_KEYconstant will contain your API key. This is necessary to incorporate Google’s Cloud Vision API in our app - Later on, we created a
generateBodyfunction that will generate a payload for our request. React Native will send this payload to Google for OCR purposes - Furthermore, this method also accepts an
imageparameter. This will contain base64-encoded data on the desired image
After this step, append the following code to helperFunctions.js:
//file: helperFunctions.js
async function callGoogleVisionAsync(image) {
  const body = generateBody(image); //pass in our image for the payload
  const response = await fetch(API_URL, {
    method: 'POST',
    headers: {
      Accept: 'application/json',
      'Content-Type': 'application/json',
    },
    body: JSON.stringify(body),
  });
  const result = await response.json();
  console.log(result);
}
export default callGoogleVisionAsync;
Let’s break down this code piece by piece:
- First, we are generating a payload using the
generateBodyfunction - Later on, the program submits a
POSTrequest to Google’s API and sends the payload as a request - In the end, we are outputting the server’s response to the console
Building our image picker component
Create a new file called ImagePickerComponent.js. This file will be responsible for letting the user choose a photo from their gallery.
In ImagePickerComponent.js, write the following code:
import * as ImagePicker from 'expo-image-picker';
import React, { useState, useEffect } from 'react';
import { Button, Image, View, Text } from 'react-native';

function ImagePickerComponent({ onSubmit }) {
  const [image, setImage] = useState(null);
  const [text, setText] = useState('Please add an image');

  const pickImage = async () => {
    let result = await ImagePicker.launchImageLibraryAsync({
      mediaTypes: ImagePicker.MediaTypeOptions.All,
      base64: true, //return base64 data.
      //this will allow the Vision API to read this image.
    });
    if (!result.cancelled) { //if the user submits an image,
      setImage(result.uri);
      //run the onSubmit handler and pass in the image data.
      const googleText = await onSubmit(result.base64);
    }
  };
  return (
    <View>
      <Button title="Pick an image from camera roll" onPress={pickImage} />
      {image && (
        <Image
          source=
          style=
        />
      )}
    </View>
  );
}
export default ImagePickerComponent;
Here’s a brief explanation:
- After initializing
ImagePickerComponent, we created thepickImagefunction, which will prompt the user to select a file - If the user submits an image, the program will run the
onSubmithandler and pass the image’s base64 data to this function - Furthermore, after the submission, the app will display the image to the UI
All that’s left for us is to render our custom image picker component. To do so, write the following code in App.js:
import ImagePickerComponent from "./ImagePickerComponent";

return (
  <View>
    <ImagePickerComponent onSubmit={console.log} />
  </View>
);
Here, we are rendering our ImagePickerComponent module and passing in our onSubmit handler. This will log out the chosen image’s encoded data to the console.
Run the app using this Bash command:
expo start
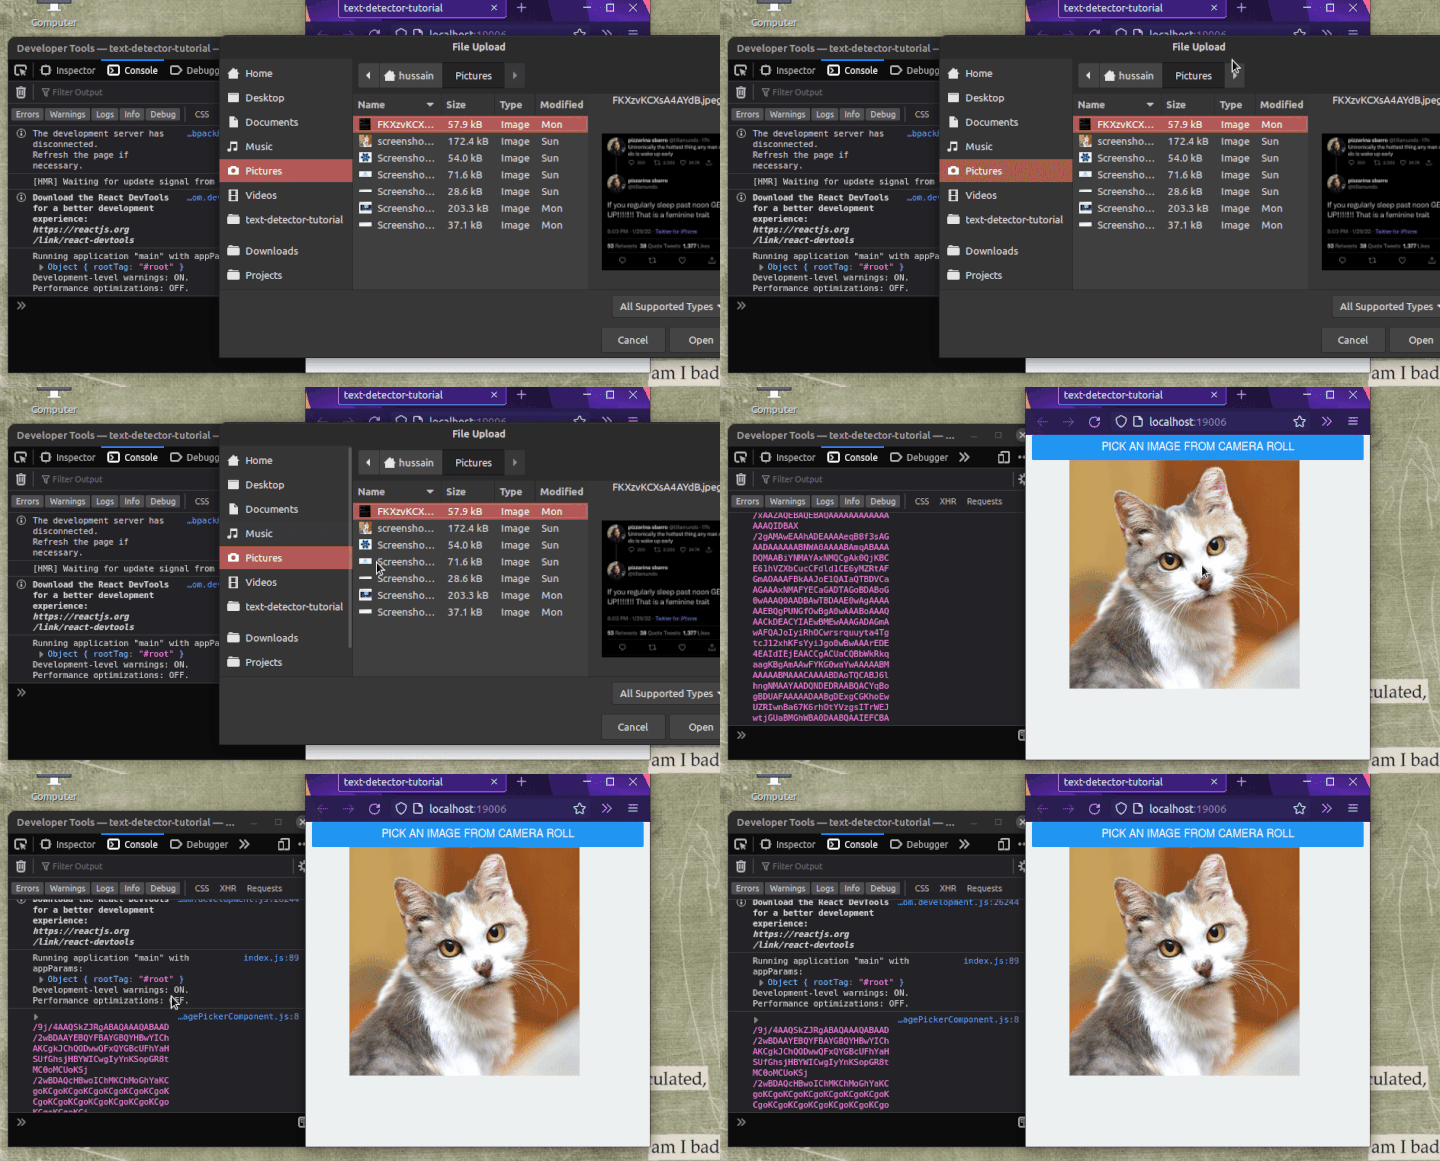
Our code works! In the next section, we will use the power of Google Vision to implement OCR in our app.
Connecting Google Cloud Vision with the image picker
Edit the following piece of code in App.js:
import callGoogleVisionAsync from "./helperFunctions.js";
 //code to find:
return (
  <View>
    {/*Replace the onSubmit handler:*/}
    <ImagePickerComponent onSubmit={callGoogleVisionAsync} />
  </View>
);
In this snippet, we replaced our onSubmit handler with callGoogleVisionAsync. As a result, this will send the user’s input to Google servers for OCR operations.
This will be the output:
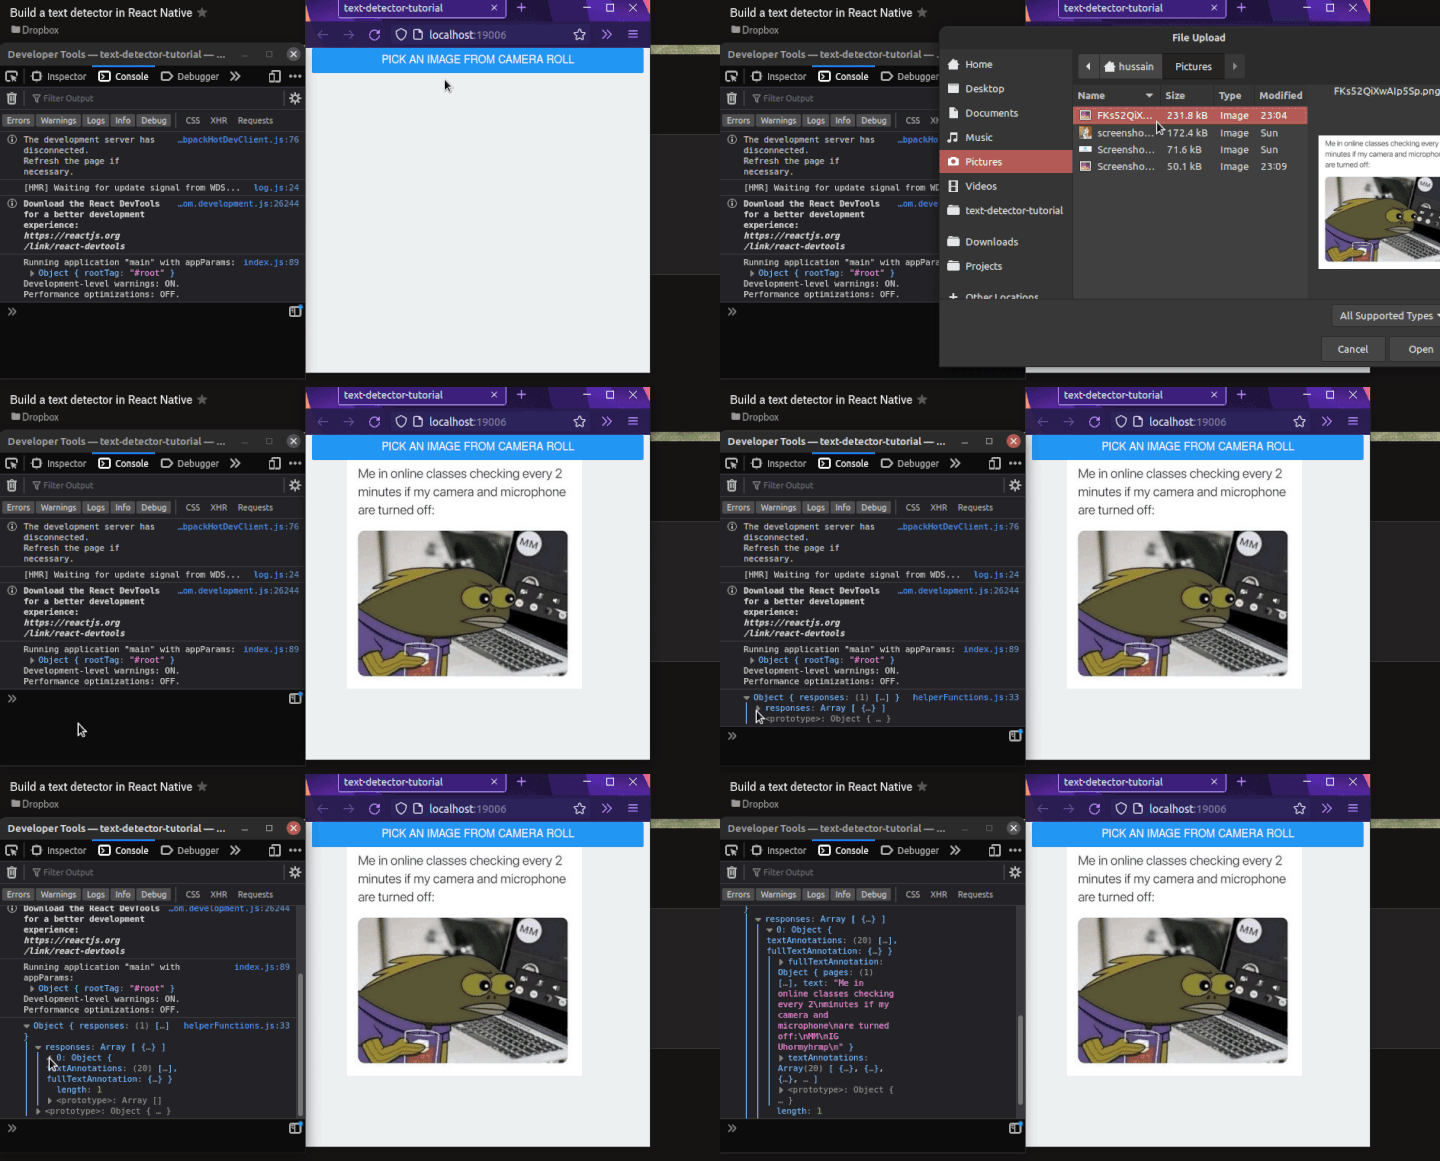
Notice that the program is now successfully procuring text from the image. This means that our code was successful!
As the last step, attach this piece of code to the end of callGoogleVisionAsync:
//file: helperFunctions.js.
//add this code to the end of callGoogleVisionAsync function
const detectedText = result.responses[0].fullTextAnnotation;
return detectedText
  ? detectedText
  : { text: "This image doesn't contain any text!" };
This tells the program to first check if there was a valid response. If this condition is met, then the function will return the extracted text. Otherwise, an error will be thrown.
In the end, your complete callGoogleVisionAsync function should look like this:
//file: helperFunctions.js
async function callGoogleVisionAsync(image) {
  const body = generateBody(image);
  const response = await fetch(API_URL, {
    method: "POST",
    headers: {
      Accept: "application/json",
      "Content-Type": "application/json",
    },
    body: JSON.stringify(body),
  });
  const result = await response.json();
  console.log(result);
  const detectedText = result.responses[0].fullTextAnnotation;
  return detectedText
    ? detectedText
    : { text: "This image doesn't contain any text!" };
}
Rendering OCR data to the UI
Now that we have implemented OCR in our program, all that remains for us is to display the image’s text to the UI.
Find and edit the following code in ImagePickerComponent.js:
//code to find:
if (!result.cancelled) {
  setImage(result.uri);
  setText("Loading.."); //set value of text Hook
  const responseData = await onSubmit(result.base64);
  setText(responseData.text); //change the value of this Hook again.
}
//extra code removed for brevity
//Finally, display the value of 'text' to the user
return (
  <View>
    <Text>{text}</Text>
    {/*Further code..*/}
  </View>
);
- When the user has chosen an image, set the value of the
textHook to the response data - In the end, display the value of the
textvariable
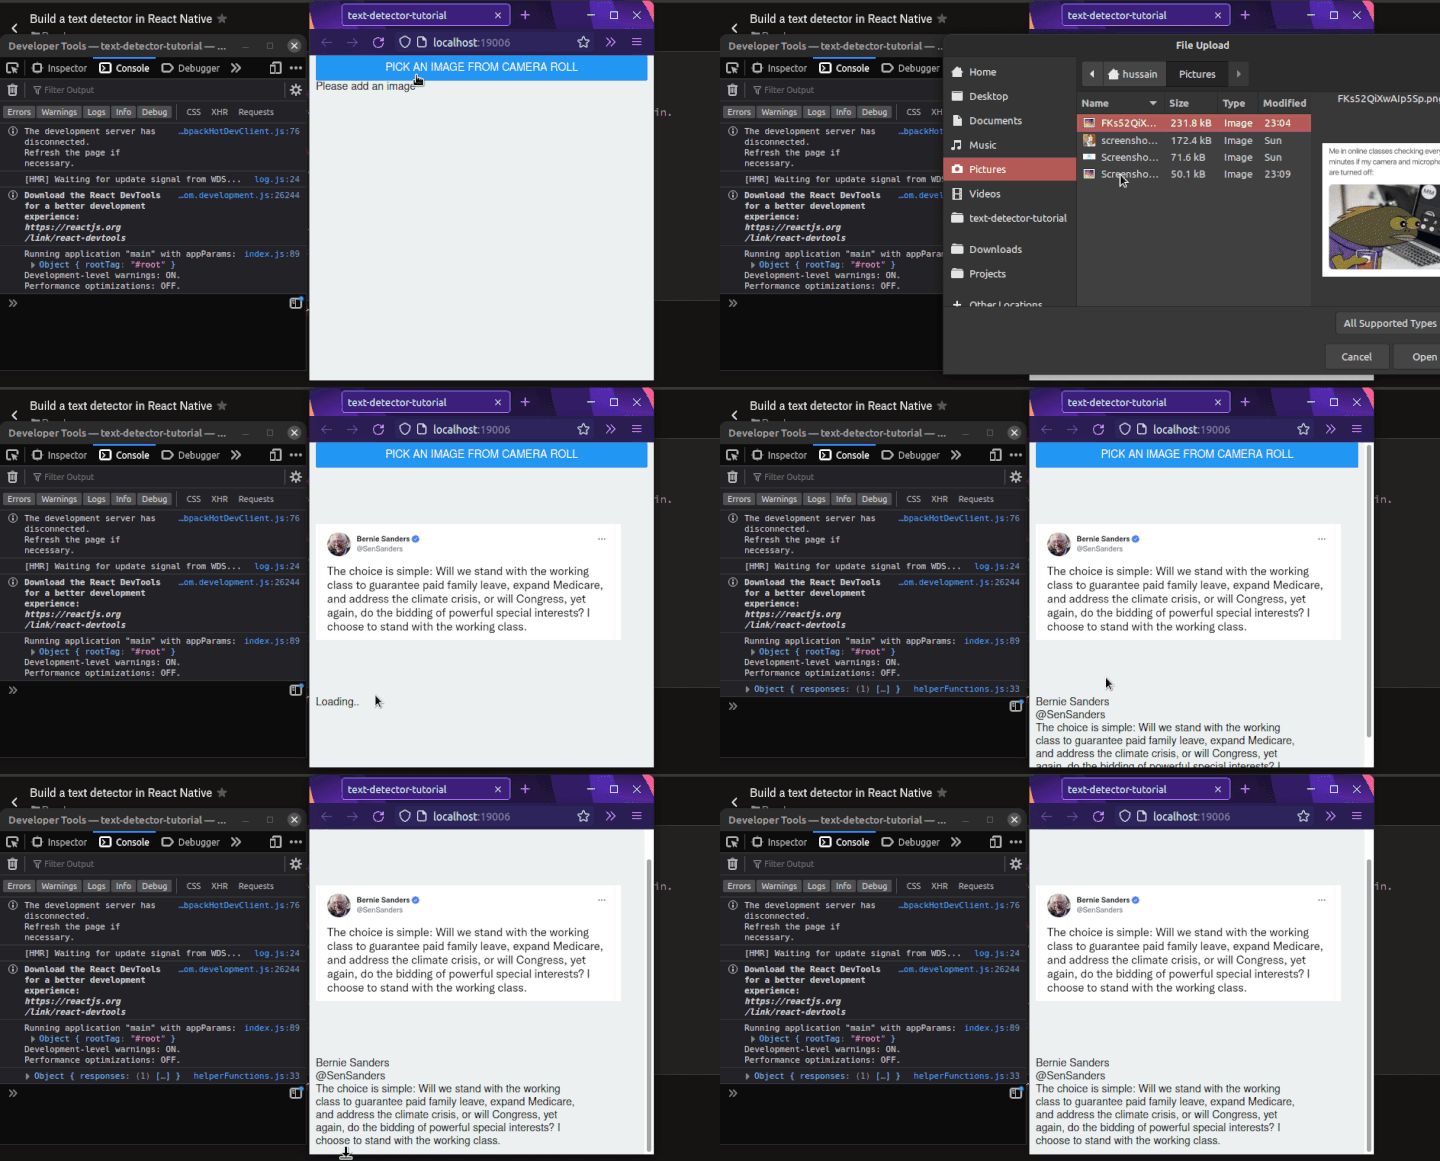
And we’re done!
In the end, your ImagePickerComponent should look like so:
function ImagePickerComponent({ onSubmit }) {
  const [image, setImage] = useState(null);
  const [text, setText] = useState("Please add an image");
  const pickImage = async () => {
    let result = await ImagePicker.launchImageLibraryAsync({
      mediaTypes: ImagePicker.MediaTypeOptions.All,
      base64: true,
    });
    if (!result.cancelled) {
      setImage(result.uri);
      setText("Loading..");
      const responseData = await onSubmit(result.base64);
      setText(responseData.text);
    }
  };
  return (
    <View>
      <Button title="Pick an image from camera roll" onPress={pickImage} />
      {image && (
        <Image
          source=
          style=
        />
      )}
      <Text>{text}</Text>
    </View>
  );
}
Conclusion
Here is the source code for this article.
In this article, you learned how to use Google Cloud Vision in your project and implement text detection capability. Other than data entry, we can use our brand new OCR app for several situations, for example:
- Retail and marketing: Supermarkets use text detection technology to scan and store discount coupons. Here, the OCR program scans the text and checks whether the coupon is usable
- Business: When the user writes their data on a paper document, government institutions use OCR to digitize the record. In this use case, the software first scans the client data and validates it to ensure that the user has followed a given format
If you encountered any difficulty, I encourage you to play with and deconstruct the code so that you can fully understand its inner workings.
Thank you so much for making it to the end! Happy coding!
The post Build a text detector in React Native appeared first on LogRocket Blog.
from LogRocket Blog https://ift.tt/3bSYu54
via Read more


