


Designers know how important it is to effectively communicate their designs to stakeholders. High-fidelity prototypes are a great way to do this, providing a realistic representation of final designs. With Figma, designers have a tool that allows them to create these prototypes quickly and easily.
Scrolling is an important aspect of designing user interfaces for digital products. Whether you’re designing a website or a mobile application, you’ll need to consider how users will navigate through your content. In Figma, you can configure both horizontal and vertical scrolling to create a seamless user experience.
In this article, we’ll explore how to configure scrolling in a Figma prototype to create interactive and realistic experiences for stakeholders. Not only will this make your prototypes more engaging, but it will also give stakeholders a better understanding of how the final experience will look and feel.
Jump ahead:
- Configuring overflow scrolling in Figma
- Horizontal overflow scrolling
- Vertical overflow scrolling
- Horizontal and vertical overflow scrolling
- How to clip content
- Fix position when scrolling
- Preserve scroll position
- Prototyping for different devices
Configuring overflow scrolling in Figma
In Figma, designers can configure overflow scrolling for frames to ensure that their designs scroll properly. This applies to top-level frames on the canvas as well as nested frames and layers.
To enable overflow scrolling, the frame must contain “overflowing” content that extends beyond its bounds. If the content within a frame fits within its bounds, then regular scrolling will be applied because there is no overflow content.
Figma provides three different overflow behaviors: horizontal scrolling, vertical scrolling, and both combined. These options allow designers to specify how overflow content should scroll when it extends beyond the frame’s bounds.
Horizontal overflow scrolling
Horizontal scrolling can have many use cases in interactive prototypes, such as scrolling through a carousel of images or scanning a zoomed-in visualization.
To enable horizontal overflow scrolling in Figma, ensure that content extends past the width of your frame. Many designers often make the mistake of using groups instead of frames. When you use a group instead of a frame, the elements within the group will adapt to the group’s bounding box. This does not allow for overflow content, and as a result, overflow scrolling.
If your content isn’t within a frame:
First, select the Design panel in the right sidebar:

Select all objects that you wish to be contained within a frame by holding down the Shift key to multiselect:

Create a frame around the selected objects by right-clicking and selecting Frame selection from the context menu. You can also use the frame selection keyboard shortcut:
- Mac:
⌥ Option + ⌘ Command + G - Windows:
Ctrl + Alt + G

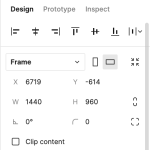
Once your frame is set, click on the frame to reveal the bounding box. Drag the bounding box horizontally to resize the frame.
You want to adjust the width of the bounding box so that the content overflows past it. Think of the bounding box as a window that displays the content within it. The overflow content should appear in the window when you scroll through it:

Next, to enable overflow scrolling, select the Prototype panel in the right sidebar:

Under Overflow scrolling, select Horizontal scrolling:

To test out your scrollable prototype, click on the Present button on the right side of the toolbar to enter presentation view. You can also use the presentation keyboard shortcut:
- Mac:
⌥ Option + ⌘ Command + Return - Windows:
Control + Alt + Enter

In presentation view, place your cursor within the bounds of your frame and scroll from side to side. Your prototype should now mimic a realistic horizontal scrolling interaction:

Vertical overflow scrolling
Vertical scrolling in prototypes is often used to reveal hidden content that lies below the fold. This is especially common for mobile websites and apps that rely on scrolling to fit content onto a page, such as a news feed.
Enabling vertical overflow scrolling is much the same as horizontal scrolling. The only difference is the direction in which your content scrolls.
To configure vertical overflow scrolling, adjust the bounding box of your frame so that the content overflows over the top or bottom bounds instead of the sides:

With your frame selected, select the Vertical scrolling option from the Overflow scrolling dropdown. Make sure you’re in the Prototype panel in the right sidebar:

Now it’s time to test your prototype. Enter presentation view and place your cursor within the bounds of your frame and scroll up and down. Your prototype should now mimic a realistic vertical scrolling interaction:

Horizontal and vertical overflow scrolling
Finally, you can enable both horizontal and vertical overflow scrolling at the same time. This option allows you to scroll in any direction, which can be useful for communicating an interactive area such as a chart or map. Let’s use a map for our example — first, ensure that the content extends past all sides of the frame:

With your frame selected, this time under Overflow scrolling, select Horizontal and vertical scrolling:

Now test out your prototype in presentation view. Place your cursor within the bounds of your frame and scroll up, down, left, and right. Your prototype should now mimic realistic scrolling in any direction:

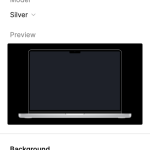
How to clip content
In Figma, clipping content allows you to hide content within a frame that extends beyond its bounds. In many cases, your design will have multiple elements within a frame. Clipping content can be useful when you want to display only the content that appears inside the frame’s bounding box and hide all content that overflows.
Even if you resize your bounding box, the overflow content will still appear in your prototype, possibly covering up or hiding behind other elements:

To give the appearance of a “window,” select the frame that you want to clip and check the Clip Content option in the Design panel. This will create a clipping mask around the selected element, hiding any content that extends beyond its boundaries:

You’ll notice that your frame has now clipped any overflow content and only shows the content within its bounding box. Don’t worry, though — your objects haven’t been deleted. They’re simply hidden from view and will appear as such in presentation view as well:

Now your prototype features a scrollable, clipped frame. Once you’ve mastered both scrolling and clipping content, the interaction possibilities are endless:

Fix position when scrolling
When creating a prototype in Figma that uses scrolling, you might not want every element to scroll along with the screen. To keep certain elements of your design stationary when scrolling, you can fix their position by using constraints.
For instance, you might want to fix a header to the top of the screen or a navigation menu to the side.
To fix an object using constraints:
- Select the object that you want to fix on the canvas.
- Select the Design panel in the right sidebar.
- In the Constraints section, set both horizontal and vertical constraints.
- Check the Fix position when scrolling option:

In the Layers panel, your objects within the parent frame will be categorized under Fixed or Scrolls to distinguish fixed objects from scrollable ones:

Now when you scroll through your prototype in presentation view, your objects will be fixed to their position while the rest of the frame scrolls:

Preserve scroll position
Let’s talk about an advanced scrolling technique that can be useful in order to create a realistic user experience for stakeholders. In Figma, you can preserve the scroll position when transitioning between different screens in a prototype.
Without this option enabled, the prototype will load the top of the frame every time you navigate to a different screen. This can potentially cause confusion when presenting your designs and represent an inaccurate experience. Preserving the scroll position will keep the last position when switching screens, whether you’ve scrolled horizontally or vertically.
To see how the Preserve scroll position option works, let’s walk through an example.
Example of preserving scroll position
For this example, we want to show the interaction of a card within a carousel changing state upon being clicked. Frame 1 shows the default state of the carousel with all cards unselected. Frame 2 shows one of the cards in a selected state, indicated by its dark border and Quick view button.
The prototype is set up in a way that will transition from Frame 1 to Frame 2 upon clicking the fourth card in the carousel:

In the Interaction details panel, under State management, the Preserve scroll position option remains unchecked:

Without Preserve scroll position checked, Frame 2 will load from the top of the frame once the card is selected, bringing the prototype back to the front of the carousel and preventing the user from experiencing the intended interaction as a result:

Now, let’s check Preserve scroll position to see what happens when the card is selected:

With Preserve scroll position checked, Frame 2 will load from the last scroll position of Frame. 1.
The user is now able to see the intended interaction as a result of selecting the card. By preserving the scroll position, you can elevate your prototypes to communicate realistic interactions to stakeholders:

Animations
Keep in mind that the Preserve scroll position option is only available for certain animations. If Smart Animate is selected, Figma will preserve your scroll position by default. For Instant or Dissolve animations, you will be given the option to preserve your scroll position.
However, for Slide, Push, or Move animations, you will not be given the option to preserve your scroll position.
Prototyping for different devices
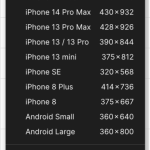
More often than not, we need to consider responsive design when designing cross-platform experiences. Being able to communicate your prototypes within the frame of a specific device can be powerful.
For this purpose, Figma provides a wide selection of popular devices to choose from under the Device dropdown in the Prototype panel:
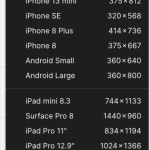
The devices available also correspond with the frame selection in the Design panel so that your screens perfectly fit into the device it was meant for:
After you’ve selected a device, your prototype will automatically scale your designs to fit the device screen in presentation view. Now you’ll be able to present your designs as if they were being shown on a real device!

Conclusion
In conclusion, Figma offers powerful prototyping features that will make your designs shine. Configuring horizontal and vertical overflow scrolling can be easily implemented to communicate various different scenarios.
Additionally, features such as clipping content, fixing object positions, and preserving scroll positions can ensure that your designs represent realistic user interactions when presenting them to stakeholders.
With Figma’s prototyping feature, you can also present your designs on different devices. Whether you are a professional designer or just getting started, these features can greatly improve your prototypes and help you present more polished designs.
The post Configuring horizontal and vertical scrolling in Figma appeared first on LogRocket Blog.
from LogRocket Blog https://ift.tt/3TCh56x
Gain $200 in a week
via Read more


