


If you’re developing a Next.js web application that consumes a third-party API, it’s crucial that you add a rate limiter to your app. Not doing so could be detrimental, particularly if you’re using an API related to artificial intelligence features. For example, I recently worked on a side project that used an AI-related API. I received a huge amount of traffic on the project and my bill from the API provider skyrocketed! By adding a rate limiter, I was able to reduce costs.
So, what exactly is a rate limiter? It’s a tool that controls the rate at which an action can be performed by a user or an IP address. This can prevent a single user from making too many requests in a short period of time and overwhelming the server. Rate limiting can also be helpful for mitigating DDoS attacks.
By implementing rate limiting, we can ensure that the server remains responsive and stable for all users. In this article, we’ll demonstrate how to set up a rate limiter in a Next.js application using ioredis, a Redis client for Node.js.
Jump ahead:
- Why use Redis for rate limiting?
- Setting up the Redis database
- Installing the Redis client
- Selecting the rate limiting algorithm
- Creating the rate limiting method
- Setting the rate limit on the API
- Testing the rate limiter
- Serverless Redis alternatives
Why use Redis for rate limiting?
Redis is a type of database that stores information in a computer’s memory rather than on a disk. This makes it super fast, which is why it’s often used for tasks like rate limiting. Redis is popular, ranking sixth on Stack Overflow’s 2022 Developer Survey.
A Next.js API that is deployed as a serverless application has the disadvantage of being unable to save state to the server. Depending on the automatic scaling of the serverless service, all requests could be routed to different servers when our application is experiencing high traffic.
Redis is a great choice for rate limiting because it is an in-memory database, making it extremely fast and efficient. It provides a range of useful features such as atomic operations, which allows for concurrent requests to be handled safely and reliably. Redis also offers several data structures, allowing for easy implementation of many different types of rate-limiting algorithms.
A couple of items to keep in mind when selecting Redis for rate limiting are the cost of setup and maintenance, as well as security considerations for storing and managing sensitive data.
Setting up the Redis database
Here’s how to set up Redis on a Macbook using Homebrew, on a Linus system using the package manager, and via Docker.
macOS Homebrew package manager
To install Redis on a MacBook, make sure you have the Homebrew package manager installed.
If you don’t have Homebrew already on your system, you can install it with this command:
&/usr/bin/ruby -e "$(curl -fsSL https://raw.githubusercontent.com/Homebrew/install/master/install)"
Next, install Redis:
&brew install redis
Then, start Redis:
&brew services start redis
Linux package manager
On a Linux system, you can use the package manager for your distribution. First, check your distribution and version to determine which package manager to use:
&cat /etc/*release
Then, install Redis using the appropriate package manager.
For Debian/Ubuntu:
&sudo apt-get install redis-server
For CentOS/Red Hat:
sudo yum install redis
For Fedora:
sudo dnf install redis
Now, start the Redis service, like so:
sudo systemctl start redis
Finally, verify the installation with this command:
redis-cli ping
If the response is PONG, Redis is installed correctly.
Docker
If you’re having a problem installing Redis on your system, you can run the Redis server via Docker. Pull the latest version of the Redis image:
docker pull redis
Then, run the Redis container:
docker run --name redis-container -d -p 6379:6379 redis
Finally, verify the installation with this command:
docker exec -it redis-container redis-cli ping
Installing the Redis client
ioredis is a performance-focused client for Redis that’s written in TypeScript. You can install ioredis via npm or yarn:
npm install ioredis request-ip


yarn add ioredis request-ip
If your projects uses TypeScript, be sure to also install a type for request-ip:
npm install --save-dev @types/request-ip
# or
yarn add @types/request-ip --dev
Also, remember to set the .env file on your project. Here’s an example for local development, .env.local:
REDIS_HOST=localhost
REDIS_PASSWORD=
REDIS_PORT=6379
Selecting the rate-limiting algorithm
In this article, we’ll use the token bucket algorithm to handle rate limiting for our application. Token bucket rate limiting is a method of controlling the rate at which requests are made by clients. It works by assigning each client a “token” that expires after a certain amount of time. In this case, the token value will be the client request ip address.
The token bucket algorithm can also be adjusted to handle traffic originating from specific geographical regions. This can be achieved by assigning tokens to clients based on their geographic location.
For instance, if you want to restrict the number of requests coming from a particular country or region, you could assign clients in that location fewer tokens, which would limit the number of requests they can make during a specified time. This can help to evenly distribute the load on your server and ensure that all clients can access your application from different places.
Here are some advantages and drawbacks to consider with regard to the token bucket algorithm:
Pros
- Easy to implement: Relatively straightforward to implement and can be used across the board for any sort of request
- Flexible: May be used to implement different rates for different types of requests, allowing for more granular control over who can access specific services and with what frequency
- Scalable: Can be used to handle large volumes of requests and may be scaled up as needed
Cons
- Resource intensive: Consumes more resources compared to other rate limiting strategies
- Difficult to customize: Not as flexible as other rate limiting strategies, making it difficult to customize for specific use cases
- Not real-time: Requests can be delayed by the time required to generate and refresh tokens
The token bucket rate limit algorithm is just one of many rate limit algorithms that you may wish to consider.
Creating the rate limiting method
Now that we’ve selected our algorithm, we need to create a method to handle request limits for every user who is calling our API. We’ll designate the user ip to mark each unique request to our API:
import Redis from "ioredis";

type Result = {
  limit: number;
  remaining: number;
  success: boolean;
};

const rateLimiter = async (
  client: Redis,
  ip: string,
  limit: number,
  duration: number
): Promise<Result> => {
  const key = `rate_limit:${ip}`;
  let currentCount = await client.get(key);
  let count = parseInt(currentCount as string, 10) || 0;
  if (count >= limit) {
    return { limit, remaining: limit - count, success: false };
  }
  client.incr(key);
  client.expire(key, duration);
  return { limit, remaining: limit - (count + 1), success: true };
};

export default rateLimiter;
If you want to limit the request from a specific geographic location you can modify this function, like so:
interface Location {
  country: string;
  city: string;
}

interface GeoLimit {
  location: Location;
  limit: number;
  duration: number;
}

const rateLimiter = async (
  client: Redis,
  ip: string,
  geoLimits: GeoLimit[]
): Promise<Result> => {
  const geoIpData = await fetchGeoIpData(ip);
  const location = { country: geoIpData.country, city: geoIpData.city };
  const matchingLimit = geoLimits.find(
    (limit) =>
      limit.location.country === location.country &&
      limit.location.city === location.city
  );
  if (!matchingLimit) {
    return { limit: 0, remaining: 0, success: false };
  }
  const key = `rate_limit:${location.country}:${location.city}`;
  let currentCount = await client.get(key);
  let count = parseInt(currentCount as string, 10) || 0;
  if (count >= matchingLimit.limit) {
    return {
      limit: matchingLimit.limit,
      remaining: 0,
      success: false,
    };
  }
  client.incr(key);
  client.expire(key, matchingLimit.duration);
  return {
    limit: matchingLimit.limit,
    remaining: matchingLimit.limit - (count + 1),
    success: true,
  };
};
Setting the rate limit on the API
To implement the rate limiter to the API, we’ll first create a new file, pages/api/redis-limit.ts, in the API folder.
Later this will be translated to an endpoint: {host}/api/redis-limit.
To get started, let’s import the dependencies we need:
import type { NextApiRequest, NextApiResponse } from "next";
import requestIp from "request-ip";
import Redis from "ioredis";
import rateLimiter from "../../lib/redis-rate-limiter";
Next, we’ll continue setting up the Redis client connection with the rate limit config:
const option: RedisOptions = {
  host: process.env.REDIS_HOST!,
  password: process.env.REDIS_PASSWORD!,
  port: parseInt(process.env.REDIS_PORT!, 10),
};

const client = new Redis(option);
const LIMIT_PER_SECOND = 3;
const DURATION = 60;
/pre>
Now we can use the rate limiter to handle API requests:
export default async function handler(
  req: NextApiRequest,
  res: NextApiResponse
) {
  const identifier = requestIp.getClientIp(req);
  const result = await rateLimiter(
    client,
    identifier!,
    LIMIT_PER_SECOND,
    DURATION
  );
  res.setHeader("X-RateLimit-Limit", result.limit);
  res.setHeader("X-RateLimit-Remaining", result.remaining);

  if (!result.success) {
    res
      .status(429)
      .json("Too many requests in 1 minute. Please try again in a few minutes.");
    return;
  }

  res.status(200).json({ name: "John Doe" });
}
And here’s usage example for geo based rate limiting.
// define custom limits by location
const locationLimits = {
  "US": { // United States
    limit: 1000, // request limit
    duration: 60 * 60 // time limit in seconds (1 hour)
  },
  "GB": { // Great Britain
    limit: 500,
    duration: 60 * 30 // 30 minutes
  }
};

// usage example
const requestIp = "123.45.67.89"; // the IP address of the incoming request
const countryCode = await getCountryCodeFromIp(requestIp); // get country code from IP (you'll need to implement this yourself)

const limitConfig = locationLimits[countryCode];

if (!limitConfig) {
  // country not found, allow unlimited requests
  const result = await rateLimiter(redisClient, requestIp, Infinity, 0);
  if (!result.success) {
    // handle exceeded limit
  }
} else {
  const result = await rateLimiter(redisClient, requestIp, limitConfig.limit, limitConfig.duration);
  if (!result.success) {
    // handle exceeded limit
  }
}
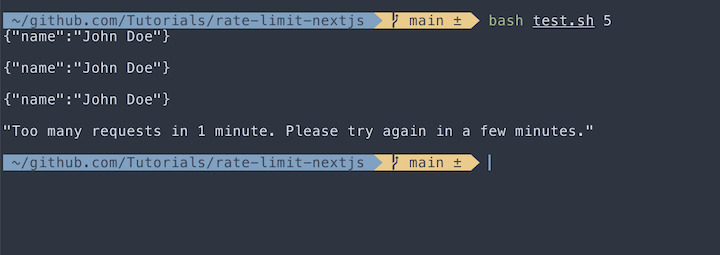
Testing the rate limiter
To test if our rate limiting works, let’s create a simple Bash script to simulate the rate limiter we just built.
Save the below script to the test.sh file:
#!/bin/bash
LIMIT=4
for i in $(seq 1 $LIMIT)
do
    curl --request GET --url http://localhost:3001/api/redis-limit
    echo -e "\n";
done
Now, you can run the script like this:
bash test.sh
Serverless Redis alternatives
Redis is not just for large enterprise applications; solo developers can also use the serverless Redis services. Here’s a list of available serverless Redis services:
- Amazon ElastiCache for Redis
- Google Cloud Memorystore for Redis
- Microsoft Azure Cache for Redis
- IBM Cloud Database for Redis
- Oracle Cloud Infrastructure Cache
- Heroku RedisGreen
- Redis Labs
- Redis on Flash (RoF)
- Heroku Redis
- Scaleway Redis
- Upstash
All you need to do is just to change the env value like this:
REDIS_HOST=serverless_host
REDIS_PASSWORD=xxx
REDIS_PORT=serverless_port
Conclusion
Rate limiting your API is important, especially if your application can be freely accessed by the public. In this article, we demonstrated how to set up, test, and deploy a rate limiter in a Next.js application using a Redis client.
The full source code for this tutorial is available on GitHub.
The post Set up rate limiting in Next.js with Redis appeared first on LogRocket Blog.
from LogRocket Blog https://ift.tt/Xh5bjfz
Gain $200 in a week
via Read more


