


Have you ever started cloning a repository, and the command just … never ends?
Large files can slow down your Git repository and make version control difficult. Git Large File Storage (LFS) offers a solution to this problem by efficiently storing and managing large files outside your repository. In this article, we are going to see how Git LFS can simplify your workflow and improve your team’s productivity.
Jump ahead:
- Why is storing large files (images, videos, etc.) a bad idea?
- What is Git LFS?
- Why not use a simple CDN provider?
- Installing Git LFS in a new project
- Adding Git LFS to an existing project
- Using Git LFS in GitHub’s ecosystem
Why is storing large files (images, videos, etc.) a bad idea?
Git repositories are designed to track changes to text-based files, like source code, and are optimized for small file sizes. When you add a large binary file like an image or a video to a Git repository, it becomes part of the repository’s history — even if you later delete it. This can quickly bloat the size of your repository, making it difficult to clone, push, or pull changes.
Another problem with storing large files in a Git repository is the issue of diffing. Git uses a diffing algorithm to track changes in your files over time. For text-based files, Git can easily identify changes based on individual lines of code. But for large binary files, like images or videos, Git doesn’t have a reliable way to determine changes between versions. This means that even if only a small portion of the file has changed, a copy of the whole binary is going to be stored.
Furthermore, storing large files in your Git repository can also slow down your workflow, particularly if you’re working with a team. Every time a team member clones the repository, they have to download the entire history of the repository, including all the large binary files. This can take a long time and use a lot of bandwidth, making it difficult to collaborate effectively.
What is Git LFS?
Let’s start with the definition and how it works. On the official Git LFS website, you can find the following definition:
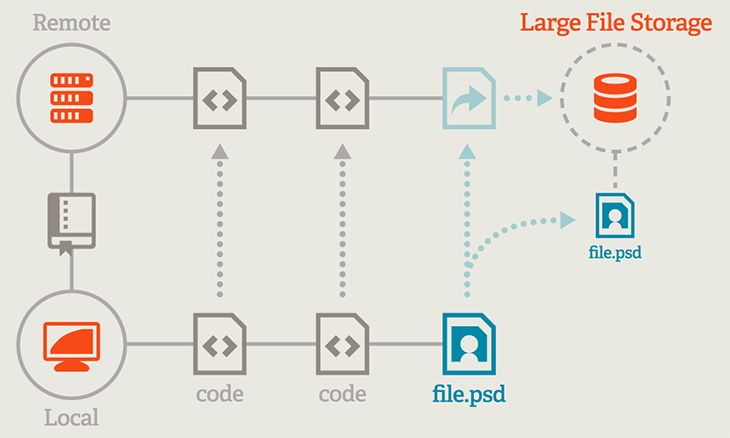
Git Large File Storage (LFS) replaces large files such as audio samples, videos, datasets, and graphics with text pointers inside Git while storing the file contents on a remote server like GitHub.com or GitHub Enterprise.
The flow of Git LFS is relatively straightforward. When you add a large file to your Git repository that’s configured with Git LFS, the file is replaced with a pointer file that contains metadata about the large file. This pointer file is then added to the repository just like any other file, but the actual contents of the large file are stored outside the repository in a designated storage space, such as Amazon S3 or a dedicated server.
An important detail to highlight about Git LFS with GitHub is its storage limit. At the moment of writing this article, there is a limitation of 2GB on their free plan. If you need to store more than 2GB of large files, you will need to upgrade to a paid plan or use another storage solution.
I think that 2GB should be enough for most projects in most cases, except that we are dealing with heavy content projects, such as galleries, animations, or even games. You can read more about the different plans that GitHub offers in their official website.
Why not use a simple CDN provider?
While both a CDN and Git LFS can help with storing and distributing big files, they serve different purposes and work in different ways:
CDNs
A content delivery network (CDN) is a distributed network of servers that store and deliver web content, such as images, videos, or documents, to users around the world.
The goal of a CDN is to improve the speed and reliability of content delivery by serving the content from a server that is closest to the user. When you upload a large file to a CDN, the file is replicated across multiple servers in different geographic locations, making it easier and faster to access the file from anywhere in the world.
Git LFS
Git LFS, on the other hand, is an extension for Git that enables version control for large files. With Git LFS, you can store large files, such as audio or video files, outside your Git repository and reference them via pointers.
When you need to access large files, Git LFS automatically downloads them from the designated storage space. The goal of Git LFS is to make it easier to manage and version control large files in a Git repository without bloating the size of the repository.
In short, a CDN is designed to optimize content delivery to users around the world, while Git LFS is designed to help manage and version control large files in a Git repository.
Benefits of managing large files with Git LFS
- Better collaboration: Your team members only need to download the actual contents of the large files they need, rather than the entire history of the file. This can save time and bandwidth, making it easier to collaborate on large projects
- Better version control: We finally have version control for large files, which can be especially useful for media assets that may be updated or revised frequently. You can easily track changes to large files over time and roll back to earlier versions if necessary
- Flexible storage options: You can choose where to store your large files, whether in a cloud storage service like Amazon S3 or on a dedicated server. This gives you more control over how you manage your assets and can help you keep costs down
- Compatibility with existing Git tools: Git LFS integrates seamlessly with your existing Git workflow, so you don’t have to worry about learning a new system or switching to a different version control tool
Installing Git LFS in a new project
To get started, jump to the official Git LFS website, where you can dig more into the benefits that I highlighted before. There, you should find a Download button that should get the latest release of the tool for your current OS. You can read more about it in the Installing section on the GitHub repository.
Once Git LFS is installed, you need to initialize it in your Git repository. Navigate to your repository’s root directory in your terminal and run the following command:
$  git lfs install

Updated Git hooks.
Git LFS initialized.
Next, you need to track the large files in your repository that you want to manage with Git LFS. To do this, run the following command:
$ git lfs track "*.extension"
Replace *.extension with the file extension of the type of file you want to track. For example, to track all .png files, you would run:
$ git lfs track "*.png"

Tracking "*.png"
You can provide a path to a whole folder, which is quite handy when dealing with different kinds of assets or resources:
$ git lfs track "public/assets/**"

Tracking "public/assets/**"
Once you’ve tracked the large files in your repository, you can add them to your Git repository and push the changes to the remote repository.
Adding Git LFS to an existing project
I would say that, in most scenarios, you would benefit from setting up Git LFS in an existing project that is currently suffering from bad performance.
As we did in the fresh new project, you need to initialize it in your Git repository. Navigate to your repository’s root directory in your terminal, and run the following command:
$ git lfs install

Updated Git hooks.
Git LFS initialized.
Then, instead of using git lfs track to mark the files to track, we have to run a migration process. This is possible by introducing a new command: git lfs migrate.
This command will convert all of the large files in your repository that match the file extension you specified to Git LFS pointers. Note that this command will rewrite your Git history, so make sure to back up your repository before running it.
The command accepts several options flags, including:
--everything: Migrates all matching files in all commits in all branches in your Git history. If you don’t want the migration to apply to your entire history, you can use a different flag as described in the command documentation--include: Accepts rules for which files to migrate. These rules follow the same format as thegit lfs trackcommand used
Here is an example to convert all files in the images directory, along with any other GIF files, throughout the entire repository history:
$ git lfs migrate import --everything --include="images/**,*.gif"

migrate: Sorting commits: ..., done.
migrate: Rewriting commits: 100% (16/16), done.
      asd   9e47d24ab4488a28698e181d793f0c30477780ae -> f8ae661bb59b54af03b088426b1e2ae0c7057152
  main  e8af469084faab798bc6cd242ac4b9815cfc7934 -> aed2b38f266ac041c6eb83cf1e7543bdb2c88ef5
migrate: Updating refs: ..., done.
migrate: checkout: ..., done.
Finally, you have to push the newly migrated files to your remote repository. Unless you specify otherwise, the git lfs migrate import command will rewrite your commit history, converting all previous file versions to Git LFS pointers. Pushing this rewritten history to the remote on your Git provider may require a force push, as follows:
$ git push --force-with-lease
Using Git LFS in GitHub’s ecosystem
Now that you know how to use Git LFS to manage large files in your repository, let’s take a look at how to use GitHub’s ecosystem to make managing large files even easier. GitHub has several tools and integrations that can help streamline your Git LFS workflow, from automating the upload of large files to hosting your repository’s static assets on GitHub Pages.
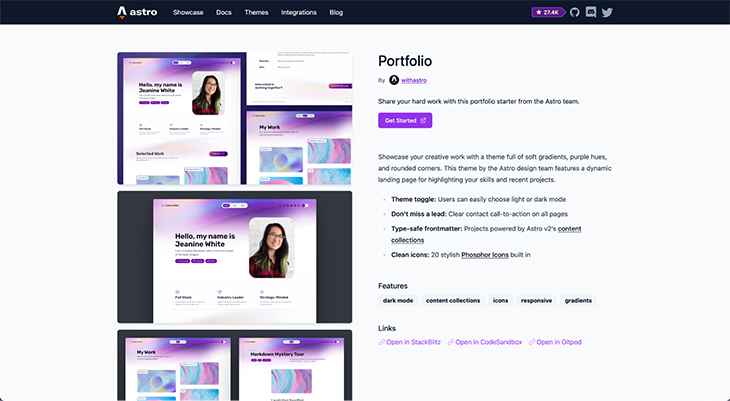
For this demo, we are going to set up a fresh new GitHub repository with Git LFS and use GitHub Actions to automate deployment via GitHub Pages. Instead of creating a medium-size application using media assets from scratch, I opted to use one of the wonderful themes from Astro: Portfolio.
Let’s start by bootstrapping the project using the Astro CLI. This process is going to create a new folder, install dependencies, and even configure TypeScript for us. Pretty cool, right?
$ npm create astro@latest -- --template portfolio
╭─────╮ Houston:
│ ◠ ◡ ◠ Let's build something awesome!
╰─────╯
astro v2.0.14 Launch sequence initiated.
dir Where should we create your new project?
./demo-git-lfs
 tmpl Using portfolio as project template
 Template copied
deps Install dependencies?
Yes
Dependencies installed
git Initialize a new git repository?
Yes
Git initialized
ts Do you plan to write TypeScript?
Yes
use How strict should TypeScript be?
Strictest
TypeScript customized
next Liftoff confirmed. Explore your project!
Enter your project directory using cd ./demo-git-lfs
Run npm run dev to start the dev server. CTRL+C to stop.
Add frameworks like react or tailwind using astro add.
Stuck? Join us at https://astro.build/chat
╭─────╮ Houston:
│ ◠ ◡ ◠ Good luck out there, astronaut!
Template copied
deps Install dependencies?
Yes
Dependencies installed
git Initialize a new git repository?
Yes
Git initialized
ts Do you plan to write TypeScript?
Yes
use How strict should TypeScript be?
Strictest
TypeScript customized
next Liftoff confirmed. Explore your project!
Enter your project directory using cd ./demo-git-lfs
Run npm run dev to start the dev server. CTRL+C to stop.
Add frameworks like react or tailwind using astro add.
Stuck? Join us at https://astro.build/chat
╭─────╮ Houston:
│ ◠ ◡ ◠ Good luck out there, astronaut!  ╰─────╯
To run the project, we just need to execute npm start on the root of the project:
➜ demo-git-lfs git:(main) npm start > demo-git-lfs@0.0.1 start > astro dev

If we take a look at the structure of the project, we have the following scenario:
/demo-git-lfs
├── README.md
├── astro.config.mjs
├── node_modules
├── package-lock.json
├── package.json
├── public
|  ├── assets
|  └── favicon.svg
├── src
|  ├── components
|  ├── content
|  ├── env.d.ts
|  ├── layouts
|  ├── pages
|  └── styles
└── tsconfig.json
This structure is quite good in our situation because all of the assets (images, logos, etc.) are placed inside the assets folder. That’s going to be helpful to define the rule of migration.
/demo-git-lfs/public/assets
├── at-work.jpg
├── backgrounds
|  ├── bg-footer-dark-1440w.jpg
|  ├── bg-footer-dark-800w.jpg
|  ├── bg-footer-light-1440w.jpg
|  ├── bg-footer-light-800w.jpg
|  ├── bg-main-dark-1440w.jpg
|  ├── bg-main-dark-800w.jpg
|  ├── bg-main-dark.svg
|  ├── bg-main-light-1440w.jpg
|  ├── bg-main-light-800w.jpg
|  ├── bg-main-light.svg
|  ├── bg-subtle-1-dark-1440w.jpg
|  ├── bg-subtle-1-dark-800w.jpg
|  ├── bg-subtle-1-light-1440w.jpg
|  ├── bg-subtle-1-light-800w.jpg
|  ├── bg-subtle-2-dark-1440w.jpg
|  ├── bg-subtle-2-dark-800w.jpg
|  ├── bg-subtle-2-light-1440w.jpg
|  ├── bg-subtle-2-light-800w.jpg
|  └── noise.png
├── portrait.jpg
├── stock-1.jpg
├── stock-2.jpg
├── stock-3.jpg
└── stock-4.jpg
Let’s create the GitHub repository to host the code; you can easily do it via github.com/new. After that, we want to link it with an existing repository:
➜  demo-git-lfs git:(master) ✗ git remote add origin https://github.com/EmaSuriano/demo-git-lfs.git
➜  demo-git-lfs git:(master) ✗ git branch -M main
➜  demo-git-lfs git:(main) ✗ git push -u origin main
Enumerating objects: 75, done.
Counting objects: 100% (75/75), done.
Delta compression using up to 6 threads
Compressing objects: 100% (70/70), done.
Writing objects: 100% (75/75), 593.85 KiB | 10.06 MiB/s, done.
Total 75 (delta 3), reused 0 (delta 0), pack-reused 0
remote: Resolving deltas: 100% (3/3), done.
To https://github.com/EmaSuriano/demo-fit-lfs.git
 * [new branch]      main -> main
branch 'main' set up to track 'origin/main'.
Our repository is now created here. Next step: setup Git LFS for the project, along with the migration:
➜  demo-git-lfs git:(main) ✗ git lfs install
Updated Git hooks.
Git LFS initialized.

➜  demo-git-lfs git:(main) git lfs migrate import --everything --include="public/assets/**"
migrate: Sorting commits: ..., done.
migrate: Rewriting commits: 100% (2/2), done.
  main        60f34e90d23427e6892c87334332769bcaf4814f -> 472d700df4f8b4e016233ab37f71dea8f451cff9
migrate: Updating refs: ..., done.
migrate: checkout: ..., done.
Once the migration is done, you’ll notice a new file added to your project called .gitattributes. This contains all the different rules for tracking Git LFS files. We can always add new files via the git lfs track command or modify this file directly.
public/assets/** filter=lfs diff=lfs merge=lfs -text
As we saw previously, the migrate command overrides the history, therefore we need to run a force push to publish the changes into GitHub:
➜  demo-git-lfs git:(main) git status
On branch main
Your branch and 'origin/main' have diverged,
and have 2 and 2 different commits each, respectively.
  (use "git pull" to merge the remote branch into yours)

nothing to commit, working tree clean

➜  demo-git-lfs git:(main) git push --force-with-lease
Uploading LFS objects: 100% (25/25), 584 KB | 194 KB/s, done.
Enumerating objects: 79, done.
Counting objects: 100% (79/79), done.
Delta compression using up to 6 threads
Compressing objects: 100% (73/73), done.
Writing objects: 100% (79/79), 114.29 KiB | 4.76 MiB/s, done.
Total 79 (delta 4), reused 0 (delta 0), pack-reused 0
remote: Resolving deltas: 100% (4/4), done.
To https://github.com/EmaSuriano/demo-git-lfs.git
 + 60f34e9...472d700 main -> main (forced update)
Did you notice the line after the push? That’s Git LFS uploading the files that we are tracking! You can always check the files being tracked by running the following command:
➜  demo-git-lfs git:(main) git lfs ls-files
b0e3b74a4d - public/assets/at-work.jpg
915fc78e30 - public/assets/backgrounds/bg-footer-dark-1440w.jpg
f0d5d430f7 - public/assets/backgrounds/bg-footer-dark-800w.jpg
0de9edd10b - public/assets/backgrounds/bg-footer-light-1440w.jpg
19bc9fb51b - public/assets/backgrounds/bg-footer-light-800w.jpg
2f0270d5e2 - public/assets/backgrounds/bg-main-dark-1440w.jpg
c96d14fe73 - public/assets/backgrounds/bg-main-dark-800w.jpg
b0d33331d2 - public/assets/backgrounds/bg-main-dark.svg
eaefb56b8e - public/assets/backgrounds/bg-main-light-1440w.jpg
d61ff0eec3 - public/assets/backgrounds/bg-main-light-800w.jpg
3bbda0ddd9 - public/assets/backgrounds/bg-main-light.svg
06e5f37773 - public/assets/backgrounds/bg-subtle-1-dark-1440w.jpg
3f953348b6 - public/assets/backgrounds/bg-subtle-1-dark-800w.jpg
a411d7d324 - public/assets/backgrounds/bg-subtle-1-light-1440w.jpg
118abb468c - public/assets/backgrounds/bg-subtle-1-light-800w.jpg
5f63b07552 - public/assets/backgrounds/bg-subtle-2-dark-1440w.jpg
b7e54238e5 - public/assets/backgrounds/bg-subtle-2-dark-800w.jpg
2bddd33031 - public/assets/backgrounds/bg-subtle-2-light-1440w.jpg
4dba81af81 - public/assets/backgrounds/bg-subtle-2-light-800w.jpg
94f27346cc - public/assets/backgrounds/noise.png
5800c072e7 - public/assets/portrait.jpg
e7049223bd - public/assets/stock-1.jpg
4bd672519c - public/assets/stock-2.jpg
de16c2c983 - public/assets/stock-3.jpg
affe45edd0 - public/assets/stock-4.jpg
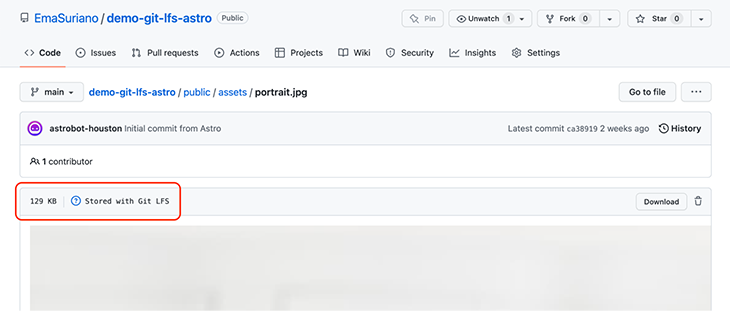
In case we want to check any of the migrated files inside GitHub, we can find this information box saying that it’s being stored with Git LFS.
The last step is to configure our deployment pipeline. This is where GitHub Actions enters the picture. By default, the starter doesn’t come with any CI configuration, so we need to create the folder structure manually:
➜  demo-git-lfs git:(main) ✗ mkdir .github/workflows
➜  demo-git-lfs git:(main) touch .github/workflows/deploy.yml
Inside deploy.yml, paste the following snippet:
name: Deploy to GitHub Pages

on:
  # Trigger the workflow every time you push to the `main` branch
  # Using a different branch name? Replace `main` with your branch's name
  push:
    branches: [main]
  # Allows you to run this workflow manually from the Actions tab on GitHub.
  workflow_dispatch:

# Allow this job to clone the repo and create a page deployment
permissions:
  contents: read
  pages: write
  id-token: write

jobs:
  build:
    runs-on: ubuntu-latest
    steps:
      - name: Checkout your repository using git
        uses: actions/checkout@v3
        with:
          lfs: true # Important! Fetches LFS data

      - name: Install, build, and upload your site
        uses: withastro/action@v0

  deploy:
    needs: build
    runs-on: ubuntu-latest
    environment:
      name: github-pages
      url: $
    steps:
      - name: Deploy to GitHub Pages
        id: deployment
        uses: actions/deploy-pages@v1
This is the standard deployment config for any Astro website in GitHub Pages, with the caveat that we are passing a special flag of lfs to actions/checkout@v3. Without this flag, our images will not be downloaded from Git LFS, resulting in a page without any assets.
Because we are using Astro, we’ll need to provide our site url inside the config file. This is because GitHub Pages creates a subroute under our username with the name of the repository, instead of using an absolute path. You can read more about the reasons for these changes in the official documentation of Astro.
// astro.config.mjs
import { defineConfig } from 'astro/config'

export default defineConfig({
+  site: 'https://emasuriano.github.io',
+  base: '/demo-git-lfs',
})
Finally, we need to update our internal assets so they include the base path as well. This task can turn out a bit tedious because of all the replacements that we have to do. To minimize the number of changes, I created a small config file inside the src folder:
export const BASE_URL = '/demo-git-lfs/';
Inside the Astro component, we need to make sure that all the <img /> tags use BASE_URL when defining the src property. The same applies to the internal routes for the <a /> tags for the href property.
---
import type { CollectionEntry } from 'astro:content';
+ import path from 'path';
+ import { BASE_URL } from '../shared';

interface Props {
  project: CollectionEntry<'work'>;
}

const { data, slug } = Astro.props.project;
---

- <a class="card" href="work/slug">
+ <a class="card" href={path.join(BASE_URL, 'work', slug)}>
  <span class="title">{data.title}</span>
  <img
-     src={data.img}
+     src={path.join(BASE_URL, data.img)}
    alt={data.img_alt || ''}
    loading="lazy"
    decoding="async"
  />
</a>
Our site is now live under the following link: Demo website.
Closing words
In this article, we covered the basics of Git LFS and how it can help you manage large files in your Git repository. We’ve also explored the benefits of using Git LFS and why storing large files directly in your repository is a bad idea. By using Git LFS, you can keep your repository small and fast, while still having the ability to version large files.
We also looked at how to install Git LFS to a new project and how to add it to an existing project. Finally, we explored the power of GitHub’s ecosystem and how it can help streamline your Git LFS workflow. With tools like GitHub Pages and GitHub Actions, managing large files with Git LFS has never been easier.
I hope this article has given you a good understanding of Git LFS and its benefits. If you have any questions or feedback, feel free to leave a comment below. Thanks for reading!
Related links
- Git LFS website
- Git FLS repository
- Git FLS restrictions inside Github
- Astro Portfolio Theme
- Deploy your Astro site to Github Pages
- Demo repository
- Demo website
The post Efficiently manage large files in Git with Git LFS appeared first on LogRocket Blog.
from LogRocket Blog https://ift.tt/NAwBf4c
Gain $200 in a week
via Read more


