


One thing is certain, the way we create and publish content online has changed drastically in the last couple of years. This also means the way we build content rich digital products has changed just as much. The whole experience from the place where we capture the content, to where and how the end user experiences that content has traditionally been tightly coupled in a monolithic system in the past, meaning one system to manage the whole process from start to finish.
From my experience this meant something like WordPress where the content capturing, authoring, and presentation on the frontend was all in one place. When WordPress released an API allowing us to consume that content externally, that was a game changer for me. For the first time, content authoring and end user experience could exist independently. It also meant we could extract content from one place and then distribute it to multiple places. This laid the groundwork for what is known as a headless CMS.
In this article, we’ll discuss the differences between a traditional and headless content management system. We’ll also walk through a tutorial to demonstrate how Gatsby and Contentful can be paired together to deliver a modern, rich experience for building a headless CMS. We’ll show how to explore the data with GraphQL and how to set up dynamic previews.
Jump ahead:
- What is a headless content management system?
- What is Contentful?
- What is Gatsby?
- Tutorial: Using Gatsby and Contentful to build a headless CMS
What is a headless content management system?
A traditional monolithic CMS architecture was once the standard for web development. However, with the advent of omni-channel experiences where users can consume content via a website, mobile app, social media, or TV operating system, we find ourselves seeking increased flexibility and scalability. This is something that only a decoupled or headless system can provide.
In short, a headless CMS is a content capturing platform that exists purely to capture and manage content. Most of the time there is no end user experience layer and the content is exposed through an API where we use a completely different tech stack to build out the end user experience.
You might wonder, why do we even need to move in this direction — why headless?
Well, 10 years ago we didn’t need this, all our content was centered around our marketing website, and the content we captured there was simply displayed in that single use case. Today, there are a myriad of applications with the same content.
We need a central source of truth to capture that content and distribute it to various channels, hence the need for a headless (API-driven) CMS. A headless content management system makes sense for where the industry is going and how today’s content is generally produced and consumed:
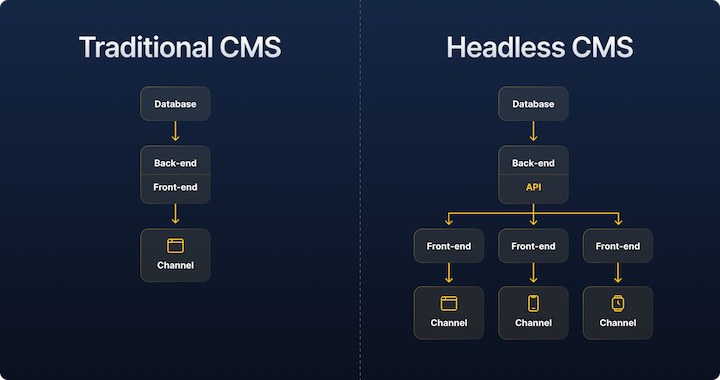
CMS data structure
Building in a monolithic system was easy. The backbone was the “what you see is what you get” (WYSIWYG) editor that did exactly what it said — just type some content and view the final result. It had a one-to-one mapping of content and presentation. Most of the time we saw a page in its completed structure and edited the content in that same way.
With the headless CMS architecture described and shown in the previous section, we have no idea what that presentation layer will look like from a design, layout, or user experience perspective. That is something that is platform specific and any company guidelines or design system guides would help us determine based on the use case. One thing is certain, we can’t rely on seeing what the presentation layer looks like when capturing content. The process is more abstract; we need to think of it more in the form of structured content and how it really unlocks a headless approach.
Headless architecture isn’t just for developers. By supporting composable content, it improves workflows and capabilities of editors, marketers, and anyone else who creates, updates, and manages content.
Composable content enables us to describe the schema of a specific building block of content. Think of something like a product having a title, description, image, image description, pricing, stock quantities, etc. It enables us to describe that content with a reusable format that could be used across any presentation layer.
This is more than just a container for the content. It can be used to personalize content for a distinct audience, reorganize it for a specific campaign, or trim it down for a mobile experience, giving us ultimate flexibility down the road while it’s contained in a predictable future-proof structure.
What is Contentful?
Contentful is a composable content platform. In the tutorial section of this article, we’ll use Contentful as our headless CMS solution. By using Contentful, we’ll be able to focus on building digital products by liberating the content capturing from the frontend development, allowing the two to work independently and not hold us back from delivering new designs or developed solutions without final content.
What is Gatsby?
Gatsby is a React-based tool that started out as one of the first static site generators and quickly evolved to become one of the go-to platforms that enable developers to build fast, secure websites. Its proprietary data layer makes integrating content from various APIs or platforms a breeze.
To further simplify this process, Gatsby provides a Contentful Source Plugin and various starters to help us easily plug our Contentful content and data into Gatsby’s data layer. Gatsby has also developed its own cloud hosted solution to enable real time previews, shareable preview links, and other information we might need to further optimize performance.
In my opinion, Gatsby is a pleasure to build with and really delivers on the modern developer experience.
Tutorial: Using Gatsby and Contentful to build a headless CMS
To get started, let’s go to https://app.contentful.com and set up a new account. Contentful has a fairly straightforward onboarding wizard. Once in, you’ll be asked to define our content model. Let’s hold off on that right now, the Gatsby starter project will help us by importing some dummy data and setting this content model up by default.
To get started with setting this up, we’ll be building a site locally to test this out with the help of a Gatsby and Contentful starter.
Gatsby requires Node.js v18+. Make sure you have the right version installed, and update it first before installing the starter. It’s also helpful to have Gatsby installed globally if you don’t have it set up yet:
npm install -g gatsby-cli
To install the demo starter locally, set up a new folder and run the following command:
npx gatsby new starter-gatsby-blog https://github.com/contentful/starter-gatsby-blog
Next, navigate into the new folder and you’ll be ready to run the setup:
cd starter-gatsby-blog
Running the setup
This setup is unique to this starter template; it enables us to easily configure everything we need to get started.
The setup helps us by:
- Setting up all the API keys to connect to Contentful
- Importing and creating the content models on Contentful that we need for a
Blog Post(an article) and aPerson(the article’s author)
To get started, run this command:
npm run setup
You’ll be asked for your:
- Space ID
- Content Management API access token
- Content Delivery API access token
Go to space settings in your Contentful account, and copy your Space ID.
Next, go to Settings > API Keys. There, you’ll need to generate a personal token for the Content Management API access token. Next, click the Add API Key button to generate the Content Delivery API access token.
Testing it out
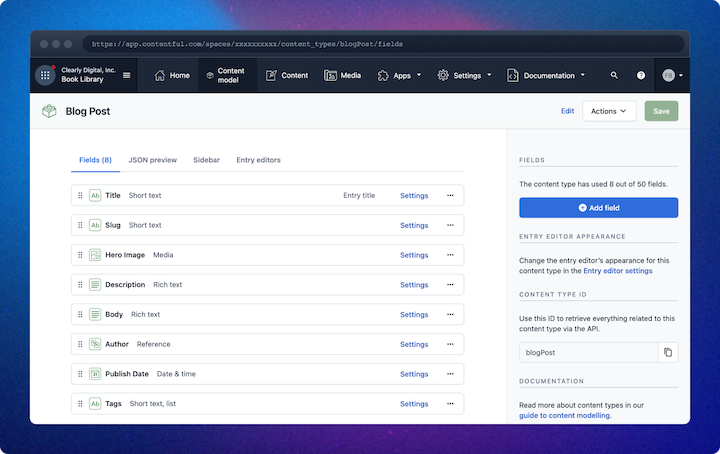
Once the importer has run, you can browse your Contentful content models to see how things are structured. It’s also easy to keep adding and shaping the fields as you require.
Start your local development environment, like so:
npm run dev
Your sample blog, that was built with Gatsby and is sourcing content from Contentful, is now available at: http://localhost:8000:
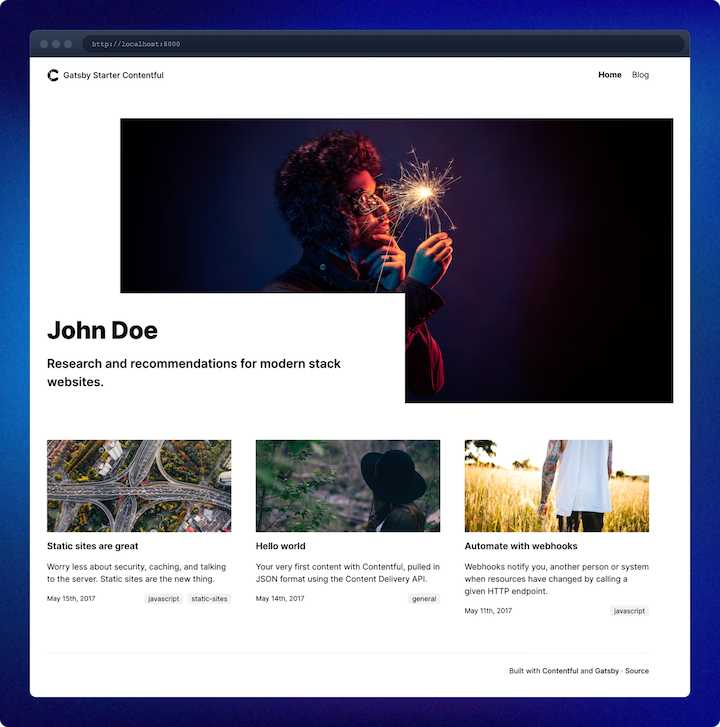
Even though this site is local, click around and you’ll soon feel the true power of static sites. It’s as smooth as butter and faster than lightning. Notice how the images are handled and loaded in without any content shift. These are some of the nice benefits that come with using Gatsby.
Exploring GraphQL data
One of the features that enables Gatsby to provide a great developer experience is its data layer powered by GraphQL. If you’re not familiar with GraphQL, here’s a short video.
The GraphiQL Explorer is one of Gatsby’s best features. This tool helps structure GraphQL queries correctly by allowing you to explore, build, and preview your queries. To access this tool, go to http://localhost:8000/_graphql while your site is running locally.
Once the editor is open, open the Explorer by clicking on the folder icon (#1, below image) in the left menu. Here you can see all the available queries you can make to GraphQL. As you select queries and properties in the Explorer, you’ll see the shape of the actual query being composed in the middle column.
To build the first query, select allContentfulBlogPost, then nodes, and then slug, tags, and title. Next, click the “play” icon (#2, below image) to run the query. On the right (#3, below image), you’ll see the data returned from Contentful with the exact fields you requested in JSON:

I’m sure you can appreciate the power of GraphQL for building the right queries to get the exact data you need on each page, for each module and page you set up on your website. Once Gatsby has sourced your content, it’s accessible via the internal data layer, making it super easy to explore and build the right queries before running it on your frontend.
Working with new content
Back on Contentful, you can explore blog posts built on the content model, and even extend the content model with more fields per your own requirements. The beauty of GraphQL is that you can easily pull in the exact fields where and when you need them, depending the needs of your application:
Publishing new articles
If you publish a new blog post and then refresh your site, the new post will not be displayed. This is expected behavior due to the way Gatsby works internally to boost performance. When you start your site, Gatsby fetches all the content from your data source (Contentful, in our case) and adds it to its internal data layer. From this point forward all data is queried against this internal data layer, so we’d have to stop the site and rebuild it to get the new content.
In practice, once you set up a Gatsby site on a hosting server, a content refresh can be achieved with webhooks. For example, when the CMS publishes new content, you’d send a webhook to your hosting provider to trigger a rebuild of the Gatsby site, thereby refreshing the content. This process normally only takes a couple of minutes, depending on the size of your site and the amount of content, and there is no downtime or interference with what is shown to users. However, only once the build is successful, does it start replacing the old version with the new version.
Previewing draft content
One advantage of using Contentful is that you can configure previews, so you can actually preview content as you build, or your team can preview a piece of content before it goes live on the site.
When you ran the setup, your API keys were added to the .env files. If you now open up .env.development, you’ll notice a CONTENTFUL_HOST variable. Go ahead and uncomment that, and then add your “Content Preview API access token” in the place of CONTENTFUL_ACCESS_TOKEN. Now, when you build your site, you’ll be able to pull in and preview draft articles before they are published.
Setting up dynamic previews
At this stage, you might be concerned with how your non-technical content team might be able to set up a workflow around this. To address this, I’ve added this optional step to provide you with truly dynamic previews so your team can add content and preview it, before hitting that publish button.
To enable dynamic previews, and avoid needing to rebuild the site each time content changes, we’ll need to set up a hosted version of the site on Gatsby Cloud and connect that to Contentful.
There are three parts to this process:
- Place website code in a hosted Git repo (I’ll be using GitHub)
- Set up a Gatsby Cloud hosting account, linked to the Git repo
- Connect Contentful to the Gatsby Cloud instance to rebuild on-demand
Adding source code to a Git repo
In order to get the frontend live, we’ll need to host it somewhere. This host needs to support a Node.js runtime environment so that we can build our site on the server. All popular hosts are set up to detect any changes in source code (Git), and then trigger a rebuild of your site. The three most popular Git hosting providers (GitHub, GitLab, and BitBucket) are supported, so you’re welcome to add your repo to whichever provider you feel most comfortable.
Creating a hosting account
There are a few hosts to try out, but for this article we’ll stick to Gatsby Cloud. I just really like the idea that the company behind the open source project (Gatsby) has created a cloud hosting environment to best match their technology, so surely it will provide the best inbuilt performance.
Follow these steps:
- Creating a free Gatsby Cloud account
- Once you’re in the dashboard, navigate to “Add a site”
- Select your Git provider and follow the steps to link it to your repo
- In the “Basic Configuration” field, leave all the default settings
- In the “Connect Integrations” box, add “Contentful”, click Connect and follow the prompts to set it up
You should see the webhooks, preview extension, and environment variables automatically selected to the setup. This is what we need to connect the two worlds.
Once you complete this setup, an automatic build will start to build your site for the first time. This may take a couple of minutes as the first time there is no cache and everything has to build from scratch. You’ll see a green “published” label as soon as the build passes, with a link to preview your site. For subsequent builds, Gatsby Cloud will use its internal cache to enable faster builds with incremental content changes.
Hooking up the previews
In Contentful, you can install the Gatsby app to facilitate the dynamic previews.
To get started, follow these steps:
- Go to Apps → Marketplace
- Search for “Gatsby” to find and install the “Gatsby Cloud” app
- Authorize the app to connect to Gatsby Cloud
Click on the purple Open Preview button to open your preview site with any unpublished changes. Your preview URL will be something like https://preview-yourslug.gatsbyjs.io. This method will provide you with a truly dynamic preview, showing you what implications content changes will have on the frontend:


Your team can use this strategy to capture, preview, and schedule content, and only once the changes are published, will it trigger a rebuild on the live site to update with the new content.
When you open the preview link, you’ll notice a small widget on the left side of the browser indicating what’s happening on Gatsby Cloud. So if you’ve just opened the link, and it needs a couple of seconds to rebuild, you can use the widget to track progress.
Conclusion
Getting a modern headless website set up is no small task, but the effort will soon yield big dividends. In our example, we simply connected some blog posts to a decoupled frontend, but I’m sure you can see the advantage of this approach for distributing content to other channels as well. This is the future. The developer experience is great once you get the hang of the tools. This actually makes you feel like you’re in control of every single piece of the process, which is something I’ve come to love again.
The post Contentful and Gatsby: Build a static site with a headless CMS appeared first on LogRocket Blog.
from LogRocket Blog https://ift.tt/W4mcaGJ
Gain $200 in a week
via Read more


