


One of the most common functionalities in a mobile app is displaying a list of items. The complexity of these items can vary. For example, a simple to-do app may only consist of plain text, while a vacation planning app might show a list of hotels, each represented by pictures, pricing info, and other kinds of details.
When dealing with a complex use case, you will need to ensure your app’s performance while the user is scrolling. Poorly managing the implementation of the list view will lead to a laggy UI and, therefore, a user experience that drives people away.
In this article, we will check out how to implement such a complex list for an Android app using RecyclerView and data binding. We will showcase the power of RecyclerView used to load images from a network and display them in a list — a common scenario for mobile apps.
We are going to see how to use data binding, how to implement a linear or a grid layout manager, how to implement the UI for our example app, and how to load an image using a popular library called Glide. Jump ahead:
- Why use data binding with
RecyclerViewin Android apps? - What makes the
RecyclerViewso highly performant? - Understanding data binding in Android projects
- Adding data binding to our
RecyclerViewAndroid project - Handling a complex list with Android’s
RecyclerViewand data binding - Making the
RecyclerViewlist items interactive - Switching to a grid layout
Why use data binding with RecyclerView in Android apps?
The RecyclerView and data binding combo is suitable for our use case for many reasons. For example, the RecyclerView optimizes the performance of the list, thus allowing us to work even with a large number of images.
Additionally, the RecyclerView allows for asynchronous data loading, so the UI thread is not going to be blocked while data is being loaded.
By using data binding, we will bind data directly to views in our layout. Therefore, in the adapter class, we will not need to handle manual data binding.
Finally, we can bind the image URL directly to an ImageView in our layout and the image loading library will handle the loading part
In the following paragraphs, we will go into more detail regarding the performance advantages that the RecyclerView brings to the table and we will also be writing some code.
What makes the RecyclerView so highly performant?
As the name suggests, a RecyclerView is a type of view in Android that deals with large lists of items in a performant way. Even if your list contains hundreds or thousands of items, the user will only see a few of them at a time — most likely between five to ten items, depending on the height of the items and screen size.
RecyclerView leverages this implementation by reusing these five to ten views for everything that gets rendered on the UI. More specifically, when the user scrolls up or down and a view disappears at the top or bottom of the screen, this item’s view is recycled and reused for new data that should now be displayed.
By simply updating some views while the user scrolls up or down, RecyclerView leads to a performant list that is able to handle a list of hundreds or even thousands of items without any negative impact on performance. It only keeps a couple of views in memory at a time and reuses them while scrolling through the list.
Another advantage of the RecyclerView that is worth mentioning is its flexibility. By using different types of layout managers, you are able to implement various layouts for your list.
The most-used types of layout managers are:
LinearLayoutManager— used for linear lists; can be vertical or horizontalGridLayoutManager— positions items in a grid with a preset number of columns
In the following screenshot, you can observe a list that uses a GridLayoutManager with three columns:
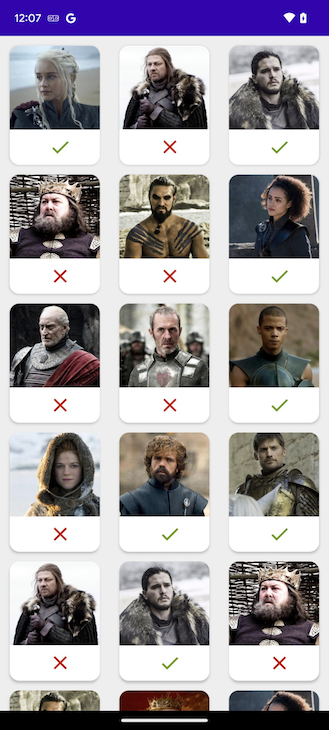
If you would like to see a LinearLayoutManager in use, keep on reading — we will use one in our final example.
Now that we understand why the preferred view for rendering lists in Android is the RecyclerView, let’s take a look at how to use it with data binding and to render large lists — or lists with images — while keeping the UI performant for a smooth user experience.
All the code snippets that will follow are written in Kotlin. The layout files are, of course, written in XML.
Understanding data binding in Android projects
Data binding is an Android support library whose purpose is to bind data sources to UI views. By using data binding, you can directly specify the exact fields from the data source which should be rendered in each view and how this rendering should be done.
There are several reasons why we should use data binding in an Android project. The most impactful reasons are improved performance due to not calling findViewById, easier testing of the code, increased readability of our codebase, and less boilerplate.
Let’s take, for example, a very simple use case in which we want to display some information about our current user such as their username, date of birth, and profile picture. Traditionally, without data binding, this would be done something like the below.
In a UserData.kt file:
data class UserData(val userName: String, val dateOfBirth: String, val profilePictureUrl: String)
In a UserProfileFragment.kt file:
private fun displayUserInfo(user: UserData) {
  findViewById<TextView>(R.id.user_name).apply { text = userData.userName }
  findViewById<TextView>(R.id.user_dob).apply { text = userData.dateOfBirth
  }
  findViewById<ImageView>(R.id.user_icon).apply {
    loadImage(this, userData.profilePictureUrl)
  }
}
As we can see, whenever we want to alter parts of our UI based on some data sources, we have to find a way to retrieve these UI elements individually — in our case, via findViewById. We also have to update them individually from code based on fields of interest from the data source.
Data binding can help us avoid large parts of this boilerplate by letting us bind these fields directly in our layouts. Let’s look at how we could improve the above example by using data binding.
Create a file called user_profile_fragment.xml and add the following:
<layout xmlns:android="http://schemas.android.com/apk/res/android">
<data>
    <import type="com.example.UserData" />
    <variable
 name ="user"
        type="com.example.UserData" />
</data>

<TextView
    android:text="@{user.userName}" />
<TextView
    android:text="@{user.userDob}" />
<ImageView
    app:profilePicture="@{user.profilePictureUrl}" />
</layout>
Additionally, add the following in the UserProfileFragment.kt file:
private lateinit var binding: UserProfileFragmentBinding

override fun onCreateView(inflater: LayoutInflater, container: ViewGroup?, savedInstanceState: Bundle?): View {
binding = UserProfileFragmentBinding.inflate(inflater, container, false)
return binding.root
}

private fun displayUserInfo(user: UserData) {
binding.user = user
}
As we can see, the bulk of the UI logic is now all contained within our layout file. This is an improvement over having the initial general UI information and components inside the layout file, as well as having to perform any further updates explicitly in our Kotlin code.
There are three important takeaways for using data binding from this example.
First, we have to declare the type and name of our data sources within our layout files. These can be of any primitive or custom type, even observable sources such as LiveData.
In this case, whenever a new value is set in the observable source, the consuming views will be automatically re-rendered. Please note that for such observable sources we also have to specify the LifecyleOwner for our data binding objects.
Second, we can reference any public property of these data sources directly in the layout. For more complex behaviors such as the app:profilePicture in the above example, we’ll have to define custom binding adapters, which we’ll explore further in our final example.
Finally, we can assign these data sources to the binding objects in our Kotlin code just as we would normal variables. Each time we do this, all the views relying on the data’s properties will be re-rendered.
Note that the concepts explained above refer to two-way data binding. For simpler interactions in which we just want a more lightweight and easy-to-use replacement for findViewById<>(), view binding is always a good alternative.
Adding data binding to our RecyclerView Android project
The data binding library is usable with API 14 and higher. The Android Gradle plugin starts with version 1.5.0.
In the past, you also had to add the library manually from the support repository. But now, it will be automatically added to the build configuration by Android Studio when you create a project.
Therefore, the only thing that you need to do to use data binding is to mark it as enabled in build.gradle:
android {
    ...
    buildFeatures {
        dataBinding true
    }
}
And that’s it! After a quick gradle sync, data binding will be ready for use in our project.
To tell the data binding library that it needs to generate a binding object for a certain layout, simply wrap the topmost view in our layout file with a <layout> tag, as we saw in the above example.
After this, or following the first successful build of the project, a binding class will be automatically generated for us based on the name of the layout file with a Binding suffix appended to it.
This step already allows us to ditch the repetitive findViewById<> calls, as all views from the layout file that have an id defined will be available as properties of the binding object. However, to actually use all the capabilities of data binding, we’ll have to add some variables in our layouts inside the section wrapped inside the <data> tags.
Handling a complex list with Android’s RecyclerView and data binding
Now that we have a basic understanding of how data binding and RecyclerView each work individually, it’s time to take a look at how they can be used together to render a complex list in Android.
Let’s assume that we want to display a list of Game of Thrones characters. For each of these characters, we want to show a name, a list of titles, an image, and an optional cause of death field. In the following, we are going to accomplish a basic Android app that uses the powerful RecyclerView
Since we are designing a list, the first step will obviously be to implement the UI data model and layout for the list items. Create a file named CharacterInfo.kt and add the following code:
data class CharacterInfo(
    val name: String,
    val titles: List<String>,
    val imageUrl: String,
    val causeOfDeath: String?
) {
    val titlesLabel: String get() = titles.joinToString(", ")
    val isAlive: Boolean get() = causeOfDeath.isNullOrEmpty()
}
What we’ve done here is very similar to the first example. We just created a simple data class containing all the information that we’ll need to display in the list. The additional helper properties we added — titlesLabel and isAlive — are going to make it much easier to interpret the information within XML.
Now, let’s set up the layout for the list items. Create a character_list_item.xml file and add the following:
<layout>
    <data>
        <import type="com.example.domain.CharacterInfo" />

        <import type="android.view.View" />

        <variable name="character"
            type="com.example.domain.CharacterInfo" />

            <variable name="listener"
          type="com.example.gotchars.CharactersListAdapter.OnClickListener"
             />
    </data>

    <ConstraintLayout
            android:onClick="@{() -> listener.onClick(character)}">

        <ImageView android:id="@+/characterStatusIcon"
                  app:displayAsAlive="@{character.isAlive}" />

        <TextView android:id="@+/characterName"
                  android:text="@{character.name}" />

        <TextView android:id="@+/characterTitles"
                  android:text="@{character.titlesLabel}" />

        <ImageView android:id="@+/characterImage"
                  app:imageUrl="@{character.imageUrl}" />

        <TextView android:id="@+/characterCauseOfDeath"
                android:text="@{character.causeOfDeath}"
                android:visibility="@{character.isAlive ? View.GONE : View.VISIBLE}"
        />
    </ConstraintLayout>
</layout>
There are two things you might notice when looking at this code.
First, the data binding syntax allows for statements as well such as conditions. These come in handy when a piece of UI information is not exposed explicitly through a property but can be deduced from existing properties — for example, whether or not the characterCauseOfDeath view needs to be visible or not.
Second, we are able to define custom XML attributes via data binding such as app:imageUrl and app:displayAsAlive. Naturally, Android doesn’t know how to handle these by default. We will have to implement something called a BindingAdapter to tell the framework how to handle these attributes:
// Adapters.kt

@BindingAdapter("imageUrl")
fun loadImage(view: ImageView, val imageUrl: String) {
    Glide.with(view.context)
            .load(imageUrl)
            .centerCrop()
            .placeholder(R.drawable.ic_placeholder)
            .diskCacheStrategy(DiskCacheStrategy.ALL)
            .into(view)
}

@BindingAdapter("showAsAlive")
fun showIconAsAlive(view: ImageView, isAlive: Boolean) {
    val iconResource = if (isAlive) R.drawable.ic_checkmark else R.drawable.ic_cross
        val iconTint = if (isAlive) android.R.color.holo_green_dark else android.R.color.holo_red_dark
        view.setImageResource(iconResource)
        DrawableCompat.setTint(
                DrawableCompat.wrap(view.drawable),
                ContextCompat.getColor(view.context, iconTint)
        )

}
These adapters don’t have to be further declared anywhere. Simply having them as public, global functions allows the data-binding annotation processor to find and interpret them.
Now that we have gotten the code for the list item logic out of the way, it’s time to implement the adapter for our RecyclerView.
Create a file called CharactersListAdapter.kt and add the following code:
class CharactersListAdapter() : RecyclerView.Adapter<CharacterViewHolder>() {

    fun interface OnClickListener {
         fun onClick(character: CharacterInfo)
    }


    var characters: List<CharacterInfo> = listOf()
        set(value) {
            field = value
            notifyDataSetChanged()
        }

    override fun getItemCount(): Int  = characters.size

    override fun onCreateViewHolder(parent: ViewGroup, viewType: Int): CharacterViewHolder {
        val layoutInflater = LayoutInflater.from(parent.context)
        val binding = CharacterListItemBinding.inflate(layoutInflater, parent, false)
                binding.listener = OnClickListener { character: CharacterInfo ->
                     Toast.makeText(parent.context, "Clicked on ${character.name}", Toast.LENGTH_SHORT).show()
                }
        return CharacterViewHolder(binding)
    }

    override fun onBindViewHolder(holder: CharacterViewHolder, position: Int) {
        holder.bind(characters[position])
    }

    class CharacterViewHolder(private val binding: CharacterListItemBinding) :
            RecyclerView.ViewHolder(binding.root) {

        fun bind(character: CharacterInfo) {
            binding.character = character
     }
}
Additionally, create a file called CharactersFragment.kt and add the following code:
class CharactersFragment : Fragment() {

    private lateinit var binding: CharactersFragmentBinding
    private val adapter: CharactersListAdapter = CharactersListAdapter()

    // ... inflate the binding object

    override fun onViewCreated(view: View, savedInstanceState: Bundle?) {
        binding.charactersList.adapter = adapter
        binding.charactersList.layoutManager = LinearLayoutManager(requireContext())
    }

    private fun onCharactersLoaded(characters: List<CharacterInfo>) {
        adapter.characters = characters
    }
}
In the following GIF, you can observe the final output of our code:
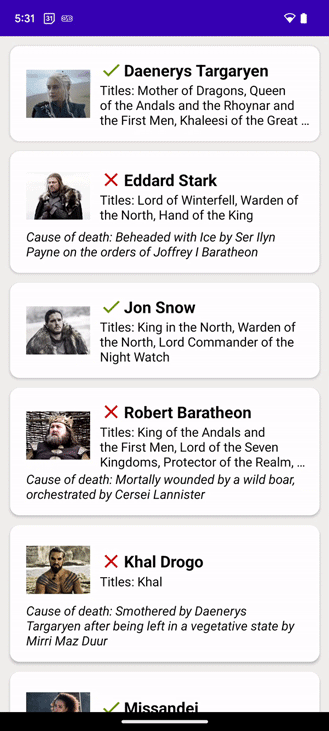
You may notice a slight lag in the GIF above. Please note that the list runs smoothly in real life — you can try it out to see for yourself! The lag occurred while converting the screen recording into a GIF.
As we can see in the code snippets above, the adapter code and its assignment to its RecyclerView is very similar to any other traditional RecyclerView. The only difference is in how the view of the ViewHolder is inflated and assigned, as well as how simple it is to bind the individual ViewHolders when necessary.
This is all possible because of data binding and how we have structured our layouts to automatically interpret UI data objects.
Making the RecyclerView list items interactive
To make our items respond to user taps, we would’ve had to apply some boilerplate logic inside our adapter if weren’t using data binding.
However, in our case, the approach we took was to define an OnClickListener interface. Then, through data binding, we directly passed an instance of that interface as a variable to our views.
Our view, in turn, will make use of that listener in the android:onClick attribute, calling it inside a lambda expression and passing the value of the character variable as an argument.
In our example, we just told the root ConstraintLayout of our list item to call a method that prints the name of the character to which the item was bound to.
Small note: the fun keyword at the beginning of the OnClickListener interface makes it a functional interface, which tells the compiler that it will have exactly one method. This will let us create an instance of that interface with a simpler syntax, as you can see in our example.
Switching to a grid layout
In the code snippets and in the last GIF, you probably noticed that we used a linear layout. At the beginning of the article, we also previewed our list in a grid layout with three items per row.
Converting your linear layout into a grid layout is easy. You can simply convert the snippets using the following three steps.
First, define new .xml layouts for the list items that you will use in the grid. Depending on how busy you can allow your UI to be, you can make them more or less complex.
Next, update the ViewHolder in the RecyclerView.Adapter to create and bind the new type of list item/
Finally, replace your LinearLayoutManager from the RecyclerView initialization with a GridLayoutManager, like this:
GridLayoutManager(requireContext(), 3, GridLayoutManager.VERTICAL, false)
The four arguments expected by the GridLayoutManager are:
- Context
- Span count — in our case, the number of items per row in our case
- Layout orientation — either vertical or horizontal
- Flag — to specify whether or not the layout should be reversed
One more important mention regarding complex lists is that, just as in Game of Thrones, data is rarely static. In our case, the characters displayed in our list are unlikely to remain alive for too long. The number of items and their individual state might often change even after the original creation of our RecyclerView.
In these cases, simply passing a new list of items to our adapter and calling notifyDataSetChanged does the job of displaying our new data. However, this is highly inefficient, especially for longer lists, and doesn’t offer the best user experience.
As such, for these more complex RecyclerView use cases, the RecyclerView adapter should be swapped out for a ListAdapter — which can be assigned to a RecyclerView in the same manner — while also integrating the DiffUtil interface.
While it is not mandatory to use the DiffUtil class when you implement a RecyclerView, it is a useful utility class that would make sense if the list will change or update frequently — for example, if the user were able to remove or reorder the items from the list.
When implementing this interface, the ListAdapter will be able to compute exactly which areas of the list need to be updated and which items need to be added or deleted without recreating the entire list on each update.
Conclusion
In this article, we had a look at Android’s RecyclerView, which is — at the time of this publication — the most efficient way of handling displaying data in such a way that the performance of the UI is not affected.
We also explored adding data binding to the project and what advantages it brings to a project: more readable code, less boilerplate, and better performance due to not using findViewById.
Thank you for reading! I hope that the article has been useful for you. Do not hesitate to start a conversation in the comments!
The post Using Android’s <code>RecyclerView</code> to handle complex lists appeared first on LogRocket Blog.
from LogRocket Blog https://ift.tt/WdTJ3Rj
Gain $200 in a week
via Read more


