Discord bots can save server owners and staff members a lot of time and effort while also providing a variety of useful features to users. You can use bots in Discord to automate repetitive tasks and tasks that would otherwise take up a lot of time and effort.
In this article, you will learn how to create a bot in Discord, add the bot to your server, and connect your Rust code to your bot.
Jump ahead:
- Setting up the Discord bot
- Setting up the Rust code environment
- Connecting the Rust codebase to your Discord bot
- Creating commands for the Discord bot
- Deploying the Discord bot to the Shuttle server
To follow along with this article, you need at least some level of familiarity with Discord. You should also have a Discord account, a Discord server that you own, and some programming experience with Rust.
Setting up the Discord bot
Setting up the bot in Discord can be a little tricky, especially if this is your first time doing it. In this section, I’ll guide you through setting up the bot for your server.
Creating an application in Discord
A Discord application is a service that provides an interface between Discord users and your code. The interface that the application provides is called a bot. A bot receives messages from users and sends a response.
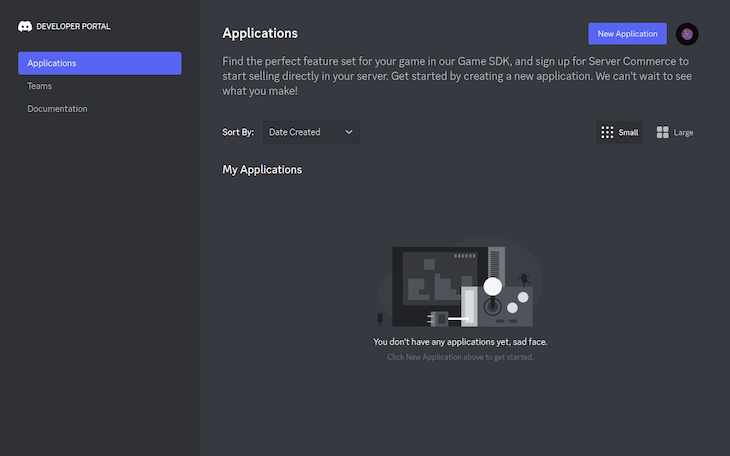
To create a Discord application, first log in to your Discord account in your browser. Next, open the Discord developer portal in your browser and click the button labeled “New Application” at the top right of the page:

Enter a name for your application:
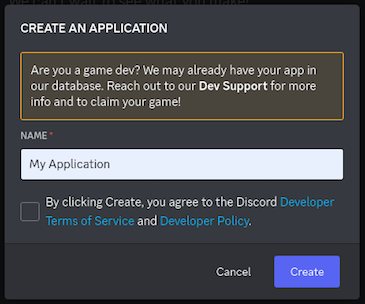
Click the button labeled “Create” to create the application. If the action completes successfully, you’ll be greeted with a dashboard that looks like this:
Creating a bot for the application
In this section, you’ll create the bot for your Discord application. On the left pane of the webpage, click “Bot” to open the bot menu:
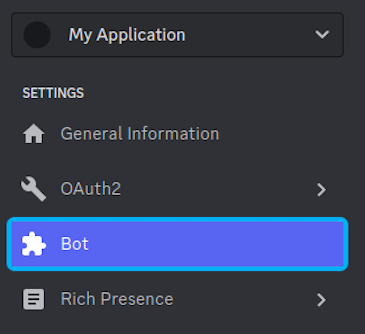
Under the “Build-A-Bot” section, click the “Add Bot” button to create the bot:

After clicking this button, you will have successfully created the Discord bot. To finish off, activate the “MESSAGE CONTENT INTENT” option so that the bot can receive messages from users in your Discord server:

Installing the bot to your Discord server
The last thing you need to do in setting your bot is to install it to your server. On the left navigation pane, click the “OAuth2” menu item to toggle a dropdown. In this dropdown, click the “URL Generator” option:
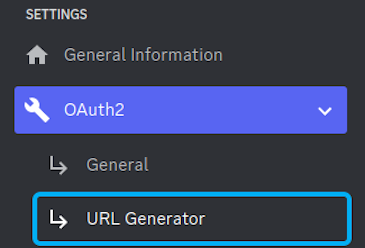
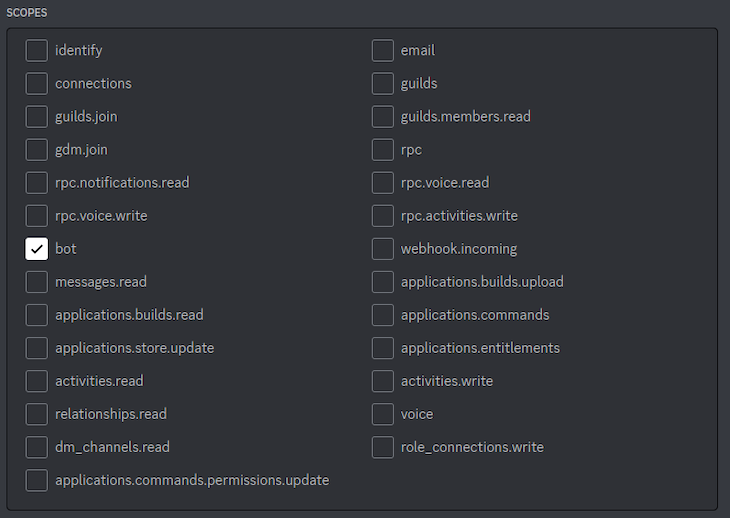
In the URL Generator menu under “SCOPES,” tick the “bot” option:
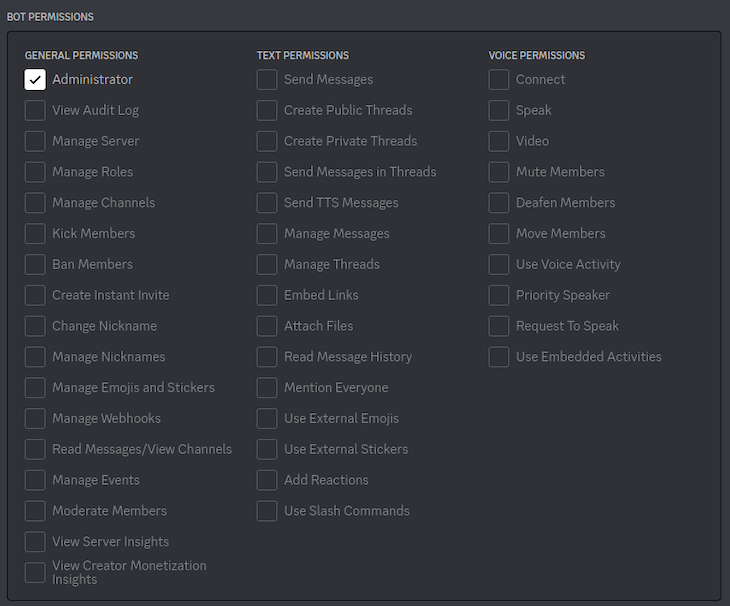
Scroll farther down the page to “BOT PERMISSIONS” and tick the “Administrator” option to give the bot admin privileges:
Scroll to the bottom of the page and copy the generated URL on the bottom, then open the generated URL in your browser:
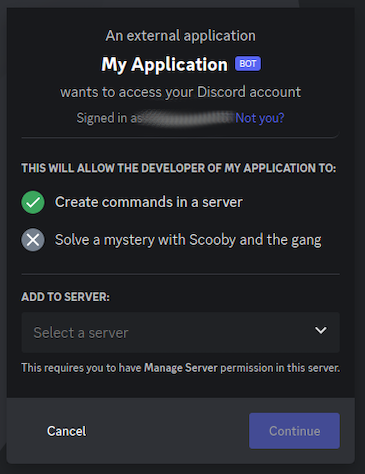
In the webpage that opens after you navigate to the generated URL, select the server that you want to install the bot in. Click “Continue” to proceed.
On the next screen, click “Authorize.” The webpage will then prompt you to verify that you are human:
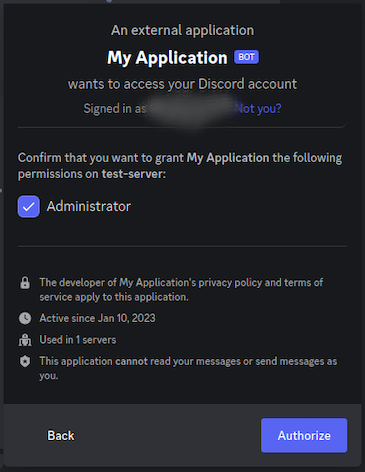
When you’re done with these steps, open your server’s member list. You should see your bot listed as a member.
Setting up the Rust code environment
In this section, I’ll guide you through setting up the Rust code environment for your Discord bot. The code environment will have the necessary code and packages for you to get started with building the bot.
To set up the project, we’ll use a tool called Shuttle. Shuttle lets you initialize, build, and deploy a variety of projects in Rust.
For this project, we’ll use Shuttle to initialize a Serenity project. Serenity is a framework for building Discord chat bots in Rust.
To initialize the Serenity project, create a new directory for where you want your project to be. Then, install Shuttle with the command below:
cargo install cargo-shuttle
Next, initialize a project in the directory:
cargo shuttle init --serenity
Finally, build the project:
cargo build
If you followed these steps correctly, you should see your directory filled with the necessary code for getting started.
Connecting the Rust codebase to your Discord bot
The src/lib.rs code — which we generated in the previous section — is a basic project that you can connect to your bot, which we will do step-by-step in this section.
In order to successfully connect your code to your bot, you first need to get your bot token. A bot token is a reference to your bot. Every bot has a unique reference that you can use to connect a codebase to your bot.
To retrieve your bot token, first open the Discord developer dashboard. Click “Bot” on the left navigation pane. Then, click the “Reset Token” button:
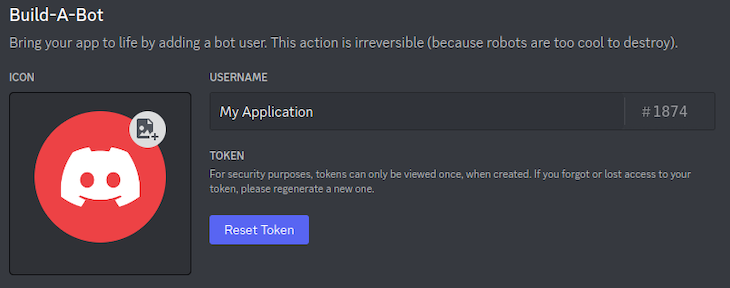
Click “Copy” to copy the token:
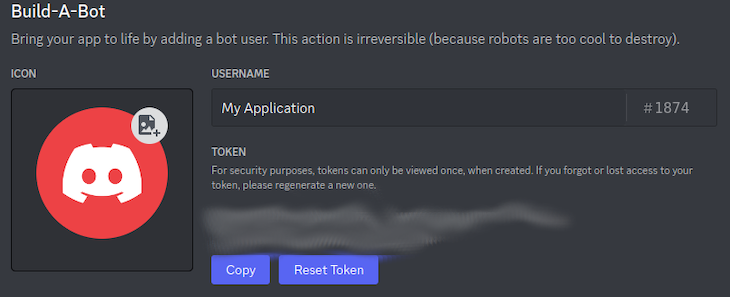
To connect the code base to your bot, create a Secrets.toml file in the project’s root directory. Write the following into the Secrets.toml file and replace * bot_token * with your bot token:
DISCORD_TOKEN="* bot_token *"
Run the project with this command:
cargo shuttle run
At the end of these steps, you should see your Discord bot online on your server. If you type !hello on the server, the bot should respond with world!.
To understand how the bot responds to !hello, take a look at the event handler from lines 12–24 of the src/lib.rs file:
struct Bot;

#[async_trait]
impl EventHandler for Bot {
   async fn message(&self, ctx: Context, msg: Message) {
       if msg.content == "!hello" {
           if let Err(e) = msg.channel_id.say(&ctx.http, "world!").await {
               error!("Error sending message: {:?}", e);
           }
       }

   }

   async fn ready(&self, _: Context, ready: Ready) {
       info!("{} is connected!", ready.user.name);
   }
}
The event handler has a message method that gets called anytime someone sends a message on the server. The message function has an if block checking if the new message says !hello:
if msg.content == "!hello" {
    if let Err(e) = msg.channel_id.say(&ctx.http, "world!").await {
        error!("Error sending message: {:?}", e);
    }
}
If the message matches !hello, the program sends the world! message back to the server with this statement:
msg.channel_id.say(&ctx.http, "world!").await
You can program the bot to respond to any custom messages with custom responses following the steps above.
Creating commands for the Discord bot
Commands are a more direct way to interact with a bot. Unlike messages, commands begin with a / slash — e.g., /hello.
You can send commands in Discord the same way you send messages, but they are the preferred way of interacting with bots because you can easily tell what messages are commands and what messages are not.
To allow your bot to respond to commands, you’ll need the ID of the server in which you installed the bot. In order to get the server ID, you need to enable developer mode on your account first.
Enabling developer mode on your Discord account
Developer mode is a Discord setting that gives developers elevated privileges in a server. In this section, I’ll guide you through enabling developer mode on your system so you can copy your server ID and enable your bot to respond to commands.
On Windows or Mac
At the bottom of your window, click the settings icon close to your username. On the left pane, select “Appearance” under “APP SETTINGS.”
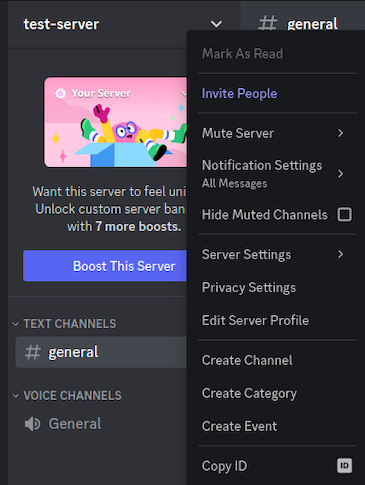
In the appearance settings menu, click “Advanced” to open the advanced settings menu, where you can then toggle the “Developer Mode” option. Finally, right-click the server name and select “Copy ID” to copy the server ID.
On Linux
At the bottom of your window, click the settings icon close to your username. On the left pane, select “Advanced” under “APP SETTINGS” to open the advanced settings menu, where you can then toggle the “Developer Mode” option.
Then, right-click the server name and select “Copy ID” to copy the server ID:
Enabling your bot to respond to a command
With the server ID ready, follow these steps to enable your bot to respond to a command. First, write the ready method below into the event handler:
struct Bot;

#[async_trait]
impl EventHandler for Bot {
   async fn message(&self, ctx: Context, msg: Message) {
       // ...
   }

   // "EventHandler" calls the "ready" method below when the project starts running
   async fn ready(&self, ctx: Context, ready: Ready) {
       info!("{} is connected!", ready.user.name);

       let guild_id = GuildId(* guild_id *);

       // add "/hello" command to the bot
       GuildId::set_application_commands(&guild_id, &ctx.http, |commands| {
           commands.create_application_command(|command| { command.name("hello").description("Say hello") })
       }).await.unwrap();

   }
}
Next, write the interaction_create handler below into the event handler:
struct Bot;

#[async_trait]
impl EventHandler for Bot {
   async fn message(&self, ctx: Context, msg: Message) {
       // ...
   }
   // `ready` method runs when the bot starts
   async fn ready(&self, _: Context, ready: Ready) {
       // ...
   }
   // `interaction_create` runs when the user interacts with the bot
   async fn interaction_create(&self, ctx: Context, interaction: Interaction) {
       // check if the interaction is a command
       if let Interaction::ApplicationCommand(command) = interaction {

           let response_content =
               match command.data.name.as_str() {
                   "hello" => "hello".to_owned(),
                   command => unreachable!("Unknown command: {}", command),
               };
           // send `response_content` to the discord server
           command.create_interaction_response(&ctx.http, |response| {
               response
                   .kind(InteractionResponseType::ChannelMessageWithSource)
                   .interaction_response_data(|message| message.content(response_content))
           })
               .await.expect("Cannot respond to slash command");
       }
   }
}
In the ready method of the event handler, replace * guild_id * on the third line with your server ID.
If your code is still running in the terminal, restart it. When you see your bot online on your server, send a /hello message. You should see a response from the bot saying hello in response.
As with message responses, you can program your bot to respond to any custom commands with custom responses by following the steps we covered above.
Deploying the Discord bot to the Shuttle server
Running your project on your system can have disadvantages. More complex bots may require large resources to run and serve every user.
Deploying your bot gives your bot the advantage of not using your computer’s resources to run. It also keeps your bot online, even if you’re not.
Shuttle allows you to deploy your bot to the Shuttle server. To deploy your bot, run this command in your project directory:
cargo shuttle deploy
Conclusion
Building a Discord chat bot in Rust can be a challenging task. But with the right knowledge and tools, it can be done easily.
With the step-by-step instructions provided in this article, anyone with programming experience in Rust and a Discord account can learn to build their own Discord chat bot. If you’re looking for some Discord bots to build, here are some ideas:
- Welcome bots to welcome new users to a server or channel
- Game bots for playing trivia, quiz, tic-tac-toe, and other games
- Media bots that play music or allow users to create or select videos, images, or GIFs to share
- Poll bots to help users create and send polls
- Utility bots for automating server functions such as answering FAQs and more
For further reading on Rust Discord bots, check out some Serenity Discord example bots or the Serenity documentation.
The post Building a Rust Discord bot with Shuttle and Serenity appeared first on LogRocket Blog.
from LogRocket Blog https://ift.tt/P4QOXHK
Gain $200 in a week
via Read more


