


With an infinite scroll, the webpage loads new content as the user scrolls down the page, thereby allowing the user to see new content without having to click on a new page or refresh the page. This feature is especially useful when you want to load large amounts of data or images as the user needs them rather than all at once.
Over the years, social networking sites like Twitter, Facebook, and Instagram have popularized the infinite scroll. In this tutorial, we’ll implement an infinite scroll using Vue, a JavaScript framework for building user interfaces and single-page applications. Let’s get started!
Jump ahead
Getting started with Vue
Vue is a lightweight framework with a virtual DOM; it provides a way to declaratively render data to the DOM and uses a two-way data binding to keep the DOM up-to-date when the data changes.
What I really appreciate about Vue 3 is the compactness of the code. Everything, including the script, HTML, and styling has its own place carved out within a single file. This solution is ideal for the most straightforward projects, like ours, and it’s a great choice to start fiddling with an idea.
Project description
In our application, we’ll implement some features that can come in handy in other projects. We’ll download data from a random online data generator. For this project, we’ll use http://random-data-api.com, which offers a useful API and realistic data to play with, thereby allowing us to see how our application would work in a real-world scenario.
For each new batch of data, a short message will appear while the new data is being downloaded in the browser. This is always good practice, especially considering how arbitrarily slow an API can respond. Therefore, the user will be aware of the fact that something is happening under the hood.
For the grid that shows data, we’ll use a masonry CSS layout. In this project, we’ll use one of the most simple CSS layouts that I’ve been able to find. You can easily adapt it for other frameworks without too much reworking.
The image below shows the final result:
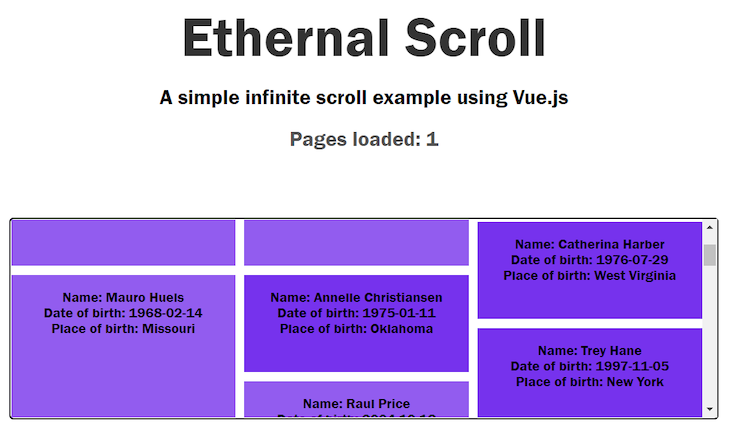
The project idea is quite simple; on the first impression of the page, the first batch of data is downloaded in the browser and visualized. As the user scrolls through the component that visualizes the data, bumping the bottom of the page will load a new batch of data. At the end of the current visualization, the new data will be pushed to the UI, and a new space will be made available to accommodate it.
To follow along, you can find the complete code repository for this project on GitHub. In the next section, we’ll discuss the most interesting bits of the code in detail.
masonry component
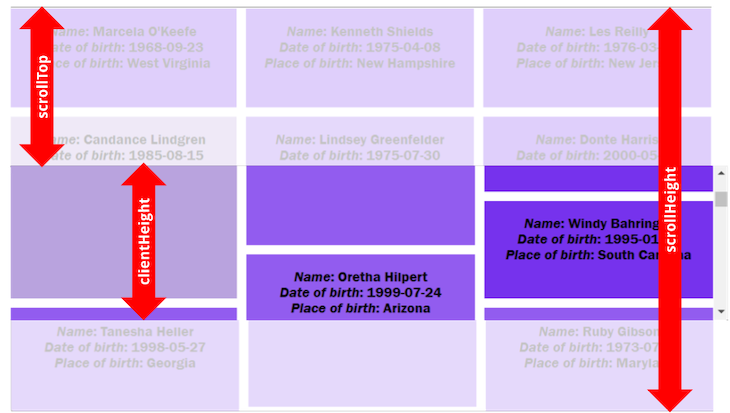
Our goal is to detect when the user has reached the bottom of the component containing the “infinite” data. In the source code, this component is called masonry. We can accomplish this by manipulating the following three properties:
masonry.clientHeight: The number of pixels for the entire height of themasonryelementmasonry.scrollTop: The number of pixels we have already scrolled through on the list of itemswindow.scrollHeight: The number of pixels that are currently contained in the list of items
The following code implements this idea:
  mounted() {
    const masonry = document.querySelector('#infinite-list');
    document.title = "Ethrnal Scroll Demo";
    masonry.addEventListener('scroll', e => {
      if (masonry.scrollTop + masonry.clientHeight >= masonry.scrollHeight) {
        this.getNextBatch(30);
      }
    })
  },
};
In the image below, you can visualize how the three variables interact. When scrollTop plus clientHeight is more than scrollHeight, then we’ve scrolled to the end of the list, and we need another batch of items:
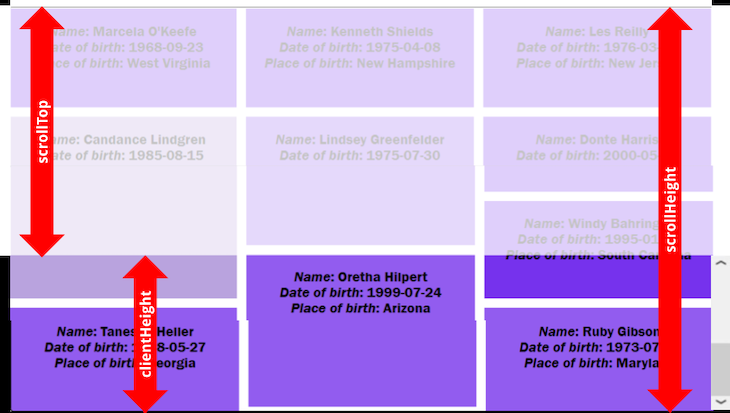
In the image below, you can see how the values change when we scroll to the end of the content:
Once we’ve cleared the mechanism that checks if we’ve reached the bottom of the list, we have to find a nice place to add this check in our code . A natural place is the scroll event. Therefore, every time we scroll back and forth, the masonry component will be able to control whether we reach the bottom of the list or not.
Another thing worth noting is that we assign the listener for the scroll event in the mounted() method that Vue provides us, allowing us to execute code after the component has been mounted.
Before discussing more of the scroll, let’s take a look at the data that our application will handle:
  data() {
    return {
      loading: false,
      items: [],
      page_count: 0,
      sizes: ["tall", "taller", "tallest"]
    };
  },
In data(), we have the state of the component. Let’s take a closer look:
loading: A boolean variable that will betruewhen we want theLoading next batchlabel to be displayed. See line 14 in theApp.vuefileitems[]: An array of objects that will contain the displayed datapage_count: The number of batches we downloaded from the random sourcesizes[]: An array that contains the labels of the three styles for the tiles we described above
grid-container {
      display: grid;
      /* 1 /
      grid-auto-rows: 50px;
      / 2 /
      grid-gap: 10px;
      / 3 /
      grid-template-columns: repeat(auto-fill, minmax(30%, 1fr));
      / 4 */
      overflow: auto;
      height: 30vh;
      border: 2px solid;
      border-radius: 5px;
      text-align: center;
      margin: 0 0 35px 0;
    }
    .tall {
      grid-row: span 2;
      background-color: #7632ed;
    }
    .taller {
      grid-row: span 3;
      background-color: #925cef;
    }
    .tallest {
      grid-row: span 4;
      background-color: #b9a3de;
    }
The code above shows the detail of the CSS defined in the <style> section of App.vue, where we defined the different tiles of the masonry component. The selectors, tall, taller, and tallest are randomly assigned to the downloaded data:
getNextBatch(size) {
this.loading = true;
axios.get("https://random-data-api.com/api/v2/users?size=" + size + "&amp;response_type=json").then((response) =&gt; {
response.data.map((x) =&gt; {
const new_item = {
name: x.first_name + " " + x.last_name,
dob: x.date_of_birth,
location: x.address.state,
size: this.sizes[Math.floor(Math.random() * this.sizes.length)]
};
this.items.push(new_item)
})
this.loading = false;
this.page_count++;
});
}
We implement loading a batch of data from the random source in the only method of the Vue application, getNextBatch, displayed above. It downloads a new batch of items from the random data source API with axios.get(), specifying the number of items we want. Once the data comes through, it is manipulated to extract some of the fields and assemble an object that will be appended to the items[] array.
getNextBatch() also does two simple things. For one, it updates the number of pages, or the number of batches we’ve downloaded, and shows and hides the Loading next batch label from the App.vue file.
Please note how we re-use the code. We also use getNextBatch() in the beforeMount() method that is run once the page is loaded, but no components are displayed yet. The effect of this call is to fill up the items[] array with some data to be visualized in the masonry component.
Conclusion
In this article, we explored a stripped-down solution for implementing infinite scroll on a webpage written in Vue.
To facilitate reuse in other projects, we implemented our infinite scroll functionality in a dedicated <div>. The other two parts of our infinite scroll are well-separated in the code, including the function that downloads a new batch of data and where we call this function. This will help the developer in replacing the URL of the API in the getNextBatch() function with something more useful.
Vue3 in particular is extremely effective for writing a small proof of concept, like in this example. But, you can also scale it up by combining components to attain more complex functions. I hope you enjoyed this article, and
The post How to implement infinite scroll with Vue appeared first on LogRocket Blog.
from LogRocket Blog https://ift.tt/ICpK8q6
Gain $200 in a week
via Read more


