


In a classic client-server architecture, an Android application can serve as a frontend client that relies on data from a backend service. Commonly, developers rely on REST and GraphQL web specifications to facilitate communication in this architecture.
In this article, we will talk about GraphQL and where it shines over REST, and finally, we will write some code to connect an Android application to a GraphQL server.
Jump ahead:
What is GraphQL?
GraphQL is a query language for fetching and mutating data from a backend service. When interacting with a GraphQL service, there is only one entry point (URL) for retrieving and mutating data. You may ask, how is that possible? Well, with GraphQL queries, you can do simply anything.
Before I show you a sample query, let’s talk about the three GraphQL operators and their usage. GraphQL operators are used to perform CRUD requests on the server and listen for events. There are three main operators in GraphQL:Query, Mutation, and Subscription:
Query: This is useful for fetching data from the serverMutation: This operator is used to create, edit, and delete data on the serverSubscription: This operator is not one that surfaces in common use cases. However, it comes in handy when implementing real-time communication between your client and server
Benefits of GraphQL
Primarily, GraphQL addresses the issues of over-fetching and under-fetching. GraphQL shines over other web specifications like REST because the client can fetch only the data it needs.
If things still sound hazy, don’t worry — you’ll have an epiphany as we write some code  .
.
Setting up the starter project
To make things more interesting, we will refactor a GitHub project using GitHub GraphQL API.
Here are a few things to note about the project we’ll be refactoring:
- Our project is written in Kotlin and Jetpack Compose
- We will use Hilt for dependency injection
- Pagination with the Paging Library 3 to achieve lazy loading of list items
- We will use Retrofit for making network requests to the GitHub REST API
Clone the project
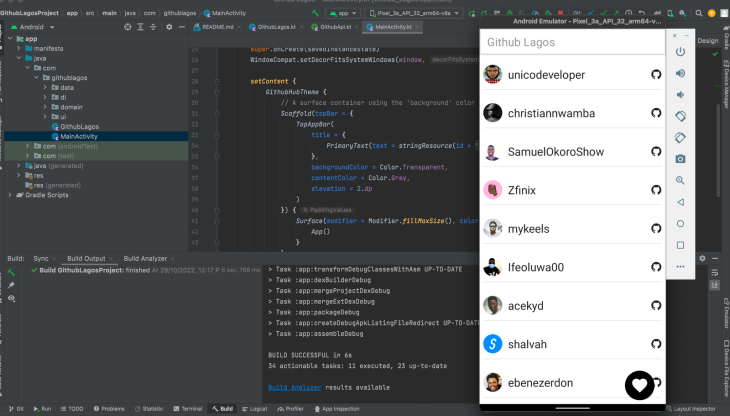
Go ahead and clone this GitHub Lagos Project sample application like so:
git clone https://github.com/Lamouresparus/GithubLagosProject.git
If the cloning is successful, open the project in Android Studio and run it. If all is well, you will have the same thing as in the screenshot below:
Add the necessary Gradle dependencies
implementation("com.squareup.okhttp3:logging-interceptor:4.10.0")
implementation("com.apollographql.apollo3:apollo-runtime:3.6.2")
The Logging interceptor is needed to aid the printing of network traffic to the Logcat window. The second dependency, Apollo, is a library for working with GraphQL APIs on Android. Apollo is for GraphQL in the same way that Retrofit is for REST.
Migration from REST to GraphQL
Migration can be a daunting task especially if you are new to a technology and if there are many touch points in the undertaking. However, in cases where the codebase is well structured and modularised, migration becomes less complex and risky. You can safely locate and update components without affecting the entire system.
In the next couple of steps, I will show you how to migrate our project to use the GitHub GraphQL API.
Replace reference to Retrofit with ApolloClient
In order to use ApolloClient to communicate with GitHub GraphQL API, we will need to migrate. First, locate NetworkModule in com.githublagos.di and update the file with this code:
@Module
@InstallIn(SingletonComponent::class)
class NetworkModule {

    @Provides
    @Singleton
    fun okhttpClient(): OkHttpClient {
       val logging = HttpLoggingInterceptor()
           .apply { level = HttpLoggingInterceptor.Level.BODY  }
       return OkHttpClient.Builder()
           .addInterceptor(AuthInterceptor())
           .addInterceptor(logging)
           .build()
    }

    @Provides
    @Singleton
    fun provideApollo(client: OkHttpClient) : ApolloClient {
        return ApolloClient.Builder()
            .serverUrl("https://api.github.com/graphql")
            .okHttpClient(client).build()
    }
}
From the code block above, there are two object types: OkHttpClient and ApolloClient. These are declared as dependencies that will be provided at runtime through dependency injection with the Hilt.
OkHttpClient is an HTTP engine used by ApolloClient for making a network request, while ApolloClient itself is the library for initiating network requests to a GraphQL server.
Take note of how I customized OkHttpClient with a customer interceptor (AuthInterceptor). I included the interceptor to modify the HTTP request to include an authorization header.
GitHub GraphQL server requires every request to be authenticated with the right scopes. See the self-explanatory code block below:
class AuthInterceptor : Interceptor {
    override fun intercept(chain: Interceptor.Chain): Response {
        val request = chain.request().newBuilder()
            .addHeader("Authorization", "token put_your_personal_access_token_here")

       return chain.proceed(request.build())
    }
}
Define GraphQL schema and Queries
The GraphQL schema defines all object types supported by GitHub’s API. Object types from this schema are used to build queries for making a network request. Follow the following steps to include the schema in the project:
- Create a
graphqlfolder underapp/src/main - Download GitHub schema
- Move the schema you’ve downloaded into the folder we created in the first step
Now, we will build our query to specify which data we want the server to return to us. In the same GraphQL folder, create a GetUsers.graphql file and paste it into it the code block below:
query GetUsers($query: String!, $pageSize:Int!, $after: String) {
    search(query: $query, type: USER, first: $pageSize, after: $after) {
        nodes {
            ... on User {
                avatarUrl
                login
                url
            }
        }
        pageInfo {
            endCursor
            hasNextPage
        }
    }
}
In a nutshell, the code block above is a query that will be used to request a list of users from GitHub GraphQL server. We will examine each component of this query below.
GetUsers is the query that accepts three parameters:
- The
Query String: This can be queries likelocation,language, and more to help narrow the search results to our specific needs Page Size: This is the number of users we want to be returned by the server on each search queryAfter String: This string helps to achieve pagination when working with the GitHub GraphQL server. The value can be the cursor ID of the last user object. Usually, for the initial search query, we set it tonull
nodes is basically a list of search items and are defined as [SearchResultItem] in our GitHub schema. SearchResultItem is a union type, and it is of several other types defined in the schema. In our case, we are interested in the User type. The trailing syntax on the User object is how we specify which type of SearchResultItem we are interested in.
The pageInfo requests the basic page information. We will use the data returned to implement pagination. endCursor is the cursor ID of the last User object for the current page. hasNextPage is a Boolean that evaluates if there’s another page of users.
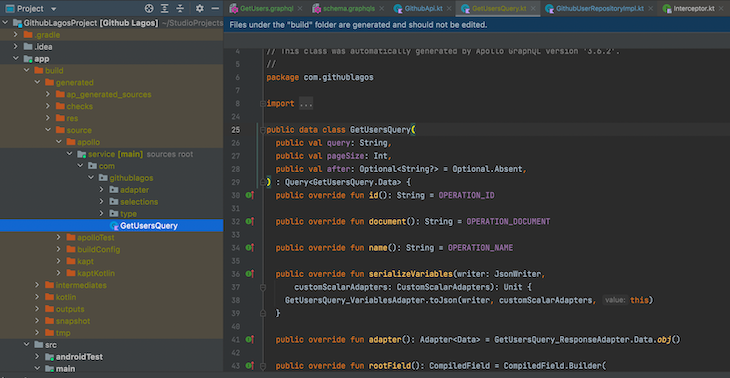
Now, we have defined a GraphQL file, but we cannot use it directly in our Kotlin code. We have to rebuild the project for code generation to kick in and create a Kotlin representation of the file. If the Gradle build is successful, you will find GetUsersQuery created in your build directory:
Refactor GitHub API
In the previous steps, we created GetUsersQuery and a singleton instance of ApolloClient. These objects will be used to perform a search on GitHub GraphQL server. Copy the code below into your IDE:
class GithubApi @Inject constructor(
    private val apolloClient: ApolloClient
) {

    // const val QUERY_LOCATION = "location:lagos"

    suspend fun getUsers(
        location: String = QUERY_LOCATION,
        endCursor: String?,
        pageSize: Int
    ): UsersResponseModel {
        val nextCursor = Optional.presentIfNotNull(endCursor)

        val query = GetUsersQuery(location, pageSize, nextCursor)
        val response = apolloClient.query(query).execute()

        val cursor = response.data?.search?.pageInfo?.endCursor

        val users = response.data?.search?.nodes?.map {
            val userName = it?.onUser?.login.orEmpty()
            val avatar = it?.onUser?.avatarUrl.orEmpty()
            val htmlUrl = it?.onUser?.url.orEmpty()
            UserRemote(userName, avatar, htmlUrl)
        }?.filter { it.login.isNotEmpty() }.orEmpty()

        return UsersResponseModel(cursor, users)
    }
}
In the code block above, I have refactored GithubApi from an interface to a class type that accepts ApolloClient as an argument. This object is responsible for executing queries, mutations, and subscriptions.
The method signature for getUsers accepts a nullable endCursor argument, making it optional. In Apollo GraphQL, we use an Optional type to represent an optional value. This object is a Kotlin-sealed class that can either be Present or Absent.
With one line of code, we can execute a GraphQL query like so: apolloClient.query(query).execute().
This does all the heavy lifting, returning a response containing a list of GitHub users alongside the page information.
Update the GithubUserSource
If you made it this far, kudos to you! This is the last piece of the refactoring. We want the pagination source to depend on Apollo GraphQL to execute multiple queries as per the scroll request.
First, locate GithubUserSource and fix the breaking changes with the code block below:
class GithubUserSource @Inject constructor(private val api: GithubApi) :
    PagingSource<String, UserDomain>() {

    override fun getRefreshKey(state: PagingState<String, UserDomain>): String? {
        return null
    }

    override suspend fun load(params: LoadParams<String>): LoadResult<String, UserDomain> {
        return try {
            val previousKey = params.key
            val result  = api.getUsers(pageSize = PAGE_SIZE, endCursor = previousKey )
            val nextKey = result.endCursor
            val userList = result.items.map { it.mapToDomain() }
            LoadResult.Page(
                data = userList,
                prevKey = previousKey,
                nextKey = nextKey
            )
        } catch (exception: IOException) {
            return LoadResult.Error(exception)
        } catch (exception: HttpException) {
            return LoadResult.Error(exception)
        } catch (exception :Exception){
            return LoadResult.Error(exception)
        }
    }
}
The major difference between the former and the new implementation is in the key type. Because we are using the cursor of the last user object to facilitate our pagination, we have defined the PagingSource to have a string key and not an integer.
The load() method is invoked when there is a request for more content to be loaded into the listview. Whenever this invocation occurs, we fetch the users from the server, specifying the page size and end cursor as parameters.
On the first invocation, previousKey will be null because, at that instance, there is no nextKey cached within the paging source. If the operation is successful, we will get a response that contains the user’s information and the end cursor. This response is mapped into a LoadResult.Page object and fed into the paging source.
Voila! We have refactored a REST-based Android project to GraphQL using ApolloClient. Now, you should be able to build and run the project successfully. There will be no visible change on the user’s screen because we only changed the data source implementation.
Conclusion
From my perspective as a mobile developer, GraphQL is easy to use on Android. The only learning curve I can think of would be the syntax of the query language. Other than that, it’s a breeze! The GraphQL documentation is a great place to learn more about it.
The post Building an Android app with GraphQL appeared first on LogRocket Blog.
from LogRocket Blog https://ift.tt/r8B1Wqw
Gain $200 in a week
via Read more


