


With its clean syntax and expressiveness, along with many other qualities, Laravel is one of the most popular PHP frameworks used by developers.
Before Laravel UI was launched, one of its key features was default support for Vue.js from Laravel v5.3 to v6. Vue is a modern JavaScript frontend framework used to create user interfaces.
In this article, we will demonstrate how you can build a single-page application using Laravel and Vue.
- Why are Laravel and Vue good together?
- What is an SPA? (single-page application)
- Project setup
- Vue routing
Why are Laravel and Vue good together?
Here are some of the key advantages of using both Laravel with Vue to create a full-stack workflow for your projects:
- The source code is combined into one project, rather than having separate projects for the backend and frontend
- Setup and configuration are simple
- A single deployment can handle both frameworks together
What is an SPA? (single-page application)
A single-page application (SPA for short) dynamically loads new data from a web server to a webpage without needing to refresh the entire page.
Examples of popular websites that use SPA include gmail.com and youtube.com — in other words, SPAs are ubiquitous to a large extent. The majority of admin dashboards that you might work with on a daily basis are created using SPAs.
Benefits of SPAs:
- User experience is more flexible
- Caches data in the browser
- Quick load time
Disadvantages of SPAs:
- Can compromise SEO (search engine optimization)
- Potential security issues
- Consumes a lot of browser resources
Project setup
This post will demonstrate how to develop a to-do app that allows users to register for an account and add tasks.
For this tutorial, Laravel 9 is being used, which calls for PHP 8.1 and Vue 3; we also need to have PHP and NGINX installed.
Let’s get started with the following command:
composer create-project --prefer-dist laravel/laravel laravel-vue-demo
Next, we will install the JavaScript dependencies.
npm install
We must install a few packages before we can add Vue to our project.
In addition, plugin-vue must be installed, as Laravel 9 ships with Vite, rather than webpack-mix, which was the previous Laravel bundler for JavaScript. Let’s do that now:
npm install vue@next vue-loader@next @vitejs/plugin-vue
Open the file called vite.config.js and add vue() to the config:
import { defineConfig } from 'vite';
import laravel from 'laravel-vite-plugin';
import vue from '@vitejs/plugin-vue'

export default defineConfig({
    plugins: [
        vue(),
        laravel([
            'resources/css/app.css',
            'resources/js/app.js',
        ]),
    ],
});
Edit the app.js file and the snippet for the Vue 3 app bootstrap:
require('./bootstrap');

import {createApp} from 'vue'

import App from './App.vue'

createApp(App).mount("#app")
Create a file called App.vue and add the following:
<template>
  <h1> Hello, Vuejs with Laravel </h1>
</template>
<script>
export default {
  setup() {

   }
}
</script>
Finally, open the welcome.blade.php file located in the resources/views folder and add the following:
<!DOCTYPE html>
<html>
<head>
 ....
        @vite('resources/css/app.css')
</head>
<body>
  <div id="app"></div>
  @vite('resources/js/app.js')
</body>
</html>
To preview our app, we need to start our Vue app and Laravel server on two different terminals/command lines:
npm run dev


php artisan serve

To build our to-do app, we need to create some more files. Vue will be creating multiple pages, principally:
- A login page
- A registration page
- A home page
To communicate with the Laravel endpoints, we need to install Axios:
npm install axios
Vue routing
Using the vue-router package, there are various routing strategies that may be used in Vue; these strategies are also known as history modes.
When a user requests routes like http://localhost:8000/home — which will return a 404 error when the page is refreshed — we can rely on Laravel to detect any fallback routes and then serve the Blade file that contains our app.
For this reason, we will be using HTML5 mode:
Route::get('/{vue_capture?}', function() {
    return view('welcome');
})->where('vue_capture', '[\/\w\.-]*');
import {createRouter, createWebHistory} from 'vue-router';

const router = createRouter({
    history: createWebHistory(),
    routes: [
        {
            path: '/',
            component: () => import('./pages/Login.vue')
        },
        {
            path: '/register',
            component: () => import('./pages/Register.vue')
        },
        {
            path: '/home',
            component: () => import('./pages/Home.vue')
        }
    ],
})
Due to the simplicity of the project, we are essentially handling authentication for the login page using Laravel Sanctum, and then we save our token in the local storage.
For other requests to be successful, the token is joined to the header, which will allow the user making the request to be identified by Laravel.
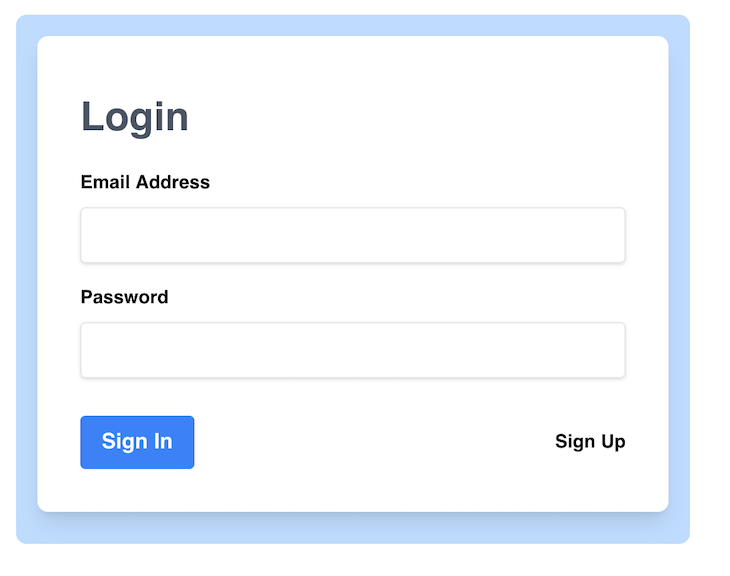
Here is what our login page will look like:
And here is what our registration page will look like:

And here are the associated code blocks for both:
<!--Login.vue-->
<template>
    <div class="mx-auto w-4/12 mt-10 bg-blue-200 p-4 rounded-lg">
        <div
            class="bg-white shadow-lg rounded-lg px-8 pt-6 pb-8 mb-2 flex flex-col"
        >
            <h1 class="text-gray-600 py-5 font-bold text-3xl"> Login </h1>
            <ul class="list-disc text-red-400" v-for="(value, index) in errors" :key="index" v-if="typeof errors === 'object'">
                <li></li>
            </ul>
            <p class="list-disc text-red-400" v-if="typeof errors === 'string'"></p>
            <form method="post" @submit.prevent="handleLogin">
            <div class="mb-4">
                <label
                    class="block text-grey-darker text-sm font-bold mb-2"
                    for="username"
                >
                    Email Address
                </label>
                <input
                    class="shadow appearance-none border rounded w-full py-2 px-3 text-grey-darker"
                    id="username"
                    type="text"
                    v-model="form.email"
                    required
                />
            </div>
            <div class="mb-4">
                <label
                    class="block text-grey-darker text-sm font-bold mb-2"
                    for="password"
                >
                    Password
                </label>
                <input
                    class="shadow appearance-none border border-red rounded w-full py-2 px-3 text-grey-darker mb-3"
                    id="password"
                    type="password"
                    v-model="form.password"
                    required
                />
            </div>
            <div class="flex items-center justify-between">
                <button
                    class="bg-blue-500 hover:bg-blue-900 text-white font-bold py-2 px-4 rounded"
                    type="submit"
                >
                    Sign In
                </button>
                <router-link
                    class="inline-block align-baseline font-bold text-sm text-blue hover:text-blue-darker"
                    to="register"
                >
                    Sign Up
                </router-link>
            </div>
            </form>
        </div>
    </div>
</template>
export default {
    setup() {
        const errors = ref()
        const router = useRouter();
        const form = reactive({
            email: '',
            password: '',
        })
        const handleLogin = async () => {
            try {
                const result = await axios.post('/api/auth/login', form)
                if (result.status === 200 && result.data && result.data.token) {
                    localStorage.setItem('APP_DEMO_USER_TOKEN', result.data.token)
                    await router.push('home')
                }
            } catch (e) {
                if(e && e.response.data && e.response.data.errors) {
                    errors.value = Object.values(e.response.data.errors)
                } else {
                    errors.value = e.response.data.message || ""
                }
            }
        }

        return {
            form,
            errors,
            handleLogin,
        }
    }
}
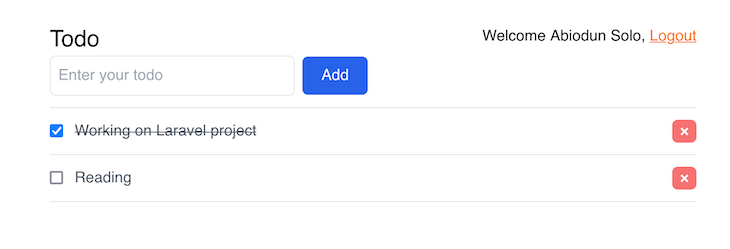
The Vue Home view/page handles all to-do actions such as creating, deleting, updating, and listing to-dos. All the actions make requests to the endpoints with the user token for authorization via Axios.
Let’s take a look at what they will look like, followed by the associated snippets:
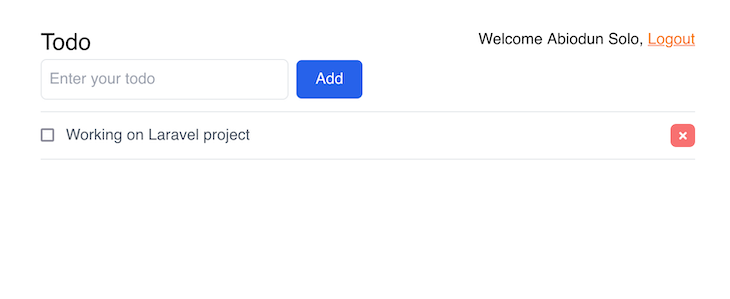
<!-- Home -->
<template>
<div class="w-6/12 p-10 mx-auto">
<div class="flex justify-between">
<h1 class="text-2xl"> Todo </h1>
<span class="capitalize">Welcome , <button
class="text-orange-500 underline hover:no-underline rounded-md"
@click="handleLogout">Logout</button></span>
</div>
<input type="text" class="p-2 w-64 border rounded-md" v-model="todo" placeholder="Enter your todo"/>
<button class="bg-blue-600 text-white px-5 py-2 rounded-md ml-2 hover:bg-blue-400" @click="addTodo">Add</button>
<Loader v-if="isLoading"/>
<ul class="border-t mt-3 cursor-pointer">
<li :class="`py-3 border-b text-gray-600 ${val.has_completed ? 'line-through' : ''}`"
v-for="(val, idx) in todos" :key="idx">
<input type="checkbox" :checked="val.has_completed" @click="checked(idx)"/>
<span @click="checked(val, idx)" class="pl-3"> </span>
<button class="float-right bg-red-400 px-2 text-white font-bold rounded-md hover:bg-red-600"
@click="deleteTodo(val, idx)">×
</button>
</li>
</ul>
</div>
</template>
setup() {
    const todo = ref('')
    const todos = ref([])
    const user = ref()
    const isLoading = ref()

    let router = useRouter();
    onMounted(() => {
        authentication()
        handleTodos()
    });

    const authentication = async () => {
        isLoading.value = true
        try {
            const req = await request('get', '/api/user')
            user.value = req.data
        } catch (e) {
            await router.push('/')
        }
    }

    const handleTodos = async () => {
        try {
            const req = await request('get', '/api/todos')
            todos.value = req.data.data
        } catch (e) {
            await router.push('/')
        }
        isLoading.value = false
    }

    const handleNewTodo = async (title) => {
        try {
            const data = {title: title}
            const req = await request('post', '/api/todos', data)
            if (req.data.message) {
                isLoading.value = false
                return alert(req.data.message)
            }
            todos.value.push(req.data.data)
        } catch (e) {
            await router.push('/')
        }
        isLoading.value = false
    }

    const handleLogout = () => {
        localStorage.removeItem('APP_DEMO_USER_TOKEN')
        router.push('/')
    }

    const addTodo = () => {
        if (todo.value === "") {
            return alert("Todo cannot be empty");
        }
        isLoading.value = true
        handleNewTodo(todo.value)
        todo.value = ""
    }

    const checked = async (val, index) => {
        try {
            const data = {has_completed: !val.has_completed}
            const req = await request('put', `/api/todos/${val.id}`, data)
            if (req.data.message) {
                isLoading.value = false
                return alert(req.data.message)
            }
            todos.value[index].has_completed = !val.has_completed
        } catch (e) {
            await router.push('/')
        }
        isLoading.value = false
    }

    const deleteTodo = async (val, index) => {
        if (window.confirm("Are you sure")) {
            try {
                const req = await request('delete', `/api/todos/${val.id}`)
                if (req.data.message) {
                    isLoading.value = false
                    todos.value.splice(index, 1)
                }
            } catch (e) {
                await router.push('/')
            }
            isLoading.value = false
        }
    }
For Laravel, we will be creating the following:
- Controllers (
AuthController,TodoController) - Models (
Todo,User) - Routes (
api) - Middleware (
auth:sanctum).
Our routes are in api.php, which handles all the endpoints consumed by Vue.
Route::post('/auth/register', [AuthController::class, 'register']);
Route::post('/auth/login', [AuthController::class, 'login']);

Route::apiResource('todos', TodoController::class)->middleware('auth:sanctum');

Route::middleware('auth:sanctum')->get('/user', function (Request $request) {
    return $request->user();
});
The register logic in AuthController registers the user and creates a token.
public function register(Request $request): \Illuminate\Http\JsonResponse
{
    try {
        //Validated
        $validateUser = Validator::make($request->all(),
        [
            'name' => 'required',
            'email' => 'required|email|unique:users,email',
            'password' => 'required'
        ]);

        if($validateUser->fails()){
            return response()->json([
                'status' => false,
                'message' => 'validation error',
                'errors' => $validateUser->errors()
            ], 401);
        }

        $user = User::create([
            'name' => $request->name,
            'email' => $request->email,
            'password' => Hash::make($request->password)
        ], 201);

        return response()->json([
            'status' => true,
            'message' => 'User Created Successfully',
            'token' => $user->createToken("API_TOKEN")->plainTextToken
        ], 200);

    } catch (\Throwable $e) {
        return response()->json([
            'status' => false,
            'message' => $e->getMessage()
        ], 500);
    }
}
The login validates the request, checks if the user exists, and then creates a token:
public function login(Request $request): \Illuminate\Http\JsonResponse
{
    try {
        //Validated
        $validateUser = Validator::make($request->all(),
            [
                'email' => 'required',
                'password' => 'required'
            ]);

        if($validateUser->fails()){
            return response()->json([
                'status' => false,
                'message' => 'validation error',
                'errors' => $validateUser->errors()
            ], 401);
        }

        if(!Auth::attempt($request->only(['email', 'password']))){
            return response()->json([
                'status' => false,
                'message' => 'Email & Password does not exist.',
            ], 401);
        }

        $user = User::where('email', $request->email)->first();

        return response()->json([
            'status' => true,
            'message' => 'Logged In Successfully',
            'token' => $user->createToken("API_TOKEN")->plainTextToken
        ], 200);

    } catch (\Throwable $e) {
        return response()->json([
            'status' => false,
            'message' => $e->getMessage()
        ], 500);
    }
}
The POST endpoints for adding new to-dos are managed by the store method in the to-do controller — /api/todos.
public function store(Request $request): \Illuminate\Http\JsonResponse
{
    $data = Todo::where('user_id', $request->user()->id)->where('title', $request->title);
    if ($data->first()) {
        return response()->json(['status' => false, 'message' => 'Already exist']);
    }
    $req = $request->all();
    $req['user_id'] = $request->user()->id;
    $data = Todo::create($req);
    return response()->json(['status' => true, 'data' => $data], 201);
}
This manages the Todo update endpoint, which is called after a user completes a to-do and is located at /api/todos/id.
public function update(Request $request, $id): \Illuminate\Http\JsonResponse
{
    $validateUser = Validator::make($request->all(),
        [
            'has_completed' => 'required',
        ]);

    if ($validateUser->fails()) {
        return response()->json([
            'status' => false,
            'message' => 'validation error',
            'errors' => $validateUser->errors()
        ], 401);
    }

    $data = Todo::find($id);
    $data->has_completed = $request->has_completed;
    $data->update();
    return response()->json(['status' => true, 'data' => $data], 202);
}
When a user deletes a Todo, the endpoint /api/todos/id is called, and this takes care of it:
public function destroy(int $id): \Illuminate\Http\JsonResponse
{
    throw_if(!$id, 'todo Id is missing');
    Todo::findOrFail($id)->delete();
    return response()->json(['status' => true, 'message' => 'todo deleted']);
}
Well done, we’ve created a single-page app using Laravel and Vue!  Here’s the final result of our to-do app, and here’s a link to the source code:
Conclusion
We were able to establish how much simpler it is to create a straightforward user authentication and to-do application using Vue and Laravel when compared to the traditional PHP/Vue combo — which can require a lot more setup work.
The combination of Vue with Laravel, in my view, makes it easy to develop single-page applications because there is no need to worry about routing, middleware, or handling CORS. Let me know about your experiences developing SPAs in the comments section below.
Thanks for reading! 
The post Creating a single-page app with Laravel and Vue appeared first on LogRocket Blog.
from LogRocket Blog https://ift.tt/kpwQM2c
Gain $200 in a week
via Read more


