In iOS 16.1, Apple has introduced the new Live Activities feature, in which interactive notifications provide real-time updates right on the Lock Screen. For iPhone 14 Pro and Pro Max, this feature also extends to the Dynamic Island, a pill-shaped cutout at the top of the screen that displays alerts and notifications and dynamically changes shape and size according to the content.
Imagine tracking the progress of your food delivery on your Lock Screen, your workout, or even the current positions of your stocks without continually opening the app. How cool and convenient!
In this article, we’ll explore the advantages of Live Activities and the ActivityKit framework that is used for displaying and working with Live Activities. In the demo portion of the article, we’ll show how to add Live Activities to a simple stock tracking app to display real-time information on both the Lock Screen and in the Dynamic Island.
OK, let’s take a look at how to incorporate Live Activities in your apps!
Jump ahead:
- Advantages of Live Activities
- WidgetKit and WidgetConfiguration
- ActivityKit
- Demo: Live Activities sample project
- Implementing Live Activities in the Dynamic Island
- Production readiness
- Availability
Advantages of Live Activities
One of the biggest problems with home screen widgets is that they do not show actual real-time updates. The closest is an update with a one-minute delay, and this can sometimes be contained by the system.
However, with Live Activities, you can show real-time updates on the Lock Screen itself. This is helpful for apps that need to show time-critical information, like an ongoing trade in a crypto app, progress tracking in a food delivery app, or the score of a live-action game.
With the iPhone 14 Pro and Pro Max, you can use Live Activities to show real-time updates right in the Dynamic Island section of the home screen. Clicking on a Live Activity in the Dynamic Island will launch your app, while holding down on the Dynamic Island will display an expanded view with more descriptive content.
WidgetKit and WidgetConfiguration
When the WidgetKit framework was first introduced, it offered two types of configuration: StaticConfiguration and IntentConfiguration.
For Live Activities, WidgetKit now offers a third type of configuration, ActivityConfiguration:
struct ActivityConfiguration<Attributes>: WidgetConfiguration where Attributes: ActivityAttributes
As an example, here’s how you’d create an ActivityConfiguration, provide it with the context, and pass it to the view for a Live Activity:
struct TradinzaLiveActivity: Widget {
  var body: some WidgetConfiguration {
    ActivityConfiguration(for: StockTradingAttributes.self) { context in
      CurrentTradeView(context: context)
        .padding()
    }
  }
}
Next, let’s explore ActivityKit and see how to maintain the life cycle of a Live Activity.
ActivityKit
Apple has provided the ActivityKit framework to enable developers to create Live Activities. This framework, which is only available for iPhones with iOS 16.1+, allows you to share live updates from your app as Live Activities on the Lock Screen or in the Dynamic Island.
To create the UI and the presentation layer for the Live Activities, you will use SwiftUI and WidgetKit, respectively. The ActivityKit will be used for starting, updating, and ending the Activity.
Demo: Live Activities sample project
In this article, we’ll work with a sample app, Tradinza, which enables the buying and selling of stocks on a hypothetical stock exchange called Bow. Tradinza has many listed stocks that may be bought and sold intraday:
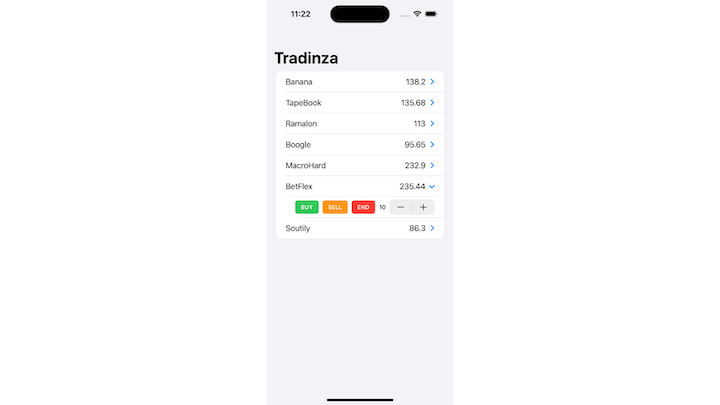
To track the current live positions in a trade, we’ll demonstrate how to add Live Activities to both the Lock Screen and the Dynamic Island.
The Tradinza app contains a Stock structure to define stock and has some sample stocks:
struct Stock: Identifiable, Codable, Equatable, Hashable {
  var id = UUID()
  var name: String
  var price: Double
  var date = Date()
}

extension Stock {
  var maximumPrice: Double {
    price * 1.2
  }

  var minimumPrice: Double {
    price * 0.8
  }
}

extension Stock {
  static let stocks = [
    Stock(name: "Banana", price: 138.20),
    Stock(name: "TapeBook", price: 135.68),
    Stock(name: "Ramalon", price: 113.00),
    Stock(name: "Boogle", price: 95.65),
    Stock(name: "MacroHard", price: 232.90),
    Stock(name: "BetFlex", price: 235.44),
    Stock(name: "Soutily", price: 86.30)
  ]
}
Creating the Attributes
As part of the ActivityKit framework, Apple provides an Activity object that manages the functionality of starting, updating, and ending a Live Activity. The Activity object is responsible for helping with the Live Activity’s life cycle:
class Activity<Attributes> where Attributes: ActivityAttributes
The content of the Live Activity is described using the ActivityAttributes protocol. This protocol has one required associated type, ContentState, that must be implemented while conforming to this protocol. The ContentState type describes a Live Activity’s dynamic content.
The attributes have two properties. One property remains static and does not change throughout one Live Activity. The other property is dynamic and may constantly change throughout the Live Activity.
In the Tradinza app, the current trade has static properties, such as the stock and its quantity (we will keep the quantity static for the simplicity of our example). It also has dynamic content, such as the current price, the state of trade (i.e., ongoing or ended), and the trade’s final profit or loss:
struct StockTradingAttributes: ActivityAttributes {
  enum TradeState: Codable {
    case ongoing
    case ended
  }

  public struct ContentState: Codable, Hashable {
    var position: Double
    var currentPrice: Double
    var tradeState: TradeState
  }

  var stock: Stock
  var quantity: Int
}
Starting an Activity
To start an Activity, you first request it by providing the initial state and the attribute. You can provide the token for starting either from a remote push notification or directly from the app:
static func request(
    attributes: Attributes,
    contentState: Activity<Attributes>.ContentState,
    pushType: PushType? = nil
) throws -> Activity<Attributes>
For the stock trading app, we’ll provide attributes such as the Stock structure and the quantity of stocks purchased. The currentPrice of the stock and the user position are both dynamic states that may change throughout the Live Activity:
Button("Buy") {
  let currentPrice: Double = .random(in: stock.minimumPrice..<stock.maximumPrice)
  let position = (currentPrice - stock.price) * Double(quantity)

  let state = StockTradingAttributes.ContentState(position: position, currentPrice: currentPrice)
  let attributes = StockTradingAttributes(stock: stock, quantity: quantity)

  do {
    activity = try Activity.request(attributes: attributes, contentState: state)
  } catch (let error) {
    print("Error requesting stock trade Live Activity: \(error.localizedDescription).")
  }
}
This is how the Widget code looks for an ActivityConfiguration:
struct TradinzaLiveActivity: Widget {
  var body: some WidgetConfiguration {
    ActivityConfiguration(for: StockTradingAttributes.self) { context in
      CurrentTradeView(context: context)
        .padding()
    } dynamicIsland: { context in
      ///
    }
  }
}
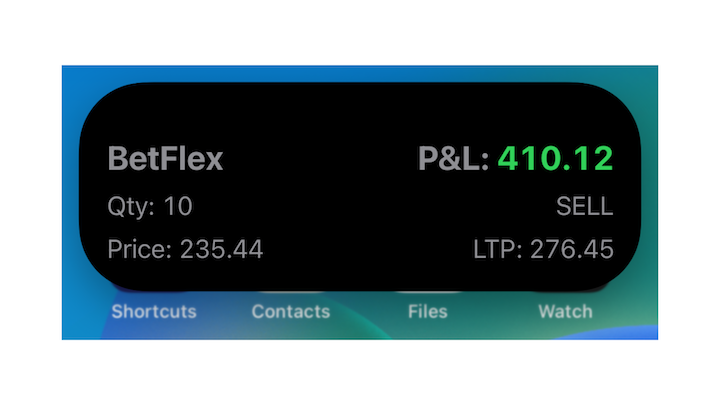
When you start an Activity, it uses the View that you have provided in the ActivityConfiguration. In the example of the Tradinza app, you put the Live Activity view in the CurrentTradeView:
struct CurrentTradeView: View {
  var context: ActivityViewContext

  var body: some View {
    HStack {
      VStack(alignment: .leading, spacing: 8) {
        Text(context.attributes.stock.name).bold()
          .font(.title2)

        Text("Qty: ") + Text(context.attributes.quantity, format: .number).monospacedDigit()

        Text("Price: ") + Text(context.attributes.stock.price, format: .number).monospacedDigit()
      }

      Spacer()

      VStack(alignment: .trailing, spacing: 8) {
        Text("P&L: ").bold()
          .font(.title2) +
        CurrentTradePAndLView(context: context, font: .title2).body

        Text("SELL")

        Text("LTP: ") + Text(String(format: "%.2f", context.state.currentPrice)).monospacedDigit()
      }
    }
    .foregroundColor(.gray)
    .activityBackgroundTint(Color.white)
    .activitySystemActionForegroundColor(Color.black)
  }
}
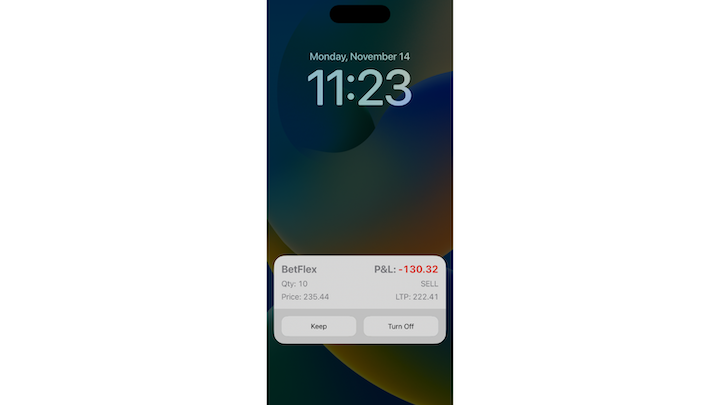
After starting an activity and running it on a device, you have created your first Live Activity!
Updating an Activity
You can update the Activity using the update method:
func update(using contentState: Activity<Attributes>.ContentState) async
You can also alert the user with a notification about the updated content of the Live Activity.
func update(
    using contentState: Activity<Attributes>.ContentState,
    alertConfiguration: AlertConfiguration? = nil
) async
The stock app updates every second with new data from the stock exchange. To update the Live Activity with the latest price and position, use the Activity.update(using:) method:
let currentPrice: Double = .random(in: stock.minimumPrice..<stock.maximumPrice)
let position = (currentPrice - stock.price) * Double(quantity)

let priceStatus = StockTradingAttributes.ContentState(position: position, currentPrice: currentPrice)

Task {
  do {
    try await activity.update(using: priceStatus)
  } catch(let error) {
    print("Error updating Live Activity: \(error.localizedDescription)")
  }
}
Ending an Activity
To end a Live Activity, use the following method:
func end(
    using contentState: Activity<Attributes>.ContentState? = nil,
    dismissalPolicy: ActivityUIDismissalPolicy = .default
) async
In the case of the sample Tradinza app, when the Live Activity ends it will show the final trade price and the user’s position (i.e., profit or loss):
func endTrade(for stock: Stock) async {
  let contentState = StockTradingAttributes.ContentState(position: position, currentPrice: currentPrice, tradeState: .ended)

  await activity?.end(using: contentState, dismissalPolicy: .default)
}
The ContentState shows the final position and current price, as the Live Activity remains visible until the user removes it manually. If you want the system to remove the Live Activity automatically, pass .immediate to the dismissalPolicy parameter.
Based on the state, you can also create a custom view for the end state.
Implementing Live Activities in the Dynamic Island
To add Live Activities to the Dynamic Island, all you need to do is add the parameter dynamicIsland to the ActivityConfiguration and provide the relevant views.
There are four view options (all example images are from the Apple Developer Live Activities documentation):
- Expanded view: When the Dynamic Island is held down, it displays a detailed view; place your view here; it can be either leading, center, trailing, or bottom

- Compact leading view: The Dynamic Island content displays on the left side of the pill shape
- Compact trailing view: The Dynamic Island content displays on the right side of the pill shape
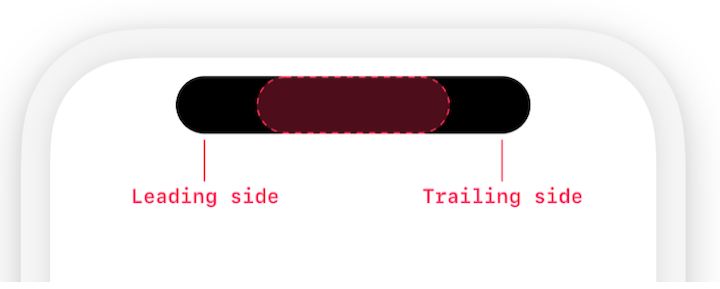
- Minimal view: This view is shown when another app’s content is being shown in the Dynamic Island
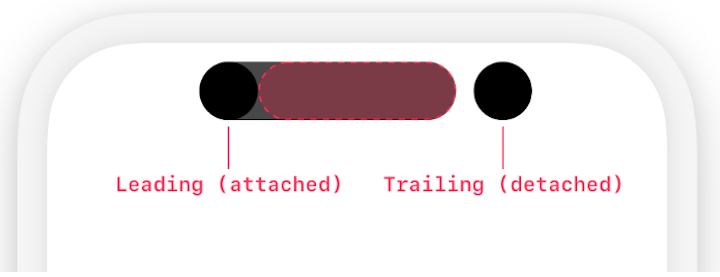
To use the Dynamic Island for the Tradinza app, you’d show the same Live Activity view for the expanded view. For the compact leading section, you’d provide the symbol of the currently traded stock. For the compact trailing section, you’d provide the current position (i.e., the profit or loss). For the minimal view, you’d just provide the current position number.
Here’s the code for your reference:
struct TradinzaLiveActivity: Widget {
  var body: some WidgetConfiguration {
    ActivityConfiguration(for: StockTradingAttributes.self) { context in
      CurrentTradeView(context: context)
        .padding()
    } dynamicIsland: { context in
      DynamicIsland {
        DynamicIslandExpandedRegion(.bottom) {
          CurrentTradeView(context: context)
        }
      } compactLeading: {
        Text(context.attributes.stock.symbol).bold()
          .foregroundColor(.white)
      } compactTrailing: {
        CurrentTradePAndLView(context: context, font: .body)
      } minimal: {
        CurrentTradePAndLView(context: context, font: .body)
      }
    }
  }
}
Running the Dynamic Island on an iPhone 14 Pro or 14 Pro Max, we get the following view at the top of the screen:

When you hold the Dynamic Island, a detailed view is opened where you can show more detail about the current activity:
Production readiness
As of this writing, the official version of iOS 16.1 has been released for developers and users. However, it’s important to note that iOS developers are still exploring the ActivityKit framework and working their way through the Dynamic Island documentation. At this time, there isn’t a large community that can answer all questions and queries related to the Live Activities API. So, depending on your development journey, you could face some delays or difficulties getting your Live Activities apps to the App Store.
Availability
While Live Activities and Dynamic Island are exciting features to implement in your app, unfortunately, they are only available for iOS 16.1+.
As of this writing, the official version of iOS 16.1 has been released to the developers, and you can submit your app(s) with Live Activities to the App Store.
Conclusion
Live Activities is a great solution for incorporating real-time updates into your iOS app without unlocking your iPhone. If your app requires immediate updates for users, like food delivery or ride-sharing updates, then you should take advantage of this feature in your app.
You can find the final sample project showcased in this blog post on GitHub.
N.B., as of this writing and the release of iOS 16.1, you can only interact with Apple apps for Live Activities on the Lock Screen, like the Apple Music app. Apple has no third-party APIs enabling interactivity for Live Activities. You can add deep link URLs in the Live Activities to open your app, but the user cannot interact with Live Activities on the Lock Screen itself
I hope this article enables you to get started adding Live Activities to your iOS apps!
The post Exploring the iOS Live Activities API appeared first on LogRocket Blog.
from LogRocket Blog https://ift.tt/j1B5AFn
Gain $200 in a week
via Read more


