


One of the many features of modern full-stack React frameworks like Next.js is an impressive built-in routing system. While React is great for single-page applications on its own, we can use it with frameworks like Next.js to build multi-page applications.
These frameworks also provide a way to handle navigation across the app with the router. For example, routing in Next.js is as easy as creating a set of pages for the app and uniquely handling moving from one page to another.
Next.js makes it possible for us to listen to events regarding navigations from one page to another. For example, the event routeChangeStart fires up when a route starts to change; in other words, when a user navigates to a new page.
In this article, we are going to take a look at the routeChangeStart event as well as the other router events in Next.js. We will cover:
- How routing works in Next.js
- Router events in Next.js
- Where to use router events in Next.js
- When to use router events in Next.js
All the code examples used in this article are a part of a simple Next.js project and can be found in this repository. You can also view the demo here.
How routing works in Next.js
Before we jump into router events in Next.js, let’s recap how routing works in Next.js and explore some of the routing concepts we will mention and use in this article.
Routing in Next.js is based on the concept of pages. A page is any file with a .ts, .js, .tsx, or .jsx extension in the pages directory. So, any React file that is in the pages directory is a page and is automatically available as a route. See below:
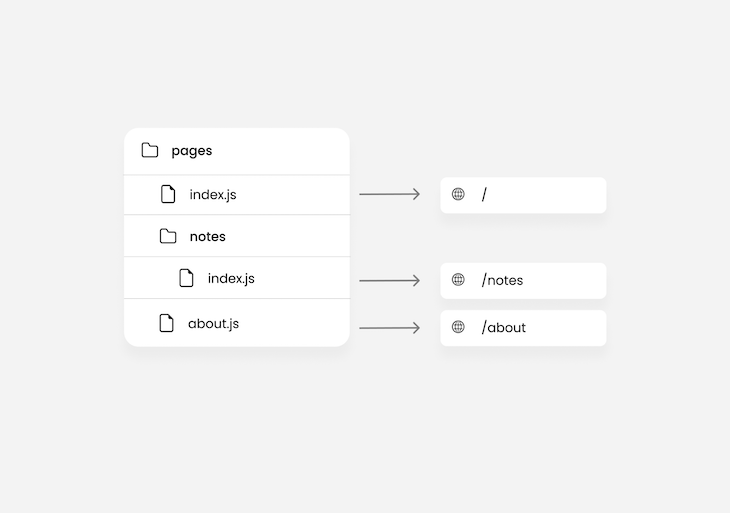
As shown in the image above, we can tell that this Next.js project’s route is going to have three pages. This includes the index.js page, which represents the page for the current directory — in the above, / and /notes.
Nested routing in Next.js
Nested routes help you structure your routes better. In the pages directory, you can not only create nested files, but folders as well. Files created in nested folders are also considered as pages and nested routes.
For example, let’s say we have four sets of notes we would like to make available as a page in a project. We can simply create four pages, like so:
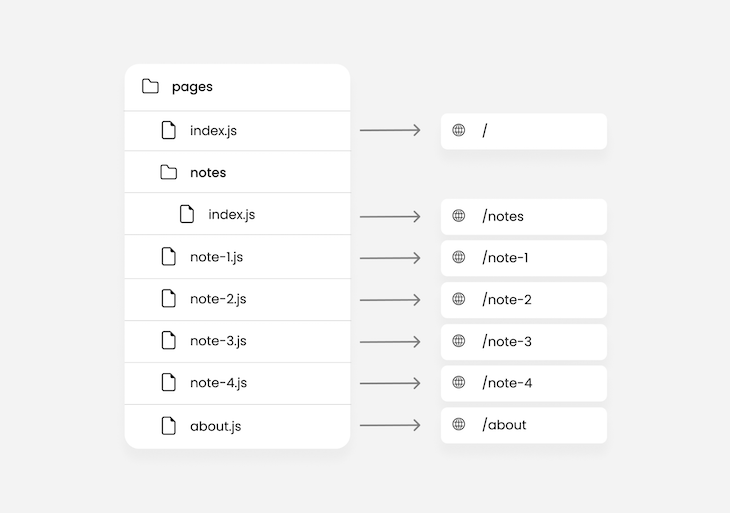
As seen in the image above, we’d wind up with a naming convention that looks like /note-1, /note-2, and so on for each note’s page URL.
That’s a little strange, and not quite intuitive, because the naming convention we are used to for related pages on the web these days looks like /notes/1, /notes/2, and so on.
This is where nested routing comes in. The Next.js router will automatically route nested folders to the structure of the folder and its files. So, for example:
pages/notes/1file structure will yield a/notes/1routepages/notes/drafts/1file structure will yield a/notes/drafts/1route.
As a result, we would have:
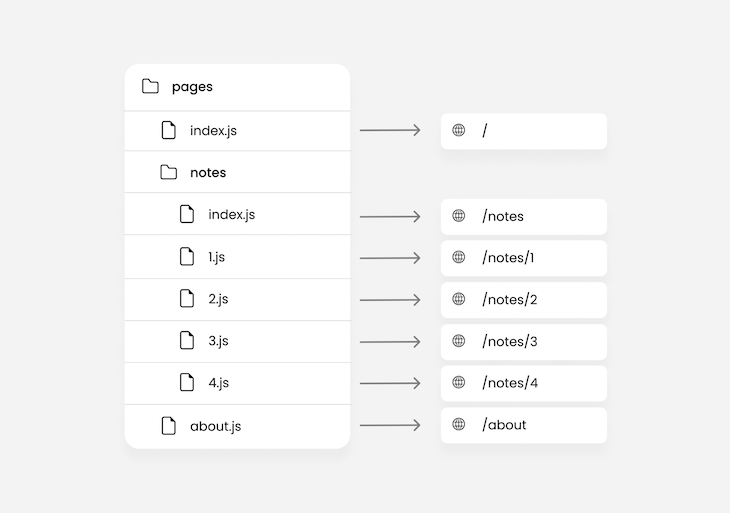
For now, ignore the weird naming structure in the image above — we will fix that in the next section.
Dynamic routing in Nest.js
Dynamic routing involves creating a single dynamic file that represents an indefinite amount of similar pages.
For example, if we have 15 different notes and we want to have a separate page for each of them, we will wind up creating 15 files. The more notes we want, the more files we will have — which is ultimately inconvenient and unnecessary.
This is where dynamic routing comes in. Since all the notes will have similar page layouts, we can create a single file that represents an infinite amount of notes rather than creating a file for each note we want. See below:

The square braces [] in the code below represent a dynamic route. Whatever is used as a placeholder in those braces will be pushed by the router as a property of the query object:
// pages/notes/[id].js
import { useRouter } from 'next/router';

const Sam = () => {
  const router = useRouter();

  useEffect(() => {
    console.log(router.query); // route /notes/1 -> { id: 1 }
  }, [router.query]);

  return (
    <div>
      <h1>Note - {router.query?.id}</h1>
    </div>
  );
};
If you’re using a class-based component, or you perhaps don’t want to use the useRouter hook to access the router object, you can use the withRouter function instead:
const Note = ({ router }) => {

  useEffect(() => {
    console.log(router.query); // route /notes/1 -> { id: 1 }
  }, [router.query]);

  return (
    <div>
      <h1>Note - {router.query?.id}</h1>
    </div>
  );
};
export default withRouter(Note);
Shallow routing in Next.js
Shallow routing allows you to make changes to the path of a page without running data fetching methods again. It helps retain the state of the page even after changing the URL.
The router object will also have access to the updated pathname. Changing the URL could mean adding a new query, so we could have the following:
// pages/notes/[id].js
const Note = () => {
  const router = useRouter();

  useEffect(() => {
    router.push('?id=4', '', { shallow: true });
  }, []);

  useEffect(() => {
    console.log(router.query);
  }, [router.query]);

  return (
     <div>
      <h1>Note - {router.query?.id}</h1>
    </div>
  );
};
export default Note;

export const getServerSideProps = async () => {
  console.log('called');
  return { props: {} };
};
The getServerSideProps function is supposed to be called when the router.push method changes the URL of the page. However, because the routing is shallow in this case, neither the getServerSideProps nor any other data fetching methods will be called.
The router.push method is an alternative to the Next.js Link component used for navigating between pages. In the case of this example, rather than navigating to a new page, we navigate to the current page — /about — but with a new query, username.
Note that the router.push method takes an object of options as the last argument, with which we specify if the routing is shallow or not — for example, shallow: true.
Meanwhile, the Link component uses the shallow props to specify if the routing is shallow or not. Both cases — router.push and Link — default to false.
Router events in Next.js
The router object has different properties and methods. One of these is the events property, which we will be looking at in this section.
The events property provides methods that allow you to listen to router events, such as:
- When a route is about to change
- When a route changes completely
- When the browser history is about to change
- When a route encounters an error while changing.
Let’s explore each of these in more detail below.
The routeChangeStart event
The routeChangeStart event is triggered when a route is about to change. In other words, when a user clicks a link to navigate to a new page, an event is triggered. Take a look at the below example:
function MyApp({ Component, pageProps }) {
  const router = useRouter();

  useEffect(() => {
    router.events.on('routeChangeStart', (url, { shallow }) => {
      console.log(`routing to ${url}`, `is shallow routing: ${shallow}`);
    });
  }, []);

  return <Component {...pageProps} />;
}
export default MyApp;
In this case, we’re subscribing to this event inside the MyApp component in the pages/_app.js file. This isn’t the only option for subscribing to the event, but it is the most convenient one.
We will talk more on the above shortly, but in the meantime, let’s focus on what exactly the routeChangeStart event does.
The Next.js router provides two methods for subscribing and unsubscribing to the events property. These methods are on and off, respectively.
So from the example above, we used the on method to subscribe to the routeChangeStart event. Then, the second argument is a callback that returns the URL that the user is navigating to and an object with a shallow property that indicates if the routing is shallow or not.
The event is triggered by the Next.js router, not the browser. As a result, routing outside of the Next.js router is not going to trigger the event.
For example, using the default a tag for navigation or manually changing the URL in the browser will not trigger the router events.
This doesn’t just apply to the routeChangeStart event; it applies to all of Next.js router events.
The routeChangeComplete event
The routeChangeComplete is triggered when a route changes completely:
function MyApp({ Component, pageProps }) {
  const router = useRouter();

  useEffect(() => {
    router.events.on('routeChangeComplete', (url) => {
      console.log(`completely routed to ${url}`);
    });
  }, []);

  return <Component {...pageProps} />;
}
export default MyApp;
This can be useful to terminate anything that was initiated with the routeChangeStart event.
For example, say that you want to get the total amount of time it takes for a page to load, so you initiated a timer when the routeChangeStart event is triggered. With the routeChangeComplete, you can terminate and round up the timer.
The beforeHistoryChange event
When in action, the beforeHistoryChange event can almost look similar to the routeChangeStart event. However, when there is a delay on the destination page, the difference between these events is clearer.
The beforeHistoryChange event is nothing like the routeChangeStart. It is only triggered the moment the history of the browser is about to change.
Consider an example case of server-side rendering where the delay on the destination page is caused by the volume of data being prefetched before routing to that page.
When a user clicks a link to a page, the routeChangeStart event is triggered and fetching of data on that page begins. Subsequently, when the server-side function is executed completely, this means the new page is fully ready.
The next step is to move the user to that new page. That is when the beforeHistoryChange event is triggered.
The beforeHistoryChange event can appear similar to routeChangeComplete because after the browser’s history has changed, the routing will be indicated as completed. There is no afterHistoryChange event because the routeChangeComplete already serves that purpose.
Take a look at the code below:
function MyApp({ Component, pageProps }) {
  const router = useRouter();

  useEffect(() => {
    router.events.on('beforeHistoryChange', (url) => {
      console.log(`appending ${url} to history`);
    });
  }, []);

  return <Component {...pageProps} />;
}
export default MyApp;
The outcome of this event is that it alerts you when the URL is appended to history.
The hashChangeStart and hashChangeComplete events
The hashChangeStart event is triggered when the hash of a URL starts to change, but not the page. In comparison, the hashChangeComplete event is triggered when the hash of a URL has completely changed.
Hashes are mostly used for navigating within a page in docs or sometimes articles. The set of elements in the viewport always changes but the page remains the same.
For example, try revisiting the table of contents at the beginning of this article and click on the title of this section. It’s going to automatically navigate you back here.
These two events are triggered when hashes change. You can use them to handle what happens when the user is navigating within a page with hashes, like so:
function MyApp({ Component, pageProps }) {
  const router = useRouter();

  useEffect(() => {
    router.events.on('hashChangeStart', (url) => {
      console.log(`navigating to ${url}`);
    });

    router.events.on('hashChangeComplete', (url) => {
      console.log(`navigated to ${url}`);
    });

  }, []);

  return <Component {...pageProps} />;
}
export default MyApp;
Apart from adding a hash to the URL, removing a hash from the URL also triggers these events.
The routeChangeError event
This event is triggered when a route fails to change. There could be several reasons why a route fails to change, but one common reason is that the user has canceled navigation to the destination link.
When a user clicks a link and immediately clicks another, navigation to the first clicked link has been canceled and will therefore trigger this event. See the below:
function MyApp({ Component, pageProps }) {
  const router = useRouter();

  useEffect(() => {
    router.events.on('routeChangeError', (err, url) => {
      console.log(err.cancelled ? 'you cancelled the navigation' : err);
    });
  }, []);

  return <Component {...pageProps} />;
}
export default MyApp;
The callback returns an err variable with a cancelled property to determine if it was canceled by the user or not.
Unsubscribing from events
As mentioned before, you can use on to subscribe to an event in Next.js, while the off method is for unsubscribing.
Unsubscribing from any event in React is mostly done when a component unmounts. In functional components, we would have the following:
function MyApp({ Component, pageProps }) {
  const router = useRouter();

  useEffect(() => {
router.events.on('routeChangeStart', (url, { shallow }) => {
      console.log(`routing to ${url}`, `is shallow routing: ${shallow}`);
    });

    return () => {
      router.events.off('routeChangeStart', () => {
        console.log('unsubscribed');
      });
    };
  }, []);


  return <Component {...pageProps} />;
}
export default MyApp;
In class-based components, you would use componentWillUnmount instead.
You can unsubscribe from as many events you subscribed to, but you must unsubscribe from each one independently. For example, if you subscribed to routeChangeStart and routeChangeComplete, you should unsubscribe from both separately.
Where to use router events in Next.js
All the examples we’ve looked at so far have been on the pages/_app.js page. But the use cases for events in Next.js are not limited to just that page — you can subscribe to router events on any page or component.
You are also not limited to remaining inside a component. For example, you could have:
import Router from 'next/router';

Router.events.on('routeChangeStart', (url, { shallow }) => {
    console.log(`Navigating to ${url}`);
});

function MyApp({ Component, pageProps }) {
  return <Component {...pageProps} />;
}
export default MyApp;
The Router variable also has the same properties and methods as the variable returned by useRouter . Because of that, we can listen to the router events outside of the component MyApp.
When to use router events in Next.js
It’s great to know what router events are available for you to use in Next.js and how to use them. Apart from that, knowing where they can be useful can also be very helpful.
Some example use cases for Next.js router events include, but are not limited to:
- Creating a loading indicator between page navigations
- Custom monitoring of user navigation behavior
- Determining the load time of a page
- Animations during navigations
With custom monitoring, you can determine things like the most visited page, broken links, and more without requiring any additional library or tool.
Earlier, we mentioned how data fetching can affect router events. Note that any loading indicator triggered by these router events will mostly only have a noticeable effect when you’re using server-side rendering in Next.js.
Server-side rendering tends to be the only data-fetching method that will cause any delay during routing because it executes at runtime, unlike static site generation, which executes at build time.
In other words, with server-side rendering, the data-fetching method getServerSideProps will only execute when the page is requested.
So the moment a link to a page using server-side rendering is clicked, the getServerSideProps function is executed before the router navigates to that page. As a result, no matter how long it takes to execute the getServerSideProps function, the router will not move to the next page.
This is where router events can play a very vital role in informing the user with a loading indicator, as well as determining the load time of the page.
Whenever you are routing to a server-side rendered page, you would do well to use the router events to display an indicator.
You never know how long a page will end up taking to load, so it is safer for the user to be informed that loading is in progress rather than being left to wonder if the link is broken or it’s not a link at all.
Conclusion
In this article, we looked at what Next.js router events are, how to use them, and when and where to use them.
Next.js router events can be very useful for applications that rely on server-side rendering, or as a means to trigger animation during navigation.
You should check out the Github repository containing the examples in this article. The code contains a loading-indicator animation that is triggered by a custom delay in a server-side rendering page.
Alright, that’s it for this article. Hope it was useful. Don’t forget to leave your thoughts on this in the comment section. Thanks for reading.
Happy hacking.
The post Understanding Next.js <code>routeChangeStart</code> and router events appeared first on LogRocket Blog.
from LogRocket Blog https://ift.tt/XUhanNv
Gain $200 in a week
via Read more


