Caching refers to the process of storing frequently demanded information in a cache so that the content can be accessed quickly. A cache is either hardware or software that temporarily stores frequently used data, improving its memory access time.
There are various methods and tools available for us to use in performing caching for both frontend and backend applications. If you’re a full-stack developer reading this article, you should already be familiar with caching using Redis, an open source, in-memory data store.
In this tutorial, we’ll focus on setting up a frontend cache with Vue and Workbox. To follow along with this article, you’ll need familiarity with the following:
- Basic HTML, CSS, and JavaScript
- Vue and Node.js
We’ll cover the following:
- What is frontend caching and why is it important
- What is a Workbox service worker?
- When is caching needed?
- Service worker strategies
- Workbox caching with Vue
- Generating service workers for Vue with the Workbox CLI
- Configuration
- Using
GenerateSWmood - Test the application
- Using
InjectManifestmood - Challenges with caching
What is frontend caching and why is it important?
Caching on the client-side is a very powerful technique for optimizing your app and improving your user experience. The idea of caching a web application’s data in the browser comes from the realization that fetching data from a local cache or browser storage API is more cost-effective than network requests.
What is a Workbox service worker?
Workbox deploys a set of modules and tools that simplify interaction with service workers by handling routing and caching. Workbox is designed to make developing service workers easy while also making room for complex application requirements. Each individual module in Workbox addresses specific functionality with service workers.
Progressive web applications use service workers to provide offline capabilities and boost the page performance of web applications. A typical web application that depends on multiple data sources to display a plethora of content to end-users requires a medium to cache and render information even when the application is in an offline mood.
The Service Worker API has a lot of complex interactions that handle network requests, caching, cache management, pre-caching, and more.
Workbox is an abstraction of the Service Worker API. It’s a set of JavaScript modules where each module handles a specific part of the Service Worker API:
workbox-routing: Request matchingworkbox-strategies: Caching strategiesworkbox-precaching: Pre-cachingworkbox-expiration: Managing caches
These modules compose service workers in a declarative manner that makes them easier to read and maintain than directly interacting with the Service Worker API.
When is caching needed?
As long as performance remains a great concern for software application users, caching will continue to evolve, and more solutions and strategies will emerge. The following are some applications that require caching:
- Single-page applications with a lot of static assets
- Web apps optimized for mobile users
- New online platforms
Service worker strategies
A service worker strategy is a communication between a service worker’s fetch event and its cache interface. There are five popular service worker strategies that software developers often leverage to make their applications more performant:
- Cache first: Sends requests to the service worker cache. If a response is found, it serves the response. Otherwise, it falls back to the network
- Network first: Sends requests to the network. If a response is found, it serves the response. Otherwise, it falls back to the service worker’s cache
- Cache only: Forwards all requests on the current webpage to its matching response on the worker cache
- Network only: Sends all requests through service workers to the network without any interaction with the cache
- Stale while invalidate: The first request is sent to the network and stored on the cache. Subsequent requests are sent to the service worker’s cache while the network request runs in the background and updates the cache if there were new updates
Workbox caching with Vue
To get started, let’s install Vue globally:
npm install -g @vue/cli
# OR
yarn global add @vue/cli
After the installation is complete, run the code below to confirm the Vue version:
vue --version
Then, create a new Vue project:
vue create vue workbox
Navigate into the newly created workbox folder and start the project with the command below:
cd vue
yarn serve
Generating service workers for Vue app with the Workbox CLI
Add the Workbox plugin for Vue with the following command:
vue add pwa
The command above will install Workbox and all the dependencies required to communicate with Workbox in CDN mood.
Configuration
Next, update your vue.config.js file with the code below:
const { defineConfig } = require('@vue/cli-service')
module.exports = defineConfig({
  transpileDependencies: true,
   pwa: {
    name: "workbox",
    themeColor: "#fff3e0",
    msTileColor: "#fff3e0",
    appleMobileWbeAppCapable: "yes",
    appleMobileWebAppStatusBarStyle: "#fff3e0",
    workboxPluginMode: "InjectManifest",
    workboxOptions: {
      swSrc: "./service-worker.js",
      exclude: [/_redirect/, /\.map$/, /_headers/],
    },
    manifestOptions: {
      background_color: "#ffe24a",
    }
  }
})
workbox-webpack-plugin supports two modes. In the configuration above, we’re setting the workboxPluginMode to InjectManifest. The InjectManifest mood requires that you specify your service-worker path swSrc in the workBoxOptions object. The other option, GenerateSW, does not require a service.
Notice that we specified the directory for the service worker with the code below:
swSrc: 'src/service-worker.js',
If you intend to write your service-worker file yourself, you can skip to the Using InjectManifest section. Otherwise, follow the steps below.
Using GenerateSW mood
First, set the workboxPluginMode with the code below:
workboxPluginMode: "GenerateSW"
// swSrc: "./service-worker.js" comment out this line of code,
Then, build the production version of the app as follows:
yarn build
Test the application
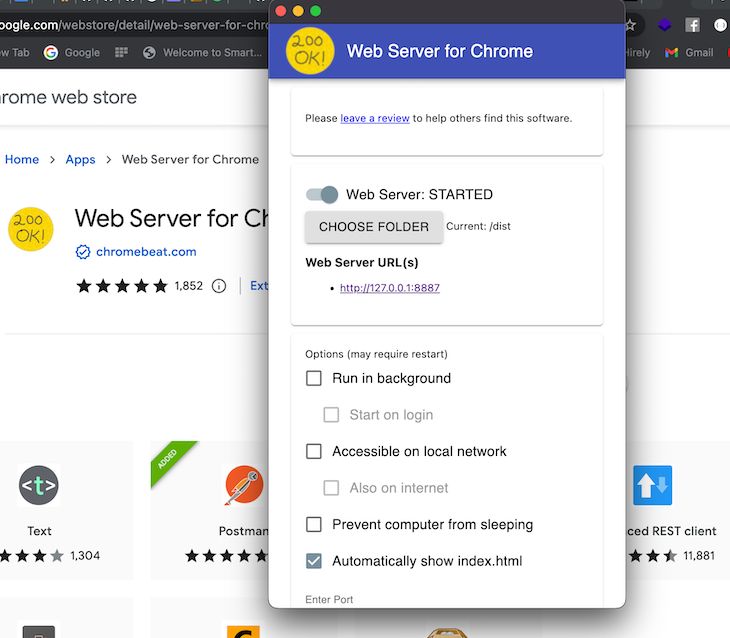
Once the build is complete, you should have manifest.json and service-worker.js added to the /dist directory. To test the application in a production server, download and install Web Server for Chrome and set the folder to the ./dist of your application, as seen in the screenshot below:

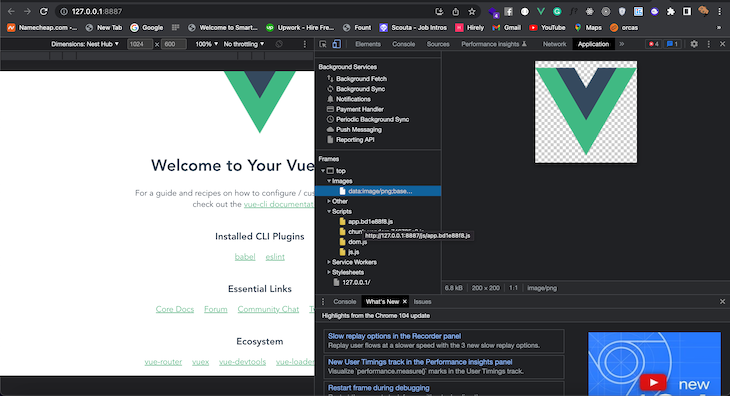
To view your application, click the URL provided by the web server. Inspect the webpage and navigate to the application. In the frame section, you should already see the images, script, and stylesheet folders. This is an indication that all the web application’s static assets have been pre-cached and would still work even in offline mode:

Using InjectManifest mood
Open up service-worker.js and add the code below:
const { precacheAndRoute } = workbox.precaching;
const { registerRoute } = workbox.routing;
const { CacheFirst, StaleWhileRevalidate } = workbox.strategies;
const { Plugin: ExpirationPlugin } = workbox.expiration;
const { Plugin: CacheableResponsePlugin } = workbox.cacheableResponse;
Since Workbox functions from the Workbox CDN v4.3.1, Vue 3 automatically adds the CDN. The code above registers some of the Workbox endpoints that the application depends on to perform caching:
workbox.core.setCacheNameDetails({ prefix: "appname" });

self.addEventListener("message", (event) => {
  if (event.data && event.data.type === "SKIP_WAITING") {
    self.skipWaiting();
  }
});

/**
 * The workboxSW.precacheAndRoute() method efficiently caches and responds to
 * requests for URLs in the manifest.
 */
self.__precacheManifest = [].concat(self.__precacheManifest || []);
precacheAndRoute(self.__precacheManifest, {});

// cache image and render from the cache if it exists or go t the network
registerRoute(
  ({ request }) => request.destination === "image",
  new CacheFirst({
    cacheName: "images",
    plugins: [
      new CacheableResponsePlugin({
        statuses: [0, 200],
      }),
      new ExpirationPlugin({
        maxEntries: 60,
        maxAgeSeconds: 2 * 24 * 60 * 60, // cache the images for only 2 Days
      }),
    ],
  })
);
The code above takes images from the Vue /dist folder and caches them for two days.
To get a response from the Workbox API, add the code below after the registerRoute in service-worker.js:
registerRoute(
  ({ url }) => url.pathname.startsWith("https://dog.ceo/api/"),
  new StaleWhileRevalidate()
);
We’re using the StaleWhileRevalidate function to cache the API response and serve it from the cache if it exists or goes to the network. Once you’re satisfied with the service worker, you can follow the instructions from earlier to test the application.
Keep in mind that this is an example service-worker file. Your service-worker file can contain only the logic that applies to your use case.
Challenges with caching
Caching web application assets can improve overall user experience, however, it can also ruin user experience when glitches happen and old web application source code is served to users instead of the most recent cached version. Although it rarely happens, I’ll advise you always confirm that your caching and fallback logic is correct before deployment to avoid such scenarios.
Conclusion
Caching improves the overall performance of our website or application. Once all the assets have been downloaded to a user’s machine, it becomes pretty convenient to show the user a pre-cached version of the website’s content, even in bad network situations.
In this article, we explored using Workbox service workers with Vue to handle routing and caching in our application. We covered what service workers are, when caching is needed, and finally, some potential problems that can arise from caching.
I hope you enjoyed this article, and be sure to leave a comment if you have any questions.
The post Frontend caching in Vue with Workbox service workers appeared first on LogRocket Blog.
from LogRocket Blog https://ift.tt/wbA4zyk
Gain $200 in a week
via Read more


