In this article, we will take a practical look at how to integrate a GitHub social login into a NestJS application that can easily be applied to other social platforms, such as Facebook, Google, etc. We’ll then learn how to protect private routes using guards and various authentication and authorization mechanisms provided in NestJS. You can get the complete source code for this article in this GitHub repository.
To jump ahead:
- Prerequisites
- Setting up our NestJS project
- Registering an OAuth application with GitHub
- Implementing GitHub social login
- Setting up JWT token strategy in our Nest app
- Using JWT tokens to protect private routes
Prerequisites
To follow along in this article, it’s essential to have at least a basic understanding of Node.js. You’ll also need to have Node.js and the Node Package Manager installed. You can download these here (Node Package Manager comes bundled with Node.js). It’s also necessary for you to have a GitHub account because we’ll be integrating GitHub social login.
With that sorted, let’s set up the essential packages we’ll need for the application.
Setting up our NestJS project
In this article, we’ll use a library called Passport to help us implement social login. Passport simplifies the social login process by providing mechanisms called strategies to help with integrating social logins of external social platforms, such as GitHub, Google, Facebook, etc.
We’ll use the GitHub Passport strategy and corresponding NestJS guards to implement a series of steps:
- First, we’ll authenticate a user through GitHub OAuth
- Then, we’ll create a JWT token encoded with a payload that is based on the user’s authenticated state received from GitHub
- Finally, we’ll protect private routes and only allow requests with valid JWT tokens to access these routes
Let’s set up the project!
First, install the NestJS CLI, as it provides a one-command mechanism to help us create a new project. Run the following command in the terminal:
npm i -g @nestjs/cli
When that’s done installing, we can scaffold a new NestJS project by running the following command in the terminal:
nest new nestjs-social-login
NestJS will then create a new application with some important files and modules. There’s also one important module called @nestjs/config that we have to install. We’ll specifically use a service provided by this library to retrieve existing environmental variables. To install this module, run this command in the terminal:
npm install @nestjs/config
After that, simply import this module into the base app module, and set it as global so sub-modules can use it seamlessly:
//app.module.ts

import { ConfigModule } from '@nestjs/config';
...

@Module({
  imports: [
    ConfigModule.forRoot({ isGlobal: true }),
  ],

...
Over the course of the article, we’ll install other packages as needed, but this should suffice for now.
As mentioned earlier, we’ll be setting up GitHub social login, so we’ll need to register a new OAuth application with GitHub to get some important credentials.
Registering an OAuth application with GitHub
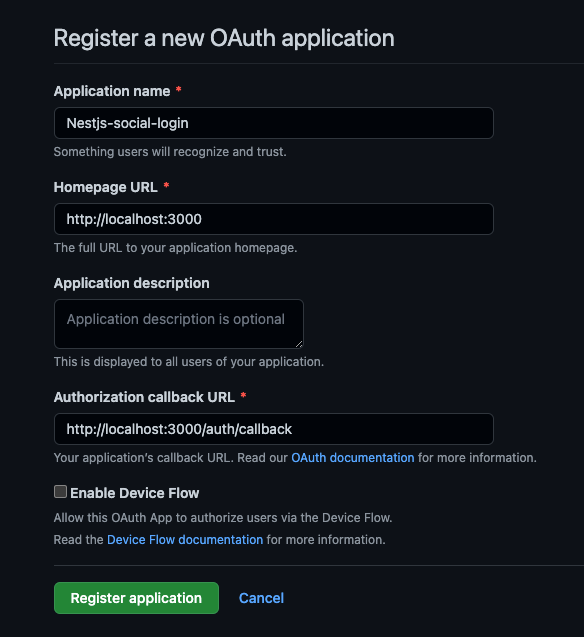
To register a new application, head over to GitHub and fill out the necessary details:

Once GitHub authenticates a user, the user will be redirected to the URL specified in the Authorization callback URL field. Later on, we’ll implement a route with this path in our application to handle the received data.
After filling out that form, click on the Register application button; it should register a new application and redirect you to a new page showing information about the newly created application:

On this page, there’s a Client ID and Client secrets; we’ll need those two values in the application soon, so click on the Generate a new client secret button to get a client secret, and then copy the Client ID and newly generated client secret.
Now, let’s add these values to our application. Head over to the root of the Nest application and create a .env file. This file holds the application’s environmental variables. Now, paste the values so that the .env file looks like this:
//.env

GITHUB_CLIENT_ID=YOUR_CLIENT_ID
GITHUB_CLIENT_SECRET=YOUR_CLIENT_SECRET
Note: The client secret is confidential and should not be shared with anyone; that’s why we’re adding them as environmental variables. It is also important not to commit them to any version control system. If you’re using Git, ensure the
.envfile has been added to.gitignore.
That’s all for registering an OAuth application; let’s go ahead and start writing some code to use what we’ve done so far.
Implementing GitHub social login
Earlier on, we listed a series of steps to implement. The first one is authenticating a user through GitHub. Let’s start working on that.
Authenticate a user through GitHub
Go ahead and install the Passport library and the library for the Passport GitHub strategy. Navigate to the application directory and run the following command in the terminal:
npm install passport @nestjs/passport passport-github
Let’s take a brief look at the three libraries we just installed and what they help with:
passportis an authentication middleware that provides a comprehensive set of strategies to support a wide range of authentication methods such as Username/password, SSO, OpenID, etc@nestjs/passportis a wrapper around the Passport library; it packages utilities from the Passport library to enable us to use them in a NestJS application seamlesslypassport-github, on the other hand, implements an authentication strategy for GitHub and allows us to plug that into Passport
Now, let’s create a separate Nest module, called auth, for implementing all things authentication. Then, navigate to the src folder in the application and run the following command to provision a new module:
nest generate module auth
This command generates a new module called auth. Navigate to the auth folder and create a file called auth.strategy.ts. We’ll implement all Passport strategies in this file (in this case, the GitHub strategy).
Paste the following code in the auth.strategy.ts file, and we’ll go through it right after:
//auth.strategy.ts

import { Injectable } from '@nestjs/common';
import { ConfigService } from '@nestjs/config';
import { PassportStrategy } from '@nestjs/passport';
import { Profile, Strategy } from 'passport-github';

@Injectable()
export class GithubStrategy extends PassportStrategy(Strategy, 'github') {
  constructor(configService: ConfigService) {
    super({
      clientID: configService.get<string>('GITHUB_CLIENT_ID'),
      clientSecret: configService.get<string>('GITHUB_CLIENT_SECRET'),
      callbackURL: '<http://localhost:8000/auth/callback>',
      scope: ['public_profile'],
    });
  }

  async validate(accessToken: string, _refreshToken: string, profile: Profile) {
    return profile;
  }
}
A lot is going on in the above code snippet, so let’s break it down:
We created a class called GithubStrategy, this class inherits from a base class exposed by the Passport module. We also registered the specific strategy we want to use, in this case, GitHub, and that is exemplified in this snippet: PassportStrategy(Strategy, 'github').
Then, in the class constructor, we pass in the credentials that we got when we previously registered for an OAuth application with GitHub. There’s also a scope property passed in; we use this property to inform GitHub of the type of data we want to retrieve for a specific user. In this case, we’re just interested in getting the public profile details for a particular user. We can find an exhaustive list of the possible values to be passed into the scope property here.
There’s also a validate method; this method contains parameters specific to the Passport GitHub strategy. After GitHub authenticates a user, this function is called with specific parameters; the profile parameter contains the GitHub public profile data of the authenticated user. Ideally, we’ll also perform extra validations in this function, such as checking if a user with that specific email already exists in the database.
For simplicity’s sake, in this article, we’ll only return the user’s profile details retrieved from GitHub. In an alternative scenario where we implement some extra validation and it fails, Passport expects this method to return a null value.
It’s also necessary to add the new strategy as a provider in the auth module. We can simply do this by adding it to the provider’s array:
//auth.module

...

providers: [GithubStrategy]

...
Creating authentication routes in our NestJS app
Finally, for this section, let’s create the authentication routes that serve as the entry point for users when they want to log in to our application.
Once again, head over to the auth folder and run the following command in your terminal:
nest generate controller auth --flat
Then, paste the following code into the newly created controller file, and we’ll go through it after:
//auth.controller.ts

import { Controller, Get, Req, UseGuards } from '@nestjs/common';
import { AuthGuard } from '@nestjs/passport';

@Controller('auth')
export class AuthController {
  constructor() {}

  @Get()
  @UseGuards(AuthGuard('github'))
  async login() {
    //
  }

  @Get('callback')
  @UseGuards(AuthGuard('github'))
  async authCallback(@Req() req) {
    return req.user;
  }
}
The first thing we might notice in the code snippet above is this statement: @UseGuards(AuthGuard('github')). Typically, we use NestJS guards to prevent unauthorized users from accessing a particular route. The @nestjs/passport package provides built-in guard functionality and support for integrating various strategies with these guards (in this case, the guard will use the GitHub strategy).
Let’s go through the flow.
When the user visits the first route/auth, it triggers the GitHub login for that particular user. If that’s successful and the user authenticates, GitHub redirects the user to the callback URL we specified: the /auth/callback route.
Before the user can access this callback route, the validate method in the GithubStrategy class we defined earlier is executed with parameters such as the user’s GitHub profile details. Suppose the method does not return null (in our case, we return the user profile details). Passport automatically attaches the return value of the validate method to the req object as a user property. This gives us access to the user details from the request object.
Currently, we return req.user, but we want to use those details to create a JWT token that can be sent when a user wants to access specific private routes. That’s the next thing we’ll implement.
Setting up JWT token strategy in our NestJS app
This step is essential because we want to ensure that only authenticated users can access protected routes. Thankfully, NestJS also provides the @nestjs/jwt library that helps us implement this fairly easily. The first thing to do is install the library:
npm install @nestjs/jwt
When that’s completed, we’ll need to set up the library and import it as a module into our application’s auth module. The following code handles that; we’ll go through it after:
//auth.module.ts

...

import { JwtModule } from '@nestjs/jwt';
import { ConfigService } from '@nestjs/config';

imports: [

...

JwtModule.registerAsync({
  useFactory: async (configService: ConfigService) => {
    return {
      signOptions: { expiresIn: '10h' },
      secret: configService.get<string>('JWT_SECRET'),
    };
  },
  inject: [ConfigService],
}),

...

]

...
The code snippet above registers the JWT Module and sets up important options, such as how long a signed JWT should remain valid and a secret string for signing the encoded payload. It’s also important to add the secret to the .env file because anyone who grabs hold of it can sign valid JWTs and send them to our application. Essentially, it’s a major security risk and must be avoided.
So, add a secure string to the .env file:
//.env

JWT_SECRET=YOUR_JWT_SECRET
With that done, we need to go back to the authentication callback route in the auth.controller file and make a few adjustments. All we need to do now is create a payload using the authenticated user’s details, use that to create a new JWT Token, and return it to the user. The user will provide this token when accessing protected routes (we will create these routes later).
The adjustments to the auth callback route are relatively straightforward:
//auth.controller.ts

import { JwtService } from '@nestjs/jwt';

...

constructor(private jwtService: JwtService) {}

@Get('callback')
  @UseGuards(AuthGuard('github'))
  async authCallback(@Req() req) {
    const user = req.user;
    const payload = { sub: user.id, username: user.username };
    return { accessToken: this.jwtService.sign(payload) };
  }

...
In the code snippet above, we extract the authenticated user’s profile details received from GitHub and pass the user’s id and username as payload to encode into the JWT. The @nestjs/jwt package provides a convenient service that exposes a sign method, which takes in a payload and returns a valid signed JWT token; we can then return this to the user.
Using JWT tokens to protect private routes
In this last step, we’ll use a JWT strategy to automatically validate JWTs received from users when trying to access protected routes. The first step is to install a library that implements this JWT strategy called passport-jwt:
npm install passport-jwt
The next thing is to set up the strategy. It’s quite similar to how we implemented the GitHub strategy, so we might as well put them in the same file just for simplicity’s sake. Head over to the auth.strategy.ts file and add the following code:
//auth.strategy.ts

import { ExtractJwt, Strategy as PassportJwtStrategy } from 'passport-jwt';
import { ConfigService } from '@nestjs/config';

...

@Injectable()
export class JwtStrategy extends PassportStrategy(PassportJwtStrategy) {
  constructor(configService: ConfigService) {
    super({
      jwtFromRequest: ExtractJwt.fromAuthHeaderAsBearerToken(),
      ignoreExpiration: false,
      secretOrKey: configService.get<string>('JWT_SECRET'),
    });
  }

  async validate(payload: any) {
    return { id: payload.sub, username: payload.username };
  }
}

...
Let’s go through the parameters used for setting up the JWT strategy:
jwtFromRequest: supplies the method that indicates how the JWT will be extracted from the request. In this instance, we’ll specify an approach of extracting the token as a bearer token from theAuthorizationheaderignoreExpiration: this property tells the Passport module to deny requests where an expired JWT is sent in theAuthorizationheadersecretOrKey: here we supply a secret from our.envfile for signing the token. However, there are specific situations where a PEM-encoded public key may be more appropriate, for example, in production applications
Finally, the validate method gets called with the decoded payload from the JWT. We can then return this information and allow access to that route.
Once again, we must add this new strategy as a provider in the auth module; we can simply do this by adding it to the provider’s array:
// auth.module
...

providers: [GithubStrategy, JwtStrategy]

...
The last part is to guard the routes we want to protect.
Let’s create such a route and then protect it using a NestJS guard. Just head over to the app.controller.ts file and add the following code:
// app.controller.ts

import { Controller, Get, Req, UseGuards } from '@nestjs/common';
import { AuthGuard } from '@nestjs/passport';

...

@UseGuards(AuthGuard('jwt'))
@Get('profile')
getProfile(@Req() req) {
  return req.user;
}

...
When a user tries to access the profile route, the AuthGuard('jwt') statement automatically uses the JWT strategy we just defined to validate the token received from the user. If the validation fails, the route is a 401 Unauthorized; otherwise, it returns the user details.
Let’s test the entire flow.
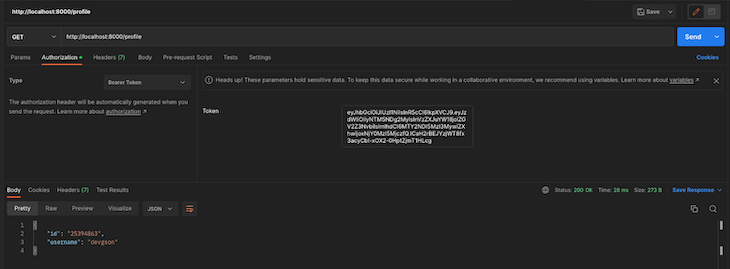
First, navigate to the /auth route to log in with GitHub. We’ll get an access token:

Then, we can send that token when trying to access the protected profile route:

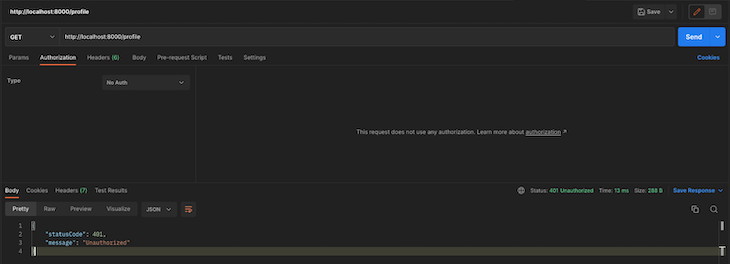
If we try to access the route with an invalid token or with no token at all, we’ll get a 401 Unauthorized error:

Voila, that’s all we need to do to integrate social login for GitHub. The good thing is that we can easily replicate this same process for multiple social platforms.
Conclusion
In this article, we went through the process of integrating GitHub social login into a NestJS application. We learned how to authenticate with GitHub, implement a specific strategy using Passport, and then finally set up a JWT strategy for securing private routes.
The post Creating social logins in NestJS appeared first on LogRocket Blog.
from LogRocket Blog https://ift.tt/QNT6z0E
Gain $200 in a week
via Read more


