Copper is an all-inclusive Go toolbox for creating web applications with less boilerplate and high focus on developer efficiency, which makes building web apps in Go more interesting and fun.
Copper still relies on the Go standard library to maintain the traditional Go experience while allowing you build frontend apps along with your backend and ship everything in a single binary. It has support for building full-stack web apps with React and Tailwind in the frontend, and it also supports building APIs that give more flexiblity to work with other frontend frameworks like Vue and Svelte.
In this article, we will be taking a look at how we can build a web application in Go with the gocopper framework so you can see how you’d implement it in your own projects.
Prerequisites
To get along with this tutorial, you should have the following:
- Go v1.16+ installed
- Node v16+ installed
- Experience building Golang applications
Installation
To get started with Copper, we’ll run the following command on our terminal:
$ go install github.com/gocopper/cli/cmd/copper@latest
Run the following command to ensure your Copper installation works correctly:
$ copper -h
If copper -h didn’t work, it probably means that $GOPATH/bin is not in your $PATH. Add the following to ~/.zshrc or ~/.bashrc:
export PATH=$HOME/go/bin:$PATH
Then, restart your terminal session and try copper -h again.
Configuration
Copper allows you to configure the project template using -frontend and -storage arguments.
The -frontend argument allows you to configure your frontend with the following frontend frameworks and libraries:
The -storage argument allows you to configure your database stack, which is sqlite3 by default. You have options to set it to postgres, mysql, or skip storage entirely with none.
What we will be building: A simple to-do app
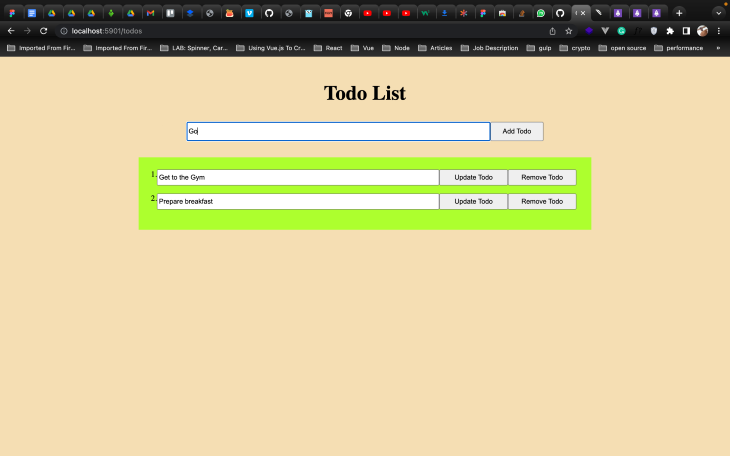
We will be building a full-stack web application that allows us to perform CRUD operations on our SQLite database. Basically, we will be building a to-do application. Here is how the finished app looks:

This application allows us to get, add, update, and delete to-do items from our database. Without further ado, let’s get started.
Project setup
We’ll create a project that uses the Go templates for frontend using the go frontend stack as follows:
copper create -frontend=go github.com/<your-username>/todolist
With the above command, copper create a basic scaffold project with the Go templates for frontend and sqlite3 for the database.
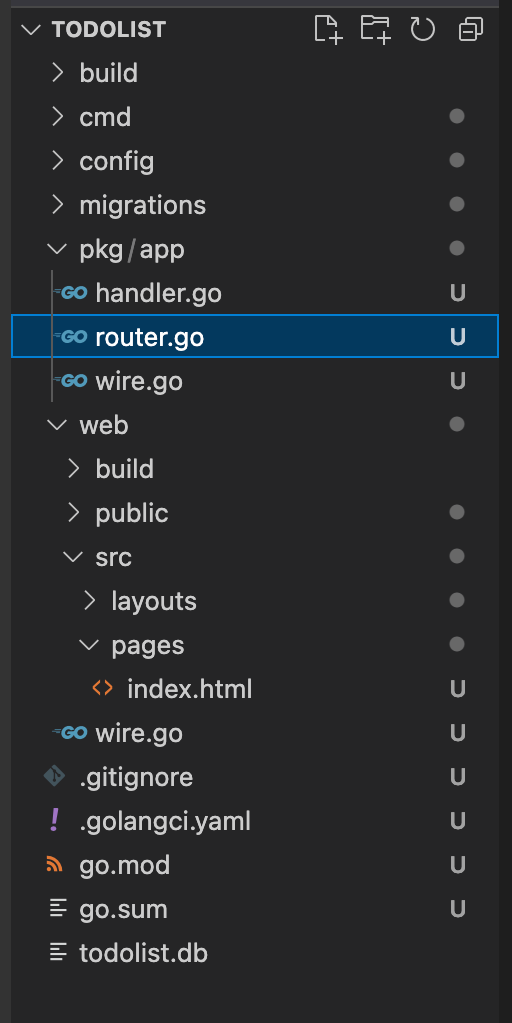
Here is how your project scaffold should look:

To start the app server, run the following command:
$ cd todolist && copper run -watch
Open http://localhost:5901 to see the Copper welcome page.
Updating the layout file
Let’s update the web/src/layouts/main.html file with a script tag as follows:
<!DOCTYPE html>
<html lang="en">
  <head>
    <meta charset="UTF-8" />
    <meta name="viewport" content="width=device-width, initial-scale=1.0" />
    <title>Copper App</title>
    <link rel="stylesheet" href="/static/styles.css" />
  </head>
  <body>

    <script src="/static/index.js"></script>
  </body>
</html>
We’ll write some javascript in the static/index.js file to handle the delete request in our app as we proceed.
Our to-do app requires users to add to-dos to the database. Let’s create a new to-dos page with a simple form and a section to list all to-do items.
Navigate to the pages directory and create a file called todos.html with the following:
<div class="gr-container">
    <h2 class="heading">Todo List</h2>
    <form class="add-todo" action="/todos" method="post">
        <input type="text" name="todo">
        <button type="submit">Add Todo</button>
    </form>
    <div class="todo-list">
        <form class="todo-item" action="" method="post">
            <input type="text" name="todo">
            <button class="update" type="submit">Update Todo</button>
            <button class="delete" type="button">Remove Todo</button>
        </form>
    </div>
</div>
Styling our sample app
Navigate to web/public directory and update style.css with the following:
@import url('https://fonts.googleapis.com/css2?family=Work+Sans:ital,wght@0,700;1,400&display=swap');
html, body {
    margin: 0;
    background-color: wheat;
}
#app {
    /* background-color: whitesmoke; */
    padding: 40px 0;
    font-family: 'Work Sans', sans-serif;
    text-align: center;
    height: 100%;
    box-sizing: border-box;
}
.tagline {
    font-style: italic;
    font-weight: 400;
}
hr {
    margin: 40px auto;
    width: 60%;
    border-top: 1px solid #ddd;
}
.video {
    width: 60%;
    margin: 0 auto;
}
.todo-list {
    background-color: greenyellow;
    margin-top: 2rem;
    width: 60%;
    padding: 1.5rem;
}
.add-todo {
    width: 50%;
    display: flex;
    justify-items: center;
}
.add-todo input {
    width: 85%;
    height: 2rem;
}
.add-todo button {
    width: 15%;
    /* height: 1.5rem; */
}
.todo-item {
    display: flex;
    margin-bottom: 1rem;
}
.todo-item input {
    width: 65%;
    height: 1.6rem;
}
.update, .delete {
    width: 16%;
}
.heading {
    text-align: center;
    font-size: 2.5rem;
}
.gr-container {
    padding: 1rem;

    display: flex;
    flex-direction: column;
    align-items: center;
}
In order to view the to-dos page on the browser, we’ll update the pkg/app/router.go file as follows:
func (ro *Router) Routes() []chttp.Route {
    return []chttp.Route{
        {
            Path:    "/",
            Methods: []string{http.MethodGet},
            Handler: ro.HandleIndexPage,
        },
        {
            Path:    "/todos",
            Methods: []string{http.MethodGet},
            Handler: ro.HandleTodosPage,
        },
    }
}
func (ro *Router) HandleTodosPage(w http.ResponseWriter, r *http.Request) {
    ro.rw.WriteHTML(w, r, chttp.WriteHTMLParams{
        PageTemplate: "todos.html",
    })
}
Here, we update our app route with the "/todos" path and also create the HandleTodosPage handler, which serves todos.html page when a user hit the "/todos" route in the browser.
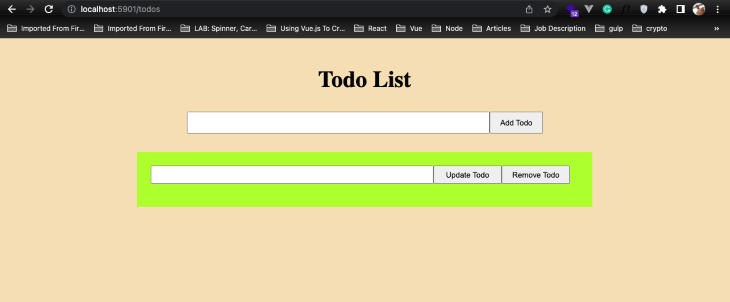
Restart the app server and open http://localhost:5901/todos to see the to-dos page.
Here is how the to-dos page should look:

Implement a feature to create now to-do items
To implement the create feature, we’d set up a storage layer that can save the todo items into our database.
Let’s run the following command to create the pkg/todos package as well as a pkg/todos/queries.go that we can use to implement our SQL queries:
copper scaffold:pkg todos
copper scaffold:queries todos
Next, we’ll create the Todo model and its database migration. Open up pkg/todos/models.go and define the Todo model:
type Todo struct {
    Name string
    Rank int64 `gorm:"-"`
}
Then, open up migrations/0001_initial.sql and define its database schema:
-- +migrate Up
CREATE TABLE todos (
    name text
);
-- +migrate Down
DROP TABLE todos;
In your terminal, run copper migrate to create the table.
Now that we have a Todo model and a todos table in our database, we can write our database queries in the pkg/posts/queries.go file.
Let’s add a SaveTodo method that can be used to insert new to-dos into the todos table:
import (
    "context"
    ...
)
func (q *Queries) SaveTodo(ctx context.Context, todo *Todo) error {
    const query = `
    INSERT INTO todos (name)
    VALUES (?)`
    _, err := q.querier.Exec(ctx, query,
        todo.Name,
    )
    return err
}
Here, we use an SQL query to insert a new to-do into the DB. The question mark is a placeholder for a value in the query. The q.querier.Exec function takes a context object, a query, and as many arguments you want to pass into the placeholders. Then, the values in the placeholders are inserted in the order they appear in the q.querier.Exec function.
Now, let’s head over to pkg/app/router.go and use the SaveTodo method to handle form submissions for creating new to-dos.
Create a new route handler, HandleSubmitPost, to handle submissions for creating new to-dos as follows:
func (ro *Router) HandleCreateTodos(w http.ResponseWriter, r *http.Request) {
    var (
        todo = strings.TrimSpace(r.PostFormValue(("todo")))
    )
    if todo == "" {
        ro.rw.WriteHTMLError(w, r, cerrors.New(nil, "unable to create todos: todo cannot be empty", map[string]interface{}{
            "form": r.Form,
        }))
        return
    }
    newtodo := todos.Todo{Name: todo}
    err := ro.todos.SaveTodo(r.Context(), &newtodo)
    if err != nil {
        ro.logger.Error("an error occured while saving todo", err)
        ro.rw.WriteHTMLError(w, r, cerrors.New(nil, "unable to create todos", map[string]interface{}{
            "form": r.Form,
        }))
        return
    }
    http.Redirect(w, r, "/todos", http.StatusSeeOther)
}
This function creates a new to-do item. First. we get the to-do value from the form and trim any white space the user may have added. Then, we check if the to-do is an empty string, in which case we throw an error. Next, we create a new to-do object and call the ro.todos.SaveTodo function to save it into the database. If there was an error while saving the to-do, we throw an error. Finally, we redirect to the to-dos page.
Update the pkg/app/router.go file with the HandleCreateTodos as follows:
import (
    "strings"
    "github.com/gocopper/copper/cerrors"
    "github.com/gocopper/copper/chttp"
    "github.com/gocopper/copper/clogger"
    "net/http"
    "github.com/emmanuelhashy/todolist/pkg/todos"
)

type NewRouterParams struct {
    Todos  *todos.Queries
    RW     *chttp.ReaderWriter
    Logger clogger.Logger
}

func NewRouter(p NewRouterParams) *Router {
    return &Router{
        rw:     p.RW,
        logger: p.Logger,
        todos:  p.Todos,
    }
}

type Router struct {
    rw     *chttp.ReaderWriter
    logger clogger.Logger
    todos  *todos.Queries
}

func (ro *Router) Routes() []chttp.Route {
    return []chttp.Route{
        {
            Path:    "/",
            Methods: []string{http.MethodGet},
            Handler: ro.HandleIndexPage,
        },
        {
            Path:    "/todos",
            Methods: []string{http.MethodGet},
            Handler: ro.HandleTodosPage,
        },
        {
            Path:    "/todos",
            Methods: []string{http.MethodPost},
            Handler: ro.HandleCreateTodos,
        },
    }
}
Now, the create feature for our todo app should work! We can add a new to-do into the todos table.
Add a read feature to see all the to-do items
To implement the read feature, we’d create a new SQL query to return a list of all todos that exist in the database and work our way up from there.
Update pkg/todos/queries.go with the following method to list all to-dos:
func (q *Queries) ListTodos(ctx context.Context) ([]Todo, error) {
    const query = "SELECT * FROM todos"
    var (
        todos []Todo
        err   = q.querier.Select(ctx, &todos, query)
    )
    return todos, err
}
Here, we use an SQL query to get all the to-dos stored in the database. Since we are not updating a value in the DB, we use the q.querier.Select method as opposed to q.querier.Exec.
Next, update the HandleTodosPage method in pkg/app/router.go to query all todos and pass it to the HTML template:
func (ro *Router) HandleTodosPage(w http.ResponseWriter, r *http.Request) {
    todos, err := ro.todos.ListTodos(r.Context())
    if err != nil {
        ro.logger.Error("an error occured while fetching todos", err)
        ro.rw.WriteHTMLError(w, r, cerrors.New(nil, "unable to fetch todos", map[string]interface{}{
            "form": r.Form,
        }))
    }
    for i := range todos {
        todos[i].Rank = int64(i + 1)
    }
    ro.rw.WriteHTML(w, r, chttp.WriteHTMLParams{
        PageTemplate: "todos.html",
        Data:         todos,
    })
}
To make use of the data and render a list of all to-dos, update web/src/pages/todos.html as follows:
<div class="gr-container">
    <h2 class="heading">Todo List</h2>
    <form class="add-todo" action="/todos" method="post">
        <input type="text" name="todo">
        <button type="submit">Add Todo</button>
    </form>
    <div class="todo-list">

        <form class="todo-item" action="/" method="post">
            .
            <input type="text" name="todo" value="">
            <button class="update" type="submit">Update Todo</button>
            <button class="delete" type="button">Remove Todo</button>
        </form>


    </div>
</div>
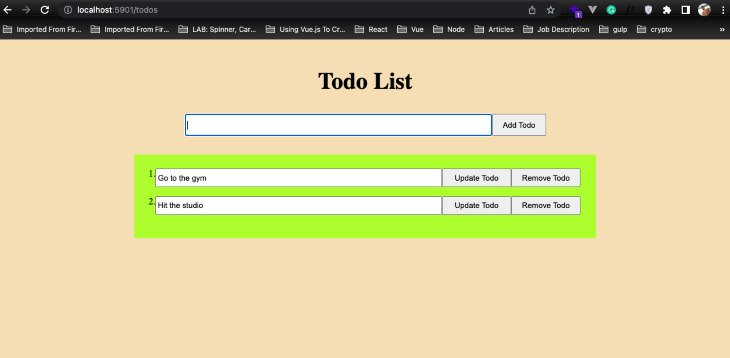
Now, you should see a list of all the to-dos in the database in the to-dos page.

Update to-do items
To implement the update feature, we’ll create a new SQL query to update to-dos that exist in the database.
Update pkg/todos/queries.go with the following method:
func (q *Queries) UpdateTodo(ctx context.Context, oldName string, todo *Todo) error {
    const query = `
    UPDATE todos SET name=(?) WHERE name=(?)`
    _, err := q.querier.Exec(ctx, query,
        todo.Name,
        oldName,
    )
    return err
}
Here, we use an SQL query to update a to-do value in the DB. We pass in new and old values respectively to the placeholder in the SQL query.
Next, we’ll create a HandleUpdateTodos method in pkg/app/router.go to update existing todos:
func (ro *Router) HandleUpdateTodos(w http.ResponseWriter, r *http.Request) {
    var (
        todo    = strings.TrimSpace(r.PostFormValue("todo"))
        oldName = chttp.URLParams(r)["todo"]
    )
    if todo == "" {
        ro.rw.WriteHTMLError(w, r, cerrors.New(nil, "unable to update todos: todo cannot be empty", map[string]interface{}{
            "form": r.Form,
        }))
        return
    }
    newtodo := todos.Todo{Name: todo}
    ro.logger.WithTags(map[string]interface{}{
        "oldname": oldName,
        "newname": newtodo.Name,
    }).Info("Todo updated")
    err := ro.todos.UpdateTodo(r.Context(), oldName, &newtodo)
    if err != nil {
        ro.logger.Error("an error occured while saving todo", err)
        ro.rw.WriteHTMLError(w, r, cerrors.New(nil, "unable to update todos", map[string]interface{}{
            "form": r.Form,
        }))
        return
    }
    http.Redirect(w, r, "/todos", http.StatusSeeOther)
}
Then update Routes with the HandleUpdateTodos method as follows:
func (ro *Router) Routes() []chttp.Route {
    return []chttp.Route{
        ...
        {
            Path:    "/{todo}",
            Methods: []string{http.MethodPost},
            Handler: ro.HandleUpdateTodos,
        },
    }
}
Delete to-dos
To implement the delete feature, we’ll create a new SQL query to delete to-dos that exist in the database.
Update pkg/todos/queries.go with the following method:
func (q *Queries) DeleteTodo(ctx context.Context, todo *Todo) error {
    const query = `
    DELETE from todos WHERE name=(?)`
    _, err := q.querier.Exec(ctx, query,
        todo.Name,
    )
    return err
}
Next, we’ll create HandleDeleteTodos method in pkg/app/router.go to delete existing to-dos:
type error struct {
    error string
}

func (ro *Router) HandleDeleteTodos(w http.ResponseWriter, r *http.Request) {
    var (
        todo = strings.TrimSpace(chttp.URLParams(r)["todo"])
    )
    if todo == "" {
        deleteError := error{error: "Unable to delete todo"}
        ro.rw.WriteJSON(w, chttp.WriteJSONParams{StatusCode: 500, Data: deleteError})
        return
    }
    newtodo := todos.Todo{Name: todo}
    err := ro.todos.DeleteTodo(r.Context(), &newtodo)
    if err != nil {
        ro.logger.Error("an error occured while deleting todo", err)
        deleteError := error{error: "Unable to delete todo"}
        ro.rw.WriteJSON(w, chttp.WriteJSONParams{StatusCode: 500, Data: deleteError})
        return
    }
    http.Redirect(w, r, "/todos", http.StatusSeeOther)
}
Then update Routes with the HandleDeleteTodos method as follows:
func (ro *Router) Routes() []chttp.Route {
    return []chttp.Route{
        ...
        {
            Path:    "/{todo}",
            Methods: []string{http.MethodDelete},
            Handler: ro.HandleDeleteTodos,
        },
    }
}
To wrap up the delete feature of our to-do app, we’ll create an index.js file in web/public directory and add the following function:
function deleteTodo(name){
    fetch(`/${name}`, {method: "Delete"}).then(res =>{
        if (res.status == 200){
            window.location.pathname = "/todos"
        }
    }).catch(err => {
        alert("An error occured while deleting the todo", err.message)
    })
}
Then, update the remove to-do button in pages/todos.html as follows:
<button class="delete" type="button" onclick = "deleteTodo('')" >Remove Todo</button>
We have successfully built a web app in Go using gocopper.
If you followed the above tutorial correctly, your to-do app should be able to perform basic create, read, update, and delete operations.
Here is the link to the final code repository.
Conclusion
This tutorial has finally come to an end. We looked at how to create a web application in Go using Copper, and we used this to build a to-do application successfully.
Copper makes use of google/wire to enable on-the-fly dependency injection. It comes with the clogger package, which enables structured logging in both development and production environments. Also, it works closely with the cerrors package to help add structure and context to your errors, resulting in significantly improved error logs.
I can’t wait to see what you build next because there are so many ways to make this better. You may follow me @5x_dev on Twitter.
The post Build a web app in Go with Copper appeared first on LogRocket Blog.
from LogRocket Blog https://ift.tt/frW8R4G
Gain $200 in a week
via Read more


