Storing, building, and deploying code using cloud services has become ubiquitous. You have many options to choose from. The options become much more limited if you want to build and deploy from your own server. Sure, you can install and configure multiple tools yourself, but it can be difficult to recreate those rich developer ecosystems provided by GitHub, GitLab, and other popular cloud service providers. This is where OneDev can help.
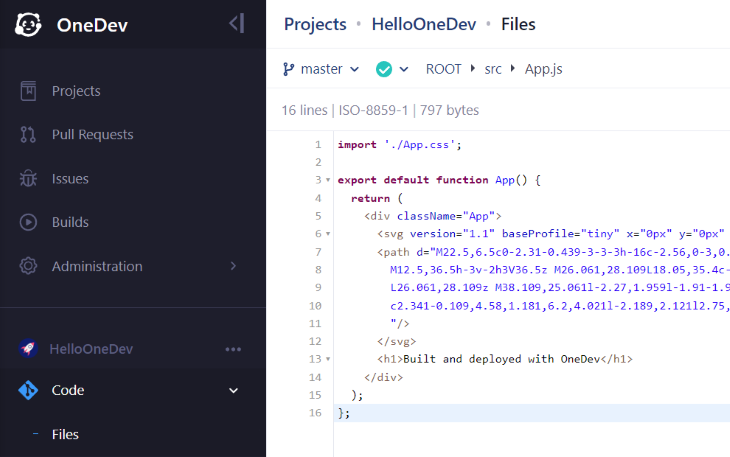
OneDev is an all-in-one, open source DevOps system that you can host on your own server. It includes some of the most common capabilities that developers have become accustomed to on popular DevOps platforms including:
- Git-based source control including pull requests, code comparison tools, and commenting capabilities
- Issue tracking system, including boards to visualize issues
- Automated job system to run build and deployment jobs
In this article, we’ll explore OneDev from a React web developer’s perspective. We’ll set up a new OneDev instance, push React web app source code to it, and set up some build and deploy jobs to deploy to Azure App Service.
Jump ahead:
- Prerequisites
- Set up OneDev
- Create a project
- Create a sample React app
- Push your code
- Create a job to build and test your code
- Create a job to deploy your code
Prerequisites
To follow along with this tutorial, you’ll need the following:
- A system with a recent version of Docker, Node.js, and Azure CLI installed
- A free Azure account to run the deploy job
Set up OneDev
The official OneDev installation guide describes how to set up OneDev as a standalone Docker container, as a node in a Kubernetes cluster or installed directly onto a server without using container technology.
The easiest way to get started is to run OneDev as a standalone Docker container. In fact, the following Docker compose file makes it as simple as running a single command:
version: '3.8'
services:
  onedev:
    image: 1dev/server
    ports:
      - 6610:6610
      - 6611:6611
    volumes:
      # allow Docker to communicate with host
      - /var/run/docker.sock:/var/run/docker.sock
      - onedev_data:/opt/onedev
volumes:
  onedev_data:
This sample Docker compose file takes care of a few things for you:
- Exposes the required ports
- Ensures that the Docker installed within the OneDev container can communicate with the Docker installed on your local system
- Stores all OneDev data in a persistent volume called
onedev_dataso that your data is not lost when your restart the container
Save the sample Docker compose file to docker-compose.yml on your system. Then, open a new command shell in the same folder and run the following command to start the container in detached mode:
docker compose up -d
After the container starts, access OneDev in the browser at http://localhost:6610. You may need to wait a few minutes for OneDev to initialize before it loads in the browser. The first thing you will see is the Server Setup screen; it will guide you through the initial setup.
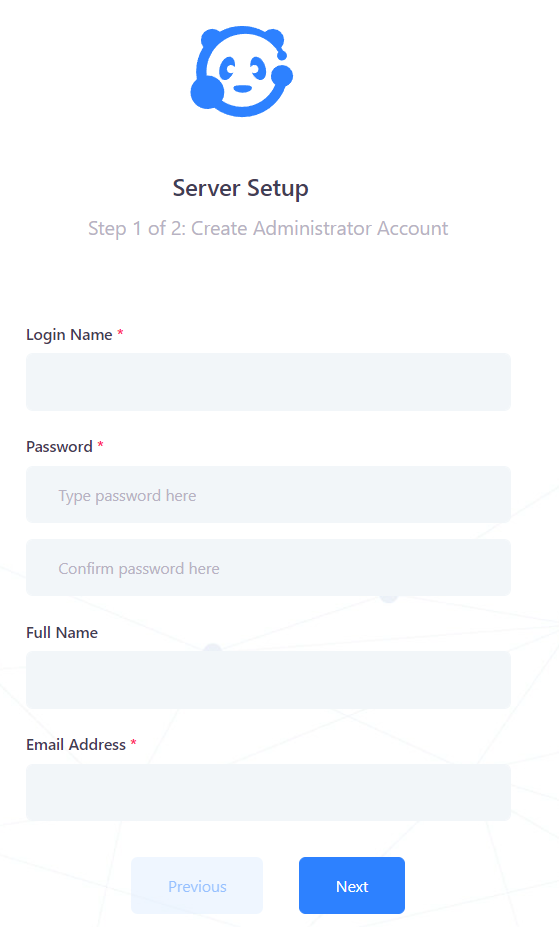
Complete the fields in the Server Setup screens. On the second screen, leave the server URL as default. OneDev will ask you to verify your email address after the server setup is complete, so be sure to use a real email address.
OneDev has its own inbuilt authentication and user store. If you were to delete the Docker container and volumes, your account and data would be lost. External authentication sources can be set up in the Administration area if you prefer not to use the inbuilt user store.
Take a few minutes to explore the OneDev user interface. On the left, you’ll find a navigation menu that provides access to most features. In the top-right, you’ll find a menu with a variety of user-specific options.
Create a project
Before you can start working in OneDev, you’ll need to create a project. A project contains a Git repository, an issue tracker, and one or more automation (build) jobs.
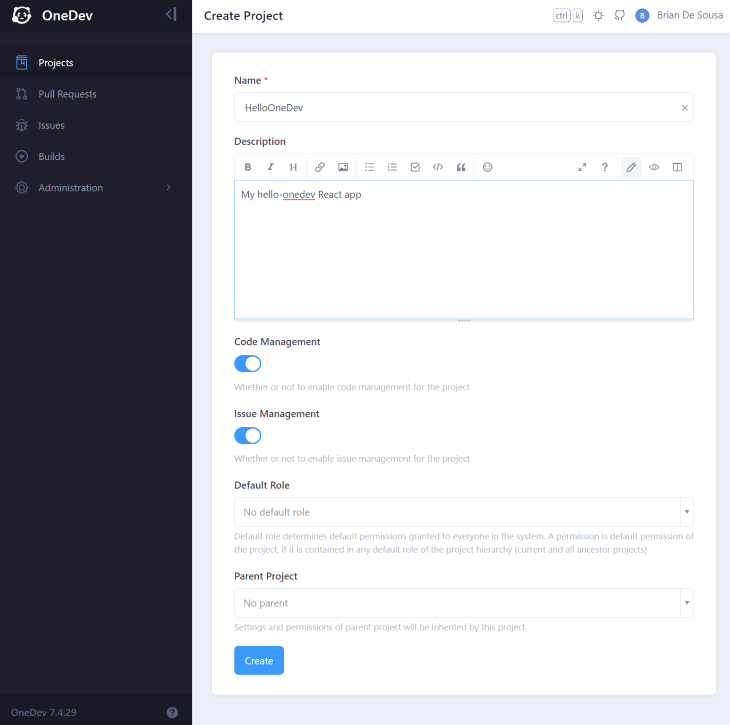
To create a new project, click Projects in the left navigation menu and then click the + (add) button:

Specify a Name and Description for your project. Leave all other options as default:
Now that you have a project to work in, you’ll need some code to work with.
Create a sample React app
In order to keep things simple, use create-react-app to generate a new sample React web app:
npx create-react-app hello-onedev
To make things a little more interesting, replace the contents of src/App.js with this code:
import './App.css';

export default function App() {
  return (
    <div className="App">
      <svg version="1.1" baseProfile="tiny" x="0px" y="0px" width="200px" height="200px" viewBox="-0.5 0.5 42 42">
      <path d="M22.5,6.5c0-2.31-0.439-3-3-3h-16c-2.56,0-3,0.69-3,3v29c0,2.5,0.62,3,3,3h10v-2l9-8V6.5z M5.5,8.5h12v24h-12V8.5z
        M12.5,36.5h-3v-2h3V36.5z M26.061,28.109L18.05,35.4c-1.04,1.108-2.7,2.01-1.16,3.898c1.28,1.57,2.969,0.12,3.93-0.898l7.99-7.41
        L26.061,28.109z M38.109,25.061l-2.27,1.959l-1.91-1.97L34.8,22.9l-2.14-2.682c0,0-4.16-3.31-9.36-0.05
        c2.341-0.109,4.58,1.181,6.2,4.021l-2.189,2.121l2.75,2.629l1.799-1.619l2.201,1.93L32.3,30.93l2.14,2.16l5.761-5.58L38.109,25.061z
        "/>
      </svg>
      <h1>Built and deployed with OneDev</h1>
    </div>
  );
};
Delete the src/App.test.js file to avoid test failures.
The create-react-app command initialized a local Git repository. Don’t forget to commit the changes you just made:
git add *
git commit -m "make things interesting"
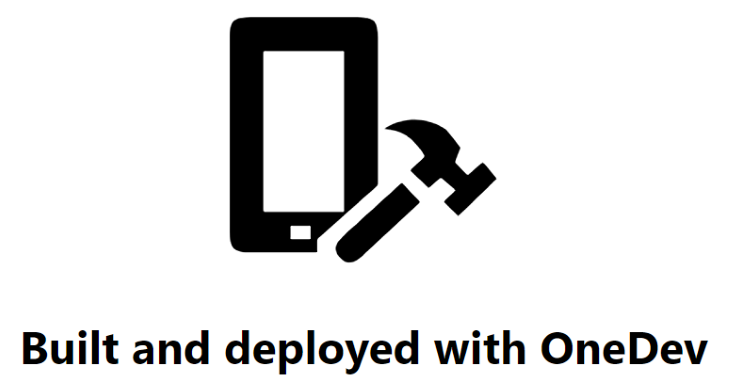
Run your app with npm start to confirm that it is working as expected. You should see the below icon and message:
Push your code
OneDev includes a fully featured Git server. To push code to it, you’ll need to add OneDev as a remote to your local repository.
Navigate to the project you created previously. Click on pushing an existing repository and run the commands shown against your local repository. When prompted for credentials on git push, use the OneDev account you just created.
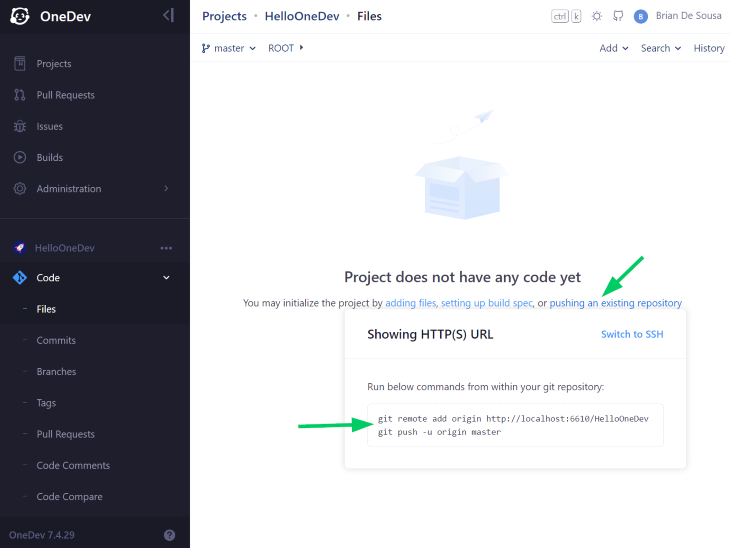
Reload the page to see your code in OneDev. Although your code is now in the OneDev container, you may still want to consider pushing it to an alternate, remote location for backup purposes. For example, you could add a second remote Git repository to push your code to GitHub.
Create a job to build and test your code
OneDev has an inbuilt automation job engine that allows you to define jobs and chain them together. Jobs are defined in a build spec file, named .onedev-buildspec.yml, that is stored in the root of the Git repository. You can edit this file as code, but it is much easier to use the inbuilt build spec editor.
If your Git repository does not contain a build spec file, OneDev will prompt you to create one. To do so, click on adding .onedev-buildspec.yml:

Click the + (add) button on the Jobs tab to add a new job. Name the job Build.
Jobs contain a sequence of steps that are executed in a job workspace. Add the following three steps to check out the code, build and test it, and publish a build artifact so that it can be deployed by a subsequent deploy job.
- Add a Checkout Code step named
checkout. Leave all other options as default:
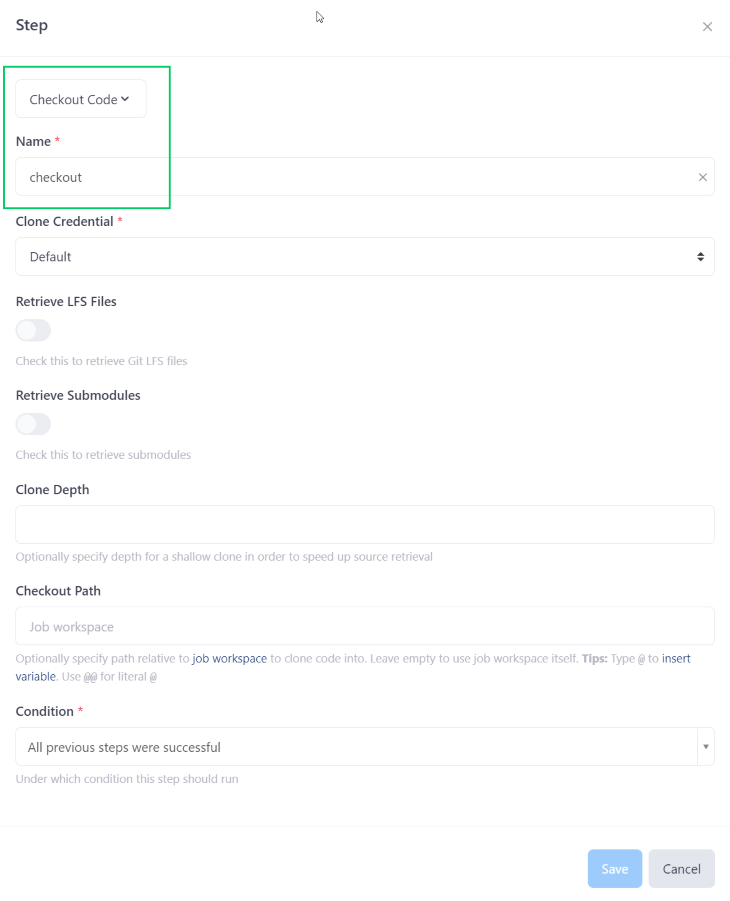
- Add an Execute Commands step named
build & test. Set the image property tonode:current-alpineand the commands to the following:
npm install
export CI=TRUE
npx react-scripts build
npx react-scripts test --passWithNoTests
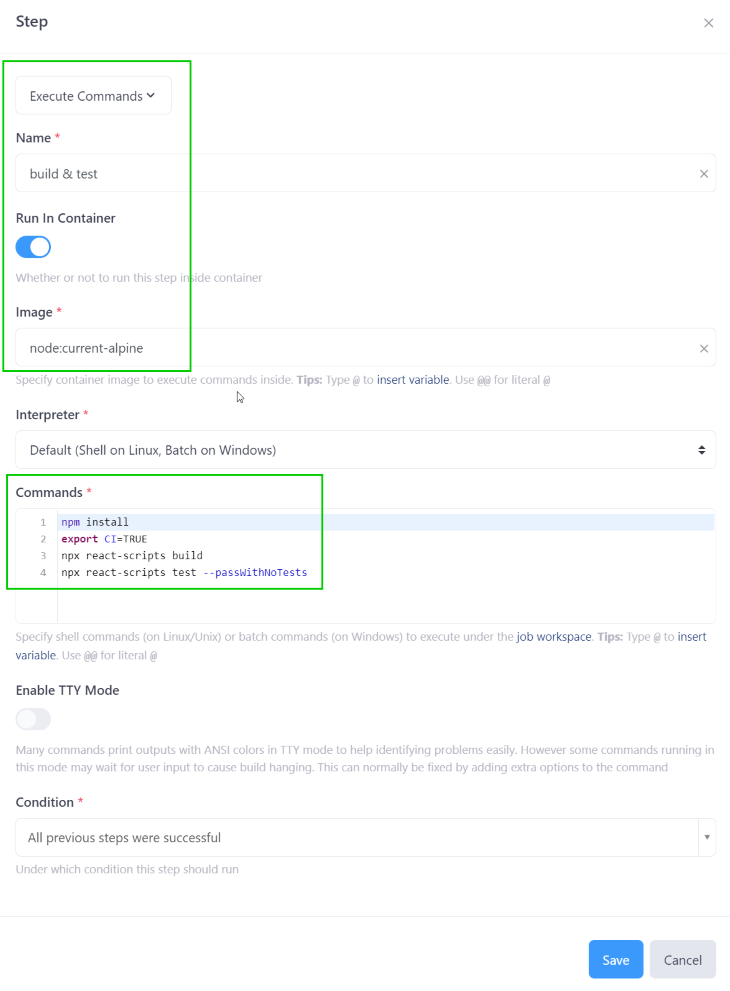
This step will create a new Docker container based on the Node.js image and execute the build within the container.
- Add a Publish Artifacts step named
publish. Set the Artifacts property tobuild/(this is where the build output from the previous step is located). These artifacts will be available to future jobs in the build spec:
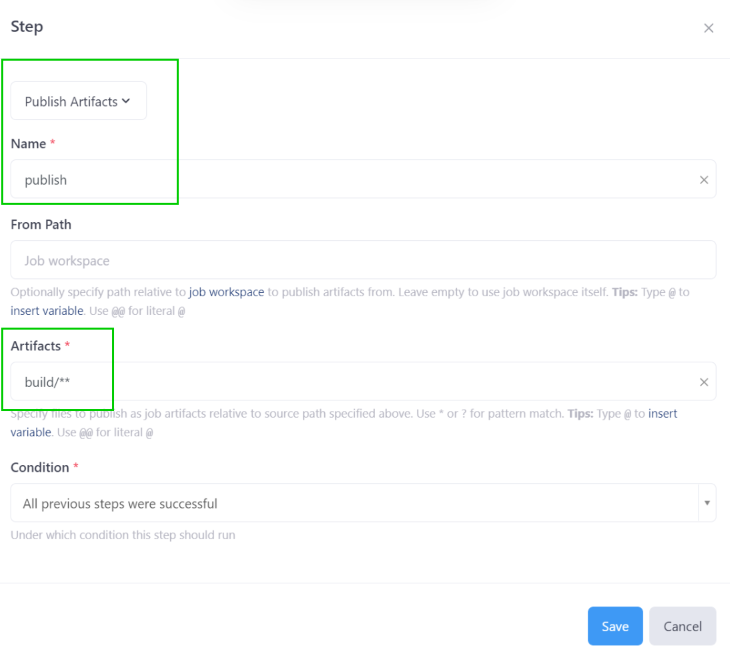
Now that you have specified all the steps, you’ll need to tell OneDev when this job should run.
Under the Params & Triggers section, add a new branch update trigger. Leave all options as default. This job will trigger every time a commit is pushed to any branch.
Your job should look like this so far:
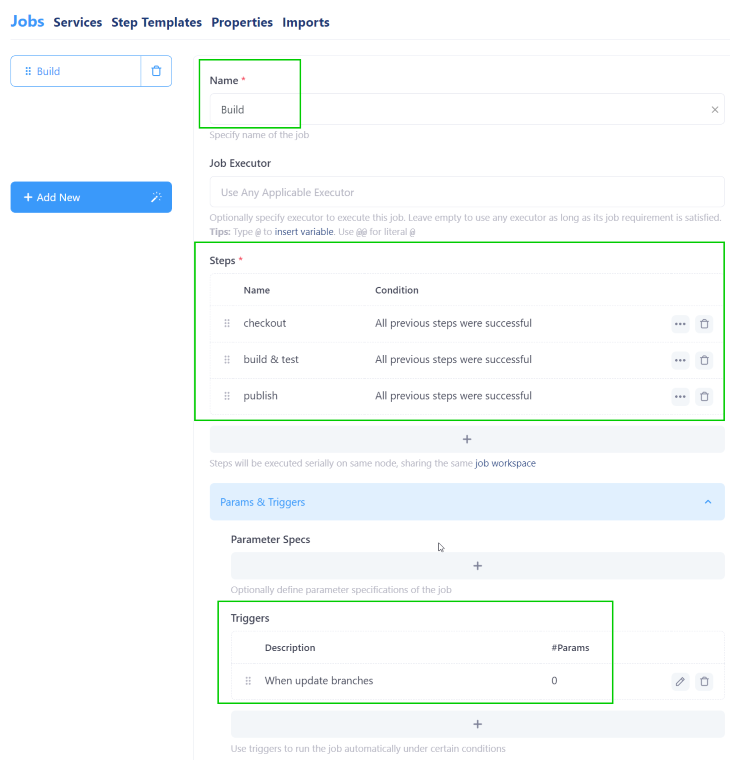
Click the Save button to commit all your configuration to build spec file on the currently selected branch. After committing, the job will start running.
After a few moments, the job should complete successfully:

Click the green checkmark to view the build. Then click the Artifacts tab to view the published artifacts:
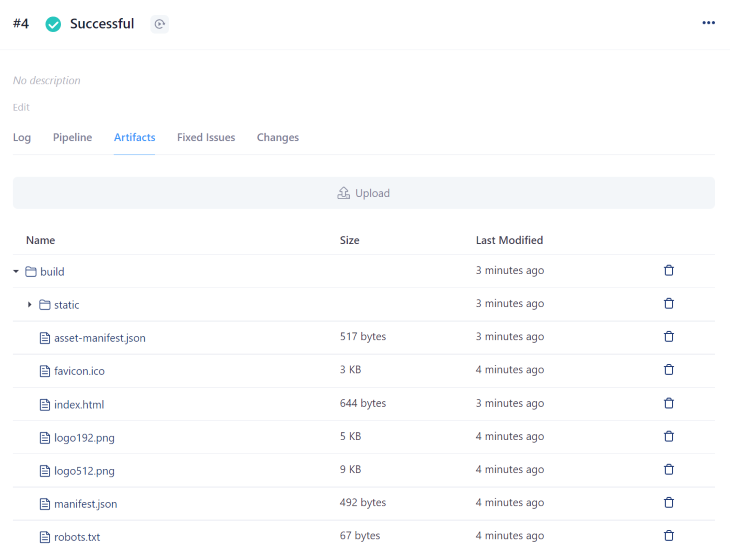
Great! You have a successful build job running in OneDev. Let’s take this a step further and set up a deploy job.
Create a job to deploy your code
Next, we’ll demonstrate how to deploy your app to Azure using the Azure CLI; we’ll provide all required Azure CLI commands and scripts.
N.B., Azure resources that are deployed by these scripts are free but, as noted previously, you will need to have a free Azure account
The deployment job will take the artifacts generated from the build job and deploy them to the Azure App Service using the Azure CLI. You will create and use a service principal for your deploy job to log in to your Azure account.
From a security perspective, we’re following the principle of least privilege access. You can restrict permissions on the service principal to only what your deploy job absolutely requires.
Run the following commands in a Bash window to create a new service principal. You will need to specify your own Azure subscription ID. This command requires a local installation of the Azure CLI. Alternatively, follow these instructions to create a service principal in the Azure portal:
# log in to your Azure account
az login

# set the ID of the Azure subscription to use
SUBSCRIPTION_ID="a123b456-7cde-8fgh-901234i5678j"

# create the service principal
MSYS_NO_PATHCONV=1 az ad sp create-for-rbac -n onedev-azure-cd --role Contributor --scopes /subscriptions/$SUBSCRIPTION_ID
Copy the value of appId, password, and tenant from the command output. You will need these shortly.
Navigate to Code > Files in the left navigation. Open .onedev-buildspec.yml and click the Edit button to open the build spec editor:

Use the + (add) button to add a new job named Deploy. Then, add a step to the job with the following settings:
- Set the step Type to
Execute Command - Set the step Name to
deploy to Azure - Select the Run in Container option and set the Image to
mcr.microsoft.com/azure-cli; this step will execute in a container that has the Microsoft Azure CLI installed - Add the below script to the Commands field, but make the following changes to the script:
-
- On lines 2-4, specify the details of the service principal you previously created
- One line 7, specify two or three characters to be used to make your Azure resource names globally unique
# fill in your service principal details:
APPID='YOUR_APP_ID'
PASSWORD='YOUR_PASSWORD'
TENANT='YOUR_TENANT_ID'

# Azure resource configuration
UNIQUE_SUFFIX='abc'
RESOURCEGROUPNAME='onedev'
LOCATION='eastus'
APPSERVICEPLANNAME="onedev-react-asp-$UNIQUE_SUFFIX"
APPNAME="onedev-react-app-$UNIQUE_SUFFIX"

# Login with service principal
az login --service-principal -u $APPID -p $PASSWORD --tenant $TENANT

# Create resource group if it doesn't exist
if [ $(az group exists --name $RESOURCEGROUPNAME) = false ]; then
    az group create --name $RESOURCEGROUPNAME --location $LOCATION
else
        echo "Resource group exists already: $RESOURCEGROUPNAME"
fi

# Create app service if it doesn't exist
appServicePlans=$(az appservice plan list -g $RESOURCEGROUPNAME --query "[?name=='$APPSERVICEPLANNAME']")
if [ $appServicePlans = "[]" ]; then
        az appservice plan create -n $APPSERVICEPLANNAME -g $RESOURCEGROUPNAME --sku F1
else
         echo "App service plan exists already: $APPSERVICEPLANNAME"
fi

# Create app if it doesn't exist
webapps=$(az webapp list -g $RESOURCEGROUPNAME --query "[?name=='$APPNAME']")
if [ $webapps = "[]" ]; then
         az webapp create -n $APPNAME -p $APPSERVICEPLANNAME -g $RESOURCEGROUPNAME
else
        echo "App service exists already: $APPNAME"
fi

# Deploy React app
(cd ./build && zip -r ../app.zip .)
az webapp deploy -g $RESOURCEGROUPNAME -n $APPNAME --src-path app.zip
This script will log into Azure with your service principal (line 14), create all required resources (lines 17-37), create a zip archive containing your React build artifacts (line 40), and deploy it (line 41)
-
- Add a new Job Dependency on the Build job. Leave all other fields as default. Leave the default value for the Artifacts to Retrieve property to ensure that all artifacts published in the Build job are available to this job:
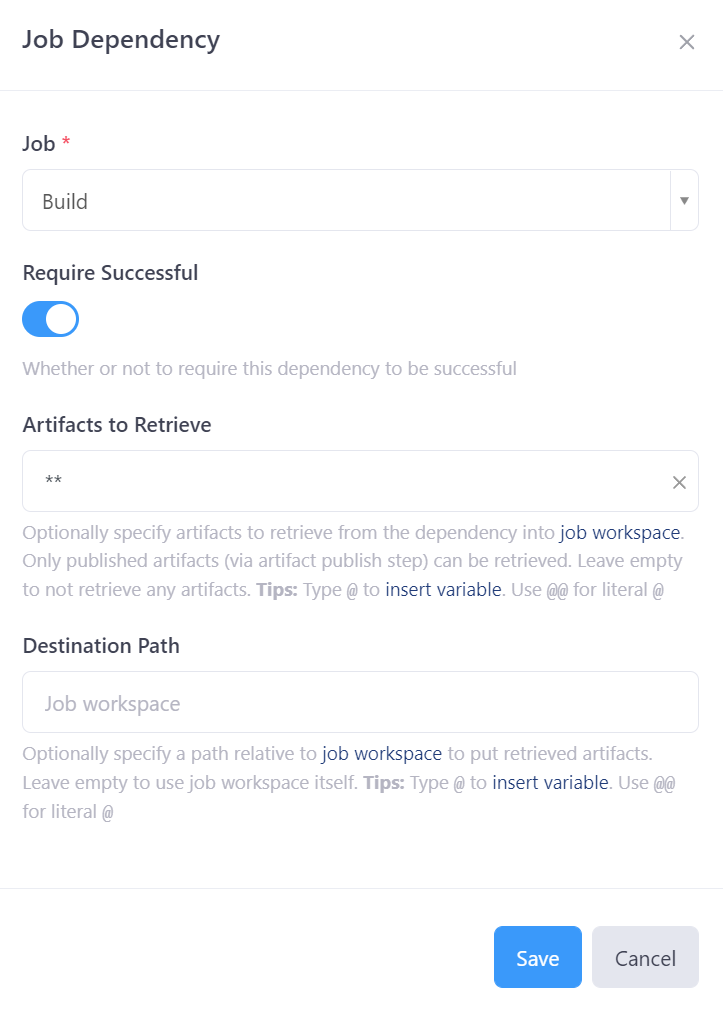
Finally, you can leave all other options as default.
Your job should look like this:
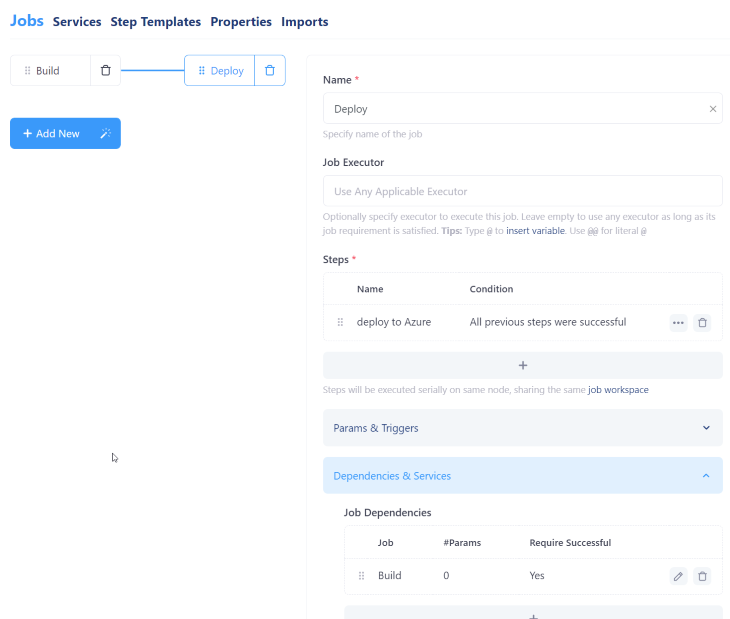
Click the Save button to commit changes to the build spec file.
Since you didn’t specify a trigger on the Deploy job, it won’t run yet. To fix that, re-open the build spec editor and click the Build job to edit it.
Under the More Settings section, add a new Post Build Action to run the Deploy job, but with a Condition to limit it to changes committed to the main branch of your Git repository only. The Post Build Action should look like this:
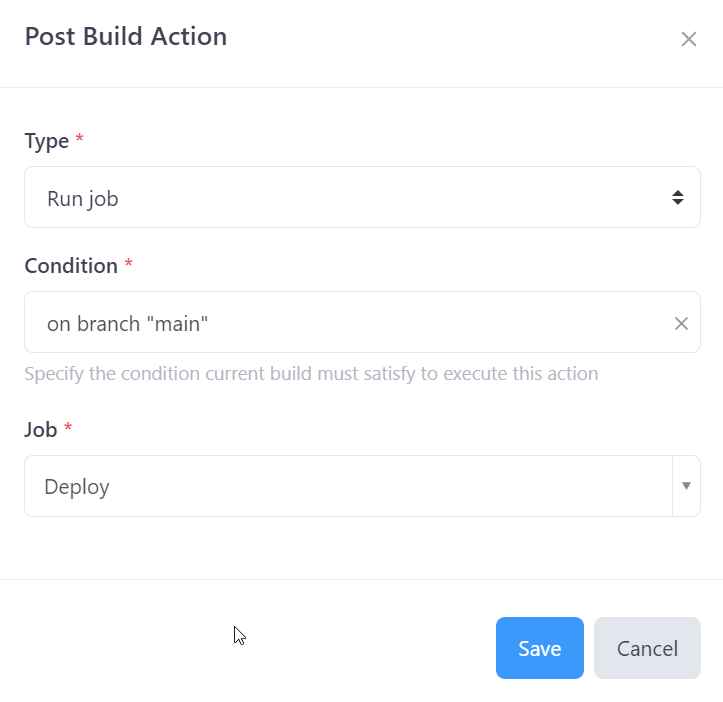
Save and commit your changes to the build spec file once more.
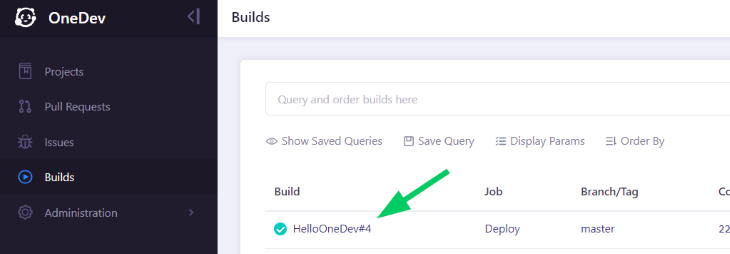
After a few moments, your build and deploy jobs should complete successfully. To view job output, click Builds in the left navigation. To view the output of the Deploy job, click on its build name, in this case, HelloOneDev#4, under the Build column:
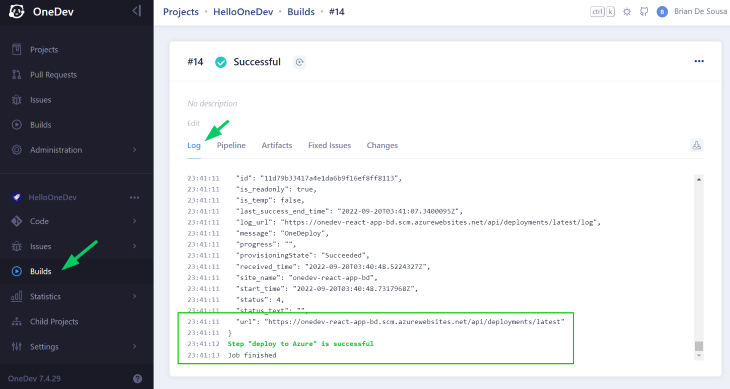
Then, scroll down to the bottom of the Log tab to see output that indicates the Azure deployment was successful:
Now that your React app is deployed to Azure App Service, you can view it in the browser. The default website URL will be https://APPNAME.azurewebsites.net, where APPNAME is the value from line 11 of the Azure CLI script used in the Deploy job.
When you are ready to clean up Azure resources created by the Deploy job, run the following Azure CLI commands in a Bash window:
az group delete -g $RESOURCEGROUPNAME --yes
az ad sp delete --id $APPID
What’s next?
There are plenty of improvements that could be made to the build and deploy jobs. For example, hardcoding the Azure service principal password in the Deploy job means it will be stored as plain text in the build spec file in your GitHub repo. You should create a Job Secret instead to store the password safely in project settings and reference it in the build spec file.
In this article, we set up a simple build, test, and deploy workflow in OneDev for a React web app, but there are so many more possibilities. You can combine various types of steps and jobs together to form more complex CI/CD workflows.
Be sure to check out OneDev’s official documentation on GitHub or the company website for more inspiration.
The post Build and deploy a React web app from OneDev appeared first on LogRocket Blog.
from LogRocket Blog https://ift.tt/PZgIJWF
Gain $200 in a week
via Read more


