


When it comes to building web applications, authentication can be a major headache. Developers need to decide what security pattern they want to implement, and do so the right way.
Magic, formerly Fortmatic, which was known for its quick, seamless, one-way integration for web authentication, is now a major player in the blockchain ecosystem thanks to its Magic Auth product.
In this tutorial, we’ll demonstrate how to use Magic with Ethereum, discuss setting up a smart contract, and learn how to authenticate users using Magic on the Ethereum blockchain.
You can find a link to the public repo that contains the project we created in this article. We’ll cover the following:
- What is the blockchain?
- What is Magic and Magic Auth?
- What is web3.js?
- Setting up Magic and web3.js
- Writing our smart contract
- Compile the smart contract
- Authenticating users with Magic Auth
- Writing to the blockchain
Let’s get started!
What is the blockchain?
The blockchain is a buzz word that has stirred up the internet in the last five years, but simply put, it is a distributed database that is shared among the nodes of a computer network, storing information electronically in digital format. The blockchain has been widely adopted because it guarantees the truthfulness and security of a record of data.
Blockchains are best known for their crucial role in cryptocurrency systems, where they maintain a secure and decentralized record of transactions.
Ethereum is a popular, decentralized open source blockchain with smart contract functionality. In this article, we’ll use Ethereum as the blockchain we interact with.
What is Magic and Magic Auth?
Magic, originally Fortmatic, is widely known for providing a seamless way to integrate authentication into your web applications. Magic is an SDK that enables passwordless authentication and can be integrated into your app with just a few lines of codes.
Magic Auth, which we‘ll use in this article, is an SDK that, when integrated into your application, enables passwordless Web2 and Web3 onboarding and authentication using magic links. At the time of writing, Magic Auth supports over 20 blockchains and can be implemented with just a few lines of code.
What is web3.js?
web3.js is a collection of libraries that allow you to interact with a local or remote Ethereum node using HTTP, IPC, or WebSocket. In summary, Web3.js is a library that enables us to interact with the Ethereum blockchain using JavaScript.
Setting up Magic and Web3.js
To get started using Magic in the Ethereum blockchain, we need to add some configurations and setup.
First, create a new directory to house our project:
mkdir magic-blockchain && cd magic-blockchain
Next, initialize a Node.js project:
npm init -y
Now, we’ll install the web3.js library and the Magic SDK:
npm install --save web3 magic-sdk@1.0.1
Writing our smart contract
We need to create a smart contract that we can later deploy to the Ethereum blockchain. Smart contracts are programs stored on a blockchain that run when predetermined conditions are met.
We will create a basic “Hello, World!” smart contract. Create a new file called helloworld.sol with the following code:
// SPDX-License-Identifier: MIT

pragma solidity ^0.8.9;

contract helloworld {

  string public message = "Hello World";

  function update(string memory newMessage) public {
    message = newMessage;
  }

}
Compile the smart contract
As stated earlier, we’ll need to deploy our smart contract to the Ethereum blockchain. To do so, we’ll need to compile it to a form that we can execute within the blockchain.
We’ll use the code below to help us compile our smart contract by getting the Abi and bytecode we need:
npm i solc@0.8.9
Create a file named compile.js and add the code below to it:
const path  = require('path');
const fs = require('fs');
const  solc = require('solc')
const helloWorldPath = path.resolve(__dirname, '' , 'helloworld.sol');
const file = fs.readFileSync(helloWorldPath).toString();
// Input structure for solidity compiler
var input = {
    language: "Solidity",
    sources: {
      "helloworld.sol": {
        content: file,
      },
    },

    settings: {
      outputSelection: {
        "*": {
          "*": ["*"],
        },
      },
    },
  };
  const output = JSON.parse(solc.compile(JSON.stringify(input)));
  if(output.errors) {
      output.errors.forEach(err => {
          console.log(err.formattedMessage);
      });
  } else {
      const bytecode = output.contracts['helloworld.sol'].helloworld.evm.bytecode.object;
      const abi = output.contracts['helloworld.sol'].helloworld.abi;
      console.log(`bytecode: ${bytecode}`);
      console.log(`abi: ${JSON.stringify(abi, null, 2)}`);
  }
Next, we compile the contract to get the abi and bytecode we need. Run node compile.js and copy the output bytecode and abi to store them somewhere safe.
For the contract deployment, I will use the address of the contract I already deployed.
Authenticating users with Magic Auth
As stated earlier, Magic Auth creates an Ethereum public address for all authenticated users, which we can then use to authenticate users.
Let’s create an index.html file that will act as a GUI for the application we‘ll develop.
To authenticate users into our app, we’ll integrate with Magic. Once the user is authenticated, we’ll be able to see the accounts and public addresses created automatically by Magic for that user on the Ethereum blockchain.
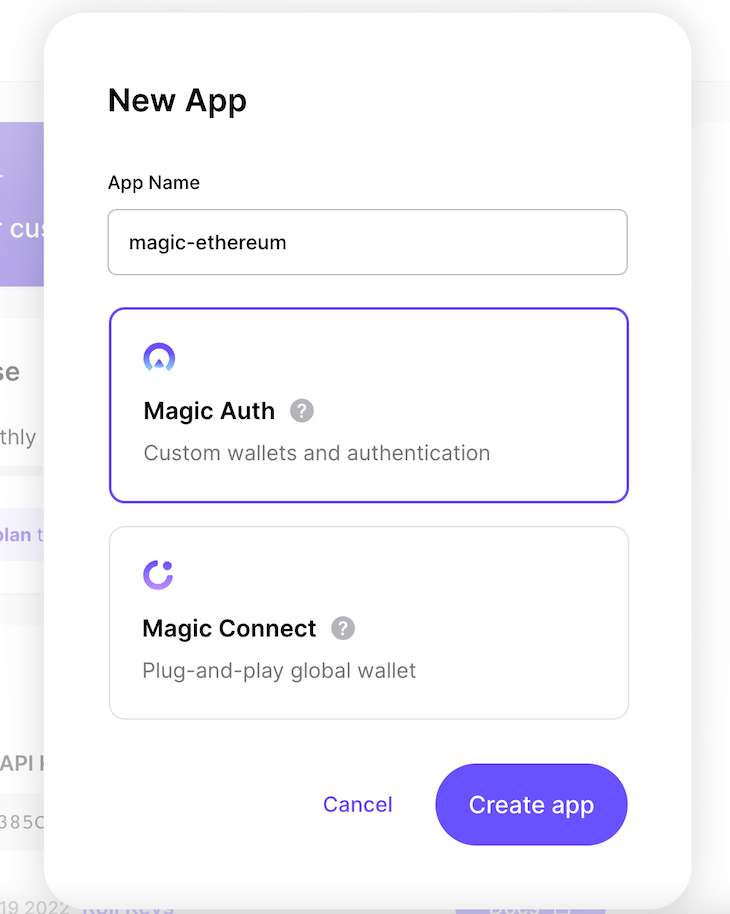
Before we can achieve this, we first need to create a Magic Auth application to get the keys we’ll need in the application.
Head over to your Magic dashboard, click on the New App button, and enter the name of the app. Then, copy the content of the PUBLISHABLE API KEY:
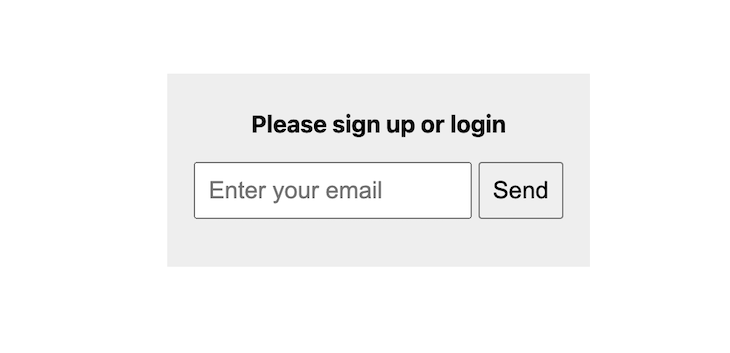
The content of the index.html file enables sign-in and logout ability, as well as the initial interaction with the Ethereum blockchain:
<!DOCTYPE html>
<html>
<head>
<title>Magic and Ethereum</title>
<meta charset="UTF-8" />
<meta name="viewport" content="width=device-width, initial-scale=1" />
<link rel="stylesheet" type="text/css" href="styles.css" />
<script src="https://auth.magic.link/sdk"></script>
<script src="https://cdn.jsdelivr.net/npm/web3@1.2.11/dist/web3.min.js"></script>
<script>
/* Configure Ethereum provider */
const magic = new Magic("pk_live_your_own_here", {
network: "rinkeby"
});
const web3 = new Web3(magic.rpcProvider);
const render = async () => {
const isLoggedIn = await magic.user.isLoggedIn();
let authHtml = `
<div class="container">
<h1>Please sign up or login</h1>
<form onsubmit="login(event)">
<input type="email" name="email" required="required" placeholder="Enter your email" />
<button type="submit">Send</button>
</form>
</div>
`;
let userHtml = "";
const target = document.querySelector("#app");
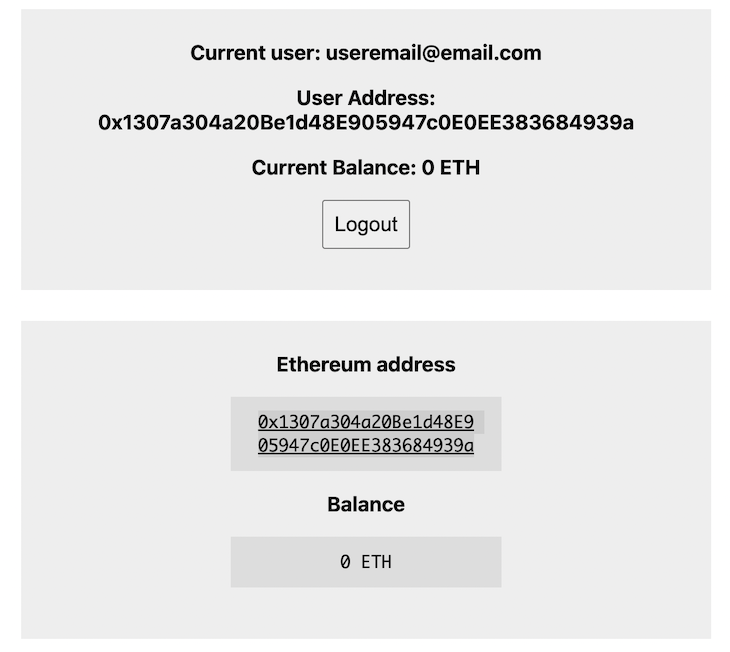
if (isLoggedIn) {
const userMetadata = await magic.user.getMetadata();
const userAddress = (await web3.eth.getAccounts())[0];
const userBalance = web3.utils.fromWei(
await web3.eth.getBalance(userAddress)
);
authHtml = `
<div class="container">
<h1>Current user: ${userMetadata.email}</h1>
<h1>User Address: ${userAddress}</h1>
<h1>Current Balance: ${userBalance} ETH</h1>
<button onclick="logout()">Logout</button>
</div>
`;
userHtml = `
<div class="container">
<h1>Ethereum address</h1>
<div class="info">
<a href="https://rinkeby.etherscan.io/address/${userAddres s}" target="_blank">${userAddress}</a>
</div>
<h1>Balance</h1>
<div class="info">${userBalance} ETH</div>
</div>
`;
}
target.innerHTML = authHtml + userHtml
};
const login = async e => {
e.preventDefault();
const email = new FormData(e.target).get("email");
if (email) {
await magic.auth.loginWithMagicLink({ email });
render();
}
};
const logout = async () => {
await magic.user.logout();
render();
};
</script>
</head>
<body onload="render()">
<div id="app">
<div class="container">Loading...</div>
</div>
</body>
</html>
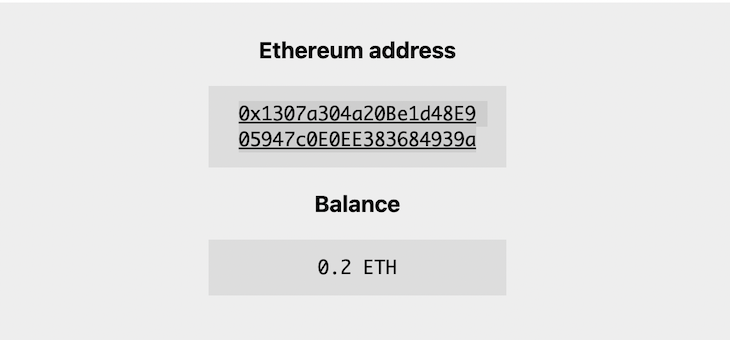
After the user authenticates, we show them a few details to ensure that everything works well:
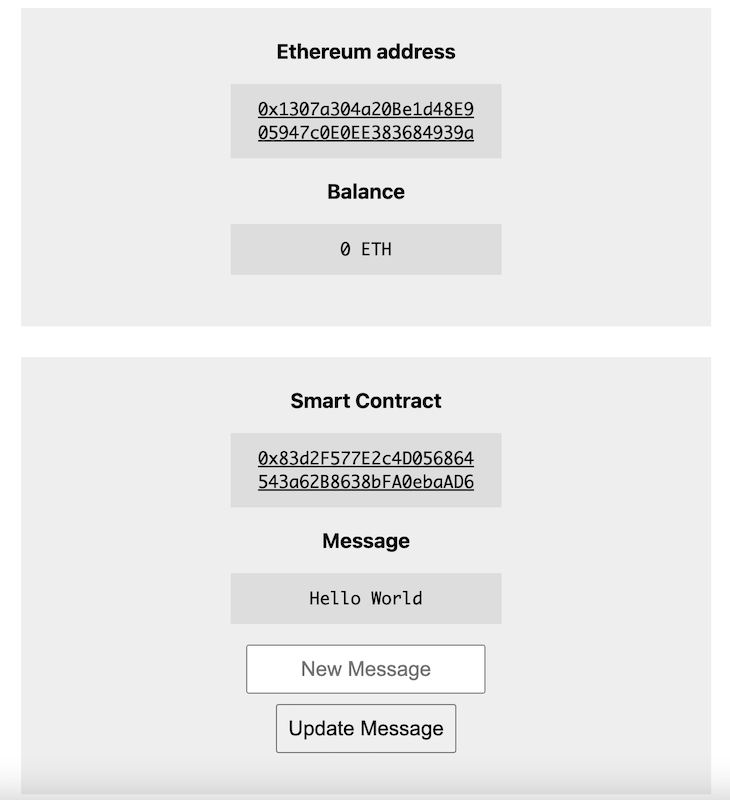
Writing to the blockchain
After the user is logged in, they can interact with the blockchain through Magic. To test this, we‘ll update the message property in the contract by writing to the blockchain.
We’ll simply call the update method in the contract and pass in the new message. Let’s update the index.html file:
const contractABI = 'theabi';
let contractAddress = "0x83d2F577E2c4D056864543a62B8638bFA0ebaAD6";

let userHtml = "";
let contractHtml = "";
if (isLoggedIn) {
let contract = new web3.eth.Contract(
            JSON.parse(contractABI),
            contractAddress
          );
          const currentMessage = await contract.methods.message().call();
          contractHtml = `
            <div class="container">
              <h1>Smart Contract</h1>
              <div class="info">
                <a href="https://rinkeby.etherscan.io/address/${contractAddress}" target="_blank">${contractAddress}</a>
              </div>
              <h1>Message</h1>
              <div class="info">${currentMessage}</div>
              <form onsubmit="update(event)">
                <input type="text" name="new-message" class="full-width" required="required" placeholder="New Message" />
                <button id="btn-update-msg" type="submit">Update Message</button>
              </form>
            </div>
          `;
        }

target.innerHTML = authHtml + userHtml + contractHtml
Next, we add the update method, which simply uses the first public Ethereum account provided by Magic to send the call to the update method of the contract:
const update = async e => {
        e.preventDefault();
        const newMessage = new FormData(e.target).get("new-message");
        if (newMessage) {
          const btnUpdateMsg = document.getElementById("btn-update-msg");
          btnUpdateMsg.disabled = true;
          btnUpdateMsg.innerText = "Updating...";
          const fromAddress = (await web3.eth.getAccounts())[0];
          const contract = new web3.eth.Contract(
            JSON.parse(contractABI),
            contractAddress
          );
          const receipt = await contract.methods
            .update(newMessage)
            .send({ from: fromAddress });
          console.log("Completed:", receipt);
          render();
        }
      };
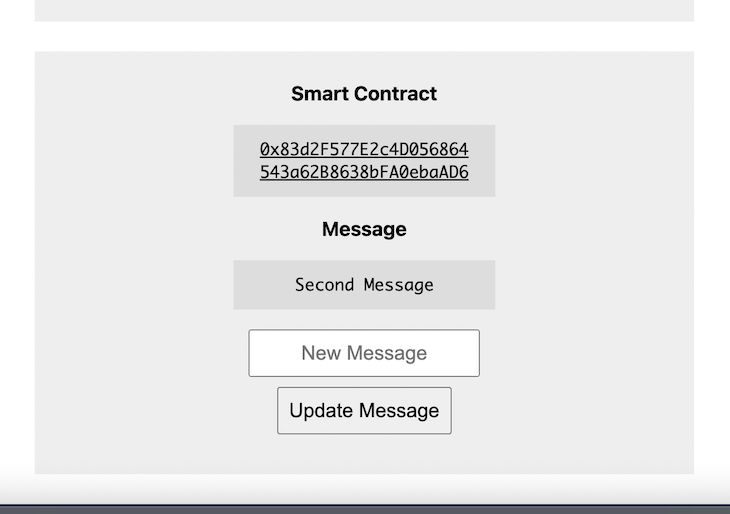
We now have a new interface, as seen in the image below:
Once the user enters a new message, a new transaction will be initiated to update the message property.
Keep in mind that we need to add test ethers to the account used to interact with the blockchain. To do so, head over to the Rinkeby Ether Faucet. After getting some ether in your account, refresh the page so the changes will be reflected:
Next, the user updates the message by inserting a new one. This will take some time because it needs to interact with the Ethereum blockchain running on the Rinkeby network. Once it is done, it should re-render the page, and the new contract message will be displayed.
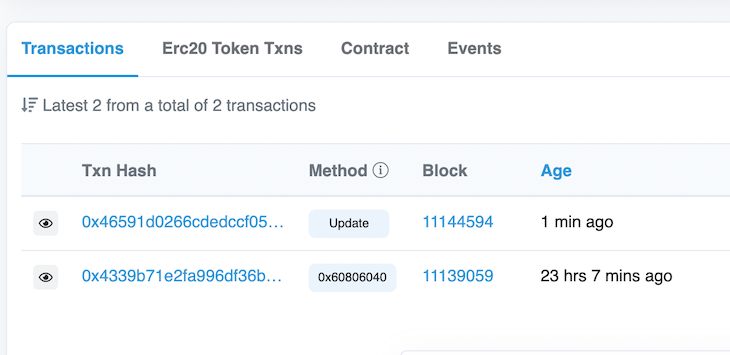
Head over to Rinkeby by clicking on the link to the deployed smart contract to verify that we can see the transaction that deployed the contract and that updated the message:
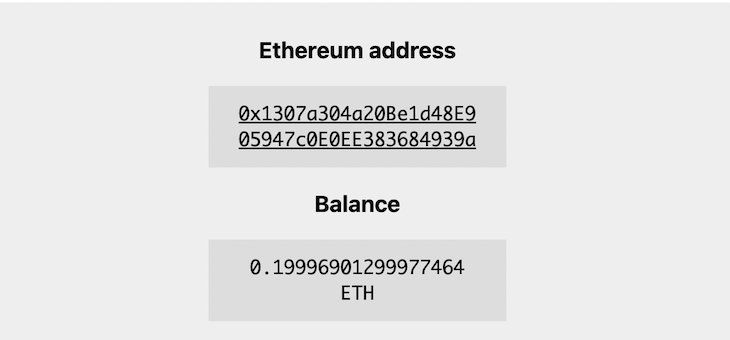
This update takes some gas fees from the account we used to make the update. If we check our current balance, we’ll see that the required ether was deducted:
Conclusion
In this article, we learned about Magic and how it integrates with the Ethereum blockchain using the web3.js JavaScript library.
Hopefully you enjoyed this article and are excited about the opportunities Magic gives blockchain developers to create secure, decentralized applications. Thanks for reading!
The post Use Magic with the Ethereum blockchain appeared first on LogRocket Blog.
from LogRocket Blog https://ift.tt/1oLZ89U
Gain $200 in a week
via Read more


