Next.js is a flexible React framework that can be used to build fast web applications. We can use the Next.js configuration to create, develop, and ship products fast without spending days structuring the application. We can also use Next.js to build both server-side rendering and static web applications using React.
But, building a web app quickly and creating a fast-loading web app are two different things.
The time it takes a web app to load to the client depends on how long it takes to serve its application code, styles, and data to the client in the first initial load. For example, the application’s performance degrades if the server needs to send additional assets, such as images, during the first initial load.
Multiple studies have shown a positive correlation between website page load speed and user experience and conversions. There are numerous ways to optimize or improve the performance of your Next.js app to achieve a faster loading time.
For example, you could use server-side rendering to render the initial HTML of your web page on the server side before delivering it to the browser, use the Next.js inbuilt caching feature to cache frequently used content, remove unused dependencies (which increase the size of your final application’s bundle and loading time), or optimize images using lazy loading or placeholder images.
In this article, we’ll focus on one of these optimization strategies: using image placeholders for image optimization. Specifically, we’ll demonstrate how to create image placeholders using the BlurHash algorithm.
Jump ahead:
- What is an image placeholder?
- What is BlurHash?
- How does BlurHash work?
- How much does BlurHash impact page speed?
- How do you implement BlurHash in a Next.js app?
What is an image placeholder?
Having too many images in your app or images that are very large and load slowly can negatively impact page speed and user experience. In fact, images are probably one of the most significant contributors to your app’s speed.
Instead of reducing the number of images in an app, we can use placeholders for some of them, thereby reducing the number of image files on initial load.
An image placeholder is a dummy image that the browser can load initially to represent the actual image until the true image has been downloaded. Placeholders can enhance page speed because their file size is tiny compared to that of the actual image they represent. Image placeholders can also prevent webpage layout shifts from occurring.
The placeholder could be a thumbnail of the image, an empty gray box, an img element with a border or background color, or even the dimensions of the image (if fixed) or the image’s alt text. However, none of these options are pretty, and all of them will make your webpages look boring.
Now, let’s consider another option for the placeholder.
What is BlurHash?
To make the image placeholder more visually appealing, we can use the BlurHash method to create a blurred version of the image, resulting in a more visually appealing design.
The process involves producing a string of characters that encode a distorted version of the image; the number of characters created depends on the image’s quality.

The BlurHash string is small enough that you don’t need to retrieve and download an image file; instead, you may provide it straight into your website’s HTML and have it decoded into the blurred picture.
Using this BlurHash string as your image placeholder makes your webpage more visually appealing and also reduces the page speed or initial load of your webpage.
How does BlurHash work?
The BlurHash algorithm analyzes an image and generates a string that serves as the image’s placeholder. This process is usually done at the backend of your service, where the image URL is stored, so you can keep the BlurHash string alongside the image URL. The BlurHash string and the image URL are sent to the client together.
The BlurHash string is short enough to quickly fit into whatever data type you prefer. For example, it’s easy to include it as a field in a JSON object.
To display a BlurHash placeholder image while the actual picture loads over the network, your client first takes the BlurHash string and decodes it into an image while its full-size version loads in the background.
{
    src: "https://i.ibb.co/5MMtXQQ/masahiro-miyagi-t-Hz-Ai-Axe-GBo-unsplash.jpg",
    blurhash: “L44-*2%456X8~Xxv9aoepJS$RPxE”
}
How much does BlurHash impact page speed?
The amount that BlurHash impacts page speed can vary based on several factors. But here’s an example that illustrates how BlurHash positively affects a page’s initial load.
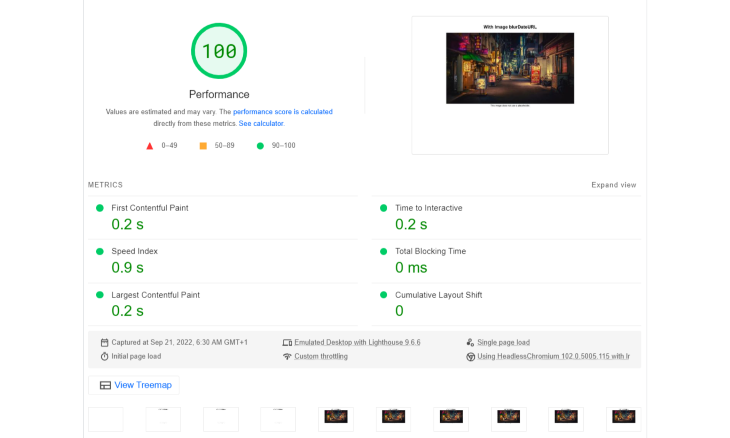
I used Google PageSpeed Insights to test the page speed of two versions of a webpage. The first version had an image without a placeholder. The second version had the same image with a BlurHash placeholder.

The first version of the page, which had an image without a placeholder, had a Speed index of 0.9sec.

The second version of the page, which had an image with a BlurHash placeholder, had a Speed index of 0.2sec.
How do you implement BlurHash in a Next.JS app?
By default, Next.js automatically generates the BlurHash string for any static image (i.e., import banner from ../some/src/), decodes it, and uses it as the image placeholder. But, if your image is dynamic (e.g., stored in your database, backend, or cloud), you must provide a data URL as a placeholder for the image.
Generating BlurHash placeholders for static images
For static images in a Next.js app, you can generate BlurHash placeholders using the placeholder attribute on the Image component and giving it a blur value, like so:
import Image from "next/image";
import image from "../public/masahiro-miyagi-xk0YHAn3dzk-unsplash.jpg";

…

<Image
   src={image}
   alt="masahiro-miyagi-xk0-YHAn3dzk-unsplash"
   placeholder="blur"
   layout="fill"
/>
Generating BlurHash placeholders for dynamic images
For dynamic images in a Next.js app, in addition to the placeholder attribute, you’ll also have to use the blurDataUrl attribute. This attribute takes in the image’s data URL.
import Image from "next/image";

…

const images = [
  {
    src: "https://i.ibb.co/5MMtXQQ/masahiro-miyagi-t-Hz-Ai-Axe-GBo-unsplash.jpg",
    blurUrl: "mokjmin2kl/9j/4AAQSk…"
  }
]

<Image
    src={images[0].src}
    alt={images[0].src}
    placeholder="blur"
    blurDataURL={images[0].blurUrl}
    layout="fill"
/>
Converting a Base83 data URL to a Base64 data URL
It is important to note that if you use the data URL generated on the BlurHash website directly in Next.js for dynamic images, it won’t work. This is because Next.js only accepts Base64-encoded images as data URLs, whereas BlurHash encodes images into Base83. No BlurHash implementation has been created yet for Next.js (view the list of BlurHash’s implementations here).
From my research, I could not find any Next.js package that could help me with the conversion from BlurHash’s Base83 data URL to a Base64 data URL, or any Next.js implementation that works for dynamic images. The few packages I found, like the recently published use-next-blurhash and plaiceholder.co, do not work with Next.js for dynamically stored images.
However, there is a Next.js Image blurDataURL generator created by Jimmy Chion, that generates an image’s BlurHash and Base64 data URL. You can fork the repo on GitHub and implement it into your project.
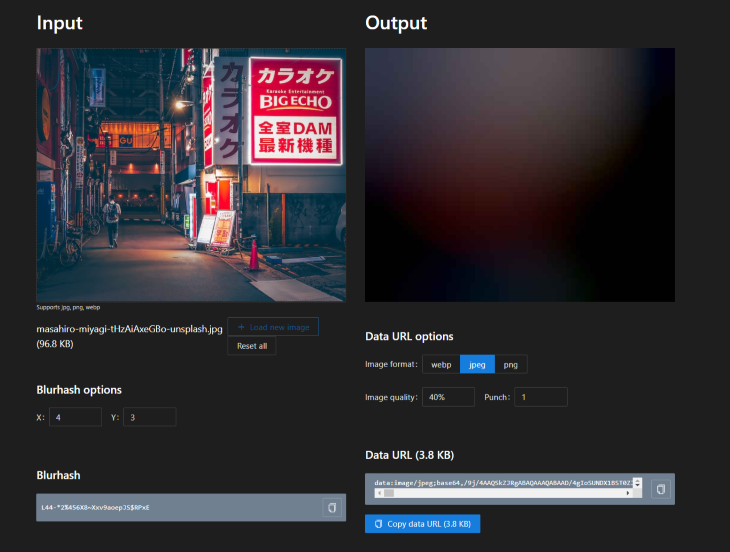
I will use the website version in this article to generate the data URLs; here’s the process:
- Visit blurred.dev
- Upload the image
- Manipulate the BlurHash algorithm’s setting and the data URL formatting to get both URLs
You’ll also notice how minute the size of the data URL is, compared to the size of the image.
Use a small version of your image to generate the URL, since the fine detail of the image will be lost anyway when the BluHash is generated. A thumbnail of your image is the ideal choice.

Adding the BlurHash URL to a Next.js app
Now, let’s use the URL in our Next.js app.
We’ll create the Next.js app using the following command:
yarn create next-app blurdataurl-in-nextjs
Next, we’ll make changes to the index.js file and create a Home.module.css file in the styles folder.
//index.js
import Image from "next/image";
import styles from "../styles/Home.module.css";
import image from "../public/masahiro-miyagi-xk0YHAn3dzk-unsplash.jpg";
import images from "../public/images";

export default function Home() {
  return (
    <div className={styles.container}>
      <main className={styles.body}>
        <h1>Using BlurDataUrl in Next.js</h1>
        <section className={styles.section}>
          <figure>
            <div className={styles.imageWrapper}>
              <Image
                src={image}
                alt="masahiro-miyagi-xk0-YHAn3dzk-unsplash"
                layout="fill"
              />
            </div>
            <figcaption className={styles.imageCaption}>
              Image 1 is stored locally and does not use a placeholder.
            </figcaption>
          </figure>

          <figure>
            <div className={styles.imageWrapper}>
              <Image
                src={image}
                alt="masahiro-miyagi-xk0-YHAn3dzk-unsplash"
                placeholder="blur"
                layout="fill"
              />
            </div>
            <figcaption className={styles.imageCaption}>
              Image 2 is stored locally and uses a placeholder.
            </figcaption>
          </figure>

          <figure>
            <div className={styles.imageWrapper}>
              <Image src={images[0].src} alt={image.scr} layout="fill" />
            </div>
            <figcaption className={styles.imageCaption}>
              Image 3 is stored remotely but does not use a placeholder.
            </figcaption>
          </figure>

          {images.map((image, index) => (
            <figure key={index}>
              <div className={styles.imageWrapper}>
                <Image
                  className={styles.image}
                  src={image.src}
                  alt={image.src}
                  placeholder="blur"
                  blurDataURL={image.blurUrl}
                  layout="fill"
                />
              </div>
              <figcaption className={styles.imageCaption}>
                Image {index + 4} is stored remotely and uses a placeholder.
              </figcaption>
            </figure>
          ))}
        </section>
      </main>
    </div>
  );
}
//Home.module.css
.body {
  padding: 20px;
  text-align: center;
}
.section {
  display: flex;
  flex-wrap: wrap;
  align-items: flex-start;
  justify-content: center;
  gap: 10px;
}
.imageWrapper {
  position: relative;
  width: 200px;
  height: 150px;
}
.imageCaption {
  margin-top: 5px;
  width: 200px;
}

@media screen and (max-width: 500px) {
  .imageWrapper {
    position: relative;
    width: 300px;
    height: 225px;
  }
  .imageCaption {
    width: 300px;
  }
}
The first and third figure elements contain images that are stored locally and remotely but have no placeholders.
The second figure element has an image that is stored locally and has a placeholder.
In contrast, the fourth figure element maps through an array of image object data which mocks the data we’ll get from the backend. We’ll store our mock data in the public folder inside the images.jsfile. You can access the mock data on GitHub.
//images.js
const images = [
  {
    src: "https://i.ibb.co/5MMtXQQ/masahiro-miyagi-t-Hz-Ai-Axe-GBo-unsplash.jpg",
    blurUrl:
      "data:image/jpeg;base64,/9j/4AAQSkZJRg….",
  },
  {
    src: "https://i.ibb.co/2kWYRTr/masahiro-miyagi-Lfoh1h1azok-unsplash.jpg",
    blurUrl:
      "data:image/jpeg;base64,/9j/4AAQSkZJRgAB…",
  },
];
export default images;
Now, run yarn dev in your terminal, so you can view the app in your browser.
As you can see, the placeholders load almost immediately for both local and remote images before the actual images get downloaded and loaded by the browser.
Conclusion
In this article, we demonstrated how to use BlurHash to generate placeholder images for a Next.js application. This strategy results in a visually pleasing webpage, prevents layout shifts by ensuring that page contents retain their position, and improves the app’s page load speed. In turn, this improves the performance of our Next.js app.
The post Improving Next.js app performance with BlurHash appeared first on LogRocket Blog.
from LogRocket Blog https://ift.tt/NnG2wps
Gain $200 in a week
via Read more


