


Node.js and Git are prerequisites for this tutorial.
Software development doesn’t only involve writing source code but also making sure that the source code we are working on can be efficiently managed and versioned.
Through proper versioning, we can plot our source code’s history; easily go back and forth and point out changes that led to the rise of certain problems; fix them; collaborate with others; branch out and pursue another parallel direction a project can go; and so forth.
With all these possibilities that arise with version control systems, there reaches a point where managing repositories efficiently becomes important, since it is very easy for solutions to give rise to new problems when not properly managed, especially when projects scale up.
Imagine a simple JavaScript project that grows as more features are added into it. Its dependencies increase over time. Likewise, the number of its scripts increase together with their independent dependencies, having development, previewing, testing, formatting, linting, building and likely continuous integration being incorporated.
One can be managing a large number of these multi-repos, which can easily become unmanageable, and so you may decide to go the monorepo route. This might not be the best solution if you don’t properly manage such a repo.
All these challenges give the rise to a need for tools that can help us properly manage source code repositories beyond what regular package managers offer.
moon is one such tool that helps in managing source code repositories efficiently with adequate automation. Let’s learn more about it:
What is moon?
moon is a repository management, organization, orchestration, and notification tool for JavaScript-based projects — or in simpler terms, a build system for the JavaScript ecosystem, written in Rust.
Many of the concepts within moon are heavily inspired from Bazel and other popular build systems but tailored for the JavaScript ecosystem.
Due to being written in Rust, moon only supports targets that are explicitly compiled for, which currently are:
- Linux 64-bit GNU (x86_64-unknown-linux-gnu)
- Linux 64-bit musl (x86_64-unknown-linux-musl)
- macOS 64-bit Intel (x86_64-apple-darwin)
- macOS 64-bit Silicon (aarch64-apple-darwin)
- Windows 64-bit (x86_64-pc-windows-msvc)
moon’s essential features
Like other build systems, moon offers a number of features that make it efficient in handling repositories over regular package managers. Here is a gist of these features:
- Tasks: Tasks in moon are commands that are run in context of a project. Briefly, tasks are npm binaries or system commands that are run as child processes
- Dependency graphs: moon generates a dependency graph between tasks so that they run in topological order. In setting up tasks, as we’ll see in a short while, we can define tasks as dependencies to other tasks. With the
moon dgcommand, we can generate dependency graphs of all actions, targets, and tasks within the workspace, and output it in Graphviz DOT format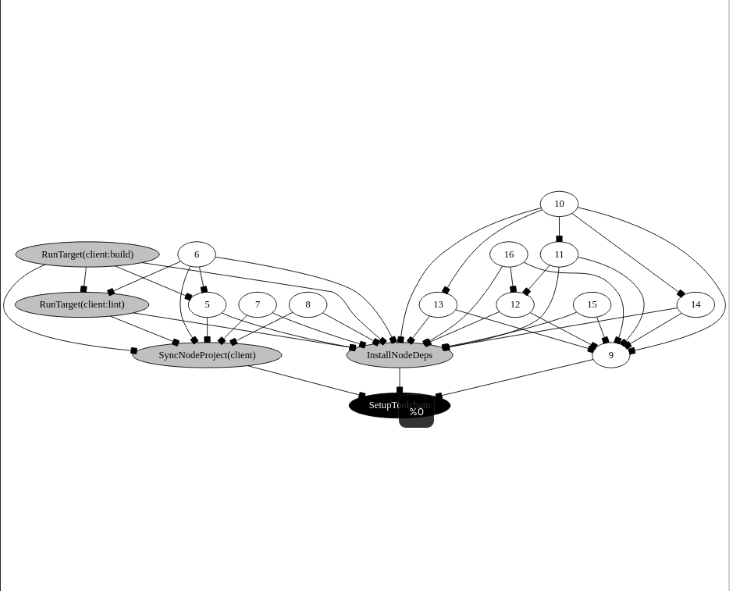
Dependency graph from moon dgcommand - Parallel execution: moon runs tasks in parallel when applicable. For example, we can use moon’s
run :<task-name>command to run the named task in all packages they are applicable to, in parallel - Caching: Tasks can be incrementally cached at each node in the dependency graph. Thus, the more tasks are run, the faster they become. This enhances performance and ensures fast runs
- Granular configuration of tasks: Tasks in moon support granular configurable options. As we’ll also see later when creating tasks, we have a number of options to choose from that decide when, how, and what should happen when tasks are run
- moon, like most build systems, runs on “affected code.” moon is able to run incremental builds by generating hashes of sources in each run, so on proceeding runs, familiar hashes are observed and runs are aborted; only changed code that leads to new hashes runs. This overall results in high performance by avoiding unnecessary rebuilds
- CI (continuous integration): moon offers CI as a first-class feature with the
moon cicommand. This command ensures that jobs are run efficiently by installing the toolchain and project dependencies; determining and running affected targets; running actions within the graph using the thread pool; and finally, displaying stats on passed, failed, or invalid actions
Managing a repo with moon
We need to see moon at work — i.e., managing a repository — to fully understand the features discussed above. I will demonstrate these features by managing a monorepo repository containing a frontend client and a backend server. I’ve chosen to go with a monorepo since through it, we can leverage moon’s maximum potential and cover more features than we could in a multi-repo setup.
Setting up moon for repository management
We can set moon up to manage a new project or migrate existing repos to a monorepo setup. Since the earlier is an easy setup, we will focus on the latter.
The following instructions are going to show us how we can migrate an ecommerce store which is currently managed in the following multi-repo setup:
As you can see, both these repositories are not the final project. The client is a bare Vue 3 scaffold and the server is an express-prisma REST API example. I have done this intentionally so that we can see how we can migrate our projects to a monorepo setup while keeping our Git histories intact. Afterward, we will see how we can continue to work on both projects in the monorepo.
To use moon to manage our monorepo, we need to first set up a new monorepo repository.
git init estore && cd estore
Inside our repo directory, add a package.json file by running the following script.
# npm
npm init

#pnpm
pnpm init
Then, add a .gitignore file, stage the existing files, and make a first commit.
git commit -m "First commit"
Migrating existing repositories with their histories
Inside our repo, we are going to place our two projects, the estore-client and estore-server, under an apps/ directory.
So, we will initially create that folder within our monorepo with mkdir apps. And, since we have named our monorepo directory estore, we’ll remove the estore prefix from our projects and remain with client and server.
To maintain the histories of the currently two projects, server and client, we will do the following for both their repositories while adding them to our estore repo.
Starting with the client, first, set a git remote inside our repo of the app being migrated.
git remote add client git@github.com:xinnks/estore-client
N.B., before proceeding, to avoid any issues, make sure you merge any open PRs in these remote repositories.
Then, we will get the code from the remote by fetching it without checking out the branch.
git fetch client
Afterward, we’ll run the following script to copy the remote’s master branch Git history to the apps/client directory with the help of the --prefix flag.
git read-tree --prefix=apps/client -u client/master
Previewing the status of our estore repo with git status, we get the following log.
On branch master
Changes to be committed:
  (use "git restore --staged <file>..." to unstage)
        new file:   apps/client/.eslintrc.js
        new file:   apps/client/.gitignore
        new file:   apps/client/.prettierignore
        new file:   apps/client/.prettietrc.json
        new file:   apps/client/.vscode/extensions.json
        new file:   apps/client/LICENSE
        new file:   apps/client/README.md
        new file:   apps/client/index.html
        new file:   apps/client/package.json
        new file:   apps/client/pnpm-lock.yaml
        new file:   apps/client/project.yml
        new file:   apps/client/public/vite.svg
        new file:   apps/client/src/App.vue
        new file:   apps/client/src/assets/vue.svg
        new file:   apps/client/src/components/HelloWorld.vue
        new file:   apps/client/src/main.js
        new file:   apps/client/src/style.css
        new file:   apps/client/vite.config.js
We’ll finalize this step by staging the changes.
# Stage changes
git commit -m "feat: Add client app" apps/client
Previewing our repo’s history, we’ll see that all the commits that were previously made to client are part of the history of estore.
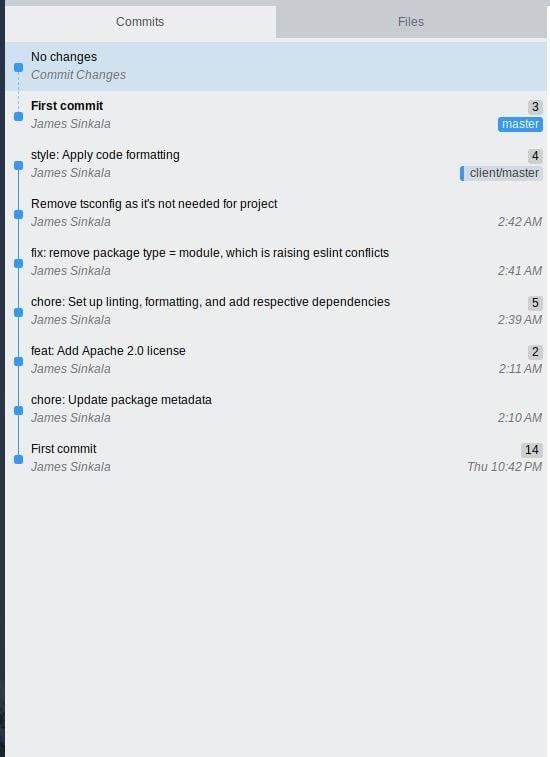
In this specific example, we can see that estore-client’s history precedes the monorepo’s First commit because the latter was created and committed after the former.
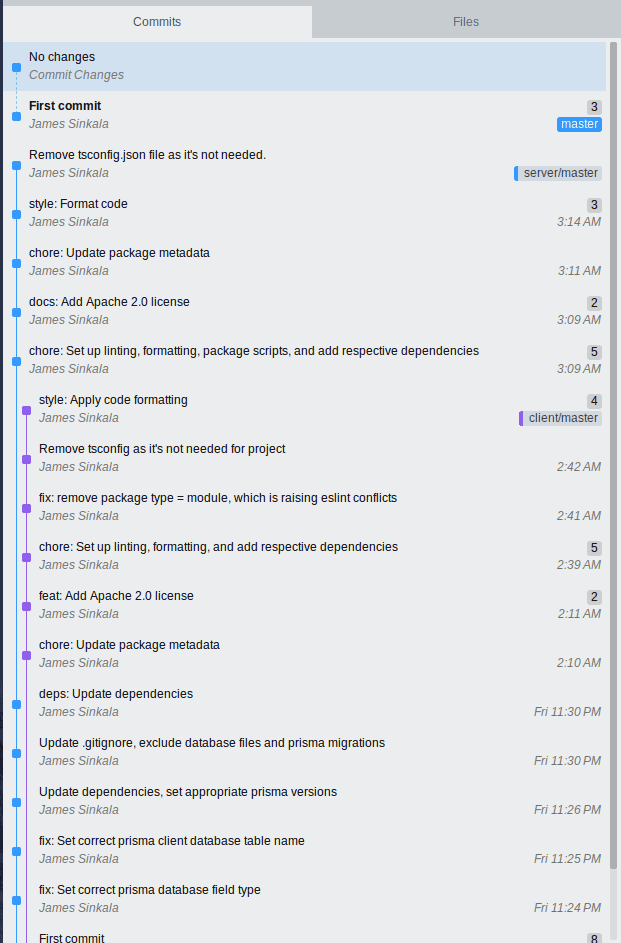
Repeat these steps for the estore-server repository, naming its remote server.
On completion, we’ll end up with something like this.
Now, we are ready to initialize moon within estore.
Installing the moon CLI
moon’s CLI is shipped inside a single binary within the @moonrepo/cli npm package. It is advised to install the CLI globally to simplify running its commands from any directory instead of relying on package.json scripts only.
Regardless of the package manager that you are using, the global installation should always be done using npm.
npm install -g @moonrepo/cli
Next, add the CLI on your repo as follows.
# yarn
yarn add --dev @moonrepo/cli

# npm
npm install --save-dev @moonrepo/cli

# pnpm
pnpm add -D @moonrepo/cli -w
When using the global binary, moon ensures that the same version is used as is defined in a repo’s dependencies section in package.json.
For scenarios such as CI (continuous integration), moon can be run through the following package.json script.
{
  "scripts": {
    // ...
    "moon": "moon",
    // Yarn 2+
    "moon": "$(yarn bin moon)"
  }
}
But such a setup comes with an overhead cost of launching Node.js and the package manager to execute the Rust binary. In such a case, the global binary setup is advised.
Also, this setup doesn’t work with package workspaces unless the script is run from the repository root.
Having installed the moon CLI, we can now initialize moon in our repo with this script.
moon init
A prompt will appear asking about the directory we are initializing moon and about the
package manager we are using.
Workspaces
A workspace is a directory that contains projects, manages a toolchain, runs tasks, and is coupled with a VCS repository. moon has first-class support for workspaces. Though not a requirement, setting them up aligns with moon’s philosophy.
The root of a workspace is denoted by a .moon directory and a package.json file.
To utilize workspaces in our project, we need to enable them per the required configuration depending on the package manager we are using. Here are various configurations.
For Yarn/npm (package.json)
{
  "workspaces": ["apps/"]
}
For pnpm (pnpm-workspace.yaml)
packages:
  - 'apps/'
Configuring workspaces in moon
We can configure our workspace by editing the workspaces.yml file that is contained within the newly created .moon directory, which was created after we ran the moon init command.
The following is a list of settings we can set up in this file.
We’ll configure it per our project’s layout.
Node.js
Under the node section of the .moon/workspace.yml file, we can define the Node.js version to be used while running moon commands. This is essential as it enforces consistency amongst possible different development teams that are working on the different projects within the same workspace repository.
node:
  version: '16.16.0'
N.B., the node.version setting requires an explicit semantic version. It does not support version ranges. moon also advises to use an Active LTS Node.js version.
Package manager
moon uses npm as the default package manager. To change that and set the package manager to one of our choice, we need to update node.packageManager in workspace.yml. We can set this value to npm, yarn, or pnpm.
node:
  version: '16.16.0'
  packageManager: 'pnpm'
Normally, moon installs the latest version of a package manager, but it’s never updated consistently. That’s why it is advised to define an explicit semantic version for it, just as we had with the Node.js version.
This ensures consistency in our toolchain. It should also be done even when you opt for npm as your package manager.
  node:
    version: '16.16.0'
    packageManager: 'pnpm'
    pnpm:
      version: '7.8.0'
After setting up the node and package manager versions, run the following script to verify that both are installed.
moon --log debug setup
This command will download and install the needed tools for our toolchain as configured.
Version control system
moon requires a version control system to be present for diffing, hashing, and revision comparison. By default, Git is used, and thus this setting can be skipped.
But for consistency, set this up too. We can do this through the vcs setting.
  vcs:
    manager: 'git'
    defaultBranch: 'master'
N.B., SVN is currently experimental, thus may not work properly.
Projects in moon
A project can be anything from an application, library, or tool. Each has its own build layer, individual tasks, and custom configuration.
With our workspace configured, we can house as many projects under it as possible.
At this point, we have the client and server projects inside the apps directory, but they cannot be accessible from moon until we map them in the projects setting found in the workspaces file.
The projects setting is a map of all projects (or file system globs) found within our workspace. We list our projects in a key: value format, where the key is a unique ID for a project, and the value is the file path to the project relative to the workspace root.
Currently, in the workspaces.yml you’ll find an example project example: 'apps/example. Remove this and add client and server projects with their respective file paths to reflect our two projects as follows.
  projects:
    server: 'apps/server'
    client: 'apps/client'
Running moon project <project-key> logs the project’s configuration as set in both the public and local moon configurations. If we get an error, that means we have not mapped our projects correctly.
Here is the expected output when we run moon project client on our repo.
  CLIENT

ID: client
Source: apps/client
Root: ~/Projects/estore/apps/client
Language: JavaScript
Type: Application
Name: client
Description: Estore front-end client application
Owner: @estore/client
Maintainers:
 - <client.project.maintainer>
Channel: #moon

 TASKS

build: vite build
dev: vite --port 3000
format: prettier --write .
install: pnpm install
lint: eslint --ext .js,.vue --ignore-path .gitignore --fix src

 FILE GROUPS

assets:
 - src/assets/*
 - **/*.{scss,css}
 - **/*.mdx
configs:
 - *.{js,json}
sources:
 - src/**/*
 - types/**/*
tests:
 - tests/**/*.test.*
 - **/__tests__/**/*
Configuring projects in moon
Projects in moon can be configured through the .moon/project.yml or the moon.yml config files at the root of each project’s directory.
The .moon/project.yml file is useful in configuring the groups and tasks that are inherited by all projects within the workspace. This is where we can place common tasks such as linting, type-checking, and formatting.
The project specific moon.yml file is useful in definition and configuration of file groups, tasks, and dependencies unique to the project.
These two configuration files are optional and can either be used separately or together. In our case, we are going to use the both of them.
Starting with the global configuration file inside .moon, add our two projects, giving them the IDs client and server.
projects:
  client: 'apps/client'
  server: 'apps/server'
Update the Node.js, package manager and VCS settings.
node:
  version: '16.16.0'
  # Any of "npm" (default), "pnpm", or "yarn".
  packageManager: 'pnpm'
  # The version of the package manager (above) to use.
  pnpm:
    version: '7.8.0'
vcs:
  # The manager/binary to use when managing the repository.
  # Accepts "git", or "svn". Defaults to "git".
  manager: 'git'
Configuring tasks
As with the two configuration files explained above, we can place global tasks inside the .moon/workspace.yml. In our projects, just as in many others, scripts that could be placed here as tasks are scripts such as linting and formatting, since these are likely synonymous to most projects.
So, we’ll update this file by adding these tasks.
tasks:
  # Name of the task.
  format:
    # The name of the binary/command on your system.
    command: 'prettier'
    # List of arguments to pass on the command line when executing the task.
    args: '--write .'
    # The type of command to run, and where to locate it.
    # Accepts "node" (default) or "system".
    type: 'node'
  lint:
    command: 'eslint'
    args:
      - --ignore-path
      - .gitignore
      - --fix
      - src
    type: 'node'
From the above configuration, we can see that tasks have a name, arguments (args), and a type. We’ll see more options later, and for full list of tasks options, you can see them in moon’s docs.
As mentioned in moon’s features, here, we are introduced to the granular configuration of tasks.
We are also going to convert the individual project scripts to moon tasks.
Starting with the server project.
# apps/server/moon.yml

---
type: "application"
language: javascript
project:
  name: "server"
  description: "Estore's back-end server application"
  channel: "#moon"
  owner: "@estore/server"
  maintainers: ["server.project.leader"]
tasks:
  lint:
    command: "eslint"
    args:
      - --ext
      - .js
    type: "node"
    options:
      mergeArgs: "prepend"
  seed:
    command: node
    args:
      - prisma/seed
    deps:
      - "~:init"
    type: node
  init:
    command: pnpm
    args:
      - dlx
      - prisma
      - migrate
      - dev
      - "--name"
      - init
    type: node
  dev:
    command: nodemon
    deps:
      - "~:seed"
      - "~:lint"
      - "~:format"
    options:
      outputStyle: "stream"
    type: node
  serve:
    command: node
    args:
      - "src/index.js"
      - "NODE_ENV=production"
    deps:
      - "~:init"
    type: node
On this configuration file, we can see more of the task options.
Here, the options.outputStyle, which is set to "stream", enables the streaming of the output log from the task being run directly to the console as the task is running.
The deps setting allows us to use one task or more as a dependencies of another task.
The options.mergeArgs, which is set to "prepend", adds the arguments in this task as a prefix to its counterpart inside the global project configuration .moon/project.yml. So, the full script of the "lint" task when run on this specific project will be as follows.
lint:
    # The name of the binary/command on your system.
    command: 'prettier'
    # List of arguments to pass on the command line when executing the task.
    args:
      - --ext
      - .js
      - --ignore-path
      - .gitignore
      - --fix
      - src
    # The type of command to run, and where to locate it.
    # Accepts "node" (default) or "system".
    type: 'node'
This is very useful for such cases where an identical task, in this case "lint", might need to apply to different file types depending on the project it’s being run in.
This configuration file also gives us a layer of setting up the projects metadata as visible in the following example through the project setting.
Finalize the client project configuration with the following settings.
type: "application"
project:
  name: "client"
  description: "Estore's front-end client application"
  channel: "#moon"
  owner: "@estore/client"
  maintainers: ["client.project.lead"]
language: javascript
tasks:
  lint:
    command: 'eslint'
    args:
      - --ext
      - .js,.vue
    type: 'node'
    options:
      mergeArgs: 'prepend'
  dev:
    command: vite
    args: "--port 3000"
    deps:
      - "~:lint"
      - "~:format"
    options:
      runInCI: false
      outputStyle: "stream"
    type: node
  build:
    command: vite
    args:
      - build
    deps:
      - "~:lint"
      - "~:format"
    type: node
  preview:
    command: vite
    args:
      - preview
    type: node
Observing the above configuration, we can see the changes being applied to the "lint" task for the client project.
As we have seen in estore, there are dependencies that exist in both projects, and some that are exclusive to a project. We can update the package.json files, adding the global dependencies to the workspace root’s package.json and removing them from the project specific package.json files.
We can now run npm install to install dependencies. And, if we’ve configured our workspace correctly, dependencies will be installed in their appropriate locations: the global dependencies on the workspace root, and project specific dependencies within the respective project roots.
We can then proceed to modifying our projects to viable levels of consumption. The complete source code can be found on estore’s GitHub repository.
Afterward, stage and commit the changes. Choose a manner of commit submission that simplifies the identification of Git histories of the separate projects but which at the same time shows a coherent flow in the repository as a whole. (Or, you can just use the code from estore‘s repository)
When everything is set, we can execute the configured tasks with the moon run command.
Tasks can be executed in two ways:
a. Within the scope of a project with moon run <project-id>:<task-name>
From our repository, we can use this format of the command to run the build task within apps/client as follows.
moon run client:build
b. We can also run tasks globally to be executed within all projects in a monorepo with this moon command: moon run :<task-name>. From our example, we can run the lint and format tasks in this way so that both projects are formatted and linted
moon run :format
To see dependency tasks in action, try running moon run client:dev on our workspace. Since this command depends on the lint and format commands, you will see that these two tasks are also run in connection to the dev task.
Despite moon being relatively new, it does a great job when it comes to managing repos. As we can see in the example above, moon has a smooth learning curve. Observing its development and seeing the features from its active development team, it shows so much promise going forward.
Make sure to visit moon’s changelog to see new features being incorporated into the project. Currently, new features are being added on a biweekly schedule.
Summary
On this comprehensive introduction to moon’s features and concepts, using a real life example (in this case, the development of an ecommerce web app), we have covered the following:
- What moon is and its essential features
- How to set up a monorepo from a multi-repo setup and manage it with moon
- How to configure workspaces in moon and manage multiple projects in a monorepo setup
- How create moon tasks and work with their various options to achieve efficient results
With features such as task caching and running only on effected code, moon, like many other build systems, can be deemed useful for all types of projects (both multi-repo and monorepo), because such features provide efficiency that is not found in regular tools such as package managers.
We acknowledge that monorepo setups introduce changes to organization and how we think about code, since it’s more than code and tools. In turn, we get advantages such as adding consistency, cutting down on the overhead involved in creating new projects, performing large scale refactorings, facilitating code sharing and collaboration, etc. Overall, they promote efficient work in otherwise complex projects.
And in this specific point, moon, despite being relatively in infancy, offers the following tools that other build systems do not currently offer:
- An integrated toolchain that ensures same versions of Node.js, package managers (npm, yarn, pnpm), and other tools are used across all machines, ensuring consistent and reproducible builds
- Easy task declaration and inheritance across the workspace. Global tasks can be defined to run on all projects within a workspace, and can be further modified per the needs of individual projects. We have seen a demonstration of this in our estore example
- Automation of common JavaScript problems such as
package.jsondependencies andtsconfig.jsonproject references - First-class support for continuous integration (CI)
A comparison of moon to other mainstream build systems can be found here.
To take a deep dive and study more about moon, its concepts, what it offers, and more examples, you can visit moon’s official docs.
The post Improve repo management with moon appeared first on LogRocket Blog.
from LogRocket Blog https://ift.tt/uCMdXYA
Gain $200 in a week
via Read more


