


The importance of analyzing data at any scale cannot be overemphasized. Nearly every part of our day-to-day lives is data driven, and as developers, one of the first considerations when building any reasonably sized application is what database to use and how to structure your data.
But, it doesn’t stop at just storing data, you’ll also need to make sense of this data by extracting and presenting it in a format that any non-technical person can understand. For example, an ecommerce business generates large amounts of data every day, meaning we’d need to keep track of things like product inventory, monthly revenue, financial statements, and more. Currently, there are many services that provide these types of solutions, but one of the easiest ways to quickly extract and present data is to generate a spreadsheet or a CSV file.
In this article, we’ll explore how to create spreadsheets in Go by building a simple expense report and exporting it in CSV format using the Excelize library. You can find the complete code for this tutorial at the GitHub repo. Let’s get started!
- Generating an expense report
- Creating a worksheet
- Adding data and creating styles
- Saving the worksheet
- Exporting to CSV
Generating an expense report
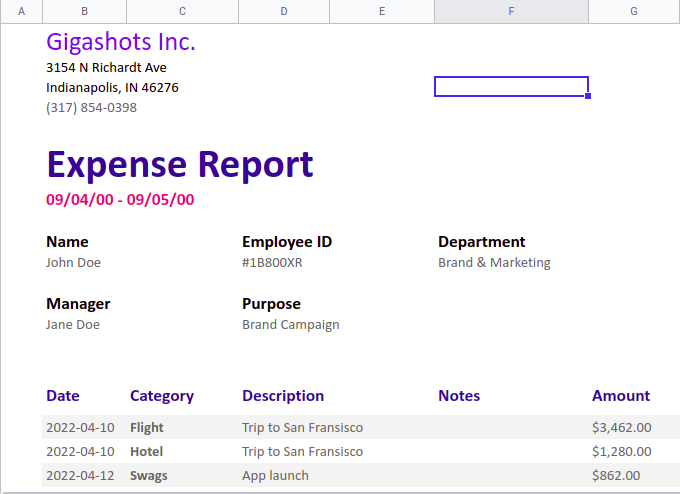
An expense report is an itemized list showing a company’s expenditure over a period of time in as much detail as possible. We’ll build a report that’s similar to what we have in the image below:
Creating a worksheet
To get started, make sure you have Go ≥v1.15 installed and create a new project folder. In the project directory, create a main.go file and initialize Go modules with the following code:
$ mkdir <project-name>
$ cd <project-name>
$ touch main.go
$ go mod init github.com/<your-username>/<project-name>
The main.go file is the entry point of our Go application, and we use the generated go.mod file for dependency management. Next, install the Excelize library by running the command below:
$ go get github.com/xuri/excelize/v2
Excelize is a Go library with no dependencies that provides primitives for reading and writing to XLSX files and other supported spreadsheet file formats. In your main.go file, import Excelize, create a new file, create a new worksheet, and set the active sheet to the worksheet you just created:
package main
import "github.com/xuri/excelize/v2"
const (
   SheetName = "Expense Report"
)
func main() {
   var err error
   f := excelize.NewFile()
   index := f.NewSheet("Sheet1")
   f.SetActiveSheet(index)
   f.SetSheetName("Sheet1", SheetName)
}
Adding data and creating styles
With our worksheet created, we can start building the report. First, we’ll set some dimensions to fit the structure we want, as shown in the image below. Add the following code block to your main function:
//main.go
//...
   err = f.SetColWidth(SheetName, "A", "A", 6)
   err = f.SetColWidth(SheetName, "H", "H", 6)
   err = f.SetColWidth(SheetName, "B", "B", 12)
   err = f.SetColWidth(SheetName, "C", "C", 16)
   err = f.SetColWidth(SheetName, "D", "D", 13)
   err = f.SetColWidth(SheetName, "E", "E", 15)
   err = f.SetColWidth(SheetName, "F", "F", 22)
   err = f.SetColWidth(SheetName, "G", "G", 13)
We just need columns A to G for the report, so we’re using the SetColWidth to adjust the width of the columns to fit our requirements. You’ll notice that we’ve defined an error variable to the top of the main function, and we’re simply assigning any error returned from these functions to it. Ideally, you should handle each error properly since it’s idiomatic in Go, but it’s fine to keep the code minimal.
The first section of the report contains static information, so we’ll have it hard-coded. Add the following code block to your main function:
//main.go
//...
   err = f.SetRowHeight(SheetName, 1, 12)
   err = f.MergeCell(SheetName, "A1", "H1")

   err = f.SetRowHeight(SheetName, 2, 25)
   err = f.MergeCell(SheetName, "B2", "D2")

   style, err := f.NewStyle(&excelize.Style{Font: &excelize.Font{Size: 20, Color: "6d64e8"}})
   err = f.SetCellStyle(SheetName, "B2", "D2", style)
   err = f.SetSheetRow(SheetName, "B2", &[]interface{}{"Gigashots Inc."})
   err = f.MergeCell(SheetName, "B3", "D3")
   err = f.SetSheetRow(SheetName, "B3", &[]interface{}{"3154 N Richardt Ave"})

   err = f.MergeCell(SheetName, "B4", "D4")
   err = f.SetSheetRow(SheetName, "B4", &[]interface{}{"Indianapolis, IN 46276"})

   style, err = f.NewStyle(&excelize.Style{Font: &excelize.Font{Color: "666666"}})
   err = f.MergeCell(SheetName, "B5", "D5")
   err = f.SetCellStyle(SheetName, "B5", "D5", style)
   err = f.SetSheetRow(SheetName, "B5", &[]interface{}{"(317) 854-0398"})

   style, err = f.NewStyle(&excelize.Style{Font: &excelize.Font{Size: 32, Color: "2B4492", Bold: true}})
   err = f.MergeCell(SheetName, "B7", "G7")
   err = f.SetCellStyle(SheetName, "B7", "G7", style)
   err = f.SetSheetRow(SheetName, "B7", &[]interface{}{"Expense Report"})

   style, err = f.NewStyle(&excelize.Style{Font: &excelize.Font{Size: 13, Color: "E25184", Bold: true}})
   err = f.MergeCell(SheetName, "B8", "C8")
   err = f.SetCellStyle(SheetName, "B8", "C8", style)
   err = f.SetSheetRow(SheetName, "B8", &[]interface{}{"09/04/00 - 09/05/00"})

   style, err = f.NewStyle(&excelize.Style{Font: &excelize.Font{Size: 13, Bold: true}})
   err = f.SetCellStyle(SheetName, "B10", "G10", style)
   err = f.SetSheetRow(SheetName, "B10", &[]interface{}{"Name", "", "Employee ID", "", "Department"})
   err = f.MergeCell(SheetName, "B10", "C10")
   err = f.MergeCell(SheetName, "D10", "E10")
   err = f.MergeCell(SheetName, "F10", "G10")

   style, err = f.NewStyle(&excelize.Style{Font: &excelize.Font{Color: "666666"}})
   err = f.SetCellStyle(SheetName, "B11", "G11", style)
   err = f.SetSheetRow(SheetName, "B11", &[]interface{}{"John Doe", "", "#1B800XR", "", "Brand & Marketing"})
   err = f.MergeCell(SheetName, "B11", "C11")
   err = f.MergeCell(SheetName, "D11", "E11")
   err = f.MergeCell(SheetName, "F11", "G11")

   style, err = f.NewStyle(&excelize.Style{Font: &excelize.Font{Size: 13, Bold: true}})
   err = f.SetCellStyle(SheetName, "B13", "G13", style)
   err = f.SetSheetRow(SheetName, "B13", &[]interface{}{"Manager", "", "Purpose"})
   err = f.MergeCell(SheetName, "B13", "C13")
   err = f.MergeCell(SheetName, "D13", "E13")

   style, err = f.NewStyle(&excelize.Style{Font: &excelize.Font{Color: "666666"}})
   err = f.SetCellStyle(SheetName, "B14", "G14", style)
   err = f.SetSheetRow(SheetName, "B14", &[]interface{}{"Jane Doe", "", "Brand Campaign"})
   err = f.MergeCell(SheetName, "B14", "C14")
   err = f.MergeCell(SheetName, "D14", "E14")
There’s a lot going on in this block of code, so let’s break it down.
As stated earlier, Excelize provides a set of primitive functions to manipulate the spreadsheet. Each functionality you need just requires calling a method on the file object, which accepts some parameters. In this case, we’re using five main methods:
SetRowHeightMergeCellNewStyleSetCellStyleSetSheetRow
SetRowHeight adjusts the height of a given row, and MergeCell combines multiple cells in a row into one single cell. To compose styles, we can use the excelize.Style struct, which provides the properties you need to define custom styles. The NewStyle method simply takes in the Style object and returns an index representing the style.
After defining your custom style, we can use SetCellStyle to apply the style to a single cell or a range of cells. We use SetSheetRow to add data to a cell or a range of cells in a single row. It accepts a slice of interface, which is a container for any primitive data type. The slice is positional, and each element will be placed in the corresponding cell starting from the axis provided. Therefore, we used an empty string in some cases where multiple cells were merged.
The second part of the report is a table containing dynamic data that can be of any length, meaning we can’t just define the content of each row like we did before. The data represented in the table follows a defined structure, so we can just loop through the incoming data and create each row dynamically.
Let’s define some arbitrary data that will represent a list of expenses. At the top of your main.go file, outside of the main function, add the following variable:
//main.go
//...
var (
   expenseData = [][]interface{}{
      {"2022-04-10", "Flight", "Trip to San Fransisco", "", "", "$3,462.00"},
      {"2022-04-10", "Hotel", "Trip to San Fransisco", "", "", "$1,280.00"},
      {"2022-04-12", "Swags", "App launch", "", "", "$862.00"},
      {"2022-03-15", "Marketing", "App launch", "", "", "$7,520.00"},
      {"2022-04-11", "Event hall", "App launch", "", "", "$2,080.00"},
   }
)
//...
Now, add the following block of code to your main function:
//main.go
//...
   style, err = f.NewStyle(&excelize.Style{
      Font:      &excelize.Font{Size: 13, Bold: true, Color: "2B4492"},
      Alignment: &excelize.Alignment{Vertical: "center"},
   })
   err = f.SetCellStyle(SheetName, "B17", "G17", style)
   err = f.SetSheetRow(SheetName, "B17", &[]interface{}{"Date", "Category", "Description", "", "Notes", "Amount"})
   err = f.MergeCell(SheetName, "D17", "E17")
   err = f.SetRowHeight(SheetName, 17, 32)

   startRow := 18
   for i := startRow; i < (len(expenseData) + startRow); i++ {
      var fill string
      if i%2 == 0 {
         fill = "F3F3F3"
      } else {
         fill = "FFFFFF"
      }

      style, err = f.NewStyle(&excelize.Style{
         Fill:      excelize.Fill{Type: "pattern", Pattern: 1, Color: []string{fill}},
         Font:      &excelize.Font{Color: "666666"},
         Alignment: &excelize.Alignment{Vertical: "center"},
      })
      err = f.SetCellStyle(SheetName, fmt.Sprintf("B%d", i), fmt.Sprintf("G%d", i), style)
      err = f.SetSheetRow(SheetName, fmt.Sprintf("B%d", i), &expenseData[i-18])
      err = f.SetCellRichText(SheetName, fmt.Sprintf("C%d", i), []excelize.RichTextRun{
         {Text: expenseData\[i-18\][1].(string), Font: &excelize.Font{Bold: true}},
      })

      err = f.MergeCell(SheetName, fmt.Sprintf("D%d", i), fmt.Sprintf("E%d", i))
      err = f.SetRowHeight(SheetName, i, 18)
   }
We’re still using the same methods to compose the styles and add data. However, we’re looping through the expenseData list and adding each item to the current row. We started the loop at 18, which is the current row in the spreadsheet. To make the rows of the table more distinct and readable, we add a subtle background color to every other row by checking if it’s even or odd using a modulo operation.
Saving the worksheet
In just a few lines of code, you’ve been able to create an expense report using simple Go functions. There are many ways that you can display the report, but in this article, you’ll save the file to your disk and upload it to Google sheets. Add the following code block at the end of the main function:
//main.go
//...
   err = f.SaveAs("expense-report.xlsx")
   if err != nil {
      log.Fatal(err)
   }
The code above will save the file in the current directory with an XLSX extension. Now, open up a new spreadsheet in Google Sheets and import the file. You should see the expense report just like in the sample image above.
Exporting to CSV
So far, we’ve explored working with XLSX files, however, there are other formats suitable for presenting this kind of data. A CSV file is a text file with rows of data delimited by commas that is mostly used for importing and exporting data.
Consider a case where we want to store the table in our expense report in some self-hosted database. We can extract this table in CSV format and import it in the database with just a few steps.
First, create a function outside of your main function called generateCSV and add the code block below:
//main.go
//...
type Axis struct {
   row int
   col string
}

func generateCSV(f *excelize.File, start, end Axis) error {
   var data [][]string

   for i := start.row; i <= end.row; i++ {
      row := []string{}
      for j := []rune(start.col)[0]; j <= []rune(end.col)[0]; j++ {
         value, err := f.GetCellValue(SheetName, fmt.Sprintf("%s%d", string(j), i), excelize.Options{})
         if err != nil {
            return err
         }
         row = append(row, value)
      }
      data = append(data, row)
   }

   file, err := os.Create("expenses.csv")
   if err != nil {
      return err
   }
   defer f.Close()

   writer := csv.NewWriter(file)
   return writer.WriteAll(data)
}
The generateCSV function accepts an excelize.File type, a start axis, and an end axis. The axis is just a combination of the row and column that makes a cell. We loop through each row, and for each row, we loop through each column within the bounds of the start and end axis.
We then use the f.GetCellValue to extract the current value of each cell. Because the columns are represented as alphabet strings, we convert them to runes to get the underlying unicode decimal. Finally, we save the extracted data to a .csv file using the CSV package from the standard library.
We can call this function after saving the worksheet and passing the file handle. In your main function, add the following code block:
//main.go
///...
   err = f.SaveAs("expense-report.xlsx")
   err = generateCSV(f, Axis{17, "B"}, Axis{22, "G"})

   if err != nil {
      log.Fatal(err)
   }
We provide the file we created earlier for the worksheet and the axis representing the range of the table. If you run the main.go file now, you should see an XLSX file and a CSV file generated:
$ go run main.go
Conclusion
There are many use cases for presenting data in a spreadsheet-compatible format, including analysis, transformation, and validation. In this article, we learned how to work with spreadsheets using Go and the Excelize package by generating an expense report.
When you consider the other features that Excelize offers out of the box, we’ve only scratched the surface. You can add images, create charts, sparklines, shapes, pivot tables, and more. I hope you learned something new, and leave a comment if you have any questions. Happy coding!
The post Building spreadsheets with Go and Excelize appeared first on LogRocket Blog.
from LogRocket Blog https://ift.tt/KIoluwS
Gain $200 in a week
via Read more


