


Apache Kafka is an event streaming platform that allows software applications to communicate effectively with each other. It’s an excellent choice for connecting small applications, like microservices, together.
In this article, you’ll learn how to build a microservice using Rust with Kafka. We will cover:
- Prerequisites
- What are microservices?
- What is Kafka?
- Getting started with Kafka
- Setting up Kafka topics, producers, and consumers
- Creating Rust consumers and producers
- Building a Rust microservice with Kafka
You can see the final project in this GitHub repo.
Prerequisites
To follow along with this article, you’ll need Rust installed in your system and basic knowledge of Rust.
What are microservices?
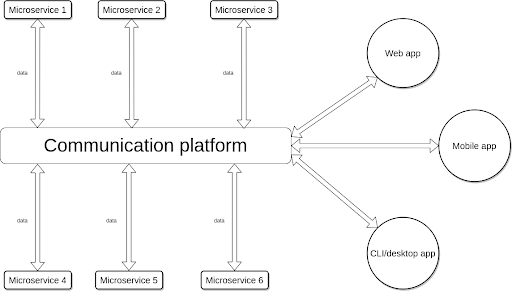
Microservices are small, independent applications that perform specific tasks that are useful for both decoupling components of complex applications and for promoting distributed applications.
Think of a microservice as an object on a larger scale. Similar to objects, microservices are independent and can be reused. However, the significant difference between the two is where they return data. While objects get and return data directly, microservices return data into a pool.
Microservices allow developers to build an application with different programming languages. Errors in a microservice rarely cause the overall application to crash.
What is Kafka?
Kafka is an event streaming platform used for reading and writing data that makes it easy to connect microservices. To learn more about Kafka, check out this Kafka real-time data streaming app tutorial.
Before we go into more depth about the platform, we need to get familiar with some Kafka terms.
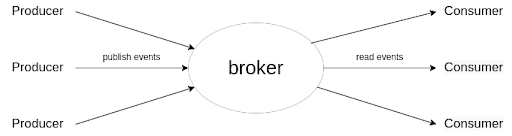
- Event: in Kafka, data is called an event
- Topic: a topic is an identifier used for organizing events. Producers and consumers can read and write to a topic in real time
- Producer: Kafka uses producers to publish events to a topic
- Consumer: these read events from a topic
- Broker: servers in Kafka are called brokers
- Cluster: several brokers working together forms a cluster, which protects events from loss. This is critical because events and topics can be replicated across one or more brokers
Getting started with Kafka
To proceed with this article, you will need to set up your Kafka broker. Note that you’ll use a local broker on your system. Aside from local brokers, Kafka provides the options to use brokers either in the Cloud or on a remote system.
To set up Kafka on your system, follow these steps:
First, download the latest Kafka release here and extract the compressed file. After that, open the decompressed folder in your terminal and start the ZooKeeper server with the following command:
$ bin/zookeeper-server-start.sh config/zookeeper.properties
Then, open another terminal session in the decompressed folder and start the Kafka broker:
$ bin/kafka-server-start.sh config/server.properties
The Kafka broker requires an active ZooKeeper to function properly. The ZooKeeper maintains the broker, and without it, the broker will generate error messages.
Setting up Kafka topics, producers, and consumers
Next, let’s organize published events in the Kafka broker by setting up topics, producers, and consumers.
To create a topic in your local server, run this command:
$ bin/kafka-topics.sh --create --topic topic-name --bootstrap-server localhost:9092
The first command starts up a consumer in the console, and --topic topic-name tells the consumer to read from topic-name. --bootstrap-server localhost:9092 tells Kafka to connect to your local server at localhost:9092.
--from-beginning tells the consumer to read all events from the earliest published. You can use --offset earliest instead of --from-beginning to achieve the same result. If you want the consumer to only listen to new events, use--offset latest.
Kafka provides a consumer and producer that you can run in the terminal:
# console consumer reading from "topic-name"
$ bin/kafka-console-consumer.sh --topic topic-name --from-beginning --bootstrap-server localhost:9092

# console producer publishing to "topic-name"
$ bin/kafka-console-producer.sh --topic topic-name --bootstrap-server localhost:9092
The command above starts a producer in the console, and the producer publishes events to topic-name, specified by --topic topic-name. The producer is connected to your local server at localhost:9092 and is specified by --bootstrap-server localhost:9092.
Creating Rust consumers and producers
Now that you’ve seen producers and consumers in the console, I’ll show you how to build a Kafka producer and consumer with Rust. Kafka-based microservices built with Rust usually have one or more producers and consumers. Let’s get started!
First, you’ll need to create a new Rust project with the following command:
$ cargo new kafka_consumer
Next, add the Kafka library to Cargo.toml:
[dependencies]
kafka = "0.9"
Now that we’ve added the Kafka library, we can build the project to fetch its dependencies:
$ cargo build
Then paste this code into src/main.rs:
use kafka::consumer::{Consumer, FetchOffset};
use std::str;

fn main () {

 let hosts = vec!["localhost:9092".to_owned()];

 let mut consumer =
   Consumer::from_hosts(hosts)
     .with_topic("topic-name".to_owned())
     .with_fallback_offset(FetchOffset::Latest)
     .create()
     .unwrap();

 loop {
   for ms in consumer.poll().unwrap().iter() {
     for m in ms.messages() {
       // If the consumer receives an event, this block is executed
       println!("{:?}", str::from_utf8(m.value).unwrap());
     }

     consumer.consume_messageset(ms).unwrap();
   }

   consumer.commit_consumed().unwrap();
 }
}
The consumer we created above reads events published to the topic-name topic and prints the event’s message to the console. Here’s how it works in more detail:
First, we initialize a list of the hosts that the consumer will connect to on line 6 (in this case, localhost:9092).
let hosts = vec!["localhost:9092".to_owned()];
Next, from line 8 to line 13, we initialize a consumer that is connected to the topic-name topic (line 10) and start reading events from the latest published:
 let mut consumer =
   Consumer::from_hosts(hosts)
     .with_topic("topic-name".to_owned())
     .with_fallback_offset(FetchOffset::Latest)
     .create()
     .unwrap();
Finally, we create an infinite loop that listens to events published to topic-name:
 loop {
   for ms in consumer.poll().unwrap().iter() {
     for m in ms.messages() {
       // convert message from bytes to string
       println!("{:?}", str::from_utf8(m.value).unwrap());
     }

     consumer.consume_messageset(ms).unwrap();
   }

   consumer.commit_consumed().unwrap();
 }
Now that we’ve successfully created our consumer, let’s look to our next steps for creating our producer.
First, create a new Rust project using this command:
$ cargo new kafka_producer
Then add the Kafka library to Cargo.toml:
[dependencies]
kafka = "0.9"
Build the project to fetch its dependencies:
$ cargo build
Then, paste this code into src/main.rs:
use kafka::producer::{Producer, Record};

fn main() {
 let hosts = vec!["localhost:9092".to_owned()];

 let mut producer =
   Producer::from_hosts(hosts)
     .create()
     .unwrap();

 for i in 0..10 {
   let buf = format!("{i}");
   producer.send(&Record::from_value("topic-name", buf.as_bytes())).unwrap();
   println!("Sent: {i}");
 }
}
The idea is to create a producer that sends numbers 0 through 9 to the topic-name topic. Here’s how it works piece-by-piece:
First, we define a list of the Kafka servers we are connecting to (localhost:9092).
let hosts = vec!["localhost:9092".to_owned()];
Notice that the Producer::from_hosts function initializes the producer. The initialized producer is connected to the local Kafka server (localhost:9092).
let mut producer =
   Producer::from_hosts(hosts)
     .create()
     .unwrap();
We create a loop that runs from zero to nine and send each number to the topic-name topic.
for i in 0..10 {
   let buf = format!("{i}");
   producer.send(&Record::from_value("topic-name", buf.as_bytes())).unwrap();
   println!("Sent: {i}");
 }
}
Now that we’ve set up our consumer and producer, let’s run them. The consumer listens to events published in topic-name, and the producer project publishes events to topic-name. Having an active consumer before publishing events ensures the events are consumed in real time.
Building a Rust microservice with Kafka
In this section, we will build a microservice to store and delete texts. This microservice is operated by sending events that describe adding or removing text. The event will be a JSON string with an action key to describe its action and a value key to provide necessary data.
The following diagram showcases how the microservice works in adding text:
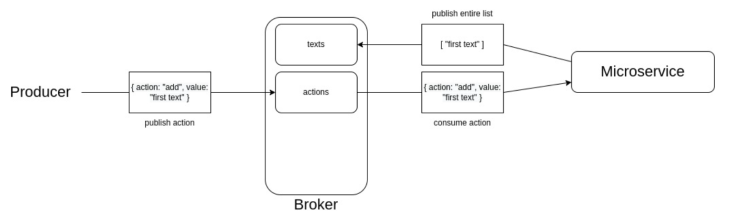
As you can see in the diagram, our microservice reads operations to perform from the actions topic and then publishes the list of texts to the texts topic. Now that we have some background, let’s build this microservice.
First, let’s create a new project:
$ cargo new texts-microservice
Add the following dependencies to Cargo.toml using the command below:
[dependencies]
kafka = "0.9"
serde_json = "1.0.85"
Build the project using the following command:
$ cargo build
After that, we will create modules that each handle the producer, the consumer, and the texts. The file names of these modules are my_consumer.rs, my_producer.rs, and texts.rs, in src.
Now, follow these steps to build the microservice:
First, we need to initialize the modules, since we are splitting the microservice into modules. So, add this code block to the main.rs file:
mod my_consumer;
mod my_producer;
mod texts;

use my_consumer::MyConsumer;
use my_producer::MyProducer;
use texts::Texts;
After that, create the main function in main.rs:
fn main() {
}
Next, define the Kafka server you are connecting the microservice to in main.rs’s main function:
let hosts = vec![ "localhost:9092".to_string() ];
Now, initialize the texts, consumer, and producer modules with the following lines in main.rs’s main function:
  let mut texts = Texts::new();
  let mut consumer = MyConsumer::new( hosts.clone(), "actions".to_string() );
  let mut producer = MyProducer::new( hosts );
Next, create a loop that listens for events that the consumer receives:
  loop {
    for ms in consumer.consume_events().iter() {
      for m in ms.messages() {

      }
      consumer.consume_messageset(ms);
    }
    consumer.commit_consumed();
  }
After that, retrieve the data from the loop in the previous code block with this line:
let event_data = MyConsumer::get_event_data(m);
Now, extract the action to perform on texts from the event data with this line following the previous code block:
let action = event_data["action"].to_string();
After that, use if, if/else, and else blocks to perform the action specified by event_data["action"]:
        if action == "\"add\"" {
          texts.add_text( event_data["value"].to_string() );

        } else if action == "\"remove\"" {
          let index = event_data["value"].to_string().parse::<usize>().unwrap();
          texts.remove_text( index );

        } else {
          println!("Invalid action");
        }
Finally, convert the texts to JSON string and send it to the texts topic with the producer at the end of the loop:
producer.send_data_to_topic( "texts", texts.to_json() );
In the end, your main.rs file should look like this:
mod my_consumer;
mod my_producer;
mod texts;

use my_consumer::MyConsumer;
use my_producer::MyProducer;
use texts::Texts;

fn main() {
  let hosts = vec![ "localhost:9092".to_string() ];

  let mut texts = Texts::new();
  let mut consumer = MyConsumer::new( hosts.clone(), "actions".to_string() );
  let mut producer = MyProducer::new( hosts );
  // put here to show that the microservice has started
  println!("Started...");

  loop {
    for ms in consumer.consume_events().iter() {
      for m in ms.messages() {

        // when the consumer receives an event, this block is executed
        let event_data = MyConsumer::get_event_data(m);
        let action = event_data["action"].to_string();

        if action == "\"add\"" {
          texts.add_text( event_data["value"].to_string() );

        } else if action == "\"remove\"" {
          let index = event_data["value"].to_string().parse::<usize>().unwrap();
          texts.remove_text( index );

        } else {
          println!("Invalid action");
        }

        producer.send_data_to_topic( "texts", texts.to_json() );
      }
      consumer.consume_messageset(ms);
    }
    consumer.commit_consumed();
  }
}
Now, create a my_consumer.rs file in src and paste the following code into it:
use kafka::consumer::{Consumer, FetchOffset, MessageSets, MessageSet, Message};
use std::str;
use serde_json::Value;

pub struct MyConsumer {
 consumer: Consumer
}

impl MyConsumer {

 pub fn new (hosts: Vec<String>, topic: String) -> Self {
   Self {
     consumer: Consumer::from_hosts(hosts)
                 .with_topic(topic)
                 .with_fallback_offset(FetchOffset::Latest)
                 .create()
                 .unwrap()
   }
 }

 pub fn get_event_data (m: &Message) -> Value {
   let event = str::from_utf8(m.value).unwrap().to_string();
   serde_json::from_str(&event).unwrap()
 }

 pub fn consume_events(&mut self) -> MessageSets {
   self.consumer.poll().unwrap()
 }

 pub fn consume_messageset(&mut self, ms: MessageSet) {
   self.consumer.consume_messageset(ms).unwrap();
 }

 pub fn commit_consumed(&mut self) {
   self.consumer.commit_consumed().unwrap();
 }

}
Also, create a my_producer.rs file with this code in it:
use kafka::producer::{Producer, Record};

pub struct MyProducer {
  producer: Producer
}

impl MyProducer {

  pub fn new( hosts: Vec<String> ) -> Self {
    let producer =
      Producer::from_hosts( hosts )
        .create()
        .unwrap();

    Self {
      producer: producer
    }
  }

  pub fn send_data_to_topic(&mut self, topic: &str, data: String ) {
    let record = Record::from_value( topic, data.as_bytes() );
    self.producer.send(&record).unwrap();
  }

}
Finally, create a texts.rs file and paste the following into it:
use serde_json::json;

pub struct Texts {
  texts: Vec<String>
}

impl Texts {

  pub fn new() -> Self {
    Self {
      texts: vec![]
    }
  }

  pub fn add_text(&mut self, text: String) {
    self.texts.push(text);
  }

  pub fn remove_text(&mut self, index: usize) {
    self.texts.remove( index );
  }

  pub fn to_json(&self) -> String {
    json!(&self.texts).to_string()
  }
}
After building the project, we need to run and test it.
First, create the texts and actions topics:
# create texts topic
$ bin/kafka-topics.sh --create --topic texts --bootstrap-server localhost:9092

# create actions topic
$ bin/kafka-topics.sh --create --topic actions --bootstrap-server localhost:9092
Next, set up a console consumer to topic texts:
$ bin/kafka-console-consumer.sh --topic texts --from-beginning --bootstrap-server localhost:9092
Set up a producer to topic actions.
$ bin/kafka-console-producer.sh --topic actions --bootstrap-server localhost:9092
Let’s now run the project with:
$ cargo run
Then, write actions to the producer:
> { "action": "add", "value": "first text" }
> { "action": "add", "value": "second text" }
> { "action": "remove", "value": 1 }
> { "action": "add", "value": "third text" }
Finally, let’s see the outcomes of each event in the consumer console:
[ "first text" ]
[ "first text", "second text" ]
[ "first text" ]
[ "first text", "third text" ]
Conclusion
In this article, we covered how to create a basic microservice with Rust. Although a single microservice is simple and focuses on one task, multiple or more advanced microservices can form an easily maintained and distributed complex application that handle databases, real-time computing, Internet of Things, real-time data collection, and fraud detection.
The post Building Rust microservices with Apache Kafka appeared first on LogRocket Blog.
from LogRocket Blog https://ift.tt/Uo0z2rE
Gain $200 in a week
via Read more


