Smart contracts are not self-executing; their execution depends solely upon on-chain transactions conducted on a blockchain network serving as a call to action that triggers function calls. However, manually executing smart contracts has drawbacks, such as potential security risks, unnecessary delays, and the possibility of human error.
This article explores the core concepts of smart contract automation and reviews the pros and cons of various smart contract automation tools. Additionally, this guide demonstrates the processes used by popular smart contract automation tools: Chainlink Keepers, the Gelato Network, and OpenZeppelin Defender.
Jump ahead:
- Prerequisites
- Understanding smart contract automation
- Chainlink Keepers
- Gelato Network
- OpenZeppelin Defender
- Pros and Cons of using Chainlink Keepers, Gelato, and OpenZeppelin Defender
Prerequisites
To follow along with this article, ensure you have the following:
- MetaMask installed
- OpenZeppelin Defender account set up
- Remix online IDE
- Rinkeby test network (or Goerli)
- Basic knowledge of Solidity and JavaScript programming languages
Understanding smart contract automation
Before the advent of smart contract automation, developers used centralized servers to implement various manual processes such as time-based execution, DevOps tasks, off-chain computations, and liquidations.
Manual processes increase security risks for smart contracts as they introduce a central point of failure to decentralized applications. In addition, the network congestion that often results from manual processes can delay the execution of transactions, putting user funds at risk.
Smart contract automation enables us to automate several Web3 functions such as yield farming, cross-chain NFT minting, liquidation of under-collateralized loans, gaming, and more.
Now that we have an overview of smart contract automation, let’s review some popular smart contract automation tools and learn how they work.
Chainlink Keepers
Chainlink Keepers is a smart contract automation tool that runs on multiple blockchains such as Ethereum, BNB chain, and Polygon. This tool enables externally owned accounts to run checks on predetermined conditions in smart contracts and then trigger and execute transactions based on time intervals.
For example, developers can register smart contracts for automated upkeep by monitoring the conditions on the Keepers network. Subsequently, off-chain computations are performed on the Keepers network by nodes until the conditions defined in the smart contract are met.
If the smart contract conditions are not met, the computations return a value of false, and the nodes continue their work. If the smart contract conditions are met, the computations return a value of true, and the Keepers network triggers the contract execution.
Chainlink Keepers offers many benefits:
- Easy integration: Chainlink Keepers’ user-friendly documentation consists of how-to guides that help developers to get up to speed with their integration
- Security and reliability: The decentralized nature of Chainlink Keepers provides a secure framework for applications by reducing the security risks associated with a centralized server. Chainlink Keepers utilizes a transparent pool for its operations, helping to establish trust among developers and DAOs
- Cost efficiency: The infrastructure of Chainlink Keepers provides features that optimize the cost and improve the stability of gas fees associated with executing smart contracts
- Increased productivity: Chainlink Keepers handles the off-chain computations that run checks on smart contracts, leaving developers with more time to focus on building DApps
Demo: Automating a smart contract with Chainlink Keepers
Let’s investigate how to automate a smart contract with Chainlink Keepers. We’ll use a Solidity contract built on a Remix online IDE and deployed to the Rinkeby test network. The smart contract will implement the interface defined in the Chainlink Keepers GitHub repository.
To be compatible with Chainlink Keepers, our smart contract must include the following two methods:
checkUpKeep(): This method performs off-chain computations on the smart contract that executes based on time intervals; the method returns a Boolean value that tells the network whether the upkeep is neededperformUpKeep(): This method accepts the returned message from thecheckUpKeep()method as a parameter. Next, it triggers Chainlink Keepers to perform upkeep on the smart contract. Then, it performs some on-chain computations to reverify the result from thecheckUpKeep()method to confirm that the upkeep is needed
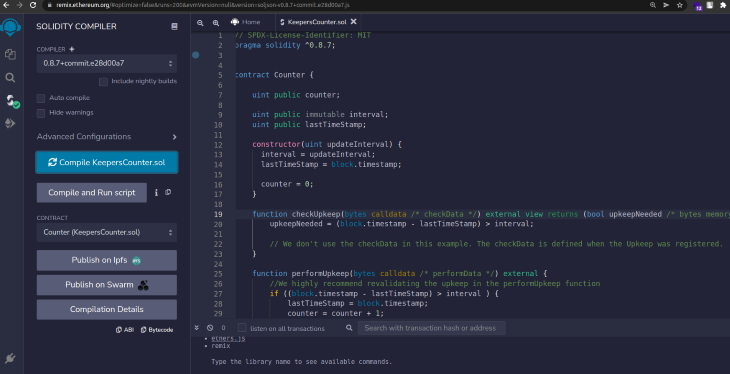
To get started, add the following code to create a simple counter contract in your Remix IDE:
// SPDX-License-Identifier: MIT
pragma solidity ^0.8.7;

contract Counter {

   uint public counter;

   uint public immutable interval;
   uint public lastTimeStamp;

   constructor(uint updateInterval) {
     interval = updateInterval;
     lastTimeStamp = block.timestamp;

     counter = 0;
   }

   function checkUpkeep(bytes calldata /* checkData */) external view returns (bool upkeepNeeded /* bytes memory  performData */) {
       upkeepNeeded = (block.timestamp - lastTimeStamp) > interval;

       // We don't use the checkData in this example. The checkData is defined when the Upkeep was registered
   }

   function performUpkeep(bytes calldata /* performData */) external {
       //We highly recommend revalidating the upkeep in the performUpkeep function
       if ((block.timestamp - lastTimeStamp) > interval ) {
           lastTimeStamp = block.timestamp;
           counter = counter + 1;
       }

       // We don't use the performData in this example. The performData is generated by the Keeper's call to your checkUpkeep function
   }
}
This contract has a public variable counter that increments by one when the difference between the new block and the last block is greater than an interval. Then, it implements the two Keepers-compatible methods.
Now, navigate to the Remix menu button (the third button from the top) and click the Compile button (indicated with a green verification mark) to compile the contract:
To proceed, you’ll need to fund your upkeep with some ERC-677 LINK tokens. Use Faucets to connect your Rinkeby test network and get some testnet LINK tokens on chainlink:
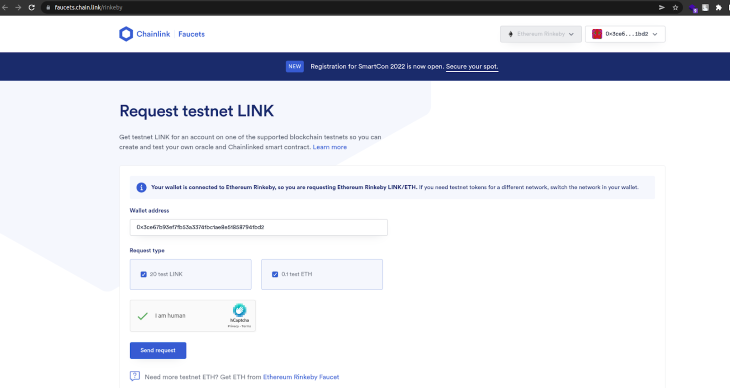
Choose Injected Web3 as the environment, and select the Rinkeby test network. Then, click Send request to get 20 test LINK and 0.1 test ETH sent to your wallet.
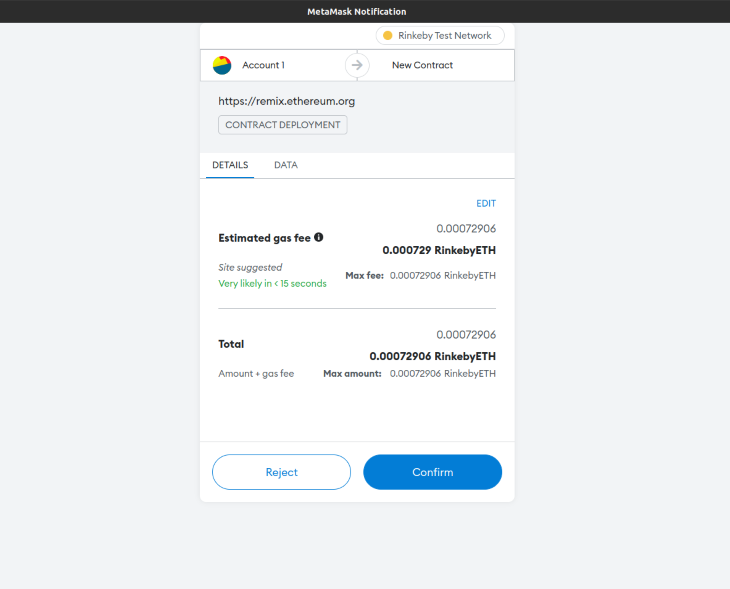
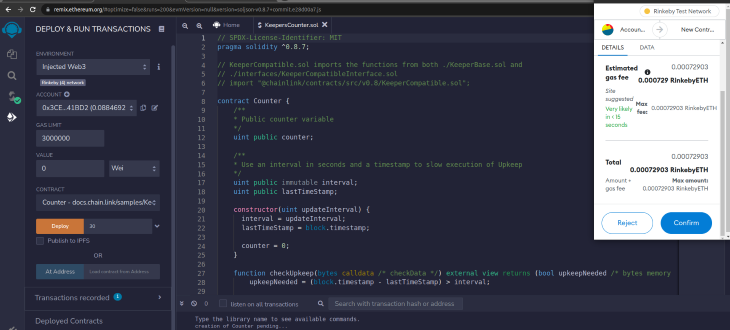
Next, deploy the contract by passing 30 seconds as the interval. Once you click Deploy, MetaMask should open, asking you to confirm the transaction.
Click Confirm in your MetaMask wallet:
Now you can view your deployed contract address:
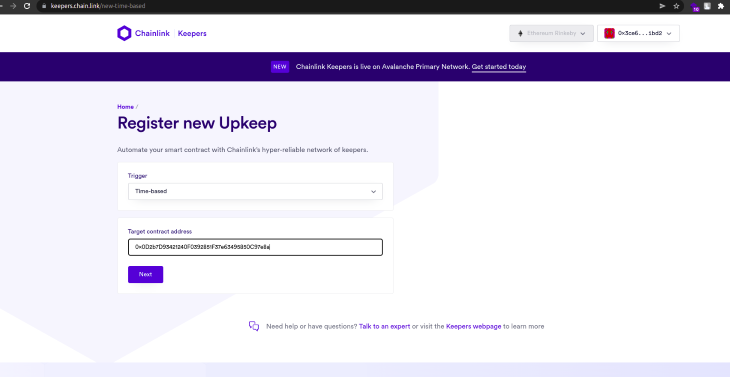
Next, navigate to Chainlink Keepers and register your deployed smart contract by selecting the Time-based trigger option and entering the address of your deployed smart contract:
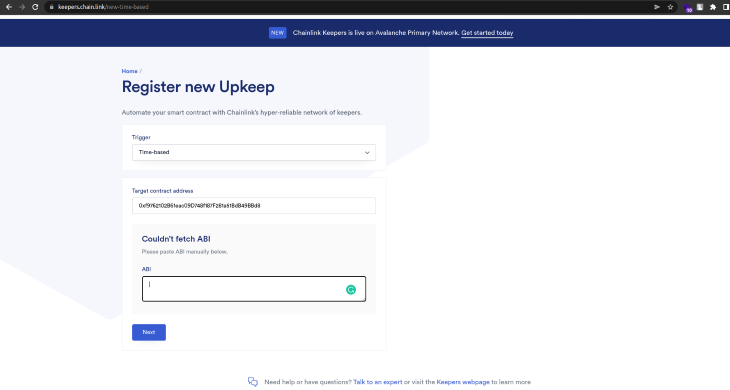
Copy your contract’s ABI from your Remix IDE and paste it into the ABI field:
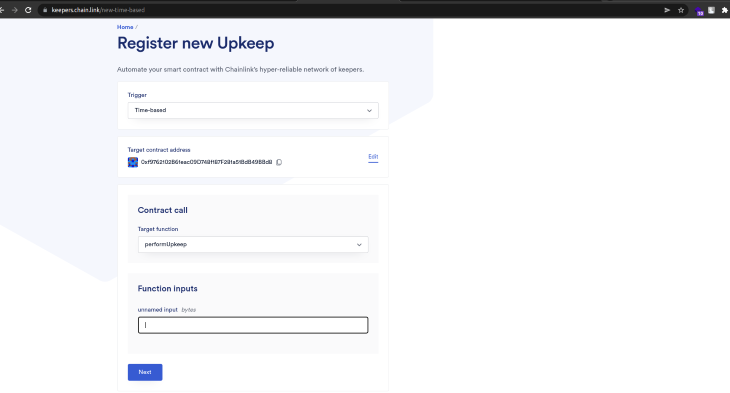
Now, enter your contract’s address in the Function Input field:
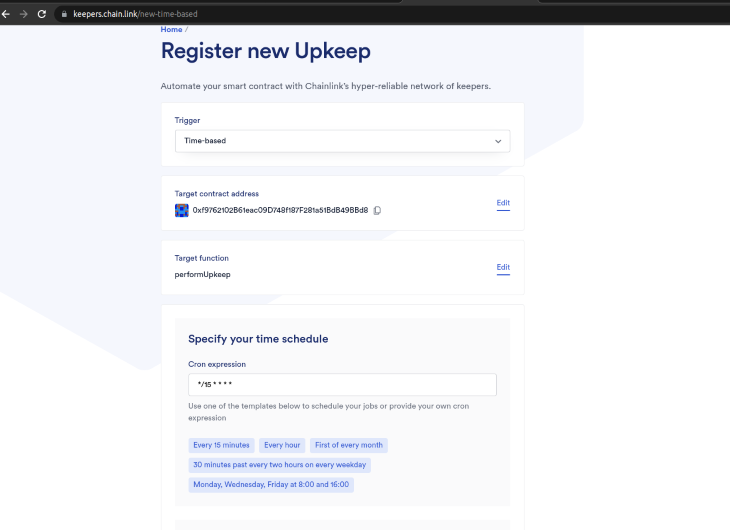
Specify the time schedule for Chainlink Keepers to perform upkeep on your smart contract. In the Cron expression field, indicate that upkeep should be performed every 15 minutes.
Next, provide details for your upkeep by entering the appropriate information into the following fields: Upkeep name, Gas limit, Starting balance of LINK tokens, and Your email address. Then, click Register Upkeep:
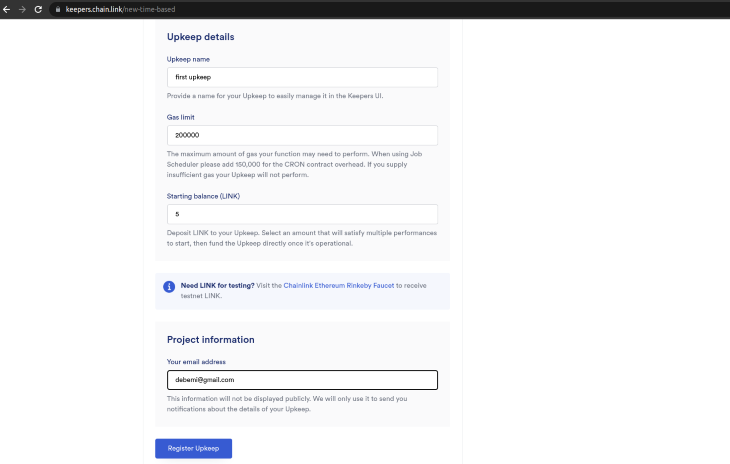
That’s it! Chainlink Keepers has successfully registered your smart contract for automated upkeep.
Gelato Network
The Gelato Network is a decentralized network of bots that automates the execution of smart contracts on all EVM blockchains. Gelato‘s easy-to-use architecture provides a reliable interface for DeFi applications.
Demo: Automating a smart contract with Gelato
To automate a smart contract with the Gelato Network, follow these steps:
- Create a new smart contract on Remix IDE that implements a counter
- Compile and deploy the smart contract to the Rinkeby test network
- Connect your MetaMask wallet to the Gelato Network and make a deposit
- Create a task on Gelato with the deployed contract address and some configurations
Let’s get started!
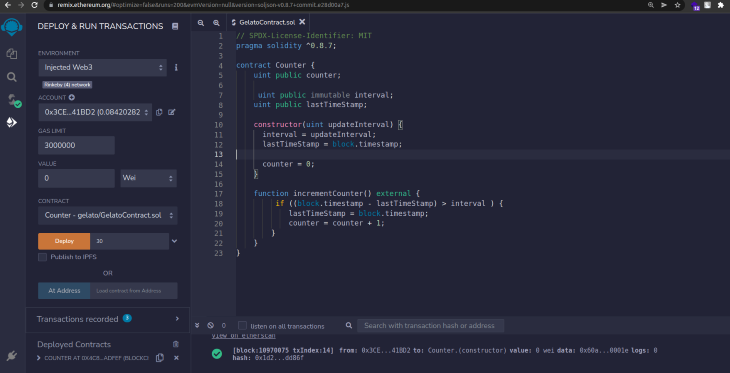
On your Remix IDE, create a gelato folder with a GelatoContract.sol file that defines a function that increments a counter variable based on the following condition:
// SPDX-License-Identifier: MIT
pragma solidity ^0.8.7;

contract Counter {
   uint public counter;

    uint public immutable interval;
   uint public lastTimeStamp;

   constructor(uint updateInterval) {
     interval = updateInterval;
     lastTimeStamp = block.timestamp;

     counter = 0;
   }

   function incrementCounter() external {
        if ((block.timestamp - lastTimeStamp) > interval ) {
           lastTimeStamp = block.timestamp;
           counter = counter + 1;
       }
   }
}
Compile the contract and navigate to the Gelato Network. Choose the Rinkeby network from the top, right dropdown. Then, connect your wallet:
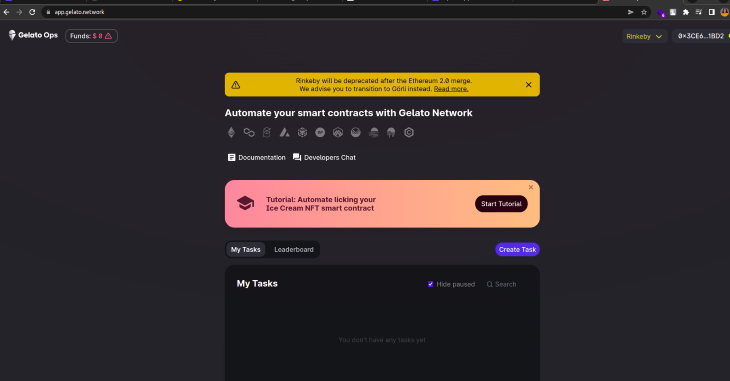
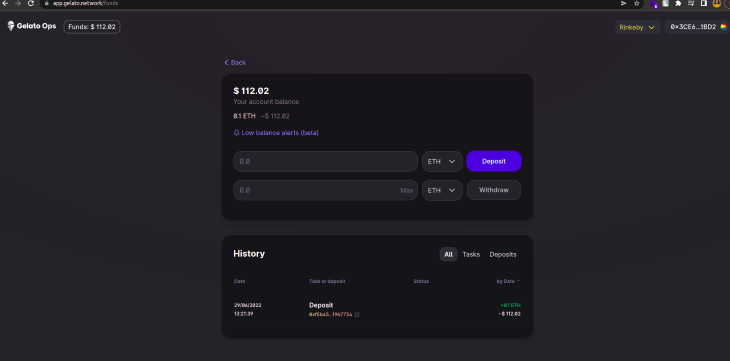
Next, click on Funds and add a deposit of 0.1 ETH:
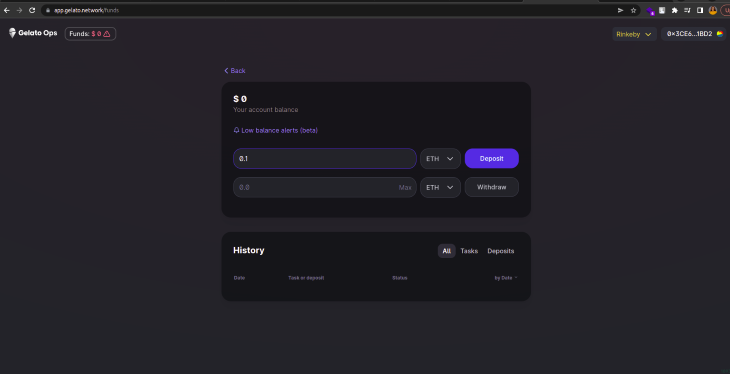
Once you click on Deposit, MetaMask will open. Click Confirm and a message should appear on your screen indicating that the transaction was successful.
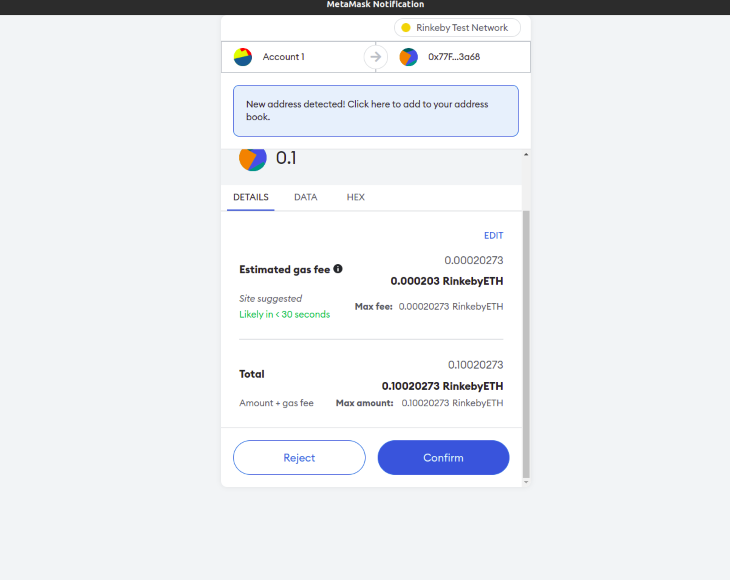
Next, some ETH will be added to your balance.
Now, return to the Remix IDE and deploy your contract on the Rinkeby test network with an interval of 30 seconds.
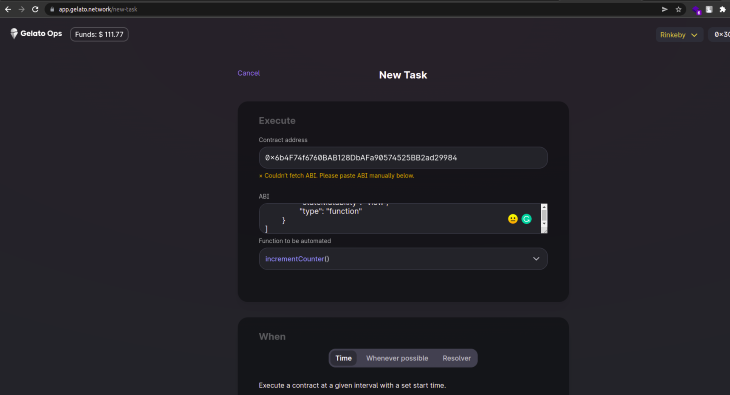
Create a new task by passing your deployed contract address and pasting your contract’s ABI into the ABI field.
Then, choose the incrementCounter() function from the Funtion to be automated dropdown.
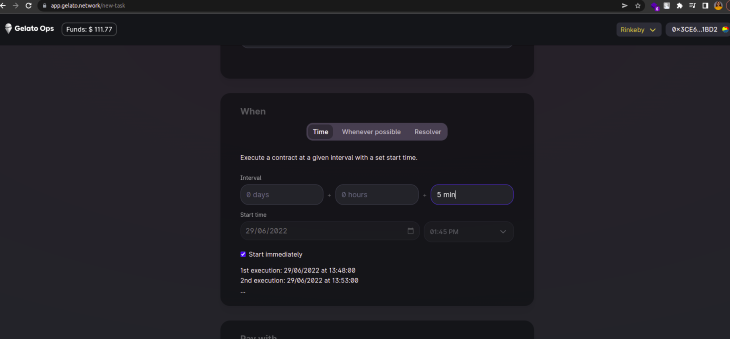
Choose a frequency of five minutes for Gelato to automate the execution of your smart contract. Then, select the Start immediately checkbox to instruct Gelato to execute your smart contract as soon as you create the task.
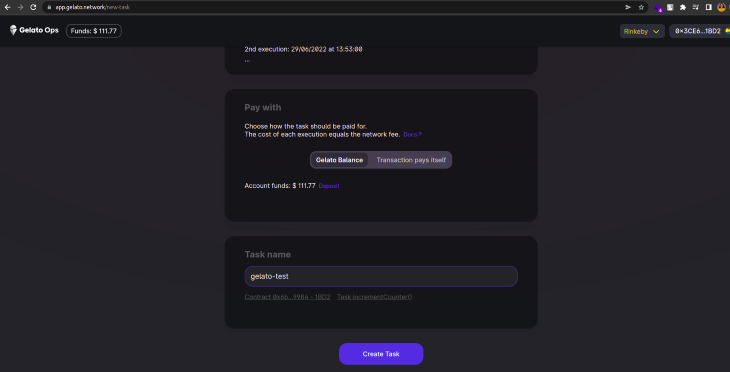
Choose the payment method for the task, click Create Task, and confirm your transaction on MetaMask.
On your Remix IDE, if you click on counter, you’ll notice that it has increased by one and will continue to increment every five minutes:
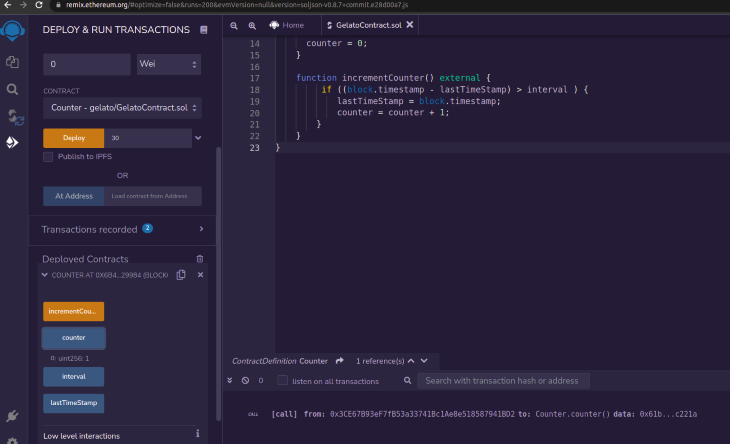
OK, you’ve successfully set up automation for your smart contract on Gelato!
OpenZeppelin Defender
OpenZeppelin is a popular tool for building secure decentralized applications. Defender is an OpenZeppelin product that is made for secure smart contract automation and supports Layer 1 blockchains, Layer 2 blockchains, and sidechains.
OpenZeppelin Defender offers the following features related to smart contract automation:
- Admin: Enables the transparent management of smart contract processes like access control (administrative rights over an asset), upgrade (fixing bugs encountered or applying new services), and pausing (using pause functionality)
- Relay: Permits the creation of Relayers (externally owned accounts) that easily secure your private API keys for signing, managing (sending) your transactions, and enforcing policies like gas price caps
- Autotasks: Connects to Relayers, allowing the writing and scheduling of code scripts in JavaScript that will run on smart contracts periodically with the help of external Web APIs or third-party services
- Sentinel: Monitors your smart contracts for transactions and provides notifications about transactions based on specified conditions, functions, or events
- Advisor: Helps you stay current with security best practices, including the implementation of security procedures for smart contract development, monitoring, operations, and testing
Demo: Automate a smart contract with OpenZeppelin Defender
Now, let’s use the features described above to automate a smart contract with OpenZeppelin Defender.
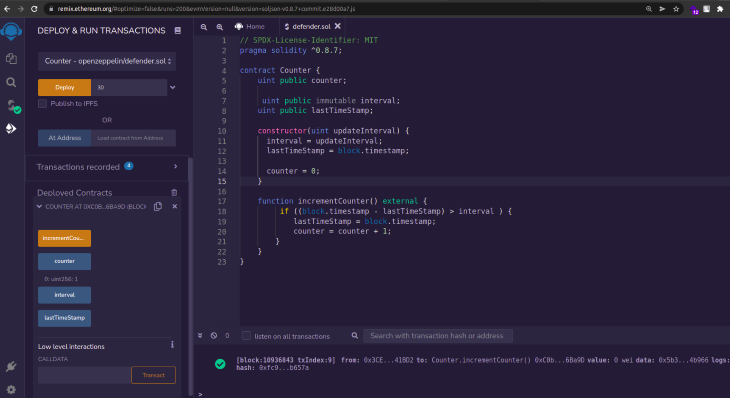
First, create a smart contract on your Remix IDE. Use the same code you used previously, but give it a new name and place it in a different folder:
// SPDX-License-Identifier: MIT
pragma solidity ^0.8.7;

contract Counter {
   uint public counter;

    uint public immutable interval;
   uint public lastTimeStamp;

   constructor(uint updateInterval) {
     interval = updateInterval;
     lastTimeStamp = block.timestamp;

     counter = 0;
   }

   function incrementCounter() external {
        if ((block.timestamp - lastTimeStamp) > interval ) {
           lastTimeStamp = block.timestamp;
           counter = counter + 1;
       }
   }
}
Deploy the contract to the Rinkeby test network and confirm your transaction on MetaMask. Then, carry out the following steps:
Step 1: Create a Relayer
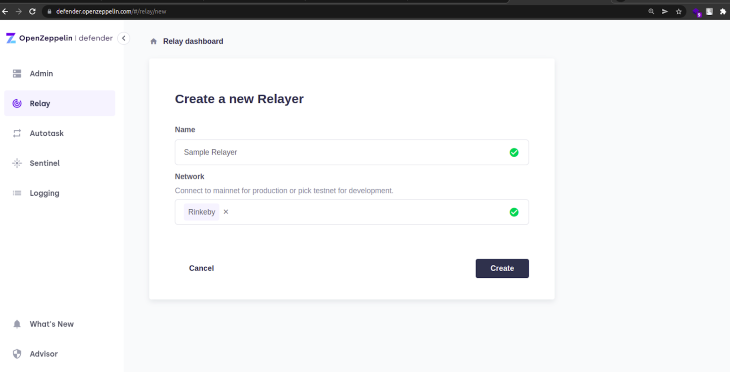
Navigate to the OpenZeppelin Defender Relay dashboard and create your Relayer by providing a Name and selecting a Network:
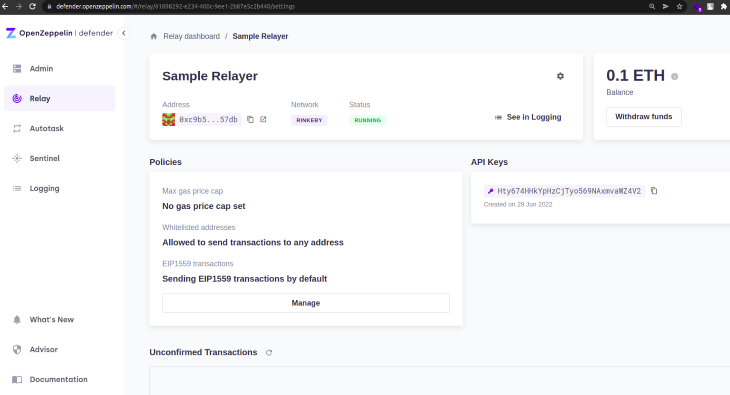
Once you create your Relayer, your ETH address, API key, and secret key will be visible on your screen. Copy your secret key, save it somewhere secure, and then copy your ETH address.
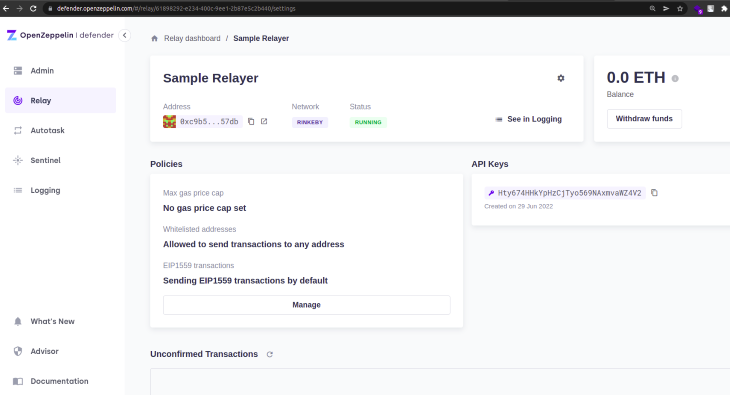
Next, fund your Relayer address with some ETH by pasting your address in a Rinkeby faucet. Then, refer to your Relayer to confirm that the ETH has been sent to your OpenZepplin account:
Step 2: Create an Autotask
Next, create an Autotask in the Defender Autotask dashboard that will connect to the Relayer you just created.
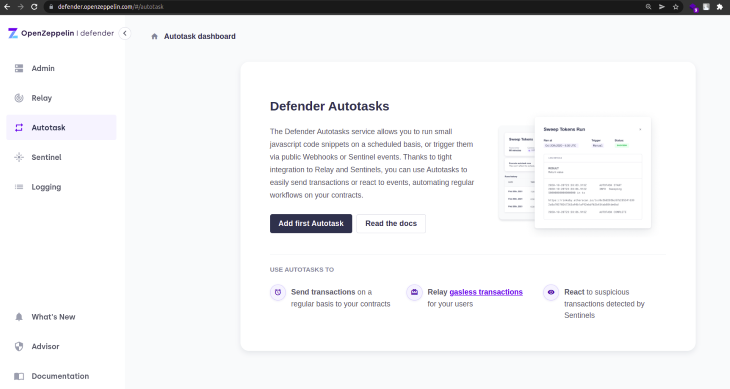
Click on Add first Autotask; you’ll have a choice of triggering the task via a schedule or an HTTP request. For this demo, select Schedule, select two minutes for the Runs Every timeframe, and add your Relayer name in the Connect to a relayer field.
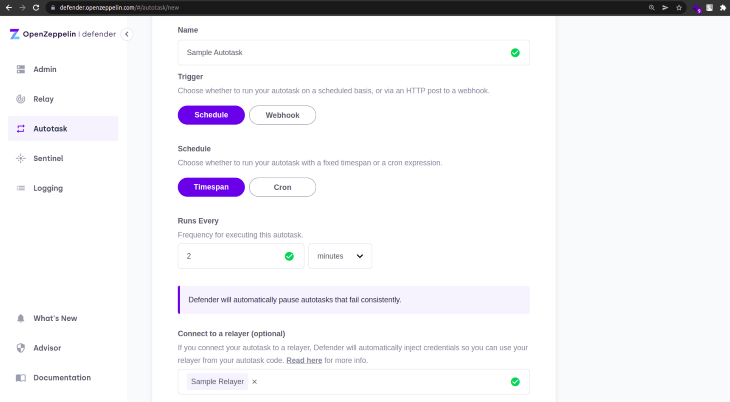
Now, pass the JavaScript code snippet which uses ethers.js with defender-relay-client to export a DefenderRelaySigner and DefenderRelayProvider for signing and sending transactions.
The following code snippet calls and executes the incrementCounter() function defined in your smart contract:
const { DefenderRelaySigner, DefenderRelayProvider } = require('defender-relay-client');
const { ethers } = require("ethers");
const ABI = [`function incrementCounter() external`];

const ADDRESS = '0xC1C23C07eC405e7dfD0Cc4B12b1883b6638FB077'

async function main(signer) {
        const contract = new ethers.Contract(ADDRESS, ABI, signer);
          await contract.incrementCounter();
          console.log('Incremented counter by 1');
}

exports.handler = async function(params) {
        const provider = new DefenderRelayProvider(params);
          const signer = new DefenderRelaySigner(params, provider, { speed: 'fast' })
    console.log(`Using relayer ${await signer.getAddress()}`);
          await main(signer);
}openzepp
Click on Autotask. Then, copy and paste the above snippet into the Code section of the dashboard:
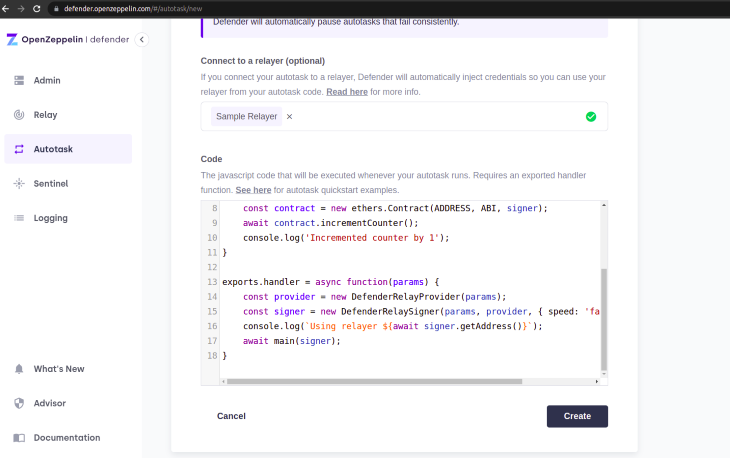
Click the Create button and Autotask will automatically execute the incrementFunction() every two minutes with the ETH balance in your Relayer.
Once the Autotask starts running, check the counter on your Remix IDE. After two minutes it should increase by one.
Pros and cons of using Chainlink Keepers, Gelato, and OpenZeppelin Defender
Chainlink Keepers, the Gelato Network, and OpenZeppelin Defender are all good options for smart contract automation. Here are some of the tradeoffs to keep in mind when selecting a smart contract automation tool for your project.
| Smart contract automation tool | Pros | Cons |
|---|---|---|
| Chainlink Keepers | – Runs on multiple blockchain networks – Offers comprehensive documentation |
– LINK tokens (ERC-677) are needed to pay the network – The smart contract must be compatible with Chainlink Keepers – LINK tokens use the ERC-677 token standard and can not be used directly on non-Ethereum blockchains like BNB chain and Polygon (MATIC) until they are bridged and swapped |
| Gelato Network | – Provides two options to pay for smart contract automation – Supports numerous blockchain networks – Easy-to-use architecture |
– Tasks can not be edited after they are created |
| OpenZeppelin Defender | – Supports multiple blockchain networks – Provides quick notifications about transactions via the specified notification pattern (e.g., email) – Provides a transparent means to easily manage tasks |
– More complex to use compared to other smart contract automation tools |
Conclusion
Enabling the automation of many smart contract functions saves time and improves security. In this article, we reviewed some popular smart contract automation tools (Chainlink Keepers, Gelato Network, and OpenZeppelin Defender), discussed their pros and cons, and demonstrated how to automate a smart contract with each tool.
The post Tools for smart contract automation: Guide with examples appeared first on LogRocket Blog.
from LogRocket Blog https://ift.tt/XKcP51v
Gain $200 in a week
via Read more


