There are times when we just want to use an application and do not have the patience to sign up and sign in with our email and password first. We might also just want to try out the application and do not want the burden of having to create a new account just for that.
At the same time, the owners of the application need to know how many users have used their application to get feedback about who’s using their application and how. To do that, they need the users to sign up with their emails to get the statistics.
These two situations put both the users and the app owners in a bit of a pickle. This is where having a Google login feature plays a very vital role.
Since Google is the most popular email platform in the world, allowing users to use Google login with your React app eliminates the friction between users and app owners. Users can begin using an application almost immediately without having to create a completely new account.
In this article we will learn how Google login works and how we can add it in our React app using a package called react-google-login. We will cover:
- Packages needed to add Google login to your React app
- Acquiring a Google client ID for your project
- Configuring a Google login consent screen for your React app
- Creating your web client ID
- Putting it all together with
react-google-login - Creating a user profile in your React app based on the user’s Google profile
To follow along with this tutorial, you should have React installed in your local computer and be familiar with how to use it. If you have installed React, then you should already have Node.js, npm, and Yarn installed too.
Packages needed to add Google login to your React app
To use the Google login, we will install two packages.
First, gapi-script is an npm package that loads Google API scripts and initializes some functions.
The second package is called react-google-login and allows us to integrate the Google login feature into our React app. Additionally, react-google-login allows us to obtain the access tokens we need to access all Google APIs both quickly and safely.
Before we install and begin integrating gapi-script and react-google-login into our React app, we will have to first configure a few things with Google. Let’s start by getting a Google client ID.
Acquiring a Google client ID for your project
A client ID is a unique identifier associated with an application that assists with client and server OAuth 2.0 authentication.
To get a client ID from Google, go over to your Google Cloud Console and create a new project. For this article, I have named the project “Google Sign In,” but you can name it whatever you want:

After creating a project, enter the project to see a dashboard that looks like the one shown below. Your current project name should be visible at the top left of your dashboard page next to the Google Cloud logo:
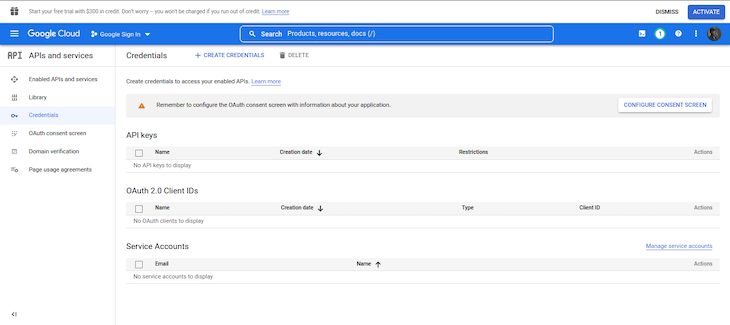
Next, let’s go over how to configure your consent screen before creating your credentials.
Configuring a Google login consent screen for your React app
A consent screen, as the name suggests, is a consent page that prompts the user to use an external or third-party library to log in. This step alerts the user that they are leaving your app’s root page and allowing access to a third-party page.
Simply put, when you use OAuth 2.0 for authorization, your app requests the user to authorize one or more scopes of access from a Google Account. Scopes of access include any information or activities your app is allowed to access or exercise on the user’s account.
The Google login consent screen your app displays to the user may include a brief description of your project, its policies, and the requested scopes of access.
A simple consent page can look like this:
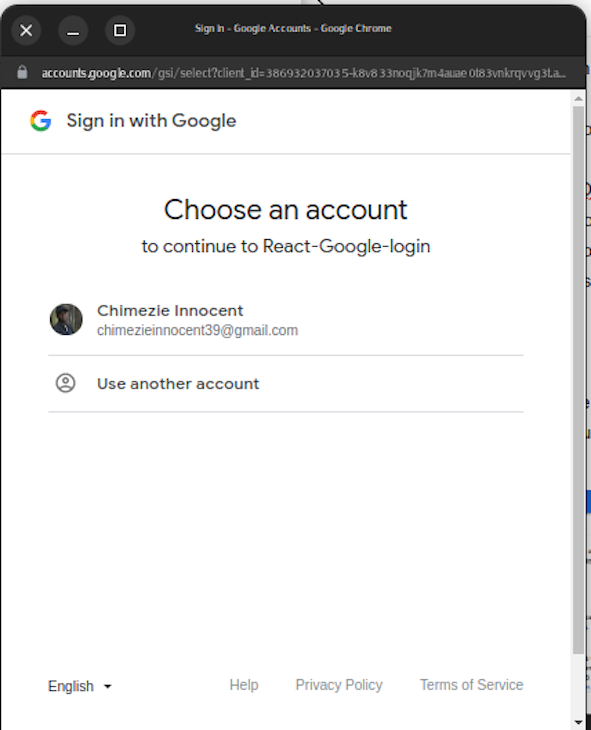
To configure the Google consent page for your React app, go to the “OAuth consent screen” tab on the left-side menu of your Google Cloud Console.
Once you are in this tab, choose external — which is actually the only option you can choose unless you are using a Google-verified organization or application — and click on the “Create” button to create your consent screen.
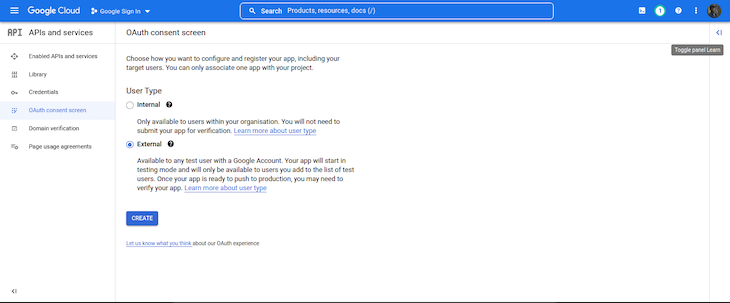
Next, in the same tab, choose a name for your application and an email address to get notifications about any changes to your project. You can keep the other requirements and options empty for now. If you have the details ready, you can add them during this step if you want.
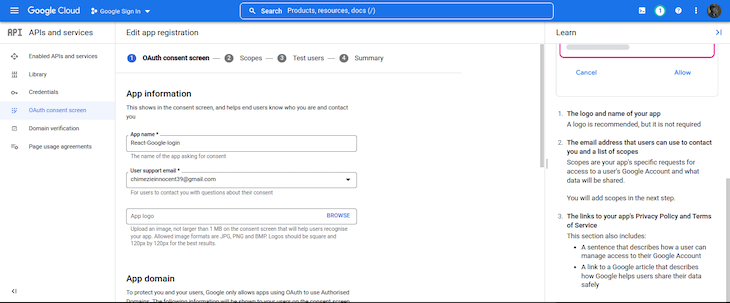
You can also skip the rest of the registration sections for now. Just scroll down on every section and click ”Save and continue” until you are finally taken back to the dashboard after completion.
Creating your web client ID
Next, in the left side menu, you will see a tab labeled “Credentials.” Click on this tab to go to the page where you can create your web client ID.
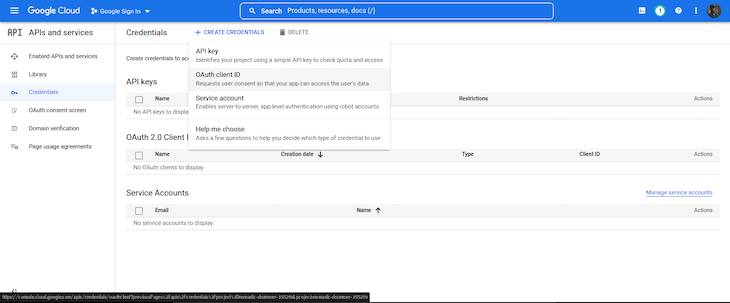
On this page, click on “Create credentials” at the top of the page, and then click on the “OAuth client ID” option.
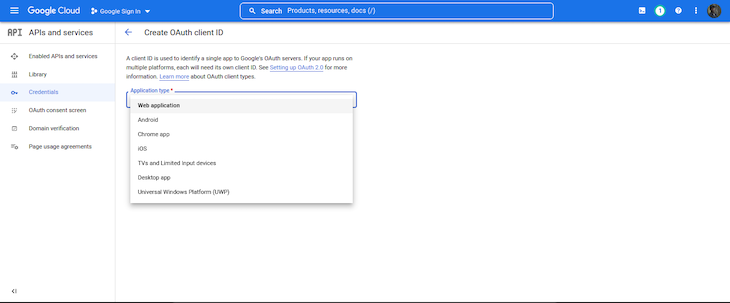
You will be prompted to select an application type, as shown in the image below. If you are following these steps for a React app, choose “Web application.” This is because we are using the Google client ID for the web.
If you are integrating it in a React Native, Flutter, or Swift application, you can choose the Android or iOS options for the two respective operating systems.
Next, we will choose a name for our client ID. This name is simply used to note or define the particular ID we are creating. So for example, if we are creating web, iOS, and Android IDs, we can include “Web ID,” “Android ID,” “iOS ID,” and so on in their names to differentiate them.
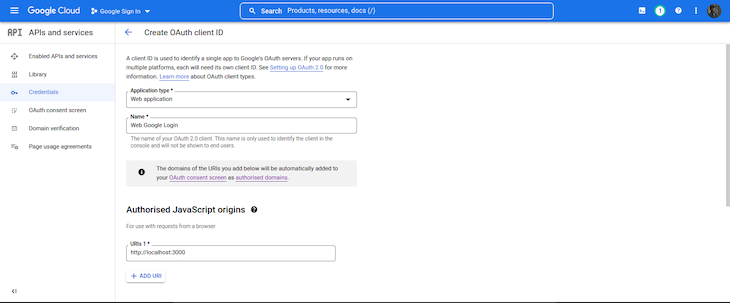
Next, we will also be adding two types of URLs: authorized JavaScript origins and authorized redirect URLs.
The authorized JavaScript origins URL is the URL from which your application is originating the login; i.e., localhost and localhost:3000 for React developers, or your hosted URL if you’ve hosted your application.
The authorized redirect URL is the link that Google will redirect the user to after the login is successful. For example, you may want to take the user back to your original link, or maybe redirect the user to another link. Either way, you have to include the URL here.
For this tutorial’s authorized JavaScript origins and authorized redirect URLs, write your localhost URLs: http://localhost:3000. See below:
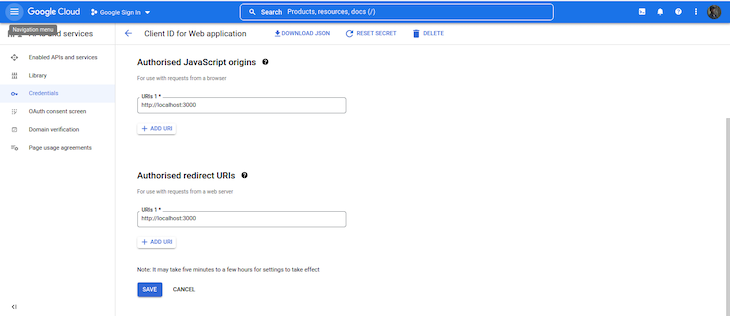
Finally, click on the “Create” button to create your web client ID. You will be taken back to the homepage, where you will see your newly created credential. Click on the copy icon to copy your new web client ID.
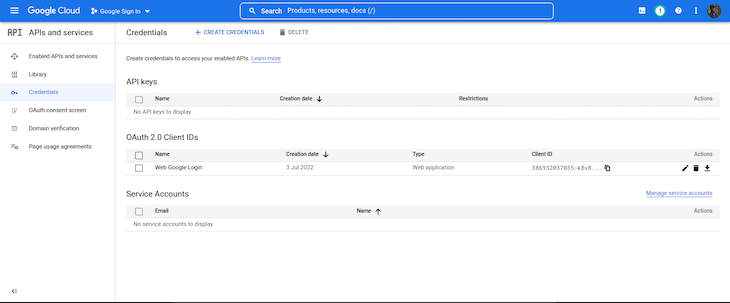
Now that we have successfully created our web client ID, let us go into our React app, install, and then integrate the Google login.
Putting it all together with react-google-login
As you may remember, we will be installing the two packages gapi-script and react-google-login for our project. Run either of the commands below to install them:
//npm
npm install react-google-login gapi-script

//Yarn
yarn add react-google-login gapi-script
Just like with every installed package in React, we must first import the modules before we can use them. In your App.js file, import the modules by writing the code below:
/*App.js*/

import { GoogleLogin } from 'react-google-login';
import { gapi } from 'gapi-script';
Next, we initialize our clientId using gapi, which is Google’s client library for browser-side JavaScript. It is a package that helps us load gapi scripts and initialize functions, and it is used in Google sign-in and other external web pages to easily connect with Google’s APIs.
To initialize our client, we will call the gapi function in our useEffect hook so that it gets called when our page loads or on every render:
/*App.js*/

const clientId = '386932037035-k8v833noqjk************.apps.googleusercontent.com';\

useEffect(() => {
   const initClient = () => {
         gapi.client.init({
         clientId: clientId,
         scope: ''
       });
    };
    gapi.load('client:auth2', initClient);
});
Next, we will add the login button that we imported from react-google-login:
/*App.js*/

    const onSuccess = (res) => {
        console.log('success:', res);
    };
    const onFailure = (err) => {
        console.log('failed:', err);
    };
    return (
       <GoogleLogin
          clientId={clientId}
          buttonText="Sign in with Google"
          onSuccess={onSuccess}
          onFailure={onFailure}
          cookiePolicy={'single_host_origin'}
          isSignedIn={true}
      />
  );
The GoogleLogin button calls the clientId and returns either a success response or an error.
If the response was successful, the onSuccess function handles it. If the response returned is an error, then the onFailure function handles it. The isSignedIn attribute keeps the user signed in by calling the onSuccess callback.
In our browser, testing out the code above will look like below;
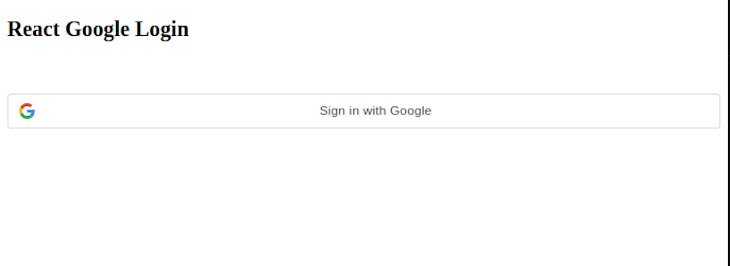
Additionally, clicking on the “Sign in with Google” button will prompt a consent screen or modal that will look like the below:
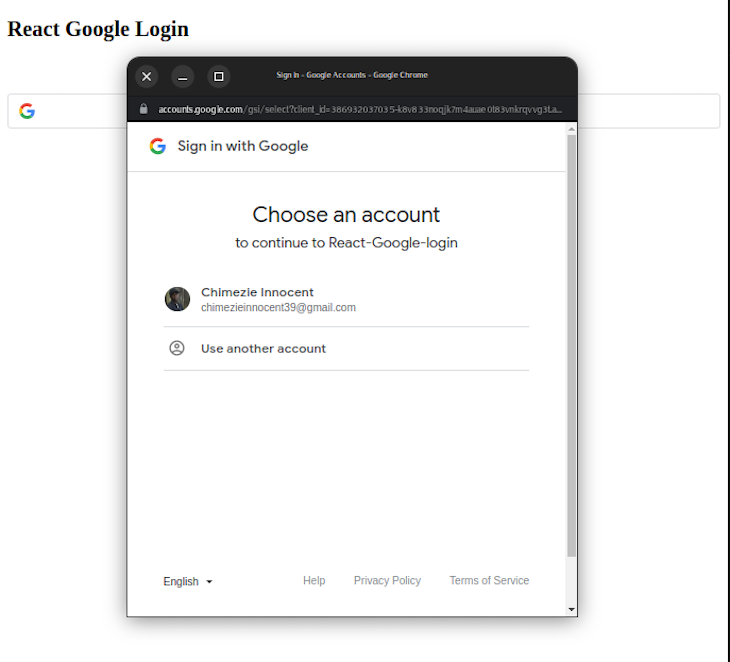
Now that we have seen how to add the Google login to our React app, let’s take it a step further and get the user’s details to create a user profile in our app. We will only be redirecting the user to a homepage and then getting the user’s email, name, and image.
Creating a user profile in your React app based on the user’s Google profile
Integrating Google login with our app gives us access to the user’s profile, which includes the user’s name, email address, image, accessToken, googleId, id_token, and so on. We will use this information to create our user’s profile.
Still in our App.js component, let’s replace our existing code with this one below:
/*App.js*/

import React, { useState, useEffect } from 'react';
import { GoogleLogin, GoogleLogout } from 'react-google-login';
import { gapi } from 'gapi-script';

function App() {
    const [ profile, setProfile ] = useState([]);
    const clientId = '386932037035-k8v833noqjk7m4auae0t83vnkrqvvg3t.apps.googleusercontent.com';
    useEffect(() => {
        const initClient = () => {
            gapi.client.init({
                clientId: clientId,
                scope: ''
            });
        };
        gapi.load('client:auth2', initClient);
    });

    const onSuccess = (res) => {
        setProfile(res.profileObj);
    };

    const onFailure = (err) => {
        console.log('failed', err);
    };

    const logOut = () => {
        setProfile(null);
    };

    return (
        <div>
            <h2>React Google Login</h2>
            <br />
            <br />
            {profile ? (
                <div>
                    <img src={profile.imageUrl} alt="user image" />
                    <h3>User Logged in</h3>
                    <p>Name: {profile.name}</p>
                    <p>Email Address: {profile.email}</p>
                    <br />
                    <br />
                    <GoogleLogout clientId={clientId} buttonText="Log out" onLogoutSuccess={logOut} />
                </div>
            ) : (
                <GoogleLogin
                    clientId={clientId}
                    buttonText="Sign in with Google"
                    onSuccess={onSuccess}
                    onFailure={onFailure}
                    cookiePolicy={'single_host_origin'}
                    isSignedIn={true}
                />
            )}
        </div>
    );
}
export default App;
In our code above, we imported our GoogleLogin and GoogleLogout buttons from react-google-login.
The GoogleLogin button makes a login request to the clientId that we provided, and gapi connects us to Google API using that same clientId. If the request fails, we handle the error in our onFailure function. If the request is successful, we handle it in our onSuccess function.
Next, in our onSuccess function, we set our profile state with the data that was returned. This data contains the user’s details, like google_id, access and id_token, email, name, and so on.
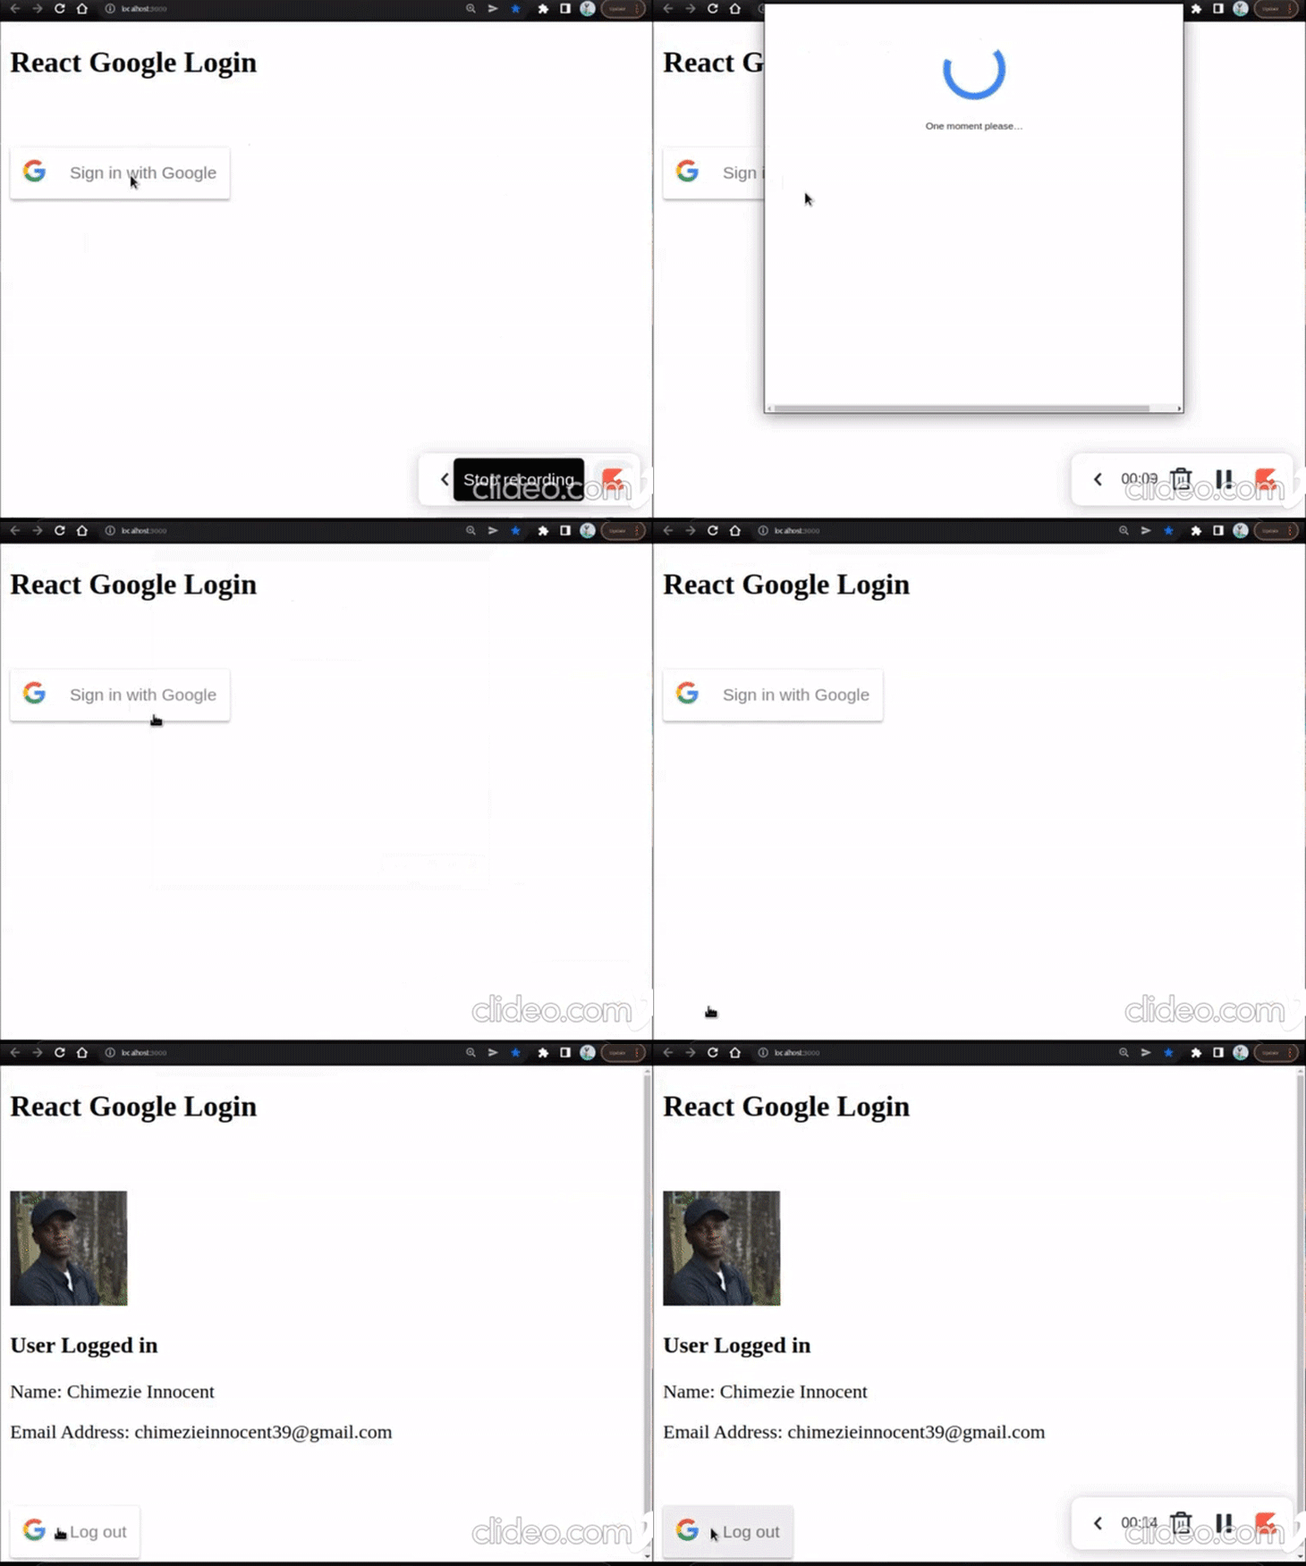
Finally, we are using a conditional to change our UI: if profile is true, the UI will show us the profile of the logged-in user with their image, name, and email. If the profile becomes null (i.e. when the user has logged out using the GoogleLogout button), it will show us the login button.
Conclusion
Google login is an important feature to include in our applications to save time and improve the user’s experience. Another great reason to add this feature is that it is fast and easy to both implement and use.
In this tutorial, we reviewed how to add Google login to our React application with react-google-login. For another approach, learn about how you can use Firebase to handle Google authentication and sign-in for your React apps.
I hope you found this article both easy to understand and helpful for your own projects.
The post The guide to adding Google login to your React app appeared first on LogRocket Blog.
from LogRocket Blog https://ift.tt/5gCbd21
Gain $200 in a week
via Read more


