A little bit more than three years ago, I revealed the idea of forming micro-frontends via some kind of discovery mechanism in a post for LogRocket, Taming the frontend monolith. The discovery mechanism, known as a feed service, was at the heart of a solution to which I was contributing.
That solution was Piral, which we officially revealed at O’Reilly’s Software Architecture conference half a year later.
Today, Piral is one of the most-used and well-known solutions in the micro-frontend space. That alone would justify another blog post — but then, we also have the increased popularity of micro-frontends, as well as the demand for scalability in general.
Without further ado, let’s have a look at what micro-frontends are, why loose coupling is so important for them, and how Piral solves this (and other issues) to achieve great scalability. We’ll cover this in the following sections:
- What are micro-frontends?
- Scalability problems with other micro-frontend frameworks
- How does Piral differ?
- Developing your app shell with Piral
- Creating the app emulator
- Rolling out micro-frontends
- Integrating SWR to perform HTTP requests
What are micro-frontends?
In recent years, micro-frontends have become increasingly popular. One reason for this is the increased demand for larger web applications. Today, powerful portals such as the AWS and Azure portals, along with rich user experiences like Netflix or DAZN, are not the exception but the norm. How can such large applications be built? How can they be scaled?
One answer to those questions can be using micro-frontends. A micro-frontend is the technical representation of a business subdomain. The basic idea is to develop a piece of the UI in isolation. This piece does not need to be represented on the screen in one area; it can actually consist of multiple fragments, i.e., a menu item and the page that the menu item links to. The only constraint is that the piece should be related to a business subdomain.
A micro-frontend consists of different components, but these are not the classical UI components like dropdowns or rich text field boxes. Instead, these components are domain-specific components and contain some business logic, such as what API requests need to be made.
Even a simple thing like a menu item is a domain component in this context because it will already know the link to the page is from the same business domain. Once the component has some domain logic, it is a domain component — and can therefore be part of a micro-frontend.
To implement micro-frontends, a whole set of approaches and practices exist. They can be brought together at build time, on the server side, and on the client side.
In this article we’ll look at composition on the client side, but the same story could be written for the server. So how do micro-frontends actually scale?
Scalability problems with other micro-frontend frameworks
Many micro-frontend frameworks face scalability issues in real-world contexts. Looking at other articles, the technology seems sound at first; for instance, if you read Creating micro-frontends apps with single-spa or Building Svelte micro-frontends with Podium, they introduce the technology and use case well. Another example can be seen in Build progressive micro-frontends with Fronts.
The problem is that these frameworks usually try to split the UI visually. However, in reality, you will never split your frontend into parts like “navigation”, “header”, “content”, and “footer”. Why is that?
A real application is composed of different parts that come, as explained in the previous section, from different subdomains that come together to form the full application domain. While these sub-domains can be fully separated nicely on paper, they usually appear to the end user within the same layout elements.
Think of something like a web shop. If you have one subdomain for the product details and another subdomain handling previous orders, then you wouldn’t want to only see meaningless IDs of products in your order history as a user. Instead, you’d expect that at least the product name and some details are shown in the order history. So, these subdomains interleave visually towards the end user.
Likewise, practically almost every subdomain has something to contribute to shared UI layout elements, such as a navigation, header, or footer. Therefore, having micro-frontends that exclusively deal with a navigation area does not make much sense in practice because this micro-frontend will receive a lot of requests from other teams — and become a bottleneck. Doing that will result in a hidden monolith.
Now, somebody may argue that not having the navigation in a micro-frontend would result in the same demand on changes, but this time on the app shell owner. This would be even worse.
So what is the solution then? Clearly, we need to decouple these things. So instead of using something like:
import MyMenuItem1 from 'my-micro-frontend1';
import MyMenuItem1 from 'my-micro-frontend2';
import MyMenuItemN from 'my-micro-frontendN';

const MyMenu = () => (
    <>
        <MyMenuItem1 />
        <MyMenuItem2 />
        <MyMenuItemN />
    </>
);
We need to register each of the necessary parts, such as the navigation items from the micro-frontends themselves. This way, we could end up with a structure such as:
const MyMenu = () => {
    const items = useRegisteredMenuItems();

    return (
        <>
            {items.map(({ id, Component }) => <Component key={id} />)}
        </>
    );
};
To avoid needing to know the names and locations of a micro-frontend, a kind of discovery is needed. This is just a JSON document that can be retrieved from a known location, such as a backend service.
Now that we know what we need to scale, it’s time to start implementing. Luckily, there is a framework that gives us already a head start on this: Piral.
How does Piral differ?
Piral is a framework for creating ultra-scalable web apps using micro-frontends. Among many things, it features:
- An integrated micro-frontends discovery mechanism
- An extensive developer experience that’s end-to-end with everything you’d need
- Loosely coupled components with cross-framework support
This way, individual teams can focus on their specific domain problems, instead of requiring alignment and joint releases. A Piral application consists of three parts:
- The app shell. This can be as simple as an HTML file containing a reference to the micro-frontend discovery service, known as a feed
- The feed of micro-frontends (could be also a static JSON, but usually you’d want something more powerful)
- The different modules (micro-frontends), referred to as pilets
The whole setup can be sketched as follows:
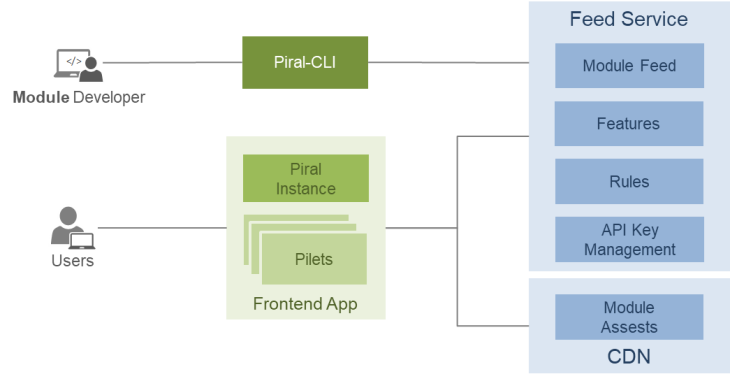
The module developers can use the command line utility piral-cli to scaffold (i.e., create with some template) and publish new pilets, debug and update existing modules, or perform some linting and validations. The real users don’t see the solution as different pieces — they actually consume the app shell together with the pilets in one application. Technically, these pilets are fetched from a feed service.
Quite often, the dev experience for micro-frontends is not ideal. Either multiple things need to be checked out and started, or the whole process boils down to a develop-submit-try-fail-restart cycle. Piral is different here — it tries to be offline-first. Micro-frontends are developed directly in a special edition of the app shell known as an emulator.
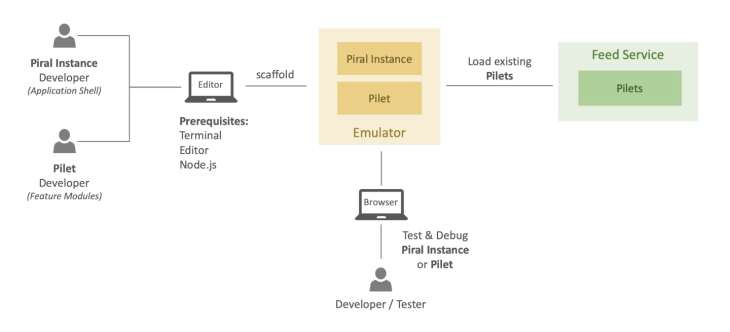
The emulator is just an npm package that can be installed in any npm project. When the piral-cli is used for debugging, it will actually use the content from the emulator as the page to display. The pilet will then be served via an internal API instead of going to a remote feed service or something similar.
Nevertheless, it may still make sense to load existing micro-frontends during development. In such cases, pilets from an existing feed can still be integrated.
Let’s see how this all works in practice.
Developing your app shell with Piral
There are multiple ways to create an app shell with Piral:
- Migrating an existing project
- Adding packages to a new project manually
- Using the
piral-clito create a new project
In this post, we’ll do the latter.
On the command line, we run:
npm init piral-instance --bundler esbuild --target my-app-shell --defaults
This will create a new app shell in the my-app-shell directory. The project will use npm, TypeScript, and the esbuild tooling as our bundler (though we could have actually selected any kind of bundler, such as webpack, Parcel, or Vite, etc.). Choosing esbuild should be sufficient in many cases and provides the benefit of the fastest installation time.
Now, we can start debugging the project. Go into the new directory (e.g., cd my-app-shell) and start the debugging session:
npm start
Going to http://localhost:1234 should show you the standard template:

Changing the template
We can now change the template in all possible aspects. For instance, we could change the provided layout to not have any fixed content tiles; just edit the src/layout.tsx file and remove the defaultTiles and the defaultMenuItems. Make sure not only to remove their initialization, but also the references to them.
To get more detailed, we can change the DashboardContainer from:
DashboardContainer: ({ children }) => (
  <div>
    <h1>Hello, world!</h1>
    <p>Welcome to your new microfrontend app shell, built with:</p>
    <div className="tiles">
      {defaultTiles}
      {children}
    </div>
  </div>
),
to:
DashboardContainer: ({ children }) => (
  <div>
    <h1>Hello, world!</h1>
    <p>Welcome to your new microfrontend app shell, built with:</p>
    <div className="tiles">
      {children}
    </div>
  </div>
),
All the components that can be seen here serve different purposes. While many of them come from optional plugins, some — such as the ErrorInfo or Layout — are already defined via the core library driving Piral.
In the case above, we define the dashboard container for the dashboard plugin from Piral. The dashboard plugin gives us a dashboard, which — by default — is located at the homepage (/) of our page. We can change everything here, including what it looks like and where it should be located (and, of course, if we want to have a dashboard at all).
Dashboards are great for portal applications because they gather a lot of information on one screen. For micro-frontends, a dashboard is also good — especially as a showcase. On this page, potentially most, if not all, of the micro-frontends want to show something.
After removing the default tiles from the dashboard container, the web app should now look a bit more empty:

The main reason for the emptiness of our web app is that we don’t integrate any micro-frontends that render components somewhere. At this point, the scaffolding mechanism wired our new app shell to a special feed that is owned by Piral itself: the empty feed.
The empty feed is a feed that, as the name suggests, will always remain empty. We can change the app shell’s code to go some other feed instead.
Changing feeds to display different pilets
For this, you need to open the src/index.tsx file. There, you’ll see the variable with the URL for the feed to be used:
const feedUrl = 'https://feed.piral.cloud/api/v1/pilet/sample';
Going to the sample feed, which is used in another app shell, we can actually see how the shell could look if properly populated by micro-frontends. The dashboard should now look like:
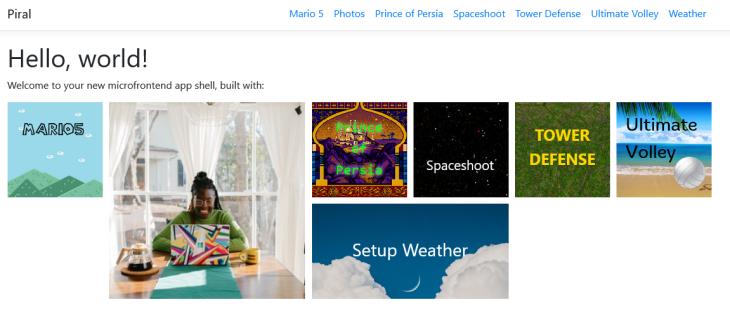
The fact that we can already display pilets from another feed in our new app shell is actually quite cool. This indicates upfront that the pilets are really independent and have no strong relation with their shell.
However, keep in mind that such a smooth integration may not always be possible. Pilets can always be developed in a way that would be rather easy to integrate in other Piral instances. Likewise, developing a pilet in a way that rules out different app shells is possible, too.
Creating the app emulator
Before we can develop some micro-frontends for this app shell, we need to create its emulator. Stop the debug process and run the following command:
npm run build
This will run piral build on the current project. The result is that there are two sub-directories in dist:
dist/releasedist/emulator
While the former can be used to actually deploy our web app somewhere, the latter contains a .tgz file that can be uploaded to a registry like this:
npm publish dist/emulator/my-app-shell-1.0.0.tgz
You might need npm credentials to publish the package, but even if you’re already logged into npm you may not want to publish it and instead keep it private, or publish on a different registry.
For testing the publishing process with a custom registry, you can use Verdaccio. In a new shell, start:
npx verdaccio
This will install and run a local version of Verdaccio. You should see something like the following printed on the screen:
warn --- http address - http://localhost:4873/ - verdaccio/5.13.1
Go to this address and see the instructions. They should look like:
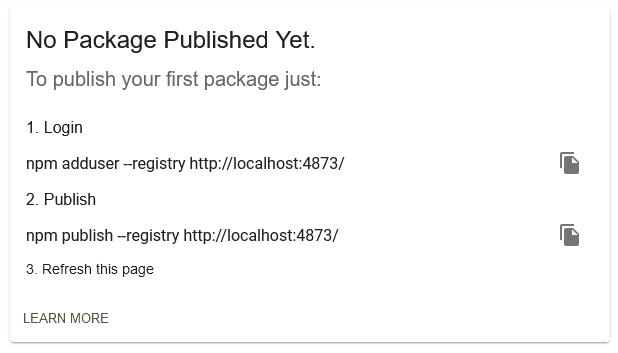
Run the login command (npm adduser --registry http://localhost:4873/) and fill out the data. For Username and Password, you can just use test. Anything will be taken; the Email can be as simple as foo@bar.com.
Publishing to the custom registry now works via:
npm publish dist/emulator/my-app-shell-1.0.0.tgz --registry http://localhost:4873/
Once done, we can create micro-frontends for this shell!
Rolling out micro-frontends
As we did for the app shell, we can use the piral-cli to scaffold us a project. The command for this now uses pilet instead of piral-instance. We run:
npm init pilet --source my-app-shell --registry http://localhost:4873/ --bundler esbuild --target my-pilet --defaults
This will create a new directory called my-pilet that contains the code for a new micro-frontend. The tooling is set to esbuild (like before, we use esbuild because it installs very quickly, but you could also go for something different like webpack).
The important part above is to specify the --source, which indicates the emulator to use for development. Now that everything is in place, we can cd my-pilet and run:
npm start
Like beforehand, the development server is hosted at http://localhost:1234. Going there results in a page as shown below:
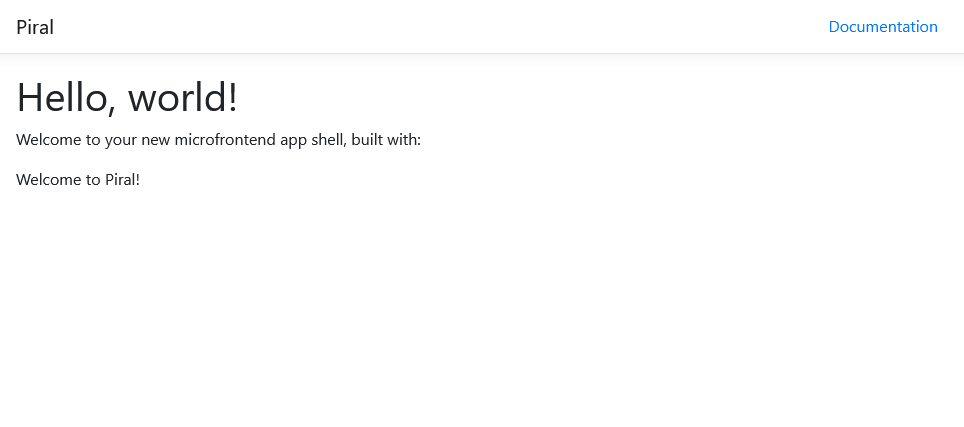
Almost as empty as if we’d used the empty feed. However, in this case, the template for the new pilet already registers a tile and a menu item. Let’s see how we can change this.
Changing pilets
Open the src/index.tsx file and have a look at the code:
import * as React from 'react';
import type { PiletApi } from 'my-app-shell';

export function setup(api: PiletApi) {
  api.showNotification('Hello from Piral!', {
    autoClose: 2000,
  });
  api.registerMenu(() =>
    <a href="https://docs.piral.io" target="_blank">Documentation</a>
  );
  api.registerTile(() => <div>Welcome to Piral!</div>, {
    initialColumns: 2,
    initialRows: 1,
  });
}
Simply speaking, a pilet is just a JavaScript library; the important part is what this library exports.
A pilet exports a setup function (and, optionally, a teardown function, to be precise). This function is used once the micro-frontend is connected, and receives a single argument, api, which is defined and created by the app shell.
The app shell’s API (often referred to as Pilet API) is the place where pilets can register their parts within the application. Let’s add a page and change the tile a bit.
We start with the tile. We can give it some class like teaser to actually have a bit of background. Furthermore, we want to add a bit of metadata for the dashboard container. We can use the initialColumns and initialRows properties to communicate the desired size.
app.registerTile(() => <div className="teaser">Hello LogRocket!</div>, {
  initialColumns: 2,
  initialRows: 2,
})
Once saved, the tile will have a bit of a different look. Let’s remove the showNotification that is no longer needed and introduce a new page:
api.registerPage('/foo', () =>
  <p>This is my page</p>
);
To link to this page, we can change the registered menu item. To perform the SPA navigation, we can use a familiar React tool, react-router-dom:
api.registerMenu(() =>
  <Link to="/foo">Foo</Link>
);
Great! However, fragments like the page are not always required and should only be loaded when they should be rendered. This kind of lazy loading can be achieved by placing the code in a dedicated file, i.e., Page.tsx, and changing the registration to be:
const Page = React.lazy(() => import('./Page'));
api.registerPage('/foo', Page);
The content of Page.tsx can be as straightforward as:
import * as React from 'react';

export default () => {
  return (
    <>
      <h1>Page Title</h1>
      <p>Lorem ipsum dolor sit ...</p>
      <p>Lorem ipsum dolor sit ...</p>
    </>
  );
};
With the page registered, you can now click on “Foo” in the navigation bar and see the page:

Building and publishing our pilet
Now that our pilet is written, we can actually build and publish it. At this point, we have not created our own feed or published the app shell anywhere, so the last part is actually a bit theoretical.
To build the pilet, you can run:
npm run build
Once created, you can pack the pilet using npx pilet pack. This will be quite similar to running npm pack. The result is another .tgz file — this time not an emulator, but the actual pilet. The tarball is what can be uploaded to a dedicated service, such as a feed service, offering the feed to be consumed by the app shell.
Examples for both non-commercial and commercial offerings for this can be found at piral.cloud.
Before we close out the tutorial, let’s look at how we can integrate one common functionality — in this case, performing HTTP requests with SWR.
Integrating SWR to perform HTTP requests
There are multiple ways of integrating common concerns like SWR. Once you add swr (or other libraries sitting on top of it) to the app shell and configure it there, you have three options:
- Exposing it as a shared library
- Exposing it via the Pilet API
- Not exposing it (though, in our example with SWR, that does not work because we need a reference to the Hook)
- Leaving the decision to use
swrto pilets: they can shareswras a distributed dependency (i.e., only loading it when no other pilets have loaded it yet)
The easiest and most reliable method for integrating SWT would be to use the first option. For this, we go back to the app shell.
In the app shell’s directory run:
npm install swr
Now, let’s modify the package.json. Keep pretty much everything, but modify the externals array of the pilets section like so:
{
  "name": "my-app-shell",
  "version": "1.1.0",
  // ...
  "pilets": {
    "externals": ["swr"],
    // ...
  },
  // ...
}
Notice that I also changed the version number. As we will make an update to our emulator, we need to have a new version. This will instruct Piral to actually share the swr dependency with all the pilets.
To actually test this, let’s write npm run build and publish again.
npm run build
npm publish dist/emulator/my-app-shell-1.1.0.tgz --registry http://localhost:4873/
With the updated shell available, let’s go into the pilet’s directory and upgrade the app shell:
npx pilet upgrade
The package.json file for the pilet should have changed. It should now contain a reference to my-app-shell in version 1.1.0 instead of 1.0.0. In addition, you should see swr listed in devDependencies and peerDependencies.
Let’s modify the page to use swr:
import * as React from 'react';
import LogRocket from 'swr';

// note: fetcher could have also been globally configured in the app shell
// however, in general the pilet's don't know about this and so they may want to
// reconfigure or redefine it like here
const fetcher = (resource, init) => fetch(resource, init).then(res => res.json());

export default () => {
  const { data, error } = useSWR('https://jsonplaceholder.typicode.com/users/1', fetcher);

  if (error) {
    return <div>failed to load</div>;
  }

  if (!data) {
    return <div>loading...</div>;
  }

  return (
    <>
      Hello {data.name}!
    </>
  );
};
And now we are done! Not only is SWR successfully set up in our app, we can also use it in all micro-frontends. This both saves the bandwidth to load SWR and the internal cache of SWR, giving all micro-frontends a nice performance benefit.
Summary
In this post, you’ve seen how easy it is to get started with Piral. Piral offers you the option to distribute your web app into different repositories, even across different teams.
We only explored the very basic setup in this post, but there is far more that you can do with Piral. The best way to explore Piral is to go through the official documentation.
The reason why Piral scales better than most other solutions is that Piral encourages loose coupling. This way, you will have a hard time fusing two things together, which helps you avoid feature overlap and hidden monoliths.
Whatever you plan to do, make sure to already think about what dependencies to share and which ones to leave up to the pilet. We’ve seen an example where providing swr as a shared dependency was actually set up in seconds. Happy coding!
The post Creating micro-frontends with Piral appeared first on LogRocket Blog.
from LogRocket Blog https://ift.tt/FBmqnOu
Gain $200 in a week
via Read more


