If you work on multiple projects, you might end up using the same ESLint and Prettier settings in each of them. Sure, using the same handy ESLint plugins and configurations is good for consistency, but you have to copy and paste your dependencies from your package.json, .eslintrc.js, and .prettierrc over and over again:
With each new project, this approach can increasingly contribute to a maintenance problem. If you want (or need) to change your rule set regularly, you have to touch all projects and make manually sure that they do not diverge from each other.
This is not a DRY approach, which essentially means that every piece of information should have a single source of truth. Duplicated code (or other information) is considered an anti-pattern and should be refactored to a unique representation.
When it comes to reducing the amount you have to copy with ESLint and Prettier configs, bundling them in your own custom npm package saves a lot of time and effort. With this approach, you only have to make changes in a single place, publish a new version, and update the dependency version in your projects. In addition, you can add or override rules, or add configurations that are project-specific.
In this post, we’ll talk about how to bundle your ESLint and Prettier configs for easier use across projects through the following sections:
- Overview of the ESLint and Prettier setup
- Monorepo setup for shared libraries
- Shared ESLint configuration (
@doppelmutzi/eslint-config-react) - Shared Prettier configuration (
@doppelmutzi/prettier-config)
- Using shared libraries in React projects
Overview of the ESLint and Prettier setup
To follow along, take a look the following GitHub projects:
- Shared ESLint and Prettier library: This is an npm workspaces project with two packages, one for each ESLint and Prettier configuration. The Prettier package demonstrates moving adjustments of the default setup into a shared library (in our case, we change the default double quotes to single quotes)
- React project: An example React project that makes use of the shared ESLint (@doppelmutzi/eslint-config-react) and Prettier (@doppelmutzi/prettier-config) packages
The ESLint package is, on the one hand, the foundation for this article, as it contains my preferred ESLint configurations that I’ve used in all my React projects for a long time. This configuration deactivates all the formatting rules of ESLint and makes sure that Prettier is used for code beautifying.
Monorepo setup for shared libraries
I aim to provide two npm packages to source out ESLint and Prettier configurations into individual npm packages. Therefore, I’m using a monorepo project to facilitate individual publishing of the packages, but it is by no means required to use a monorepo setup. This article does not explain how npm workspaces for monorepos work, but if you’re interested in that, you can follow along my in-detail guide.
The folder structure of the npm project looks like this:
.
├── packages/
│   ├── eslint-config/
│   │   ├── eslint-config.js
│   │   └── package.json
│   └── prettier-config/
│       ├── package.json
│       └── prettier-config.json
├── .gitignore
└── package.json
The root package.json defines the location of the workspaces eslint-config and prettier-config.
{
  "name": "Shared ESLint and Prettier config",
  "version": "1.0.0",
  "workspaces": [
    "packages/*"
  ],
  "scripts": {
    "publish-eslint-config": "npm publish --workspace @doppelmutzi/eslint-config-react",
    "publish-prettier-config": "npm publish --workspace @doppelmutzi/prettier-config"
  }
}
With the help of the scripts publish-eslint-config and publish-prettier-config, you can publish each package to its respective public npm registry.
Speaking of packages, let’s dive into the implementation of the package @doppelmutzi/eslint-config-react next.
Shared ESLint configuration (@doppelmutzi/eslint-config-react)
This section deals with the workspace @doppelmutzi/eslint-config-react, which exposes our ESLint configuration.
The package.json
Let’s take a look at our eslint-config/package.json in the provided GitHub repo.
{
    "name": "@doppelmutzi/eslint-config-react",
    "version": "1.0.0",
    "main": "./eslint-config.js",
    "peerDependencies": {
        "@babel/eslint-parser": "7.16.5",
        "eslint": "8.5.0",
        "eslint-config-prettier": "8.3.0",
        "eslint-config-standard": "16.0.3",
        "eslint-import-resolver-node": "0.3.6",
        "eslint-plugin-import": "2.25.3",
        "eslint-plugin-node": "11.1.0",
        "eslint-plugin-prettier": "4.0.0",
        "eslint-plugin-promise": "6.0.0",
        "eslint-plugin-react": "7.28.0",
        "eslint-plugin-react-hooks": "4.3.0",
        "prettier": "2.5.1"
    },
    "scripts": {
        "publish-manual": "npm publish"
    },
    "publishConfig": {
        "access": "public"
    },
    // ...
}
The most important part is the main property, which references the file holding our ESLint configuration. We’ll take a look at it in a minute; the version property needs to be set before you publish a new version.
The peerDependencies property defines the packages that you’ll need install in your project to use our shared library. I will go into more detail in the React example project that makes use of this library.
The publishConfig property is specific to npm and enables us to publish this project to the public npm registry. The publish-manual script just uses the inbuilt npm CLI command to publish this package. At the end of this section, we’ll invoke this script to publish a version of this package.
The eslint-config.jsfile
eslint-config.js holds the ESLint configuration that we want to reuse in our projects. We can name it however we like, but it has to be referenced in the main field of our package.json.
To make it concrete, this file holds the content you’d normally put into the ESLint configuration file (.eslintrc, .eslintrc.js, etc.) in your project.
// .eslintrc.js
module.exports = {
  // ...
  extends: [
    "plugin:react/recommended",
    "standard",
    "plugin:prettier/recommended",
  ],
  parser: "@babel/eslint-parser",
  parserOptions: {
    ecmaFeatures: {
      jsx: true,
    },
    ecmaVersion: 12,
    sourceType: "module",
  },
  plugins: ["react"],
};
As I described in the intro, this is my preferred React setup.
Publish to npm
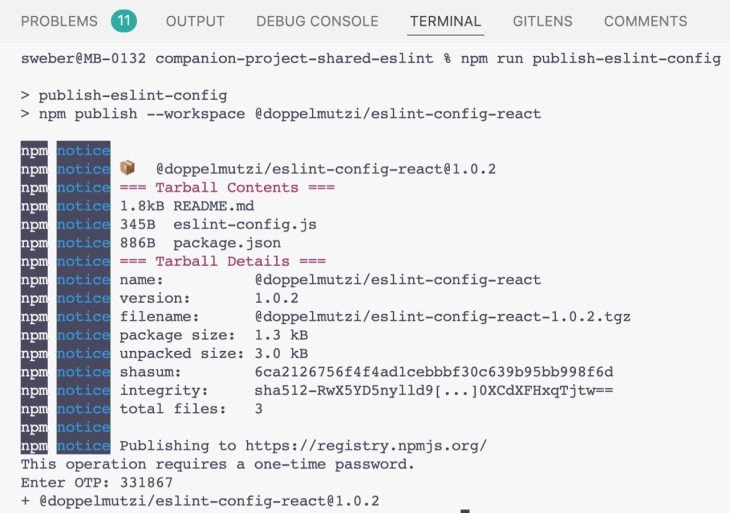
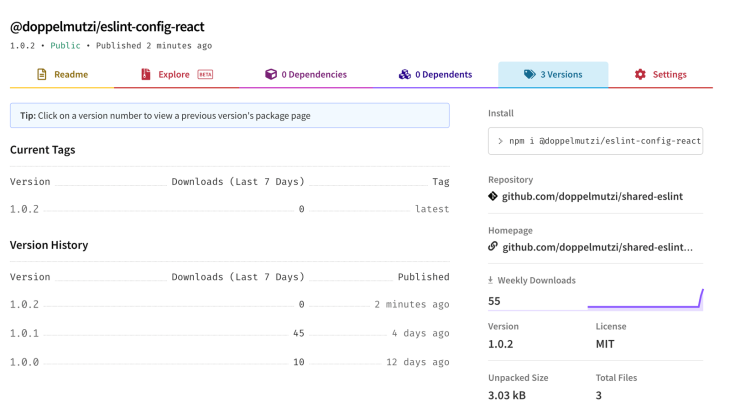
Let’s publish this to the public npm registry. In the packages/eslint-config/ folder, we can either execute $ npm run publish-manual or $ npm publish directly. Additionally, with this npm workspaces setup, we can also use the script publish-eslint-config from the root folder ($ npm run publish-eslint-config) to push it to the registry.
{
  // root package.json
  "description": "Shared ESLint and Prettier config",
  "workspaces": [
    "packages/*"
  ],
  "scripts": {
    "publish-eslint-config": "npm publish --workspace @doppelmutzi/eslint-config-react",
    "publish-prettier-config": "npm publish --workspace @doppelmutzi/prettier-config"
  }
}

npm publish commandMake sure that you’ve adjusted the version number in packages/eslint-config/package.json to the new version; otherwise you’ll get a 403 error. If publishing works, you will find your new version on npm.

Shared Prettier configuration (@doppelmutzi/prettier-config)
In this section, I’ll explain how to outsource your custom Prettier configuration into a separate package, as I’ve done with @doppelmutzi/prettier-config in my sample GitHub repo.
The package.json
Let’s take a look at our current prettier-config/package.json.
{
    "name": "@doppelmutzi/prettier-config",
    "version": "1.0.0",
    "main": "./prettier-config.json",
    "peerDependencies": {
        "prettier": "2.5.1"
    },
    "publishConfig": {
        "access": "public"
    },
    "scripts": {
        "publish-manual": "npm publish"
    },
    // ...
}
Again, the most interesting part is the main field, which points to the extracted Prettier configuration.
The other fields have the same meaning as we gave in the ESLint section; the only peer dependency is Prettier itself. This will become relevant in the next section when we will include this library.
The prettier-config.json file
prettier-config.json constitutes the configuration file. We’ll use this to override Prettier’s default behavior.
In our example, we define Prettier to use single quotes (singleQuote) and to avoid parentheses around a sole arrow function parameter (arrowParens).
{
    "singleQuote": true,
    "arrowParens": "avoid"
}
Publish to npm
This is analogous to publishing the @doppelmutzi/eslint-config-react package. After adjusting the version field, we just invoke $ npm run publish-prettier-config in the root folder.
Using shared libraries in React projects
The React example project I built shows how to use our libraries. In this section, I’ll explain step by step how to use it in your own React projects.
Install custom ESLint and Prettier packages
To introduce these libraries into your React project, you have to add them as dependencies first.
# add eslint-config-react as dev dependency
$ npm i -D @doppelmutzi/eslint-config-react
# add prettier-config as dev dependency
$ npm i -D @doppelmutzi/prettier-config
Install peer dependencies
After this, we have to install the peer dependencies we defined in the package.json files of each library. We can leverage the npm package install-peerdeps for this.
# install eslint-config-react's peer dependencies as dev peerDependencies
$ npx install-peerdeps --dev @doppelmutzi/eslint-config-react
# install prettier-config's peer dependencies as dev dependencies
$ npx install-peerdeps --dev @doppelmutzi/prettier-config
As an alternative, you can copy the libraries defined in peerDependencies fields into the devDependencies section of your package.json and invoke $ npm install.
In the end, your package.json will look like this:
{
  // ...
  "devDependencies": {
    "@babel/eslint-parser": "7.16.5",
    "eslint": "8.5.0",
    "eslint-config-prettier": "8.3.0",
    "eslint-config-standard": "16.0.3",
    "eslint-import-resolver-node": "0.3.6",
    "eslint-plugin-import": "2.25.3",
    "eslint-plugin-node": "11.1.0",
    "eslint-plugin-prettier": "4.0.0",
    "eslint-plugin-promise": "6.0.0",
    "eslint-plugin-react": "7.28.0",
    "eslint-plugin-react-hooks": "4.3.0",
    "prettier": "2.5.1",
    // your other dependencies
  }
}
Set up configuration files
The last step is to set up .eslintrc.js and .prettierrc, our config files. To use the ESLint configuration in @doppelmutzi/eslint-config-react, you need the following configuration:
module.exports = {
  extends: ['@doppelmutzi/eslint-config-react'],
};
You still have the option to override or extend this setup with your project-specific configuration.
For the Prettier setup, you just have to put the following content into .prettierrc.
"@doppelmutzi/prettier-config"
Configure VS Code and IntelliJ
The last step is to configure your IDE correctly. My preferred setup is to auto-fix ESLint issues on save; therefore, I need to provide a configuration to enable save actions as a user or workspace configuration.
For a workspace configuration, you have to open the workspace settings, switch to the JSON editor, and paste the following into it.
  "editor.codeActionsOnSave": {
    "source.fixAll": true,
    "source.fixAll.eslint": true
  },
  "editor.formatOnSave": true,
  "javascript.format.enable": false,
  "[javascript]": {
    "editor.formatOnSave": false
  },
  "[javascriptreact]": {
    "editor.formatOnSave": false
  },
  // ...
VS Code generates a .vscode/settings.json file in the project’s root folder. This settings.json file from the companion project also includes the required configuration to enable the ESLint workflow with a Yarn Berry PnP project.
To find out more about ESLint and Yarn Berry, you can read my previous LogRocket article on package managers.
To configure IntelliJ, you have to go to the Code Quality Tools section of the Preferences menu. Select Automatic ESLint configuration to let IntelliJ pick up the ESLint package from node_modules folder. In addition, you need to check Run eslint --fix on save.

Conclusion
This article explains how to make ESLint and Prettier configurations available in a separate package. With this in place, you’ll have a unique place to house your code that support reusability and constitutes a single point of truth. This DRY approach reduces maintenance effort because changes only have to be made once in order to be reflected across apps.
If you want to find out more about my approach to using ESLint and Prettier in my own React projects, feel free to read some articles I’ve published on my personal blog on this topic:
- Efficient Code Analyzing and Formatting (for Vue.js) with ESLint and Prettier
- Efficient Code Analyzing and Formatting (for React) with ESLint, Prettier and VSCode – 2020 Edition
The post Reduce maintenance effort with shared ESLint and Prettier configs appeared first on LogRocket Blog.
from LogRocket Blog https://ift.tt/YC15j8a
via Read more


