Pathfinding is an important problem in many applications. In this article, we’re going to look at some options for pathfinding in the Rust language.
What we’ll cover:
What is pathfinding?
Simply put, pathfinding is finding the shortest route between two points. In the simplest case, the answer is “a straight line,” but things can get much more complicated that that!
Some examples of complicating factors are:
- Obstacles that can’t be moved through
- Terrain that is more difficult to move through
For example, to handle terrain that is more difficult to move through, you could give the two points a cost to move through. You could then change the goal to be finding the route between those two points with the lowest cost.
Usages of pathfinding
Pathfinding is used in many applications. Some of the most common ones are robotics and video games, such as roguelike games.
In robotics, a common task for robots is to navigate the environment and get from point A to point B as quickly as possible.
In video games, a character controlled by the computer may need to move places in the environment. Also, if the game allows the player to set waypoints, it may also want to show the quickest way to get to the next waypoint.
Pathfinding examples in Rust
Now that we’ve established the usefulness of pathfinding, let’s take a look at a few examples of pathfinding in Rust, an increasingly popular programming language.
For these examples, we’re going to be using the aptly-named pathfinding crate, which is the most popular pathfinding crate available on the Rust community’s crate registry.
Note that most pathfinding algorithms work in terms of nodes instead of continuous space. This Game Developer article discusses some ways to make the results of these algorithms look more natural.
Example Rust pathfinding framework
You can check out the full code we’re going to be using in this GitHub repo.
The Board struct defines a rectangular board where each cell can be an obstacle or have a cost associated with moving to it.
Board::new() allows creating the board and specifying these cells with a Vec<string>. In this string, a character with a value between one and nine indicates a cell that can be moved to at the defined cost. Meanwhile, a character of “X” indicates an obstacle.
Note that these algorithms support having one-way links between cells. For simplicity, we’re not going to allow that functionality in the Board struct.
Board::get_successors() takes in a cell position and returns a Vec of cells that can be directly moved to along with their cost. As we’ll see, this is a key method used in all of the algorithms we’re going to look at in the pathfinding crate.
There’s also Board::draw_to_image(), which is a convenient way to write an image with the Board cells — and optionally, a path as well. This method uses the imageproc crate to do the drawing.
Using breadth-first search for pathfinding in Rust
Breadth-first search is a fairly straightforward algorithm for finding a shortest path from a start node to a goal node. Starting at the start node, it processes each connected node at a time.
If that node is the goal node, then we’re done! Otherwise, we put each of its connections in the queue of nodes to look at and continue.
The breadth-first search algorithm does not look at the costs of nodes, but it’s a pretty simple example to start with. You can check out the full source for this example using breadth-first search to follow along.
The code below shows the call to actually do the breadth-first search:
    let result = bfs(
        &start,
        |p| board.get_successors(p).iter().map(|successor| successor.pos).collect::<Vec<_>>(),
        |p| *p==goal);
Per the documentation for bfs(), the arguments are:
- The node to start with
- A function that takes in a node and returns a
Vecof nodes that can be directly moved to - A function that takes in a node and returns whether it is the goal node
Note that since breadth-first search doesn’t support costs for nodes, we have to map the result of Board::get_successors() to remove the costs.
Additionally, as the documentation notes, taking in a node and returning whether it is the goal node is more flexible than just taking in what the goal node is. This is because it allows for multiple goal nodes, or some sort of dynamic computation for whether a node is a goal or not.
In this case, we just want one goal node, and that’s easy to do as well!
bfs() returns Option<Vec<N>> where N is the type of the node you passed in. It’s an Option<> because it’s possible there is no path from start to the goal; in that case None is returned. Otherwise, it returns a Vec of the path to get from the start to the goal, including both endpoints.
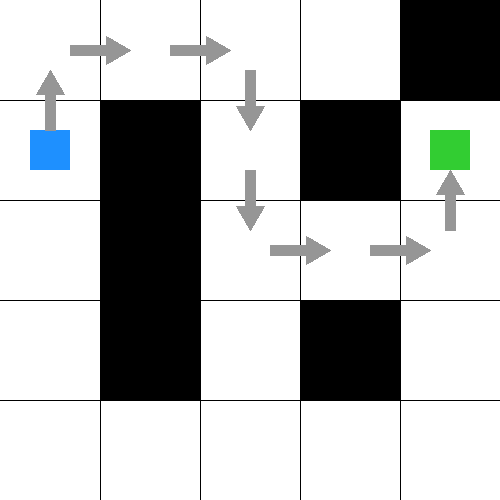
To run the example, use cargo run --bin bfs. Here’s the resulting image showing the path from the start (blue) node to the goal (green) node:

Accounting for costs in Rust pathfinding with Dijkstra’s algorithm
Dijkstra’s algorithm is another algorithm for finding a shortest path from a start node to a goal node. Unlike breadth-first search, it does use the cost of moving to a node in its calculations.
Make sure to take a look at the full source for this example using Dijkstra’s algorithm.
Here’s the call to run Dijkstra’s algorithm:
    let result = dijkstra(
        &start,
        |p| board.get_successors(p).iter().map(|s| (s.pos, s.cost)).collect::<Vec<_>>(),
        |p| *p==goal);
Per the documentation for dijkstra(), the arguments are very similar to bfs(). The only difference is that the second argument is now a Vec of tuples, each one of which contains the following:
- A node that can be directly moved to
- The cost to move to that node
Again, similar to bfs(), dijkstra() returns Option<(Vec<N>, C)>; the second member of the tuple is the total cost to get from the start node to the goal node.
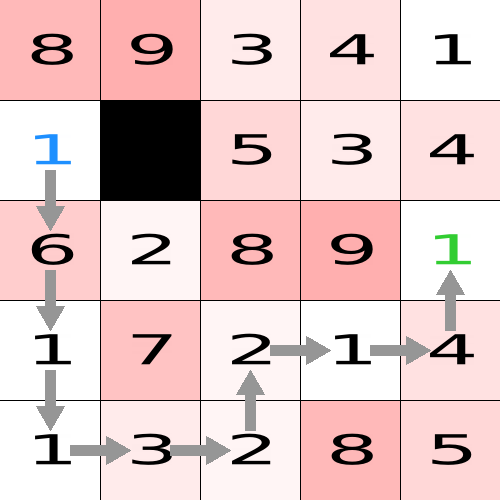
To run the example, use cargo run --bin dijkstra, and here’s the resulting image showing the path from the start node (the one with the blue number) to the goal node (the one with the green number):

Notice how the path is a bit more roundabout than a direct path because of the costs of the nodes.
Rust pathfinding using the A* search algorithm
Both of the previous searches we’ve looked at start out by trying every connected node. However, there’s often more structure in the problem that these algorithms aren’t taking advantage of.
For example, if your goal node is directly west of your start node, it probably makes sense for the first move to be in the westward direction!
The A* search algorithm (pronounced “A-star”) takes advantage of this extra structure. It requires that you pass in a heuristic function that estimates the distance from a node to the goal, and that this estimate is always less than or equal to the actual distance.
Using this heuristic, the A* search algorithm can try paths that are more likely to be lower in cost first. It can also figure out when it can stop because there can be no shorter path.
As a warning: if the heuristic doesn’t obey this property, the algorithm might not return the shortest path! If you’re concerned about this, you can run some test cases with Dijkstra’s algorithm and confirm that A* and Dijkstra’s algorithm give the same result to make sure the heuristic is valid.
Often, if you’re doing pathfinding in a two-dimensional space, a heuristic that ignores cost and just calculates the distance between the two nodes works well.
For our example Board, we’re not allowing diagonal moves, so the distance between two cells is the Manhattan distance. Since the minimum cost to get to any cell is 1, we can use this as our heuristic.
Here’s the full source for this example using the A* search algorithm, and here’s the call to run it:
    let result = astar(
        &start,
        |p| board.get_successors(p).iter().map(|s| (s.pos, s.cost)).collect::<Vec<_>>(),
        |p| ((p.0 - goal.0).abs() + (p.1 - goal.1).abs()) as u32,
        |p| *p==goal);
Per the documentation for astar(), the arguments and return value are the same as for dijkstra() except for the heuristic function, which is the third parameter.
As mentioned above, we’re using the Manhattan distance between the cells for the heuristic, which is the difference between the x-values plus the difference between the y-values.
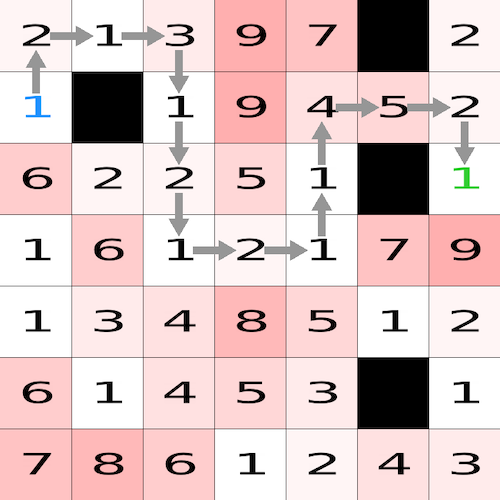
To run the example, use cargo run --bin astar. Here’s the resulting image:

Conclusion
When it comes to pathfinding in Rust, A* search is commonly used in robotics and video game applications. However, one weakness of A* search is that it can take a lot of memory to run.
There are variants such as iterative deepening A* search and fringe search that improve on its memory usage, and the pathfinding crate has support for both of these with the idastar() and fringe() methods. These methods take the same parameters as the astar() method above, so they’re easy to try out.
If you’re looking to do some pathfinding in Rust, clone the repo and give it a shot!
The post Pathfinding in Rust: A tutorial with examples appeared first on LogRocket Blog.
from LogRocket Blog https://ift.tt/mac6JH9
via Read more


