In any full stack web application, minimizing the number of trips we have to make to the data source (usually databases) can improve the speed of the application significantly. The DataLoader package is a generic utility that provides a consistent API that we can use to speed up loading data from any remote data source. It does this by providing batching and caching functionalities.
In this article, I will be showing how the DataLoader package can help us minimize the number of trips we need to make to the data source. I will be explaining the features it provides and how we can use it to solve a common problem with GraphQL servers, the N+1 problem.
Contents
- Batching and caching with DataLoader
- What is the N+1 problem in GraphQL?
- How DataLoader solves the N+1 problem
- Setting up NestJS with GraphQL
- Setting up DataLoader
- Creating the DataLoader service
- Adding loaders to context
Batching and caching with DataLoader
Batching is the primary feature of the DataLoader. It helps us load multiple resources at the same time when they would have been independently loaded by default. This can happen when we need to load multiple similar resources, but their loads are independent from each other. These resources can be from database, a REST API, or anywhere else.
DataLoader works by coalescing all individual loads occurring in the same frame of execution (a single tick of the event loop), and batching the loads into a single operation.
DataLoader also provides a memoization cache for all loads that occur within a single request to your application. This is not a replacement for a shared, application-level cache like Redis, Memcache or others. Here is a disclaimer from the DataLoader documentation about that:
DataLoader is first and foremost a data loading mechanism, and its cache only serves the purpose of not repeatedly loading the same data in the context of a single request to your application.
One of the places that the DataLoader shines most is with GraphQL queries, but a common issue that it faces is the N+1 problem. We’ll cover that in the next section.
What is the N+1 problem in GraphQL?
GraphQL solves an important problem in REST API: overfetching. It does this by making it possible to define a schema, and clients can request for the specific fields that they need.
Say that we have a GraphQL API server that lets clients query for records in a students table stored in our database. And say for the sake of explanation, there is also a friends table, storing the details of each student’s friends who are not students:
{
  students {
    name
  }
}
This query asks for the name field on the student objects that must be defined by the GraphQL server. GraphQL resolves each field by calling the Resolver function attached to the field. Each field declared in the schema must have its corresponding Resolver function.
The Resolver for students can make a single query to the database to fetch the students. Now suppose, we have this GraphQL query:
   query {
     students {
       name
       friends {
         name
       }
     }
   }
We have nested data in the students query. To execute this, a database query is executed to fetch the list of students, and because each field in the GraphQL schema has a resolver used to resolve it’s value, a database query is executed to get the friends of each of the students.
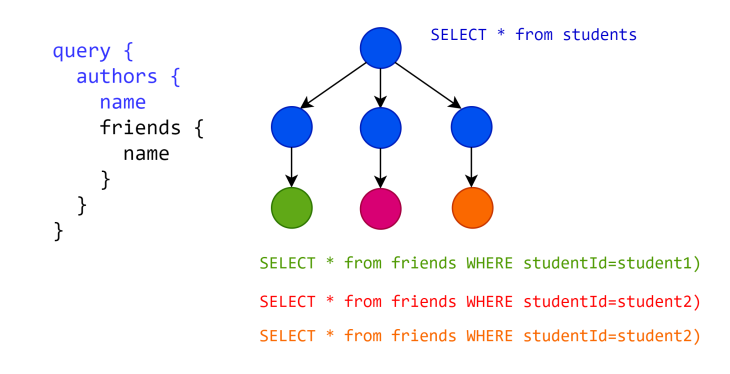
So if there are N students, we have to make one query to get the list of students, and then N queries (for each student) to get the friends. That’s where the name N+1 comes from.
In the diagram below, let’s assume that there are three students in the database that are being resolved by the students resolver. The single database query needed to fetch them has been colored blue. For each student, the three database queries to fetch their friends are given a different color. In this case, we have four.

The N+1 problem might look trivial when we have only three student records in total, but assuming we have thousands of students, the extra database queries can slow down the GraphQL queries significantly.
How DataLoader solves the N+1 problem
The N+1 problem arises from the intuitive implementation of GraphQL servers: each field should have its own resolver function. Continuing with the students query example introduced above, it will be helpful if we can somehow defer resolving the friends field of each student until we have the last student object, then we can make a single database query to fetch the friends of each student.
If we are using SQL, we can make a query like this:
SELECT * from friends WHERE studentId IN (firststudentId, secondstudentId, ...)
DataLoader can help us achieve this through its batching feature. Let us work through a sample NestJS project to see this in action.
Setting up NestJS with GraphQL
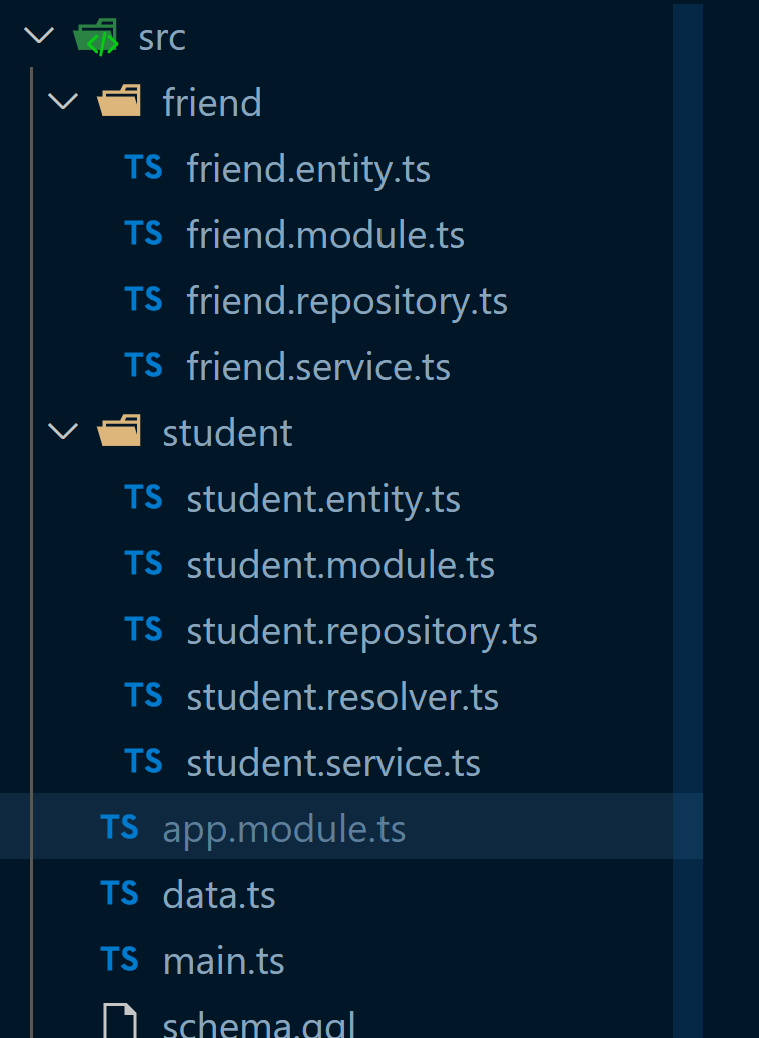
I have set up a GraphQL project following the “code first” approach described in the NestJS documentation. Here is structure of the files I have created (you can view this on GitHub here):

This is the contents of friend.entity.ts:
import { Field, ObjectType } from '@nestjs/graphql';

@ObjectType()
export class Friend {
  @Field()
  id: number;

  @Field()
  name: string;

  studentId: number;
}
And the contents of student.entity.ts:
import { Field, ObjectType } from '@nestjs/graphql';
import { Friend } from 'src/friend/friend.entity';

@ObjectType()
export class Student {
  @Field()
  id: number;

  @Field()
  name: string;

  @Field()
  class: string;

  @Field(() => [Friend])
  friends?: Friend[];
}
I have used an in-memory data store instead of an actual database to make it easier to run the project without worrying about database setup, as you can see in the data.ts file:
import { Friend } from './friend/friend.entity';
import { Student } from './student/student.entity';

export const students: Student[] = [
  { id: 1, name: 'John', class: '1A' },
  ...
  { id: 10, name: 'Mary', class: '1J' },
];

export const friends: Friend[] = [
  { id: 1, name: 'Sam', studentId: 1 },
  ...
  { id: 7, name: 'Seyi', studentId: 4 },
];
The repositories access this data store and perform mock database operations. For example, inside student.repository.ts, we have:
import { Injectable } from '@nestjs/common';
import { students } from '../data';
import { Student } from './student.entity';

@Injectable()
export class StudentRepository {
  public async getAll(): Promise<Student[]> {
    console.log('SELECT * FROM students');
    return students;
  }
}
I am logging out what the database query would look like if we were using an actual database.
The content of friend.repository.ts is as follows:
import { Injectable } from '@nestjs/common';
import { friends } from '../data';
import { Friend } from './friend.entity';

@Injectable()
export class FriendRepository {
  public async getStudentFriends(studentId: number): Promise<Friend[]> {
    console.log(`SELECT * FROM friends WHERE studentId = ${studentId}`);
    return friends.filter((friend) => friend.studentId === studentId);
  }
}
The student.resolver.ts contains methods for resolving queries:
import { Parent, Query, ResolveField, Resolver } from '@nestjs/graphql';
import { Friend } from '../friend/friend.entity';
import { FriendService } from 'src/friend/friend.service';
import { Student } from './student.entity';
import { StudentService } from './student.service';

@Resolver(Student)
export class StudentResolver {
  constructor(
    private readonly studentService: StudentService,
    private readonly friendService: FriendService,
  ) {}
  @Query(() => [Student])
  async students() {
    return await this.studentService.getAll();
  }

  @ResolveField('friends', () => [Friend])
  async getFriends(@Parent() student: Student) {
    const { id: studentId } = student;
    return await this.friendService.getStudentFriends(studentId);
  }
}
Using the @ResolveField decorator, we are specifying how the friends field on the parent Student objects should be resolved.
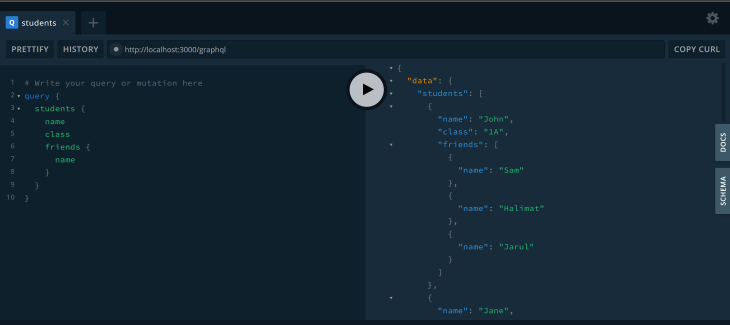
We can run the app with npm run start:dev and visit the playground that will be up on http://localhost:3000/graphql to test it out:

The query returns each student with their friends. This is the log from the terminal:

We can see the N+1 problem on display. The first query, SELECT * FROM students, fetches the students, and because there are ten students in the data store, a query is executed to get each of their friends. So we have 11 queries in total!
Setting up DataLoader
Now we are going to setup DataLoader so that we can use its batching feature to solve this N+1 problem. First we install it like so:
npm install dataloader -S
To better encapsulate things, let us create a dataloader module:
nest g mo dataloader
We will also create a DataLoader service and interface, dataloader.interface.ts, to specify the loaders we will be using.
The content of the dataloader.interface.ts inside the dataloader module folder is as follows:
import DataLoader from 'dataloader';
import { Friend } from '../friend/friend.entity';

export interface IDataloaders {
  friendsLoader: DataLoader<number, Friend>;
}
Here, we have declared the IDataloaders interface and specified the friendsLoader as a field in it. If we need more loaders, we can declare them here.
First we need a method for fetching friends by batch from an array of student IDs. Let’s update the friend.repository.ts to include a new method:
export class FriendRepository {
  ...
  public async getAllFriendsByStudentIds(
    studentIds: readonly number[],
  ): Promise<Friend[]> {
    console.log(
      `SELECT * FROM friends WHERE studentId IN (${studentIds.join(',')})`,
    );
    return friends.filter((friend) => studentIds.includes(friend.studentId));
  }
}
The getAllFriendsByStudentIds method receives an array of studentIds and returns an array of the friends of all the students provided.
Let us also update the friend.service.ts file:
export class FriendService {
  ...
  public async getAllFriendsByStudentIds(
    studentIds: readonly number[],
  ): Promise<Friend[]> {
    return await this.friendRepository.getAllFriendsByStudentIds(studentIds);
  }

  public async getStudentsFriendsByBatch(
    studentIds: readonly number[],
  ): Promise<(Friend | any)[]> {
    const friends = await this.getAllFriendsByStudentIds(studentIds);
    const mappedResults = this._mapResultToIds(studentIds, friends);
    return mappedResults;
  }

  private _mapResultToIds(studentIds: readonly number[], friends: Friend[]) {
    return studentIds.map(
      (id) =>
        friends.filter((friend: Friend) => friend.studentId === id) || null,
    );
  }
}
The getStudentsFriendsByBatch is the method that performs the batch operation we just defined in the friend.repository.ts, but it also includes the method _mapResultToIds. This is important for DataLoader to work properly.
DataLoader does have some constraints on the batch function. First, the length of the returned array must be the same with the length of the supplied keys. This is why in (friend: Friend) => friend*.*studentId === id) || null, we are returning null if a friend is not found for a given student ID.
Second, the index of the returned values must follow the same order of the index of the keys supplied. That is, if the keys are [1, 3, 4], the returned value must have this format [friendsOfStudent1, friendsOfStudent3, friendsOfStudent4]. The data source might not return them in the same order, so we have to reorder them, which is what we are doing in the function passed to studentIds*.map* inside of _mapResultToIds.
Creating the DataLoader service
Now we update the dataloader.service.ts like so:
import { Injectable } from '@nestjs/common';
import * as DataLoader from 'dataloader';
import { Friend } from '../friend/friend.entity';
import { FriendService } from '../friend/friend.service';
import { IDataloaders } from './dataloader.interface';

@Injectable()
export class DataloaderService {
  constructor(private readonly friendService: FriendService) {}

  getLoaders(): IDataloaders {
    const friendsLoader = this._createFriendsLoader();
    return {
      friendsLoader,
    };
  }

  private _createFriendsLoader() {
    return new DataLoader<number, Friend>(
      async (keys: readonly number[]) =>
        await this.friendService.getStudentsFriendsByBatch(keys as number[]),
    );
  }
}
The getLoaders method returns an object that contains loader objects. Currently, we have a loader for only friends.
The _createFriendsLoader method instantiates a new DataLoader instance. We pass in a batch function, which expects an array of keys as its single argument. We perform the batch operation by making a call to friendService.
Adding loaders to context
We now have to supply the data loaders to the Apollo Context created by NestJS in the GraphQL module. The context argument can be used to pass information to any resolver, such as authentication scope, database connections, and custom fetch functions. In our case, we will be using it to pass our loaders to resolvers.
Update app.module.ts like so:
import { Module } from '@nestjs/common';
import { GraphQLModule } from '@nestjs/graphql';
import { ApolloDriver, ApolloDriverConfig } from '@nestjs/apollo';
import { StudentModule } from './student/student.module';
import { FriendModule } from './friend/friend.module';
import { DataloaderModule } from './dataloader/dataloader.module';
import { DataloaderService } from './dataloader/dataloader.service';

@Module({
  imports: [
    GraphQLModule.forRootAsync<ApolloDriverConfig>({
      driver: ApolloDriver,
      imports: [DataloaderModule],
      useFactory: (dataloaderService: DataloaderService) => {
        return {
          autoSchemaFile: true,
          context: () => ({
            loaders: dataloaderService.getLoaders(),
          }),
        };
      },
      inject: [DataloaderService],
    }),
    StudentModule,
    FriendModule,
  ],
})
export class AppModule {}
We are now importing DataLoader and DataService and using them in GraphQLModule. We also declare the context and supplying the loaders received from the dataloader service as part of the context. Now, we can access this context in the resolver.
Next, let’s update how we are resolving the friends field in student.resolver.ts:
@Resolver(Student)
export class StudentResolver {
  ...
  @ResolveField('friends', () => [Friend])
  getFriends(
    @Parent() student: Student,
    @Context() { loaders }: { loaders: IDataloaders },
  ) {
    const { id: studentId } = student;
    return loaders.friendsLoader.load(studentId);
  }
}
The @Context decorator provides access to the context where we can access the previously added loaders. We now use the friendsLoader to load the friends for a given student.
We can now start the application again and test out the query from the GraphQL playground. The result is the same as before, but when we check the logs from the terminal, we see the following:

Fantastic! Now, only two database queries are being executed. Earlier without DataLoader, we were executing eleven; imagine retrieving 1,000 student objects! With DataLoader, we will still be making only two database queries, instead of 1,001 queries without it. That can greatly impact the performance of our application.
Conclusion
In this article I have explained what the DataLoader package is and the features it provides. I also showed how to use the package in NestJS with a GraphQL API example. Next, we went through how to solve the N+1 problem in GraphQL with the DataLoader package. There are some customizations available for DataLoader, which you can read more about in the documentation.
As I mentioned earlier, the DataLoader package is a generic utility, and it doesn’t have to be used with GraphQL servers only. You can apply the ideas from this article to fit your own use.
The repository for the NestJS project created in this article is here. The main branch contains the solution with DataLoader, while the without-dataloader branch shows the state of the application before DataLoader was introduced.
The post How to use DataLoader with NestJS appeared first on LogRocket Blog.
from LogRocket Blog https://ift.tt/KgQ4yuW
via Read more


