In this article, you will learn how to create an augmented reality experience using Vuforia and Unity. You will also learn how to test and run your app on an Android smartphone.
This is what you are going to build
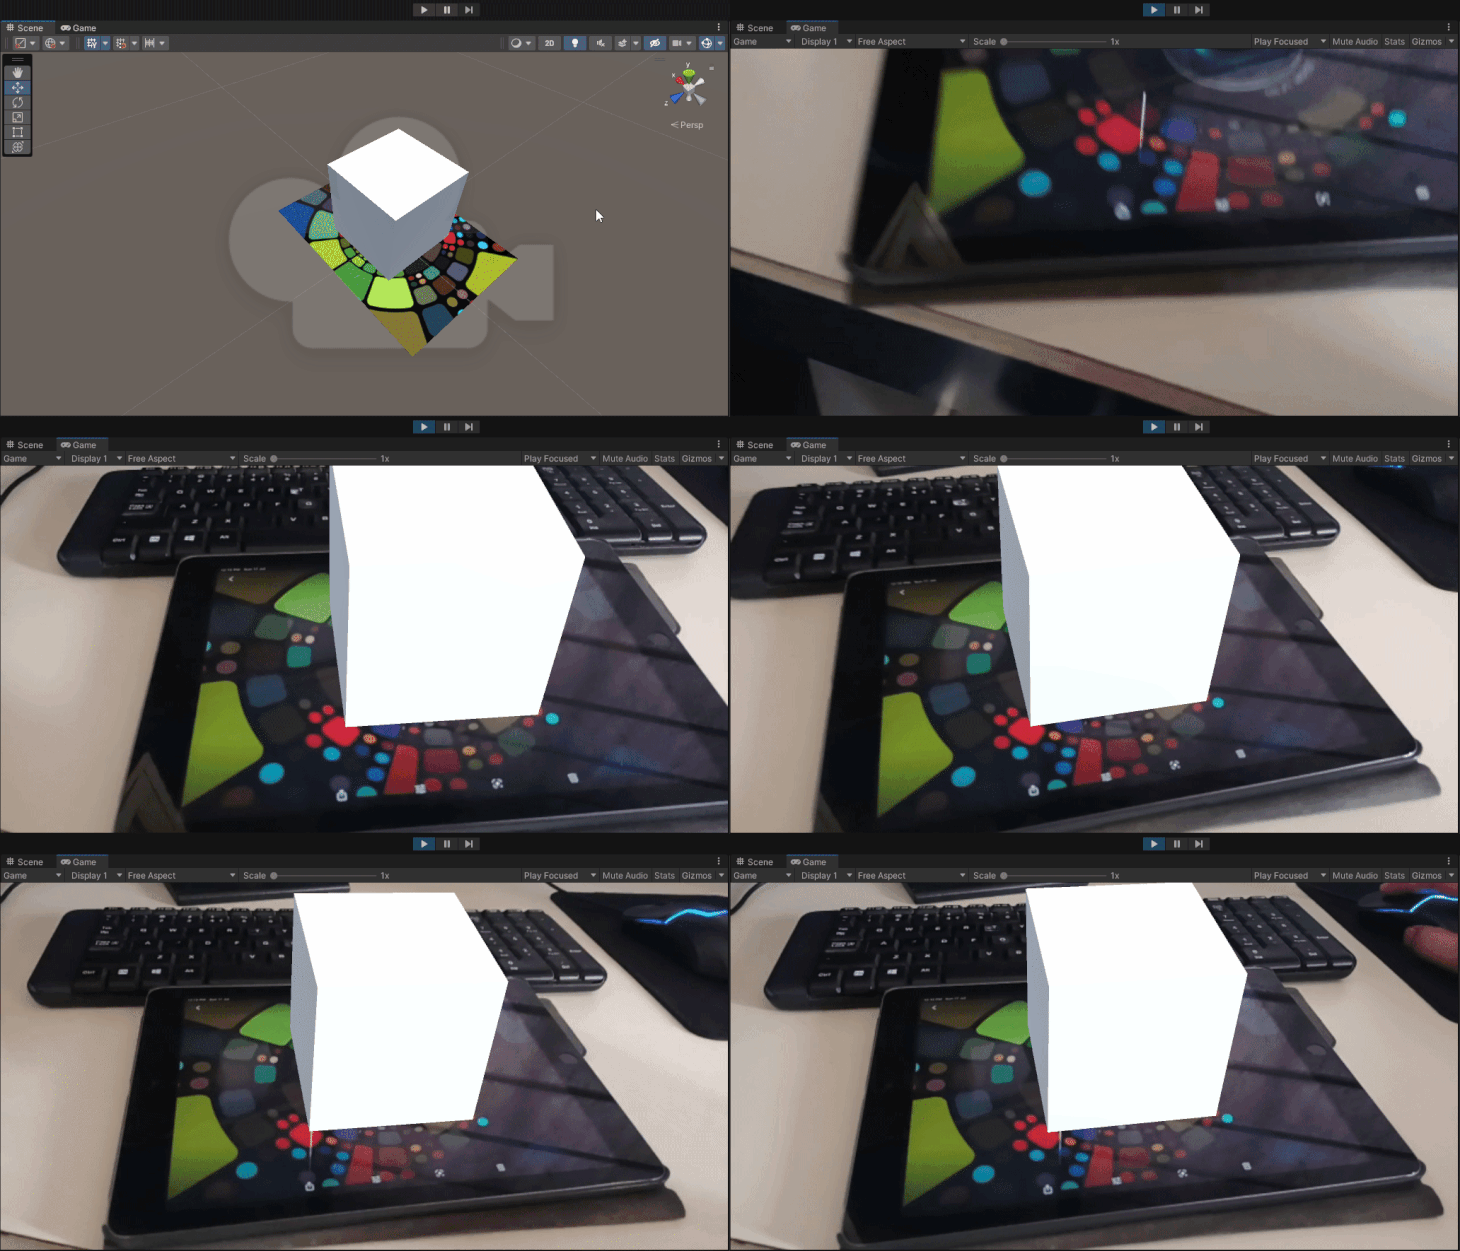
This cube can be replaced with any other 3D object, but for simplicity’s sake, we will only stick to a cube in this tutorial.
Here is a breakdown of what is happening in the above video:
- The phone’s camera detects an image
- The image is identified as a marker
- The phone then renders an object on top of the image (or marker)
Such AR experiences, where your phone renders 3D content on top of images, are known as marker-based AR experiences. This is what we aim to create today and we will do it using an SDK called Vuforia.
Why Vuforia?
Vuforia has many features such as:
- Image Tracking
- Object Tracking
- Ground Plane Tracking
- Multi Targets
- Cloud Recognition
- Virtual Buttons
and much more.
One of the reasons why I have used Vuforia in this tutorial is that it is quick and simple to set up. You can create your first AR experience without the hassle of coding.
Besides, if you know the configuration steps for Vuforia on a platform like Android, you will be able to apply the same steps for iOS. This means that you can develop once and release your app to multiple platforms.
The biggest advantage of Vuforia over ARCore and ARKit is that it supports a broad range of devices. Except for smartphones and tablets, Vuforia also supports augmented reality headsets such as Microsoft Hololens and Magic Leap. You can find the full list of recommended devices by Vuforia here.
Prerequisites
Before we jump into Unity and get started with the project, make sure that you are done with the following tasks:
- Register as a Vuforia Engine Developer
- Make sure you have Unity 2021.3 (LTS version) installed
- Check if your device supports augmented reality
Here’s what we’ll cover:
- Project setup
- Setting up Vuforia with Unity
- How do you create Image Targets in Vuforia?
- Rendering 3D content on top of an Image Target
Project setup
If you haven’t done so already, create a new Unity 3D project and name it “Hello Vuforia.”
You can do so by launching Unity Hub on your computer and clicking New Project.
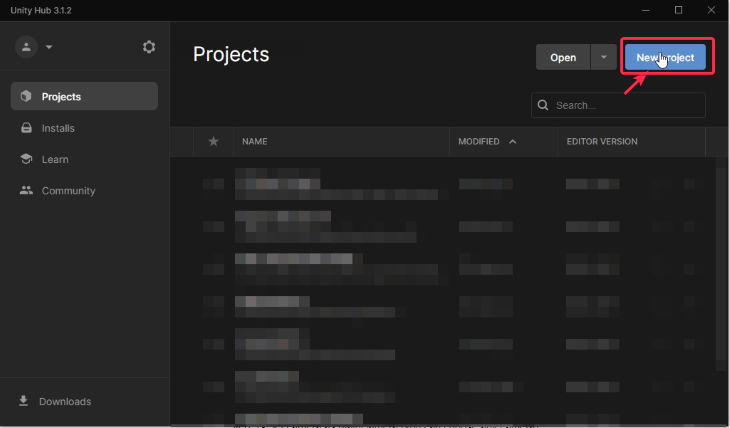
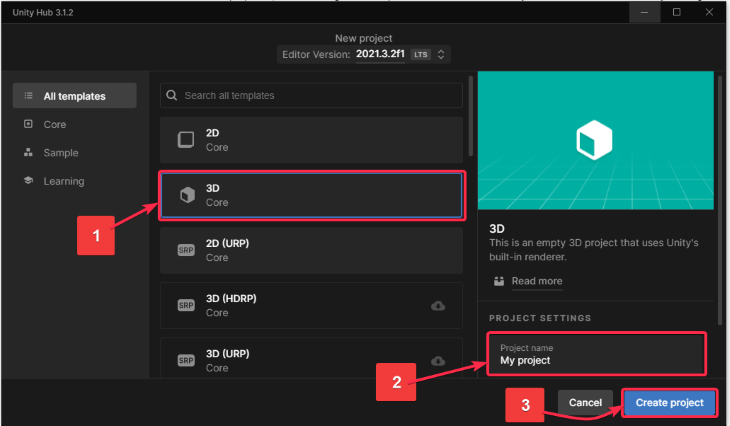
After clicking on New Project, the below window pops up. To ensure that we are creating a 3D project, do the following steps:
- Select 3D from the templates
- Update the Project Name from My Project to Hello Vuforia
- Click the Create Project button
The project will take a few minutes to open up in Unity.
Keep the project open, and let’s work on integrating Vuforia.
Setting up Vuforia with Unity
In this step, you will add the Vuforia package to the Hello Vuforia project in Unity.
To start, download the Vuforia package. Please note that you cannot download the package unless you have registered yourself as a Vuforia Developer.
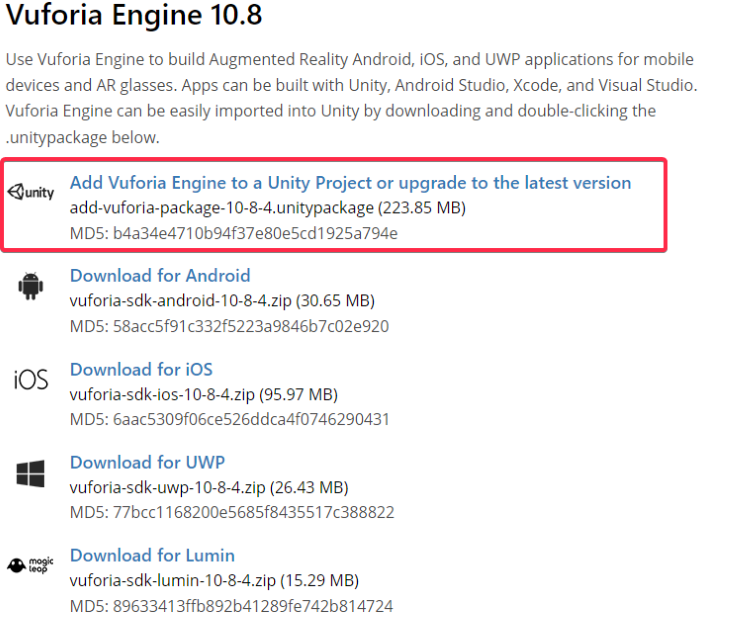
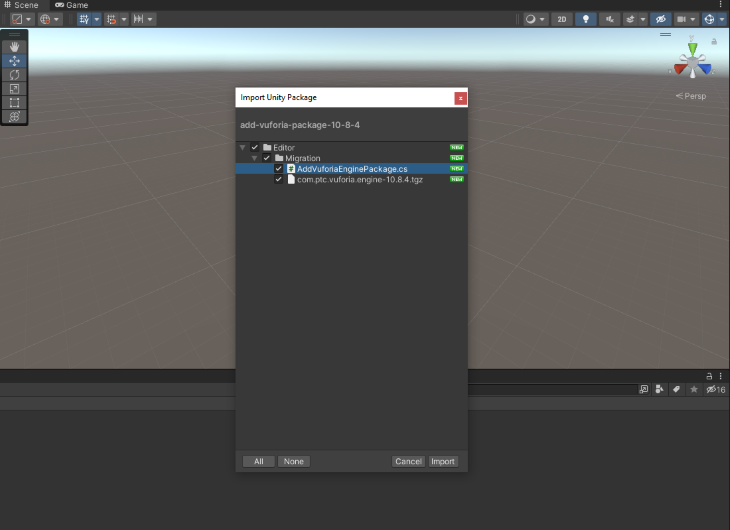
Next, double click on the downloaded Unity package and you will see this pop up in the Unity Editor automatically. Click import.
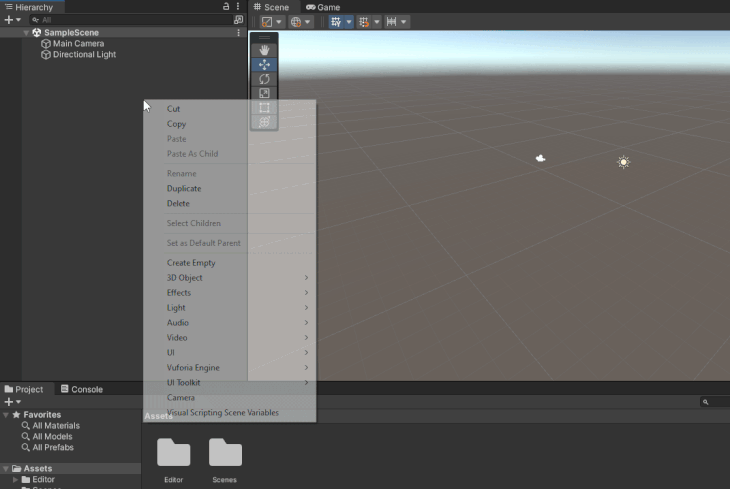
To verify whether Vuforia is imported successfully, right-click in the Hierarchy panel in the Unity Editor. If you see Vuforia Engine in the dropdown list, it means that Vuforia is imported successfully.
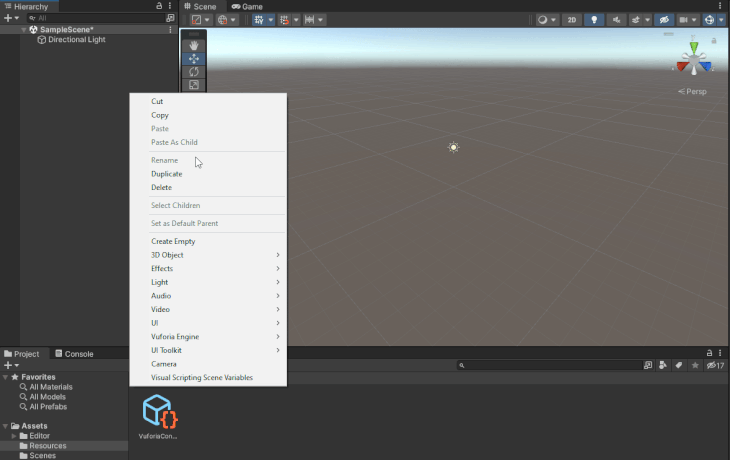
Delete the Main Camera from the scene. Then, right click in the Hierarchy panel > Vuforia Engine > Add AR Camera to the scene.
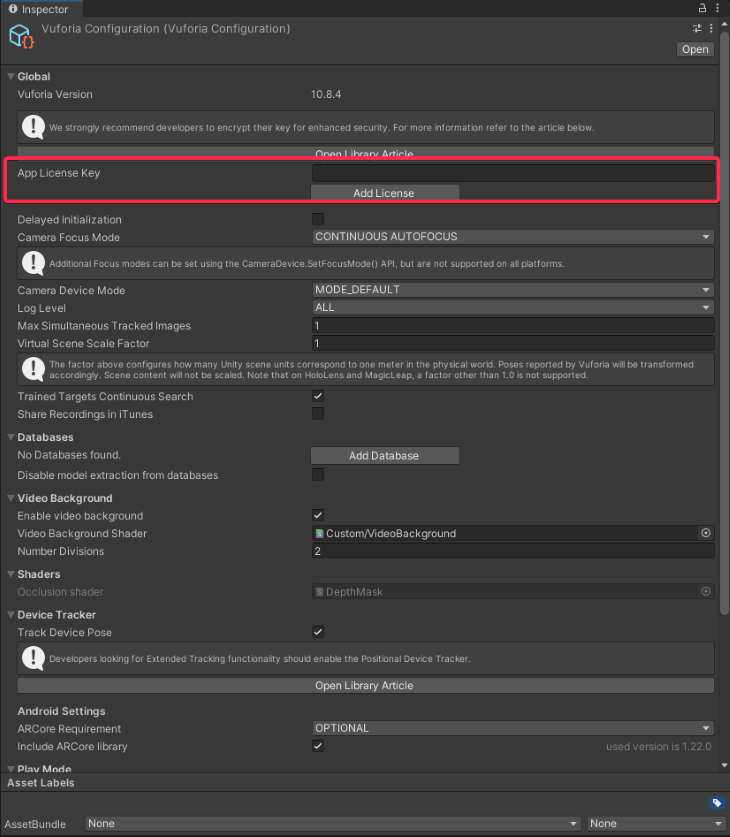
In the Project Window, go to Assets > Resources and double click VuforiaConfiguration to view its properties in the inspector panel. You will add the license key in the next step.
To add the license key, go to your Vuforia Developer Portal > License Manager and click Get Basic.
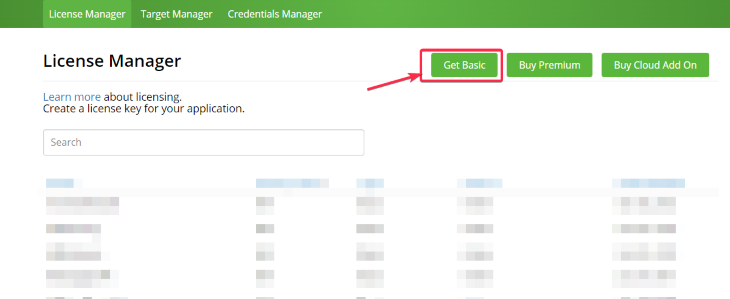
The Basic Plan (available for free) covers features such as Image Targets, Multi Targets, Cylinder Targets, VuMarks, and Ground Plane. You can build and publish an unlimited number of apps without the Vuforia watermark. However, if your application uses advanced features of Vuforia such as the Model Targets and Area Targets, the Vuforia Watermark will be present. This means you can develop your app using these features for personal research purposes but cannot publish the app on any platform.
If you would like to get access to Model Targets and Area Targets without the Vuforia Watermark being displayed in your app, you can purchase the Premium plan. To get a more detailed understanding of Vuforia you can visit this link.
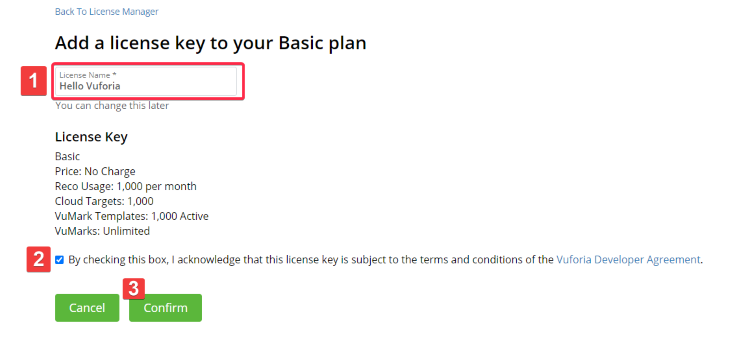
Keep the license name the same as your project name; i.e., Hello Vuforia. You can give any name to your license. Check the terms and conditions box, then click Confirm.
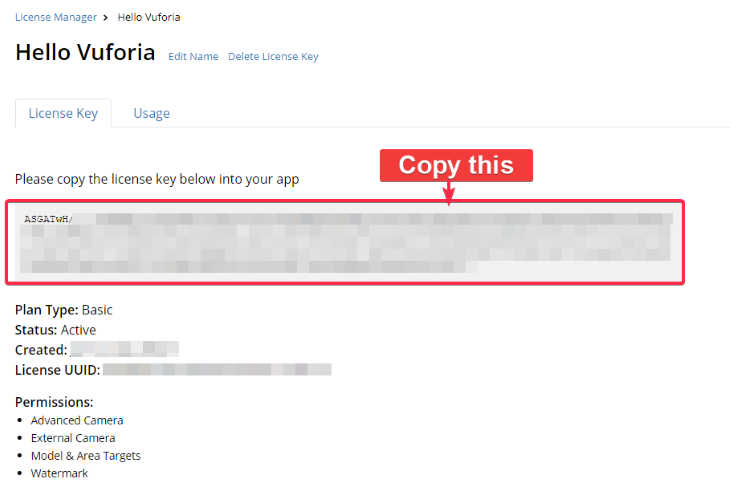
Next, copy the license key.
And paste it into the App License Key field in Unity.
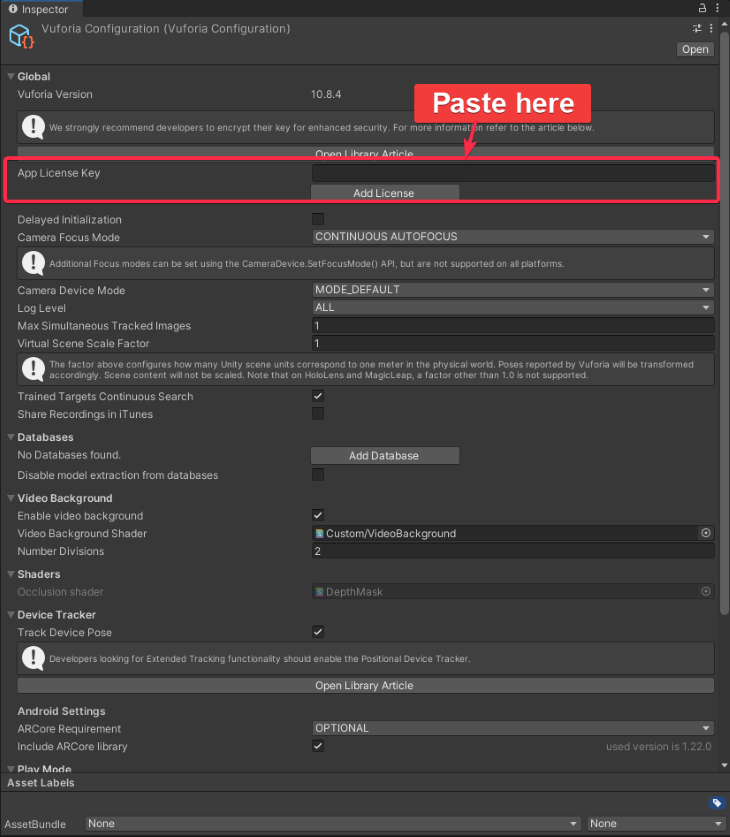
Perfect! You have successfully configured Vuforia and your Unity project.
Now we can move to the fun part: image recognition.
How do you create Image Targets in Vuforia?
In this step, we will add images (or markers) so that Vuforia can detect and track them. These detected and tracked images are known as Image Targets in Vuforia. A collection of Image Targets is stored in a Database.
Both Image Targets and Databases are created from the Vuforia Developer Portal.
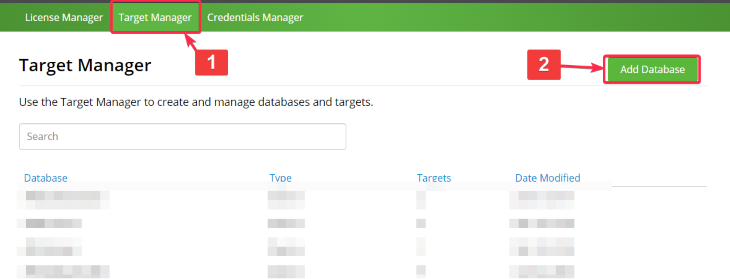
To get started with Image Targets, in the Vuforia Developer Portal, go to Target Manager. Then click Add Database.
Set the Database Name as “HelloVuforia” (no spaces) and select the Device type. A Device-type Database is a database that exists within your app. If you have a large Database, then select Cloud type. Finally, click Create.

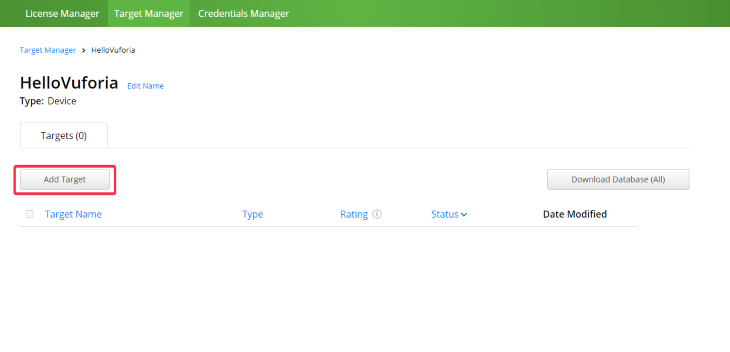
After the Database is created, open the HelloVuforia and click Add Target.
Select Image as your Type. You can upload any image in the File field; I used this one from Pixabay. This image will be your Image Target, which means that it will be detected and tracked by your app.
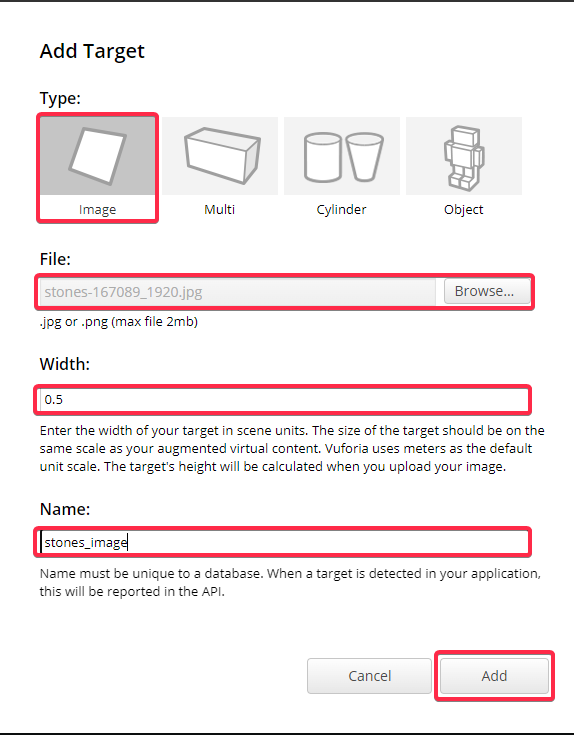
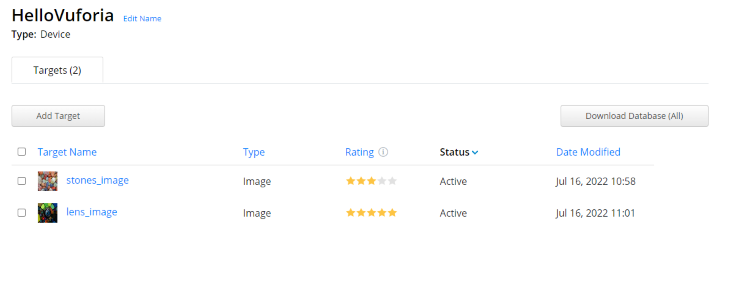
After filling in the rest of your details above, click Add. You will see the images listed in your Database. Corresponding to each image, there is a property called Rating. Try to upload an image that has a higher number of stars. The higher the number of stars, the easier it is to detect and track the image.
In the image below, you will see two Image Targets. The target called stones_image has only 3 stars, but the lens_image target has 5 stars. Both the images are augmentable, but lens_image will give better performance.
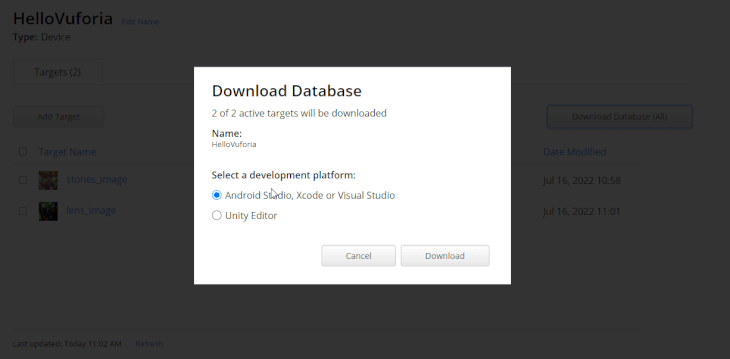
Click Download Database > Unity Editor > Download. Once it downloads, you will get a file called HelloVuforia.unitypackage. Double click on this file to open it in Unity.
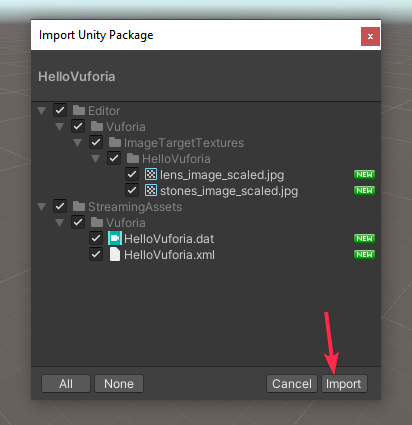
You will get the below pop-up. Click Import.
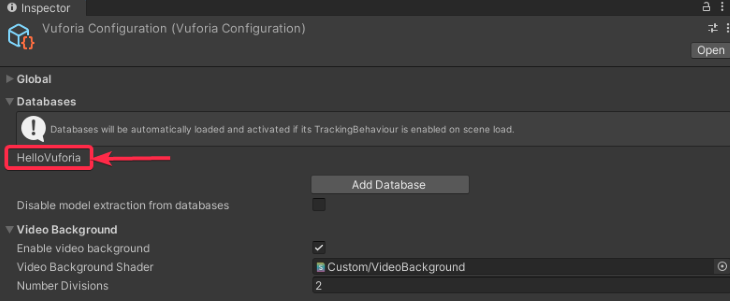
After the Database is imported in Unity, in the project panel go to Assets > Resources and double click VuforiaConfiguration to view the properties in the Inspector panel. In the Databases section, you will see HelloVuforia listed. This means that you have successfully imported the database into your Unity project.
Rendering 3D content on top of an Image Target
Now you are ready to show a Cube on top of the Image Target. Follow the rest of the steps in this tutorial in order do so.
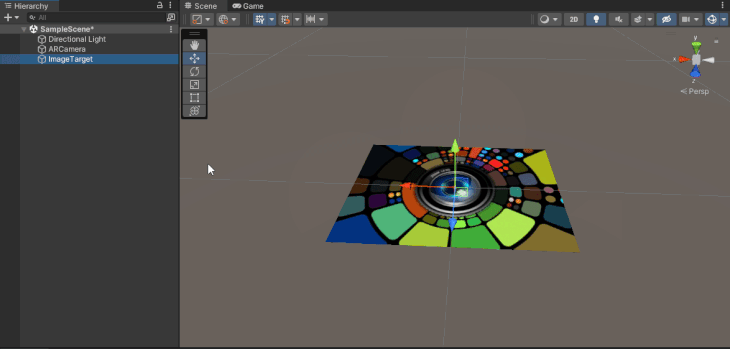
Right click in Hierarchy Panel > Vuforia Engine and add an Image Target to your Scene.
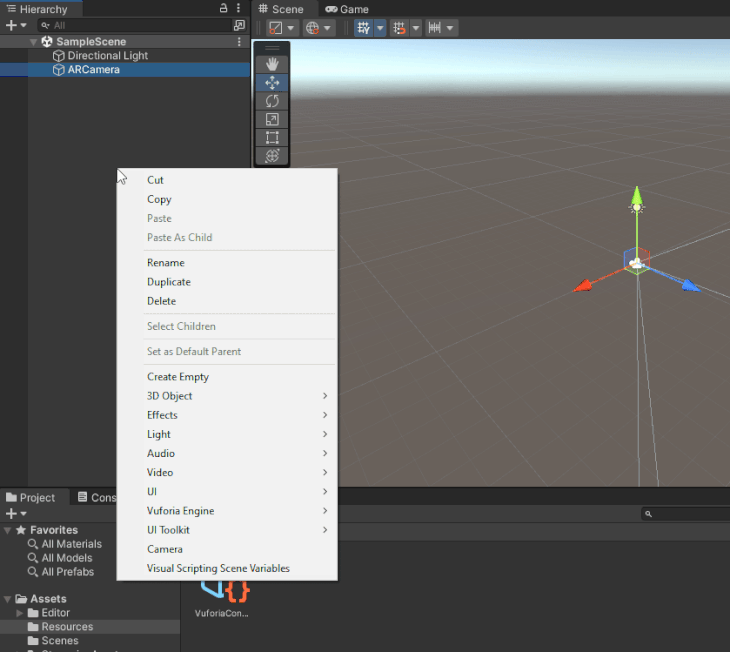
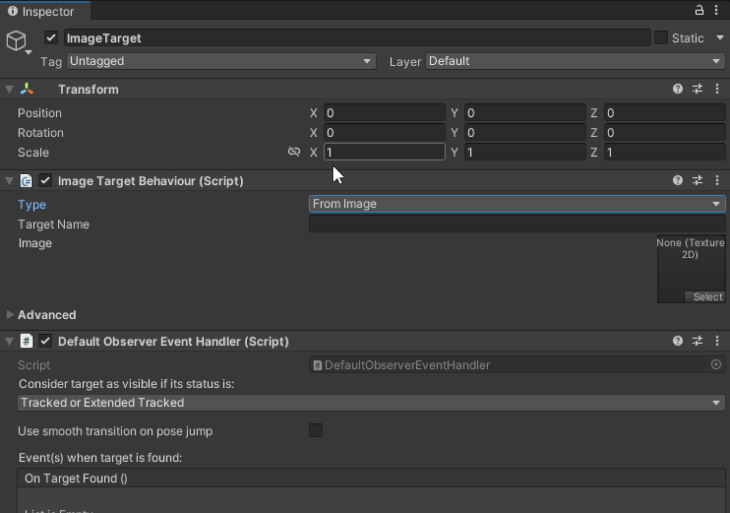
Select ImageTarget to view its properties in the Inspector panel. In the Image Target Behaviour (Script), make the following changes:
- Set Type to From Database
- Set Database to HelloVuforia
- Set Image Target to lens_image (or any other image that you had uploaded to your HelloVuforia Database)
Now add a cube as a child of ImageTarget in the Scene like this :
:
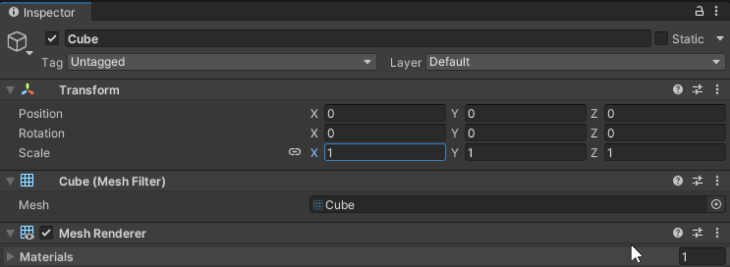
Scale down the cube to 0.2 (or smaller if you want).
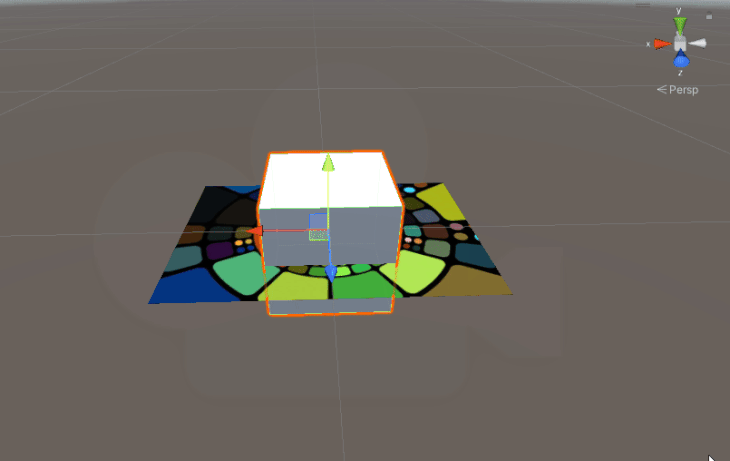
Then, move the cube in the positive y-axis a little bit so that it looks like it is floating above the image.
That’s it! Now you are ready to run the app on your Android device.
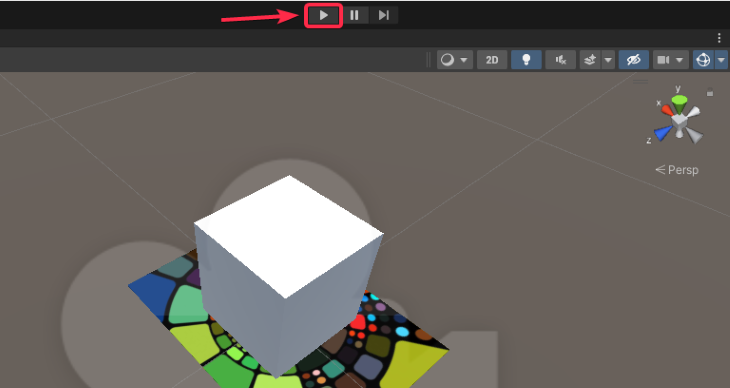
Click the play button to run the scene using your webcam.
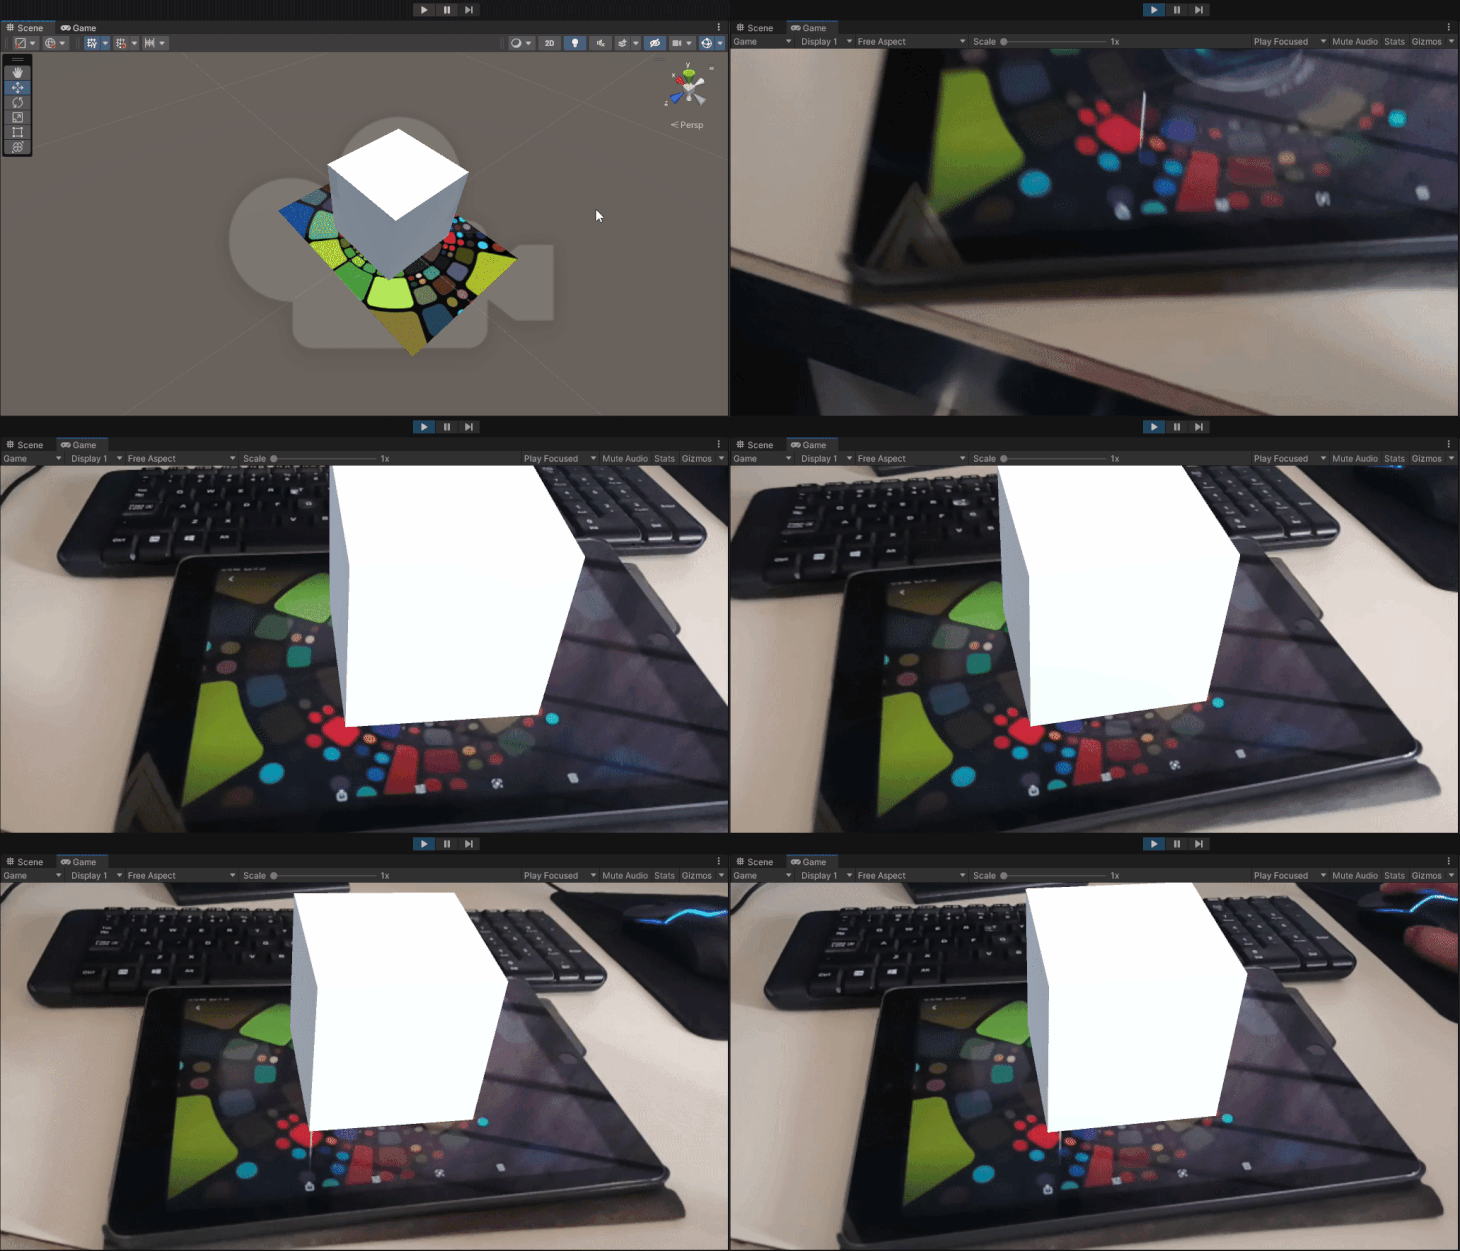
After hitting the play button, point your webcam to the image and the cube appears magically on top of the image. I have downloaded the image to my iPad, but you can take out a printout of the image and point the webcam to the printout too. It gives the same result.
Conclusion
Congratulations!
You just created an augmented reality experience with Unity and Vuforia. This tutorial was a basic one for those trying to create their first AR experience. However, the cube can be replaced with any other 3D model. Give it a try!
If you faced any issues or need some help, please ping me on Twitter or LinkedIn, and check out my Gumroad page or YouTube Channel if you’re looking for more Unity tutorials and resources.
The post How to create an AR experience with Unity and Vuforia appeared first on LogRocket Blog.
from LogRocket Blog https://ift.tt/YZ9yz5c
via Read more


