


User authentication can be handled in a myriad of ways. Because of how important this feature is, we’ve come to see more companies provide authentication solutions to ease the process — Firebase, Auth0, and NextAuth.js to name a few.
Regardless of how such services handle authentication and authorization on their end, the implementation process typically involves calling some API endpoints and receiving a private token (usually a JSON Web Token, or JWT) to be used in your frontend infrastructure.
In this article, we’ll learn how to use Redux Toolkit (RTK) to create a frontend authentication workflow in React. We’ll make use of essential Toolkit APIs, like createAsyncThunk, to make asynchronous requests to an Express backend. We’ll also use createSlice to handle state changes.
The backend for this project is built using Express with a MongoDB database, but the frontend workflow should still apply for any authentication service you use that provides a token. You can download the source files in the project’s repository with instructions on how to set up a database and can run the application locally. View the live demo here.
- Prerequisites
- Cloning starter files from GitHub
- Configuring the Redux store
- Organizing Redux slices and actions
- Backend architecture
- Register action
- Login action
- Logout action
Prerequisites
To follow along, you’ll need:
- Familiarity with React concepts, such as hooks and state
- Familiarity with Redux Toolkit, particularly the createSlice and createAsyncThunk APIs
- Knowledge of ES6 syntax and JavaScript Promises.
Now, let’s start authenticating!
Cloning starter files from GitHub
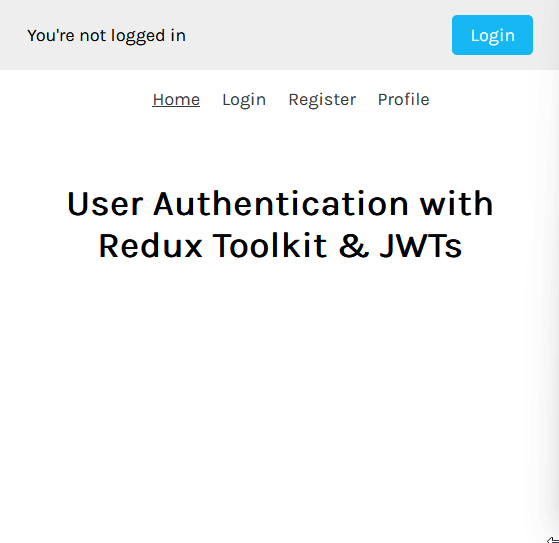
The repository includes a [starter-files] branch that contains the necessary files to bootstrap this application. The frontend folder also includes the various user interfaces seen in the demo, such as Home, Login, Register, and Profile screens with respective routes /, /login, /register, and /user-profile.
Here’s what the routing structure currently looks like:
// App.js
import { BrowserRouter as Router, Routes, Route } from 'react-router-dom'
import Header from './components/Header'
import LoginScreen from './screens/LoginScreen'
import RegisterScreen from './screens/RegisterScreen'
import ProfileScreen from './screens/ProfileScreen'
import HomeScreen from './screens/HomeScreen'
import './App.css'

function App() {
  return (
    <Router>
      <Header />
      <main className='container content'>
        <Routes>
          <Route path='/' element={<HomeScreen />} />
          <Route path='/login' element={<LoginScreen />} />
          <Route path='/register' element={<RegisterScreen />} />
          <Route path='/user-profile' element={<ProfileScreen />} />
        </Routes>
      </main>
    </Router>
  )
}
export default App
The input fields on the registration pages are connected to React Hook Form. React Hook Form cleanly grabs the input values and returns them in a handleSubmit function.
// Login.js
import { useForm } from 'react-hook-form'

const LoginScreen = () => {
  const { register, handleSubmit } = useForm()

  const submitForm = (data) => {
    console.log(data.email)
  }

  return (
    <form onSubmit={handleSubmit(submitForm)}>
      <div className='form-group'>
        <label htmlFor='email'>Email</label>
        <input
          type='email'
          className='form-input'
          {...register('email')}
          required
        />
      </div>
      <div className='form-group'>
        <label htmlFor='password'>Password</label>
        <input
          type='password'
          className='form-input'
          {...register('password')}
          required
        />
      </div>
      <button type='submit' className='button'>
        Login
      </button>
    </form>
  )
}
export default LoginScreen
In your terminal, clone the starter-files branch with the following command:
git clone --branch starter-files --single-branch https://github.com/Chinwike1/redux-user-auth.git
And install all project dependencies:
npm install
cd frontend
npm install
The above process installs the following packages on the frontend
- react-hook-form: we’ve used this above to handle form inputs and submissions
- react-router: for configuring the application’s routing
- axios: a promise-based HTTP client for the browser. We’ll use this to make API requests
- @reduxjs/toolkit: our state management library of choice
- react-redux: provides hooks we can use to access the store and dispatch actions
You can get familiar with these Redux terms here if you need to.
Finally, run the application with the following command:
cd ..
npm run dev
Configuring the Redux store
Redux Toolkit introduces a new way of creating a store. It separates parts of the store into different files, known as slices.
A slice represents a single unit of the Redux state. It’s a collection of reducer logic and actions for a single feature in your app, typically defined together in a single file. For us, this file is features/user.
By using RTK’s createSlice API, we can create a Redux slice like so:
// features/user/userSlice.js
import { createSlice } from '@reduxjs/toolkit'
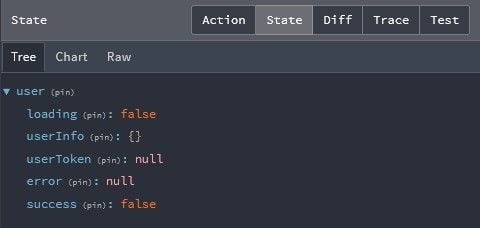
const initialState = {
loading: false,
userInfo: {}, // for user object
userToken: null, // for storing the JWT
error: null,
success: false, // for monitoring the registration process.
}
const userSlice = createSlice({
name: 'user',
initialState,
reducers: {},
extraReducers: {},
})
export default userSlice.reducer
Import the reducer property from userSlice into the store so it reflects in the root Redux state object.
// app/store.js
import { configureStore } from '@reduxjs/toolkit'
import userReducer from '../features/user/userSlice'

const store = configureStore({
  reducer: {
    user: userReducer
  }
})
export default store
Organizing Redux slices and actions
The Redux Toolkit docs suggest consolidating actions and reducers into one slice file. Conversely, I’ve found my code more readable when I split these two parts and store the actions in a separate file, e.g. features/user/userActions.js. Here, we’ll write asynchronous actions that make requests to the backend.
But before that, I’ll give a quick overview of the backend routes currently available.
Backend architecture
Our Express server, hosted on localhost:5000, currently has three routes:
api/user/login: the login route. It acceptsPOSTrequests and requires the user’s email and password as arguments. It then returns a JWT after successful authentication or an error message. This token has a 12-hour lifespanapi/user/register: the register route. It acceptsPOSTrequests and requires the user’s first name, email, and passwordapi/user/profile: an authorization route. It acceptsGETrequests and requires the user’s token to fetch their details from the database. It returns the user’s object after successful authorization or an error message.
Now we can move on to writing Redux actions, starting with the register action.
Redux authentication: Register action
In userAction.js, you will use createAsyncThunk to perform delayed, asynchronous logic before sending processed results to the reducers.
createAsyncThunk accepts three parameters: a string action type, a callback function, and an optional options object.
The callback function is an important parameter as it has two key arguments that you should take into consideration:
arg: this is the single value passed into thedispatchmethod when the action is called. If you need to pass multiple values, you can pass in an objectthunkAPI: an object containing parameters normally passed to a Redux thunk function. Parameters includegetState,dispatch,rejectWithValue, and more
// userAction.js
export const registerUser = createAsyncThunk(
// action type string
'user/register',
// callback function
async ({ firstName, email, password }, { rejectWithValue }) => {
try {
// configure header's Content-Type as JSON
const config = {
headers: {
'Content-Type': 'application/json',
},
}
// make request to backend
await axios.post(
'/api/user/register',
{ firstName, email, password },
config
)
} catch (error) {
// return custom error message from API if any
if (error.response && error.response.data.message) {
return rejectWithValue(error.response.data.message)
} else {
return rejectWithValue(error.message)
}
}

}
)

In the code block above, we've taken the values from the register form and made a POST request to the register route using Axios. In the event of an error, thunkAPI.rejectWithValue sends the custom error message from the backend as a payload to the reducer. You may notice that the register API is called without referencing the server's base URL. This is possible with the proxy configuration existing in frontend/package.json.
{
  "proxy": "http://127.0.0.1:5000",
}
Handling asynchronous functions in extraReducers
Actions created with createAsyncThunk generate three possible lifecycle action types: pending, fulfilled, and rejected.
You can utilize these action types in the extraReducers property of userSlice to make the appropriate changes to your state.
// userSlice.js
import { createSlice } from '@reduxjs/toolkit'
import { registerUser } from './userActions'

const initialState = {
  loading: false,
  userInfo: null,
  userToken: null,
  error: null,
  success: false,
}

const userSlice = createSlice({
  name: 'user',
  initialState,
  reducers: {},
  extraReducers: {
    // register user
    [registerUser.pending]: (state) => {
      state.loading = true
      state.error = null
    },
    [registerUser.fulfilled]: (state, { payload }) => {
      state.loading = false
      state.success = true // registration successful
    },
    [registerUser.rejected]: (state, { payload }) => {
      state.loading = false
      state.error = payload
    },
  },
})
export default userSlice.reducer
In this case, we set the success value to true when the action is fulfilled to signify a successful registration.
React Redux’s useDispatch and useSelector hooks
By using useSelector and useDispatch from the react-redux package you installed earlier, you can read state from a Redux store and dispatch any action from a component, respectively.
// RegisterScreen.js
import { useForm } from 'react-hook-form'
import { useDispatch, useSelector } from 'react-redux'
import Error from '../components/Error'
import { registerUser } from '../features/user/userActions'

const RegisterScreen = () => {
  const { loading, error } = useSelector(
    (state) => state.user
  )
  const dispatch = useDispatch()

  const { register, handleSubmit } = useForm()

  const submitForm = (data) => {
    // check if passwords match
    if (data.password !== data.confirmPassword) {
      alert('Password mismatch')
      return
    }
    // transform email string to lowercase to avoid case sensitivity issues during login
    data.email = data.email.toLowerCase()
    dispatch(registerUser(data))
  }
  return (
    <form onSubmit={handleSubmit(submitForm)}>
      {/* render error message with Error component, if any */}
      {error && <Error>{error}</Error>}
      <div className='form-group'>
        <label htmlFor='firstName'>First Name</label>
        <input
          type='text'
          className='form-input'
          {...register('firstName')}
          required
        />
      </div>
      <div className='form-group'>
        <label htmlFor='email'>Email</label>
        <input
          type='email'
          className='form-input'
          {...register('email')}
          required
        />
      </div>
      <div className='form-group'>
        <label htmlFor='password'>Password</label>
        <input
          type='password'
          className='form-input'
          {...register('password')}
          required
        />
      </div>
      <div className='form-group'>
        <label htmlFor='email'>Confirm Password</label>
        <input
          type='password'
          className='form-input'
          {...register('confirmPassword')}
          required
        />
      </div>
      <button type='submit' className='button' disabled={loading}>
        Register
      </button>
    </form>
  )
}
export default RegisterScreen
When the form is submitted, we start off by verifying if the password and confirmPassword fields match. If they do, the registerUser action is dispatched, taking the form data as its argument.
The useSelector hook is used to pull out the loading and error state values from the user object in the Redux store. These values are then used to make certain UI changes, like disabling the submit button while the request is in progress and displaying an error message.
Currently, when a user completes registration, there’s no indication that what they’ve done is successful. With the success value from userSlice alongside React router’s useNavigate hook and the useEffect hook, we can redirect the user to the Login page after registration.
Here’s how that would look:
// RegisterScreen.js
import { useEffect } from 'react'
import { useForm } from 'react-hook-form'
import { useDispatch, useSelector } from 'react-redux'
import { useNavigate } from 'react-router-dom'
import Error from '../components/Error'
import { registerUser } from '../features/user/userActions'

const RegisterScreen = () => {
  const { loading, userInfo, error, success } = useSelector(
    (state) => state.user
  )
  const dispatch = useDispatch()
  const { register, handleSubmit } = useForm()

  const navigate = useNavigate()

  useEffect(() => {
    // redirect user to login page if registration was successful
    if (success) navigate('/login')
    // redirect authenticated user to profile screen
    if (userInfo) navigate('/user-profile')
  }, [navigate, userInfo, success])

  const submitForm = (data) => {
    // check if passwords match
    if (data.password !== data.confirmPassword) {
      alert('Password mismatch')
      return
    }
    // transform email string to lowercase to avoid case sensitivity issues in login
    data.email = data.email.toLowerCase()
    dispatch(registerUser(data))
  }

  return (
    <form onSubmit={handleSubmit(submitForm)}>
      {/* form markup... */}
    </form>
  )
}
export default RegisterScreen
There’s a familiar pattern you’ll notice while writing Redux logic. It usually goes like this:
- Create Redux action in the action file
- Write reducer logic to handle state changes for the above action
- Dispatch action within a component
- Make necessary UI updates/side effects that happen as a result of the dispatched action
It doesn’t have to be in that order, but they’re usually reoccurring steps. Let’s repeat this with the login action.
Redux authentication: Login action
The login action will be similar to the register action, except here we store the JWT returned from the backend in local storage before passing the result to the reducer.
// userActions.js
export const userLogin = createAsyncThunk(
  'user/login',
  async ({ email, password }, { rejectWithValue }) => {
    try {
      // configure header's Content-Type as JSON
      const config = {
        headers: {
          'Content-Type': 'application/json',
        },
      }
      const { data } = await axios.post(
        '/api/user/login',
        { email, password },
        config
      )
      // store user's token in local storage
      localStorage.setItem('userToken', data.userToken)
      return data
    } catch (error) {
      // return custom error message from API if any
      if (error.response && error.response.data.message) {
        return rejectWithValue(error.response.data.message)
      } else {
        return rejectWithValue(error.message)
      }
    }
  }
)
Now you can handle the lifecycle action types in userSlice.js.
// userSlice.js
import { createSlice } from '@reduxjs/toolkit'
import { registerUser, userLogin } from './userActions'

// initialize userToken from local storage
const userToken = localStorage.getItem('userToken')
  ? localStorage.getItem('userToken')
  : null

const initialState = {
  loading: false,
  userInfo: null,
  userToken,
  error: null,
  success: false,
}

const userSlice = createSlice({
  name: 'user',
  initialState,
  reducers: {},
  extraReducers: {
    // login user
    [userLogin.pending]: (state) => {
      state.loading = true
      state.error = null
    },
    [userLogin.fulfilled]: (state, { payload }) => {
      state.loading = false
      state.userInfo = payload
      state.userToken = payload.userToken
    },
    [userLogin.rejected]: (state, { payload }) => {
      state.loading = false
      state.error = payload
    },
    // register user reducer...
  },
})
export default userSlice.reducer

Because the value of userToken is dependent on the value of the token from localStorage, it’s better to initialize it at the beginning, as shown above.
Now you can dispatch this action when the form is submitted and make your preferred UI updates.
// LoginScreen.js
import { useForm } from 'react-hook-form'
import { useDispatch, useSelector } from 'react-redux'
import { userLogin } from '../features/user/userActions'
import Error from '../components/Error'

const LoginScreen = () => {
  const { loading, error } = useSelector((state) => state.user)
  const dispatch = useDispatch()
  const { register, handleSubmit } = useForm()

  const submitForm = (data) => {
    dispatch(userLogin(data))
  }

  return (
    <form onSubmit={handleSubmit(submitForm)}>
      {error && <Error>{error}</Error>}
      <div className='form-group'>
        <label htmlFor='email'>Email</label>
        <input
          type='email'
          className='form-input'
          {...register('email')}
          required
        />
      </div>
      <div className='form-group'>
        <label htmlFor='password'>Password</label>
        <input
          type='password'
          className='form-input'
          {...register('password')}
          required
        />
      </div>
      <button type='submit' className='button' disabled={loading}>
        Login
      </button>
    </form>
  )
}
export default LoginScreen
You also want to make sure that previously authenticated users can’t access this page. userInfo‘s value can be used to redirect an authenticated user to the Login page with useNavigate and useEffect.
// LoginScreen.js
import { useForm } from 'react-hook-form'
import { useNavigate } from 'react-router-dom'
import { useDispatch, useSelector } from 'react-redux'
import { userLogin } from '../features/user/userActions'
import { useEffect } from 'react'
import Error from '../components/Error'

const LoginScreen = () => {
  const { loading, userInfo, error } = useSelector((state) => state.user)
  const dispatch = useDispatch()
  const { register, handleSubmit } = useForm()
  const navigate = useNavigate()

  // redirect authenticated user to profile screen
  useEffect(() => {
    if (userInfo) {
      navigate('/user-profile')
    }
  }, [navigate, userInfo])

  const submitForm = (data) => {
    dispatch(userLogin(data))
  }

  return (
    <form onSubmit={handleSubmit(submitForm)}>
      {/* form markup... */}
    </form>
  )
}
export default LoginScreen
And that completes it for the registration process! Next, you’ll see how to automatically authenticate a user whose valid token is still stored in the browser.
getUserProfile action
For this action, you’ll reach out to an authorization route (serving as the endpoint) that requires some credentials to go along with the client request. Here, the required credential is the locally-stored JWT.
Unlike in the authentication routes where user credentials were passed through forms, authorization routes require credentials to be passed more securely through HTTP Authorization headers using this syntax: Authorization: <auth-scheme> <credentials>.
auth-scheme represents which authentication scheme you wish to use. JWTs are designed to support the Bearer authentication scheme, and that’s what we will go with. See RFC 6750 bearer tokens for more information on this.
With Axios, you can configure the request’s header object to send the JWT:
const config = {
  headers: {
    Authorization: 'Bearer eyJhbGInR5cCI6IkpXVCJ9.eyJpZTI4MTI1MywiZXhwIjoxNjU1MzI0NDUzfQ.FWMexh',
  },
}
Because the user’s token is initiated in the Redux store, its value needs to be extracted and included in this request.
The second parameter in createAsyncThunk‘s callback function, thunkAPI, provides a getState method that lets you read the current value of the Redux store.
// userActions.js
export const getUserDetails = createAsyncThunk(
  'user/getUserDetails',
  async (arg, { getState, rejectWithValue }) => {
    try {
      // get user data from store
      const { user } = getState()

      // configure authorization header with user's token
      const config = {
        headers: {
          Authorization: `Bearer ${user.userToken}`,
        },
      }
      const { data } = await axios.get(`/api/user/profile`, config)
      return data
    } catch (error) {
      if (error.response && error.response.data.message) {
        return rejectWithValue(error.response.data.message)
      } else {
        return rejectWithValue(error.message)
      }
    }
  }
)
Next, we’ll handle the lifecycle actions:
// userSlice.js
import { createSlice } from '@reduxjs/toolkit'
import { getUserDetails, registerUser, userLogin } from './userActions'

const initialState = {
  // state values...
}

const userSlice = createSlice({
  name: 'user',
  initialState,
  reducers: {},
  extraReducers: {
    // login user reducer ...
    // register user reducer ...
    [getUserDetails.pending]: (state) => {
      state.loading = true
    },
    [getUserDetails.fulfilled]: (state, { payload }) => {
      state.loading = false
      state.userInfo = payload
    },
    [getUserDetails.rejected]: (state, { payload }) => {
      state.loading = false
    },
  },
})
export default userSlice.reducer
The Header component is a suitable location to dispatch this action from, as it is the only component that stays visible throughout the application. In here, we want this action dispatched when the app notices a change in userToken‘s value. This can be achieved with the useEffect hook.
// Header.js
import { useEffect } from 'react'
import { useDispatch, useSelector } from 'react-redux'
import { NavLink } from 'react-router-dom'
import { getUserDetails } from '../features/user/userActions'
import '../styles/header.css'

const Header = () => {
  const { userInfo, userToken } = useSelector((state) => state.user)
  const dispatch = useDispatch()

  // automatically authenticate user if token is found
  useEffect(() => {
    if (userToken) {
      dispatch(getUserDetails())
    }
  }, [userToken, dispatch])

  return (
    <header>
      <div className='header-status'>
        <span>
          {userInfo ? `Logged in as ${userInfo.email}` : "You're not logged in"}
        </span>
        <div className='cta'>
          {userInfo ? (
            <button className='button'>
              Logout
            </button>
          ) : (
            <NavLink className='button' to='/login'>
              Login
            </NavLink>
          )}
        </div>
      </div>
      <nav className='container navigation'>
        <NavLink to='/'>Home</NavLink>
        <NavLink to='/login'>Login</NavLink>
        <NavLink to='/register'>Register</NavLink>
        <NavLink to='/user-profile'>Profile</NavLink>
      </nav>
    </header>
  )
}
export default Header
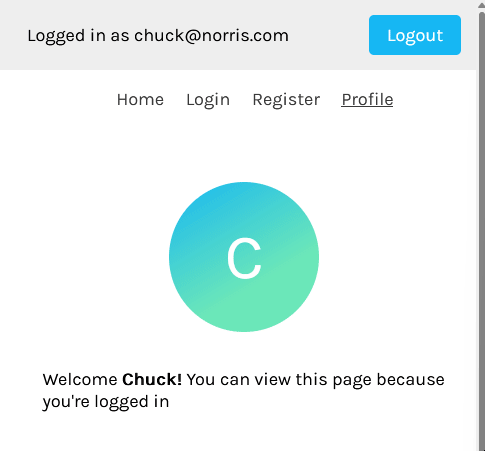
Notice that we also used userInfo to render appropriate messages and elements on the navigation bar that correlate with the user’s authentication status. Now you can move on to render the user’s details on the Profile screen.
// ProfileScreen.js
import { useSelector } from 'react-redux'
import '../styles/profile.css'

const ProfileScreen = () => {
  const { userInfo } = useSelector((state) => state.user)

  return (
    <div>
      <figure>{userInfo?.firstName.charAt(0).toUpperCase()}</figure>
      <span>
        Welcome <strong>{userInfo?.firstName}!</strong> You can view this page
        because you're logged in
      </span>
    </div>
  )
}
export default ProfileScreen
Currently, the Profile page is accessible to everyone regardless of authentication status. We want to protect this route by verifying if a user exists before granting them access to the page. This logic can be extracted into a single ProtectedRoute component, and we are going to create that next.
Protected routes with React Router
Create a folder called routing in src and a file named ProtectedRoute.js. ProtectedRoute is intended to be used as a parent route element, whose child elements are protected by the logic residing in this component.
Here, we can use userInfo’s value to detect if a user is logged in. If userInfo is absent, an unauthorized template is returned. Otherwise, we use React Router’s Outlet component to render the child routes.
// ProtectedRoute.js
import { useSelector } from 'react-redux'
import { NavLink, Outlet } from 'react-router-dom'

const ProtectedRoute = () => {
  const { userInfo } = useSelector((state) => state.user)

  // show unauthorized screen if no user is found in redux store
  if (!userInfo) {
    return (
      <div className='unauthorized'>
        <h1>Unauthorized :(</h1>
        <span>
          <NavLink to='/login'>Login</NavLink> to gain access
        </span>
      </div>
    )
  }

  // returns child route elements
  return <Outlet />
}
export default ProtectedRoute
According to the documentation, <Outlet> should be used in parent route elements to render their child route elements. This means that <Outlet> doesn’t render any markup on the screen, but is replaced by the child route elements.
Now you can wrap ProfileScreen with the protected route as such:
// App.js
import { BrowserRouter as Router, Routes, Route } from 'react-router-dom'
import Header from './components/Header'
import LoginScreen from './screens/LoginScreen'
import RegisterScreen from './screens/RegisterScreen'
import ProfileScreen from './screens/ProfileScreen'
import HomeScreen from './screens/HomeScreen'
import ProtectedRoute from './routing/ProtectedRoute'
import './App.css'

function App() {
  return (
    <Router>
      <Header />
      <main className='container content'>
        <Routes>
          <Route path='/' element={<HomeScreen />} />
          <Route path='/login' element={<LoginScreen />} />
          <Route path='/register' element={<RegisterScreen />} />
          <Route element={<ProtectedRoute />}>
            <Route path='/user-profile' element={<ProfileScreen />} />
          </Route>
        </Routes>
      </main>
    </Router>
  )
}
export default App
And that’s most of the application complete! Let’s now see how to log a user out.
Redux authentication: Logout action
To log a user out, we’ll create an action that resets the Redux store to its initial value and clears the token from local storage. Because this isn’t an asynchronous task, we can create it directly in userSlice with the reducer property.
// userSlice.js
import { createSlice } from '@reduxjs/toolkit'
import { getUserDetails, registerUser, userLogin } from './userActions'

// initialize userToken from local storage
const userToken = localStorage.getItem('userToken')
  ? localStorage.getItem('userToken')
  : null

const initialState = {
  loading: false,
  userInfo: null,
  userToken,
  error: null,
  success: false,
}

const userSlice = createSlice({
  name: 'user',
  initialState,
  reducers: {
    logout: (state) => {
      localStorage.removeItem('userToken') // deletes token from storage
      state.loading = false
      state.userInfo = null
      state.userToken = null
      state.error = null
    },
  },
  extraReducers: {
    // userLogin reducer ...
    // registerUser reducer ...
    // getUserDetails reducer ...
  },
})
// export actions
export const { logout } = userSlice.actions
export default userSlice.reducer
And dispatch it in the Header component:
// Header.js
import { useEffect } from 'react'
import { useDispatch, useSelector } from 'react-redux'
import { NavLink } from 'react-router-dom'
import { getUserDetails } from '../features/user/userActions'
import { logout } from '../features/user/userSlice'
import '../styles/header.css'

const Header = () => {
  const { userInfo, userToken } = useSelector((state) => state.user)
  const dispatch = useDispatch()

  // automatically authenticate user if token is found
  useEffect(() => {
    if (userToken) {
      dispatch(getUserDetails())
    }
  }, [userToken, dispatch])

  return (
    <header>
      <div className='header-status'>
        <span>
          {userInfo ? `Logged in as ${userInfo.email}` : "You're not logged in"}
        </span>
        <div className='cta'>
          {userInfo ? (
            <button className='button' onClick={() => dispatch(logout())}>
              Logout
            </button>
          ) : (
            <NavLink className='button' to='/login'>
              Login
            </NavLink>
          )}
        </div>
      </div>
      <nav className='container navigation'>
        <NavLink to='/'>Home</NavLink>
        <NavLink to='/login'>Login</NavLink>
        <NavLink to='/register'>Register</NavLink>
        <NavLink to='/user-profile'>Profile</NavLink>
      </nav>
    </header>
  )
}
export default Header
And that completes our application! You now have a MERN stack application with a frontend authentication workflow managed with Redux Toolkit.
Conclusion
In my opinion, Redux Toolkit delivers a better developer experience, especially compared to how difficult Redux used to be before RTK’s release.
I find Toolkit easy to plug into my applications when I need to implement state management and don’t want to create it from scratch using React.Context.
Storing tokens in WebStorage, i.e localStorage and sessionStorage, is also an important discussion. I personally find localStorage safe when the token has a short life span and doesn’t store private details such as passwords, card details, etc.
Feel free to share how you personally handle frontend authentication down in the comments!
The post Handling user authentication with Redux Toolkit appeared first on LogRocket Blog.
from LogRocket Blog https://ift.tt/UmQj2du
via Read more


