


Serverless computing is a popular topic in the software development world, and for good reason! It promises a more efficient and cost-effective way to build and run applications that scale elastically.
Supabase is a serverless cloud platform that allows developers to build sophisticated web and mobile apps without servers. Supabase has recently introduced Edge Functions as an option for those looking for an easy way to add serverless functions to their applications. Edge Functions are written in TypeScript and can be distributed and deployed with the Supabase CLI to 29 geographic regions to reach users worldwide.
At the time of writing, Edge Functions are still experimental in Supabase, and there will likely be breaking changes. Still, this feature is quickly becoming popular with developers as a means for building more powerful functions without mass server resources.
But, just how do Edge Functions work? And, how do you write serverless code? In this article, we’ll cover all of that and more!
Jump ahead:
- Understanding the Supabase Edge Functions platform
- Getting started
- Creating Edge Functions
- Deploying Edge Functions
- Running Edge Functions locally
- Use case: Using Edge Functions to send an SMS
- Limitations
Before going further, let’s first explore how Edge Functions work under the hood and how Supabase manages the platform that runs the function code.
Understanding the Supabase Edge Functions platform
Supabase Edge Functions are executed in the secure Deno environment. They are deployed all over the world in just seconds without any need for manual involvement using the Deno Deploy hosted service. This is all handled by Supabase, so you can fully focus on your application’s logic without worrying about the underlying technologies.
When a Supabase Edge Function receives an incoming request, the request first arrives at a “Relay”. The Relay acts as an API gateway for the request and authenticates the JWT passed in the headers. It also provides some additional functionalities like logging and rate limiting.
After receiving the request for a function, the Relay retrieves information about the function along with a unique identifier, called the Deployment ID, and passes it over to the Deno Deploy platform. This platform securely executes the function code and passes the response back to the Relay, which is then received by the end user.
Now, let’s create and deploy a sample Edge Function.
Getting started
To get started with Supabase Edge Functions, you’ll need to first install the Supabase CLI and set up a project. Follow these steps:
- Install the Supabase CLI:
npm install -g supabase - Log in to the CLI using the command:
supabase login - Initialize the Supabase project with the command:
supabase init - Link your local project to the remote Supabase project, like so:
supabase link--project-ref <your-project-ref>
Creating Edge Functions
To create a new Edge Function with Supabase run the following command inside your project:
supabase functions new hello
Here, we’re creating a function called hello.
This creates a boilerplate function code inside your Supabase folder at: /functions/hello/index.ts.
import { serve } from "https://deno.land/std@0.131.0/http/server.ts";

console.log("Hello from Functions!");

serve(async (req) => {
  const { name } = await req.json();
  const data = {
    message: `Hello ${name}!`,
  };

  return new Response(JSON.stringify(data), {
    headers: { "Content-Type": "application/json" },
  });
});
As you can see in the above block, the default function code is quite simple and ready to be deployed. The serve function creates an HTTP server and starts listening for incoming requests.
Deploying Edge Functions
To deploy an Edge Function with Supabase, run the following command:
supabase functions deploy hello
The functions deploy command will package your function code and deploy it to the remote Supabase project. In the Supabase dashboard, under Invoke, click on the URL with your project’s name (see below) to find more details.
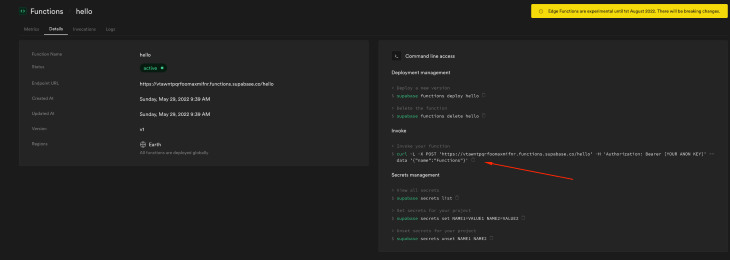
You can copy the curl request to test your function from the terminal.
Running Edge Functions locally
To develop and run the Edge Function locally, you’ll need to use Docker to set up Supabase on your local machine. You can check out this guide for help in setting up Supabase on your system.
Start the Supabase project by running the following command:
supabase start
Next, start the hello function, like so:
supabase functions serve hello
This command will start a local server for the function and will listen on localhost port 54321.
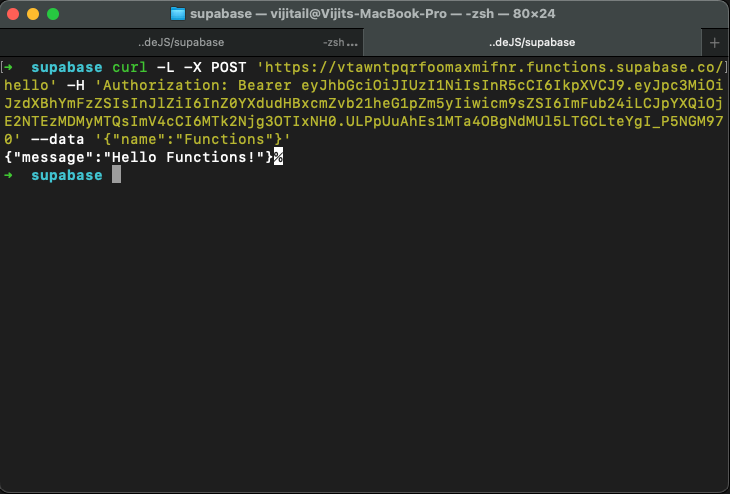
To invoke the function, make a curl request from your terminal:
curl --request POST 'http://localhost:54321/functions/v1/hello' \
  --header 'Authorization: Bearer eyJhbGciOiJIUzI1NiIsInR5cCI6IkpXVCJ9.eyJpc3MiOiJzdXBhYmFzZS1kZW1vIiwicm9sZSI6ImFub24ifQ.625_WdcF3KHqz5amU0x2X5WWHP-OEs_4qj0ssLNHzTs' \
  --header 'Content-Type: application/json' \
  --data '{ "name":"Vijit" }'
The Bearer token is required in the header for authentication. It can be your project’s ANON key, the SERVICE_ROLE key, or a user’s JWT token.
Real world use case
Supabase Edge Functions can help you do more than just build a simple CRUD app; they also enable you to connect to any database, process data in real time, and even build complex workflows.
Let’s take a look at a practical use case. We’ll create a new Edge Function, send-message, that will send an SMS using the Twilio Messaging API.
To create the send-message function, run the following command:
supabase functions new send-message
You’ll find the default function code at /functions/send-message/index.ts
To use the Twilio Messaging API you’ll need the Twilio Account SID key, an auth token, and a virtual number that will be used to send the SMS.
Create an .env file inside the project and add the following values to the file:
// .env
TWILIO_ACCOUNT_SID=
TWILIO_AUTH_TOKEN=
TWILIO_PHONE_NUMBER=
N.B., Be sure not to expose these credentials in your code or add the .env file to your GitHub history.
Next, define an interface to represent the SMS payload:
// ./send-message/types/sms.interface.ts
export interface Sms {
  [index: string]: string;
  From: string;
  To: string;
  Body: string;
}
Now, create a helper class TwilioSms to send an SMS using the Twilio Messaging API. The class constructor will accept the account SID and the auth token.
The SID and the auth tokens are encoded together and will be passed as an authorization header in the API request.
// ./send-message/helpers/twilio-sms.ts
import * as base64 from "https://denopkg.com/chiefbiiko/base64/mod.ts";
import { Sms } from "../types/sms.interface.ts";

export class TwilioSms {
  private authorizationHeader: string;

  constructor(private accountSID: string, authToken: string) {
    this.authorizationHeader =
      "Basic " +
      base64.fromUint8Array(
        new TextEncoder().encode(accountSID + ":" + authToken)
      );
  }

  async sendSms(payload: Sms): Promise<any> {
    const res = await fetch(
      "https://api.twilio.com/2010-04-01/Accounts/" +
        this.accountSID +
        "/Messages.json",
      {
        method: "POST",
        headers: {
          "Content-Type": "application/x-www-form-urlencoded;charset=UTF-8",
          Authorization: this.authorizationHeader,
        },
        body: new URLSearchParams(payload).toString(),
      }
    );

    const data = await res.json();

    return data;
  }
}
In the main function handler, you’ll need to load the environment variables using the Deno.env.get() method and import the TwilioSms class from the helpers.
Next, use the sendSms() method to send the text message to the given mobile number specified in the request body.
// ./send-message/index.ts
import { serve } from "https://deno.land/std@0.131.0/http/server.ts";

import { TwilioSms } from "./helpers/twilio-sms.ts";

const accountSid = Deno.env.get("TWILIO_ACCOUNT_SID") || "";
const authToken = Deno.env.get("TWILIO_AUTH_TOKEN") || "";
const fromMobile = Deno.env.get("TWILIO_PHONE_NUMBER") || "";

serve(async (req) => {
  const { textMessage, toMobile } = await req.json();

  const twilioClient = new TwilioSms(accountSid, authToken);

  const message = await twilioClient.sendSms({
    Body: textMessage,
    From: fromMobile,
    To: toMobile,
  });

  console.log({ message });

  const data = {
    isSuccess: false,
  };

  if (message.status === "queued") {
    data.isSuccess = true;
  }

  return new Response(JSON.stringify(data), {
    headers: { "Content-Type": "application/json" },
  });
});
To test the function locally, run the supabase functions serve command and pass the .env file path in the --env-file parameter so that environment variables are accessible to the function.
supabase functions serve send-message --env-file ./supabase/.env
Now, use the curl command to invoke the function.
curl -i --location --request POST 'http://localhost:54321/functions/v1/' \
  --header 'Authorization: Bearer eyJhbGciOiJIUzI1NiIsInR5cCI6IkpXVCJ9.eyJpc3MiOiJzdXBhYmFzZS1kZW1vIiwicm9sZSI6ImFub24ifQ.625_WdcF3KHqz5amU0x2X5WWHP-OEs_4qj0ssLNHzTs' \
  --header 'Content-Type: application/json' \
  --data '{ "textMessage":"Hello Developer!", "toMobile": "+91XXXXXXXXXX" }'
To push your local environment variables to the remote Supabase project, run the supabase secrets set command:
supabase secrets set --env-file ./supabase/.env
Once your function is tested locally and ready to be deployed, run the supabase functions deploy command:
supabase functions deploy send-message
Limitations
Supabase Edge Functions provide many benefits, but there are still some limitations as to what you can do with this new feature. For services that are data intensive and potentially time consuming to execute, you should opt to use Supabase’s Database Functions.
At the time of writing, Edge Functions are still experimental and there will be breaking changes in future updates. Edge Functions can not make outbound connections to ports 25, 465, or 587 at present. Also, this feature only supports POST requests and not HTML responses. Lastly, only one Edge Function can be served at a time in local development.
Conclusion
Supabase Edge Functions are a great solution for extending the functionality of your app. By using them, you can add features to your app that would normally require a separate server-side application.
In this article, we investigated how Supabase Edge Functions work, and looked at how to create, deploy, and run an Edge Function. We also walked through a real world use case, using Edge Functions to send an SMS without a server.
If you’re looking for a way to add custom functionality to your app without having to manage the infrastructure yourself, Supabase Edge Functions are definitely worth checking out. I hope this article will help you get started using Supabase and Edge Functions to build your own applications.
The post Using Edge Functions in Supabase: A complete guide appeared first on LogRocket Blog.
from LogRocket Blog https://ift.tt/dkYcJbv
via Read more


