


Implementing pagination with GraphQL in NestJS
Pagination is a common UX problem that comes up in many data-driven applications. We need to limit how much is shown on screen; if my content requires too much scrolling, navigating around my site becomes a painful experience for my users.
In this post, we’ll look at a common way to solve this problem by building a NestJS server with GraphQL and then consume it on a React frontend. By going step by step through the following sections, we will build a simple pagination system that can be applied to all kinds of applications.
This guide will be split into three main sections:
- The pagination algorithm
- Setting up an API using NestJS, GraphQL, and Mongoose
- Building a React frontend to consume the API
This is a practical guide to implementing a simple pagination system in NestJS and GraphQL. You can improve on the application that we will build in this guide to create something more production-ready.
I recommend coding along to solidify the concepts. All the code written in this guide can be found on my GitHub.
What are we building?
The application we’ll build is a simple React frontend that allows a user to page through a list of users. It’s just simple enough to easily understand the different concepts we’ll cover, while still practical enough to modify for existing applications.

The pagination algorithm
Before setting up the project, it’s worth it to go through the pagination algorithm we’ll be implementing. This will help you make sense of each part of the project as we start creating files and writing code.
Let’s skip ahead and take a look at the final GraphQL query that we’ll be calling to fetch and paginate the list of users.
{
  count
  users(take: 20, skip: 0) {
    firstName
    lastName
  }
}
The query consists of two resources, count and users.
The first one, count, as you can probably tell from the name, simply returns a count of all the users in the database. The other resource, users lets us specify how many users we want to retrieve (take), as well as an offset to start fetching from (skip).
How can we implement pagination with this simple query?
Consider a scenario where we have five resources:
[one, two, three, four, five]
If we run the above query with the arguments take = 2, skip = 0, we’ll get the following resources:
[one, two]
And if we ran the same query again, but with the following arguments:
take = 2, skip = 2
we’d get the following resources:
[three, four]
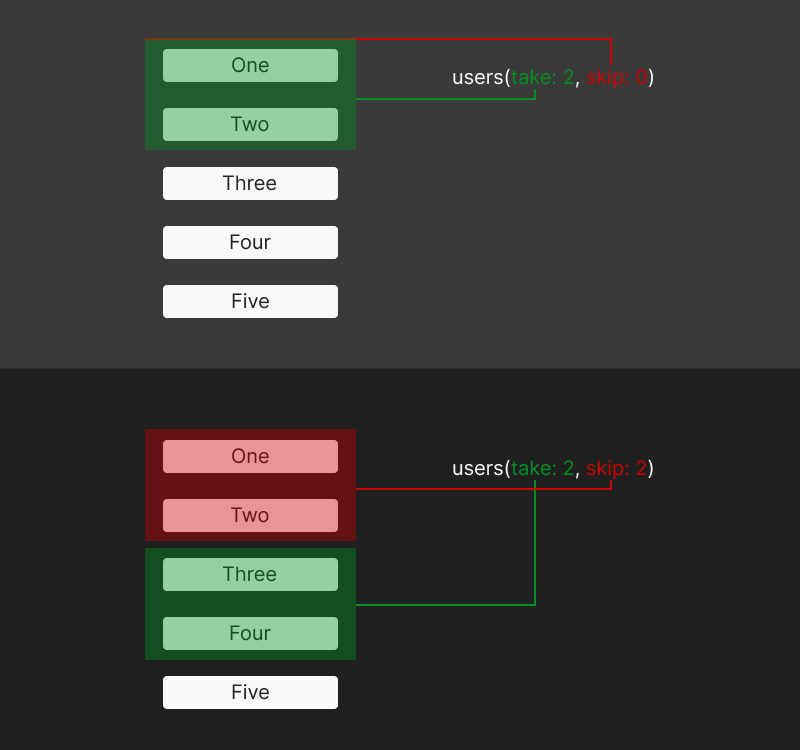
take and skip work, but visuallyBy keeping track of how many users we’ve retrieved on the frontend, we can pass a number to the skip argument to retrieve the correct number of next users. This will become clearer when we implement the frontend.
For now, let’s set up the API to implement the functionality discussed so far.
Setting up an API using NestJS, GraphQL, and Mongoose
Usually, we’d start by setting up a fresh NestJS project and installing a few dependencies to get us going.
However, to skip all the painful parts of setting up a project to follow a tutorial, I’ve gone ahead and set up a repository with all the necessary libraries and setup files.
The repository is a monorepo containing both backend and frontend components. This allows us to build both the API and the frontend in a single repo, unlocking extra speed in development time.
It relies on Yarn workspaces, so you’ll need to have both npm and Yarn installed.
Clone the repository and run the following commands to get started.
git clone https://github.com/ovieokeh/graphql-nestjs-pagination-guide.git
npm install

cd ../workspaces/frontend
npm install

cd workspaces/backend
npm install

mkdir src && cd src
If you run any of the commands in the package.json files, they’ll most likely error out. You may also see eslint errors if you have your editor configured. This is fine. We’ll fix these as we work through the guide.
Now that you’ve installed all of the required packages, we can start building the different components of our API.
Mongoose schema setup
First, we need to set up a database that will query GraphQL. I’ve decided to go with Mongoose for this guide because it’s one of the most popular database ORMs out there, but you should be able to apply the same concepts with other ORMs.
We’ll start by creating a src/mongoose folder and a src/mongoose/schema.ts file to hold our database types, models, and schema.
mkdir mongoose
touch mongoose/schema.ts
Now, let’s configure our schema.ts file.
// src/mongoose/schema.ts

import { Prop, Schema, SchemaFactory } from '@nestjs/mongoose'
import { Document } from 'mongoose'

export type UserDocument = UserModel & Document

@Schema()
export class UserModel {
  @Prop()
  firstName: string

  @Prop()
  lastName: string

  @Prop()
  email: string

  @Prop()
  dateOfBirth: Date
}

export const UserSchema = SchemaFactory.createForClass(UserModel)
UserDocumentis a TypeScript type representing a user model and Mongoose documentUserModelrepresents a single user to be stored in the databaseUserSchemais a Mongoose schema derived from theUserModel
We’ll be making use of these as we finish setting up the API.
NestJS and GraphQL
Next, we need to create some files and folders, which will be explained as we fill the contents.
mkdir users && cd users

mkdir dto entities
touch dto/fetch-users.input.ts entities/user.entity.ts
dto/fetch-users.input.ts
// dto/fetch-users.input.ts

import { Field, Int, ArgsType } from '@nestjs/graphql'
import { Max, Min } from 'class-validator'

@ArgsType()
export class FetchUsersArgs {
  @Field(() => Int)
  @Min(0)
  skip = 0

  @Field(() => Int)
  @Min(1)
  @Max(50)
  take = 25
}
FetchUsersArgs is a data transfer object (DTO), which means that it describes a piece of data being sent over the network. In this case, it’s describing the arguments, skip and take, that we will pass to the API when querying the users.
The next set of files we’ll create are the user service, resolver, and module.
Creating the users.service.ts file
touch users.service.ts users.resolver.ts users.module.ts

import { Model } from 'mongoose'
import { Injectable } from '@nestjs/common'
import { InjectModel } from '@nestjs/mongoose'

import { UserDocument, UserModel } from '../../mongoose/schema'
import { FetchUsersArgs } from './dto/fetch-users.input'
import { User } from './entities/user.entity'

@Injectable()
export class UsersService {
  constructor(
    @InjectModel(UserModel.name) private userModel: Model<UserDocument>,
  ) {}

... continues below (1) ...
NestJS injects the Mongoose database we created earlier into the UsersService class using the @InjectModel decoration. This allows us to query the database using the getCount and findAll methods.
... continues from (1) ...
  async getCount(): Promise<number> {
    const count = await this.userModel.countDocuments()
    return count
  }
... continues below (2) ...
UsersService.getCount() is a method that allows us to fetch the total number of users in the database. This count will be useful for implementing the numbered pagination component in the frontend.
... continues from (2) ...
  async findAll(args: FetchUsersArgs = { skip: 0, take: 5 }): Promise<User[]> {
    const users: User[] = (await this.userModel.find(null, null, {
      limit: args.take,
      skip: args.skip,
    })) as User[]

    return users
  }
}
UsersService.findAll({ skip, take }) is a method that fetches a specified amount of users (with the take argument) along with an offset (skip).
These two methods form the base of the pagination system we’ll be building.
Creating the users.resolver.ts file
import { Resolver, Query, Args } from '@nestjs/graphql'

import { User } from './entities/user.entity'
import { UsersService } from './users.service'
import { FetchUsersArgs } from './dto/fetch-users.input'

@Resolver(() => User)
export class UsersResolver {
  constructor(private readonly usersService: UsersService) {}

  @Query(() => Number, { name: 'count' })
  async getCount(): Promise<number> {
    return this.usersService.getCount()
  }

  @Query(() => [User], { name: 'users' })
  async findAll(@Args() args: FetchUsersArgs): Promise<User[]> {
    return this.usersService.findAll(args)
  }
}
The UsersResolver class is the GraphQL resolver for the count and users queries. The methods simply call the corresponding UsersService methods.
Creating the users.module.ts file
import { Module } from '@nestjs/common'
import { MongooseModule } from '@nestjs/mongoose'

import { UserModel, UserSchema } from '../../mongoose/schema'
import { UsersService } from './users.service'
import { UsersResolver } from './users.resolver'

@Module({
  imports: [
    MongooseModule.forFeature([{ name: UserModel.name, schema: UserSchema }]),
  ],
  providers: [UsersResolver, UsersService],
})
export class UsersModule {}
The UsersModule class imports the Mongoose schema and configures the resolver and service classes, as defined above. This module gets passed to the main app module and allows for the query defined earlier.
Creating the app.module.ts file
Finally, to tie everything together, let’s create an app.module.ts file to consume all the modules we’ve defined so far.
import { Module } from '@nestjs/common'
import { GraphQLModule } from '@nestjs/graphql'
import { ApolloDriver, ApolloDriverConfig } from '@nestjs/apollo'
import { MongooseModule } from '@nestjs/mongoose'

import { UsersModule } from './users/users.module'
import { ConfigModule, ConfigService } from '@nestjs/config'
import configuration from '../nest.config'

@Module({
  imports: [
    UsersModule,
    ConfigModule.forRoot({
      load: [configuration],
    }),
    MongooseModule.forRootAsync({
      imports: [ConfigModule],
      useFactory: async (configService: ConfigService) => ({
        uri: configService.get('databaseUrl'),
      }),
      inject: [ConfigService],
    }),
    GraphQLModule.forRoot<ApolloDriverConfig>({
      driver: ApolloDriver,
      autoSchemaFile: 'schema.gql',
      include: [UsersModule],
    }),
  ],
})
export class AppModule {}
This should all be familiar if you already have experience with GraphQL and NestJS. We’re importing:
GraphQLModulefor setting up GraphQLMongooseModulefor the databaseUsersModulefor the users resourceConfigModulefor setting up environment variables
Now, make sure to setup a MongoDB database and create a .env file using the .env.example as a guide before adding your database connection URI.
At this point, you can now test the API by doing the following:
- Ensure that you’re in the backend directory —
cd src/workspaces/backend - Run
yarn seedto seed in some fake user data - Run
yarn start:devto start the server on port 3000 - Navigate to
http://localhost:3000/graphqlon your browser to open the GraphQL playground, where you can try the query from the “The pagination algorithm” section like so:{ count users(take: 20, skip: 0) { firstName lastName } }
If you’ve made it this far, you’re a rock star  .
.
This is a good time to take a break and go through the backend code again. Take your time to understand it, maybe grab a cup of juice (or tea, if you’re fancy), and then continue with the frontend.
Building a React frontend to consume the API
With our backend all set up, we can now create a shiny React frontend to implement a basic pagination system.
Building the components
Instead of setting up a whole new frontend project, you can make use of the workspaces/frontend folder, which already has a React app set up with all the necessary dependencies installed.
cd ../frontend/src
Let’s start with a bottom-up approach to building out the components, before finally integrating it all at the end.
We’ll need the following components:
Users— queries the API and renders a list of usersPagination— provides the pagination logic and renders the controlsApp— renders both Users and PaginationIndex— wraps the app in an Apollo provider and renders to the DOM
Writing our users.tsx component

The component will query the GraphQL API using the @apollo/client library and render a list of users when the query is resolved.
// ensure you're in /workspaces/frontend/src
touch Users.tsx
Open up the newly created file.
// Users.tsx
import { gql, useQuery } from '@apollo/client'

const GET_USERS = gql`
  query GetUsers($skip: Int!, $amountToFetch: Int!) {
    users(skip: $skip, take: $amountToFetch) {
      id
      firstName
      lastName
    }
  }
`

type User = {
  id: string
  firstName: string
  lastName: string
}
... continues below (3) ...
At the top of the file, we import gql and useQuery from the @apollo/client library mentioned earlier.
gql allows us to build a GraphQL query with functionality like dynamic variable replacement. The GET_USERS variable is a query that requests a list of users of length $amountToFetch from an offset $skip .
We’re querying the id , firstName, and lastName properties of each user. The User variable is a TypeScript type that specifies the structure of a user.
... continues from (3) ...

const Users = (props: { skip?: number; amountToFetch?: number }) => {
  const { data } = useQuery<{ count: number; users: User[] }>(GET_USERS, {
    variables: props,
  })

  const renderedUsers = data?.users?.map(({ id, firstName, lastName }) => {
    const name = `${firstName} ${lastName}`
    return (
      <div key={id}>
        <p>{name}</p>
      </div>
    )
  })

  return <div className="Users">{renderedUsers}</div>
}

export default Users
Finally, we have a Users component that accepts two props: skip and amountToFetch.
It immediately kicks off a query to the API the GET_USERS query as well as passing the props as variables.
Then we map over the array of users (using the ternary operator, in case the data isn’t ready yet) and return a div containing the name of each user.
At the end, the return statement completes this component.
The pagination.tsx component

Hopefully you’re familiar with the renderProps technique in React. This component utilizes renderProps to render a component with props as well as render a select input and some buttons.
Create a new Pagination.tsx file and open it.
// ensure you're in /workspaces/frontend/src
touch Pagination.tsx
We’ll start by importing some types and utilities from React and setup some state variables to track the current state of the pagination component.
import { ChangeEvent, cloneElement, FunctionComponentElement, useState } from 'react'

const Pagination = ({ count, render }: {
  count: number
  render: FunctionComponentElement<{ skip: number; amountToFetch: number }>
}) => {
  const [step, setStep] = useState(0)
  const [amountToFetch, setAmountToFetch] = useState(10)

... continues below (4) ...
The Pagination component accepts two props:
count— The total number of users in the database. Used to calculate the number of steps to render in the UIrender— A React component that will receive additional props from thePaginationcomponent
It also has two state variables:
step— The current step in being renderedamountToFetch— Amount of users to fetch at any given time
... continues from (4) ...

const steps = count ? Math.ceil(count / amountToFetch) : 0
const renderedSteps = new Array(steps).fill(0).map((num, index) => (
  <button
    data-is-active={index === step}
    key={index}
    type="button"
    onClick={() => setStep(index)}
  >
    {index + 1}
  </button>
))

const renderWithProps = cloneElement(render, {
  skip: step * amountToFetch,
  amountToFetch,
})

... continues below (5) ...
Next, define three variables:
steps— This does some simple arithmetic to get the number of steps to render
> if count = 10 users and amountToFetch = 5
> steps = 2 // < 1 2 >
> if count = 10 users and amountToFetch = 2
> steps = 5 // < 1 2 3 4 5 >renderedSteps— Makes use ofstepsto render an array of buttons from1..steps. Each button has anonClickhandler that updates thestepstaterenderWithProps— Clones the component passed in therenderprop and adds two new props to it:skip— how much to skip by when querying the usersamountToFetch— the amount of users to retrieve
 ... continues from (5) ...

return (
<>
{renderWithProps}
 <select
    name="amount to fetch"
    id="amountToFetch"
    value={amountToFetch}
    onChange={(e: ChangeEvent<HTMLSelectElement>) => {
      const newAmount = +e.target.value
      setAmountToFetch(newAmount)
      setStep(0)
    }}
  >
    <option value={10}>10</option>
    <option value={20}>20</option>
    <option value={50}>50</option>
  </select>
  <button
    type="button"
    disabled={step === 0}
    onClick={() => setStep((prevstep) => prevstep - 1)}
  >
    {'<'}
  </button>

  {renderedSteps}

  <button
    type="button"
    disabled={(step + 1) * amountToFetch > count}
    onClick={() => setStep((prevstep) => prevstep + 1)}
  >
    {'>'}
  </button>
</>
)
}

export default Pagination
Finally, we render five elements to the DOM:
renderWithProps: Therendercomponent cloned with props addedselect: Controls theamountToFetchstate variable and allows a user to change how much users to fetch per page. We’ve currently hardcoded three steps of 20, 50, and 100. TheonChangehandler updates theamountToFetchstate and resets thestepbutton: Allows the user to move back one steprenderedSteps: A list of buttons that allows switching to the corresponding stepbutton: Allows the user to move forward one step
Again, take some time to breathe, relax, and understand the concepts covered so far. Taking a walk may not be such a bad idea 
React and Apollo
We’re so close to the finish line now! All that remains is to hook up the Users component with the Pagination component and render.
Create an App.tsx file and open it.
// ensure you're in /workspaces/frontend/src
touch App.tsx
Here are our file contents:
import { gql, useQuery } from '@apollo/client'

import Users from './Users'
import Pagination from './Pagination'

import './App.css'

const GET_USERS_COUNT = gql`
  query GetUsersCount {
    count
  }
`

function App() {
  const { data } = useQuery<{ count: number }>(GET_USERS_COUNT)

  return (
    <div className="App">
      <Pagination count={data?.count || 0} render={(<Users />) as any} />
    </div>
  )
}

export default App
This is a relatively simple component. We import:
gqlanduseQueryfor a query we will define below- The
UsersandPaginationcomponents - A CSS stylesheet that comes with the project
Then we define the GET_USERS_COUNT query, which simply requests the total amount of users in the database.
The App function requests the GET_USERS_COUNT query and stores the result in the data variable.
In the return statement, we render the Pagination component in a div and —
- Pass the
data.countvariable as thecountprop - Pass the
Userscomponent as therenderprop
Just one final piece remains and you’ll be able to test your results in the browser. Whew!
Now, create an index.tsx file and open it.
// ensure you're in /workspaces/frontend/src
touch index.tsx
Here again are our file contents:
import React from 'react'
import ReactDOM from 'react-dom/client'
import { ApolloClient, InMemoryCache, ApolloProvider } from '@apollo/client'

import App from './App'

import './index.css'

const client = new ApolloClient({
  uri: process.env.REACT_APP_API_GRAPHQL_URL,
  cache: new InMemoryCache(),
})

const root = ReactDOM.createRoot(document.getElementById('root') as HTMLElement)

root.render(
  <React.StrictMode>
    <ApolloProvider client={client}>
      <App />
    </ApolloProvider>
  </React.StrictMode>
)
Most of the content in this file should feel familiar by now. What’s interesting is that we’re creating a new Apollo client to connect to our API and passing it to the Apollo provider in the root.render statement.
Note: Make sure to create a .env file using the .env.example as a guide, and adding your API URL (most likely http:localhost:3000/graphql).
At this point, you can now start the frontend in the browser and marvel at your creation.
- Ensure that the backend is running (
yarn start:dev) - Ensure that you’re in
workspaces/frontendand runyarn start - Navigate to http://localhost:3001
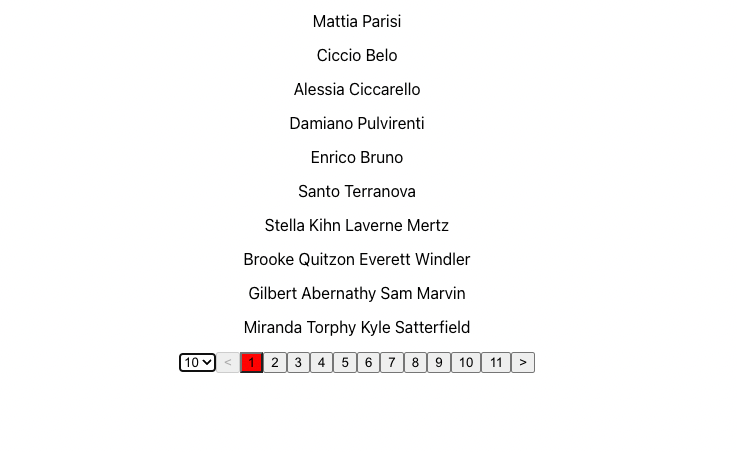
Conclusion
Go ahead and interact with the pagination controls. Maybe you can find a way to truncate the middle section or even add some nice styling; this is a base pagination system that you can customize to whatever data type or scenario.
You can find the source code for this article on my GitHub.
If you managed to stay until the end, you deserve a good pat on the back. I know it was a little dense at times but hopefully this was useful to you.
The post Implementing pagination with GraphQL in NestJS appeared first on LogRocket Blog.
from LogRocket Blog https://ift.tt/Z7vjYpT
via Read more


