


The CSS :has() selector allows us to style an element based on its descendants or any succeeding elements. In this tutorial, we will go over when and how to use the :has() selector.
What we’ll cover:
- When to use CSS
:has() - Browser compatibility for the CSS
:has()selector - CSS
:has()syntax - CSS
:has()selector examples - Combining CSS
:has()with the:not()pseudoclass - The specificity of the CSS
:has()selector - Practical examples of the CSS
:has()selector
When to use CSS :has()
Usually, when we write CSS rules that target HTML elements, the browser’s engine evaluates the rules from right to left to apply them. For instance, the following CSS rule targets the <p> element inside the <section>:
section p {
  color: red;
}
Now, let’s say we want to target an element based on its content or succeeding elements — for instance, targeting a <section> element that contains a <p> element. Normally, we would add CSS classes manually to style and modify the target element.
Another scenario involves targeting an element’s previous siblings, such as a form label that precedes a valid or invalid input.
In this case, styling the label would involve writing more CSS rules than typically necessary. Sometimes, we may require JavaScript to target preceding elements based on the status of certain elements.
However, with the :has() pseudo-class selector, we can achieve all of the above tasks with CSS more cleanly, clearly, and succinctly.
Browser compatibility for the CSS :has() selector
Before we dive in any deeper, let’s take a look at which browsers are compatible with the CSS :has selector:
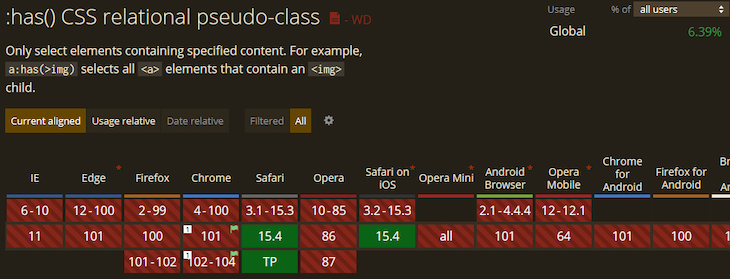
At the moment, the CSS :has() selector is only enabled by default on the latest Safari. Other browsers have yet to enable support for it.
However, in the latest Chrome versions, we can enable CSS :has() support via the experimental features flag. For the sake of this tutorial, we will start with that.
How to enable CSS :has() support in Chrome
For those of us that are not using Safari, let’s open the Chrome browser and visit Chrome’s experimental features listing by typing the following into your browser: chrome://flags/
Then, search for “experimental Web Platform features” and enable this flag, as shown in the image below:
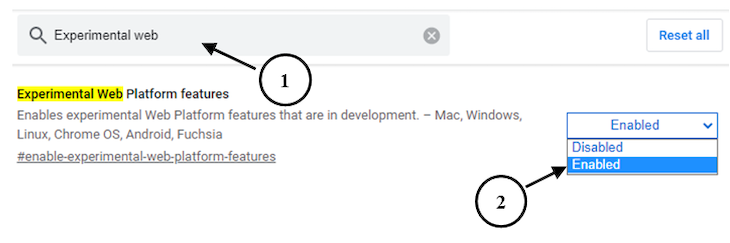
After enabling experimental Web Platform features, relaunch the browser to activate them.
CSS :has() syntax
The :has() pseudo-class accepts a CSS selector list as arguments:
<target>:has(<selector>)
Like some other CSS pseudo-classes, the selector list is “forgiving.” In other words, CSS :has ignores any invalid selectors passed as arguments.
CSS :has() selector examples
Let’s get familiar with how to use CSS :has() before we apply this selector to real-world scenarios. We’ll revisit the style rule example we used earlier to see how the :has() lets us target a parent element.
With the following rule using the :has() selector, we are targeting a <section> element that has a <p> element as a child:
section:has(p) {
  color: red
}
In the above rule, we see that section is the target element to which the style color: red applies, but only if it contains a p element.
Passing CSS combinator selectors as arguments in :has()
So far, we have only been passing simple selectors as arguments in :has(). However, we can also use more advanced CSS selectors.
For example, we can also pass some regular combinator selectors as arguments. Below, the following selector matches the h2 element that has paragraph elements as siblings:
h2:has(+ p) {
  color: yellow;
}
Unlike a simple CSS selector, h2 + p will match p elements that immediately follow an h2.
We must understand how combinator selectors work when passing them as arguments in :has(). Let’s take a look at a couple more examples.
In the code below, the selector matches list items that have a paragraph followed by another paragraph:
li:has(p + p) {
  color: grey;
}
The selector below matches p elements that directly contain a span child:
p:has(> span) {
  color: blue;
}
Combining CSS :has() with the :not() pseudo-class
Sometimes, we may want to target elements that do not match certain selectors. In this case, we can use the :has() selector with :not() pseudo-class. In the example below, the rule targets li elements that do not contain any paragraphs:
li:not(:has(p)) {
  font-weight: 700;
}
We can also pass multiple selectors as arguments. Below, the rule targets li elements that do not contain any paragraph or span element:
li:not(:has(p, span)) {
  font-weight: 700;
}
The specificity of the CSS :has() selector
Sometimes, we may experience issues with conflicting rules while using the :has() selector. Knowing how CSS handles the specificity of its overall selector can help you resolve issues with conflicting CSS rules.
Let’s take a look at the following code blocks:
Here are the HTML elements we are styling:
<ul>
  <!-- other items -->
  <li>
    <h3 id="h3">Heading III</h3> <!-- blue color -->
    <p class="cls">paragraph</p> <!-- blue color -->
  </li>
</ul>
Here are our style rules in CSS:
li:has(p, #h3) {
  color: blue; /* this declaration is applied */
}

li:has(p.cls) {
  color: green;
}
We may expect that the style rule that comes last in the cascade will be applied to the p element. But actually, in this example, the first rule is applied.
This is because of specificity in CSS — the :has() selector defers to its most specific argument. In the above rule, the #h3 is the most specific, thus making the browser also apply its style declaration to the p element.
Practical examples of the CSS :has() selector
To understand how to implement the :has() pseudo-class in a real-world project, let’s consider the following use cases.
Styling a parent with a specific child: building pricing cards
The design below is common on websites that showcase pricing plans. Notice the “recommended” card is styled differently and scaled up to draw more attention:

We can easily achieve this using the :has() selector.
Below is the HTML markup for the cards. We will style the card containing a nested recommend class differently:
<section class="card-container">
 <div class="pricing-card">
  <!-- card content -->
 </div>
 <div class="pricing-card">
  <div class="recommend">Recommended</div>
   <!-- card content -->
 </div>
 <div class="pricing-card">
   <!-- card content -->
 </div>
</section>
Note that we removed the card content in the code above for brevity. See the complete markup on CodePen.
Then, with the basic styles, the cards look like so:

With the :has() selector, we can target and style the card that only has the recommend class as a child:
.pricing-card:has(div.recommend) {
 box-shadow: 0 0 0 2px #4b4bf0, 0 1rem 2rem rgba(0, 0, 0, 0.1);
 transform: scale(1.1);
 z-index: 1;
}
The above rule targets the recommended card and scales it as intended while also applying a drop shadow to it.
If we wanted to achieve this design without using the :has() selector, we would have to manually apply a separate class on the “recommended” card container to style it differently. The downside here is that we would have to add the class across every section that uses the same design.
Let’s move on. If we take a look at the final project, the “Buy now” button of the recommended card is also styled differently from the other two cards. To achieve this, we will use the :not() alongside the :has() selector, like so:
.pricing-card:not(:has(.recommend)) a {
 color: #000;
 background: #d5ddeb;
}
In the code above, we are targeting the buttons inside the cards that do not have the recommend class as a child to give them differently colored text and backgrounds.
Styling previous siblings: valid/invalid input labels
In our next example, we will style input labels based on the validity of their corresponding inputs. Our final result will look like so:
Let’s begin. The code below renders form control inside a form element:
<form>
  <div>
   <label for="email">Email: </label>
   <input type="email" id="email" required/>
  </div>
  <!-- other input -->
</form>
Note that we are only showing one input container in the code above for brevity. See the complete markup on CodePen.
Like the previous project, let’s see how we would target the input labels without using the :has() selector.
Remember, we stated earlier that browsers normally evaluate style rules from the right. For this reason, we could place the label after the input element:
<div>
 <input type="email" id="email" required/>
 <label for="email">Email: </label>
</div>
Then, we could use the general ~ or adjacent + sibling combinator to select and style the label:
input:invalid ~ label,
input:invalid ~ label::before {
 content: ' ';
 color: red;
}

input:valid ~ label,
input:valid ~ label::before {
 content: '✓ ';
 color: green;
}
';
color: red;
}
input:valid ~ label,
input:valid ~ label::before {
content: '✓ ';
color: green;
}
After that, we would use the CSS position: absolute; to place the labels back above the input:
form > div {
 position: relative;
 margin-bottom: 30px;
}

label {
 position: absolute;
 top: -30px;
 left: 0;
 right: 0;
}
However, with the :has() selector, we don’t have to place the label after the input or use the CSS position: absolute; declaration. We can easily target the previous siblings like so:
label:has(+ input:invalid),
label:has(+ input:invalid)::before {
 content: ' ';
 color: red;
}

label:has(+ input:valid),
label:has(+ input:valid)::before {
 content: '✓ ';
 color: green;
}
In the first and second code blocks, we are targeting the label that has invalid input and valid input as next siblings, respectively.
As we can see, using the :has() selector makes our code clearer and more succinct. See the complete code on CodePen.
Conclusion
In this tutorial, we learned how the :has() selector lets us style an element based on its descendants or succeeding element(s) using practical examples. This selector opens many possibilities that would have been difficult to achieve in CSS.
Presently, the CSS :has() selector is not widely supported by browsers; this selector only works in the latest version of Safari or via the experimental features flag in the latest version of Chrome.
So for now, we must not use :has() in production. We can only explore how it works while waiting for other browsers to support it.
I hope you enjoyed reading this tutorial. If you have questions or contributions, share your thoughts in the comment section and remember to share this post around the web.
The post How and when to use the CSS <code>:has</code> selector appeared first on LogRocket Blog.
from LogRocket Blog https://ift.tt/In0RY7C
via Read more


